|
|
|
Porsche, and the Porsche crest are registered trademarks of Dr. Ing. h.c. F. Porsche AG.
This site is not affiliated with Porsche in any way. Its only purpose is to provide an online forum for car enthusiasts. All other trademarks are property of their respective owners. |
|
|

  |

| SpecialK |
 Apr 6 2004, 03:04 AM Apr 6 2004, 03:04 AM
Post
#1
|
|
aircraft surgeon  Group: Benefactors Posts: 3,211 Joined: 15-March 04 From: Pacific, MO Member No.: 1,797 |
Finally getting around to assembling my front suspension. I'm installing new polygraphite bushings and they're starting to piss me off!! (IMG:style_emoticons/default/ar15.gif) (IMG:style_emoticons/default/fighting19.gif) (IMG:style_emoticons/default/headbang.gif) , Are they usually rather tight (hell, I need a press) going on the suspension arm? Or am I doing something wrong here? (IMG:style_emoticons/default/confused24.gif)
|
   |

 
|
| thesey914 |
Apr 6 2004, 04:11 AM
Post
#2
|
|
Senior Member Group: Benefactors Posts: 1,155 Joined: 1-January 03 From: Staffordshire -England Member No.: 66 |
Yes. You need to use a press.
|
|
|
|
| ChrisFoley |
Apr 6 2004, 05:37 AM
Post
#3
|
|
I am Tangerine Racing Group: Members Posts: 7,990 Joined: 29-January 03 From: Bolton, CT Member No.: 209 Region Association: None |
Those bushings generally suck!
You don't want them to be very tight on the arm or the suspension will bind. If they went in the housing real tight the crush will make them too tight on the shaft. Did you check the fit on the arm before inserting them in the housing? |
|
|
|
| cha914 |
Apr 6 2004, 07:43 AM
Post
#4
|
|
MUSR 8 - 5lug conversion done wed - drive 500miles thrus Group: Members Posts: 739 Joined: 31-December 02 From: Austin, TX Member No.: 63 |
Do a search for these bushings, there have been several threads about installing them. But yes, they are a pain in the ass, and if you don't fit them right like Chris said your suspension will just bind. It took me a good 2 days with various sanding devices and a dremel to get them to fit like I thought they should. I would recomend cutting the spiral grove in the center so you can pack more grease in them.
Good luck, Tony |
|
|
|
| Bleyseng |
Apr 6 2004, 08:01 AM
Post
#5
|
|
Aircooled Baby! Group: Members Posts: 13,036 Joined: 27-December 02 From: Seattle, Washington (for now) Member No.: 24 Region Association: Pacific Northwest |
(IMG:style_emoticons/default/agree.gif)
They should fit snugly but they shouldn't bind. You should be able to move the A arm up and down without binding or using a jack when the A arms are mounted. If it is really tight take it apart and sand, grind it down. One size fits all if you have enough sand paper! Geoff (IMG:style_emoticons/default/wacko.gif) |
|
|
|
| Eric_Shea |
Apr 6 2004, 08:22 AM
Post
#6
|
|
PMB Performance Group: Admin Posts: 19,304 Joined: 3-September 03 From: Salt Lake City, UT Member No.: 1,110 Region Association: Rocky Mountains |
I've done this on two suspensions in the last year and "no" would be my answer... it shouldn't be that tough at all. I have a press but didn't use it.
One thing I did that may differ, and I would recommend it to "anyone" in this stage of the process is; I took the entire suspension to a sandblaster and had it cleaned down to bare metal. I then repainted it with POR-15. I used two coats on all areas "except" the surface where the bushings would reside. Those areas ony received one coat. My bushing slid on like butter. Tight but like butter... It's $20-30 bucks depending on the sandblaster you find and it's about $23 for enough POR-15 to do 3-4 suspensions. It would put you another week out (couple days at the blasters and a couple days for both coats of POR-15) but your suspension would be perfect. My $.02 |
|
|
|
| Eric_Shea |
Apr 6 2004, 09:03 AM
Post
#7
|
|
PMB Performance Group: Admin Posts: 19,304 Joined: 3-September 03 From: Salt Lake City, UT Member No.: 1,110 Region Association: Rocky Mountains |
Here's a set I blasted myself (easier to have someone else do it...)
Attached image(s) 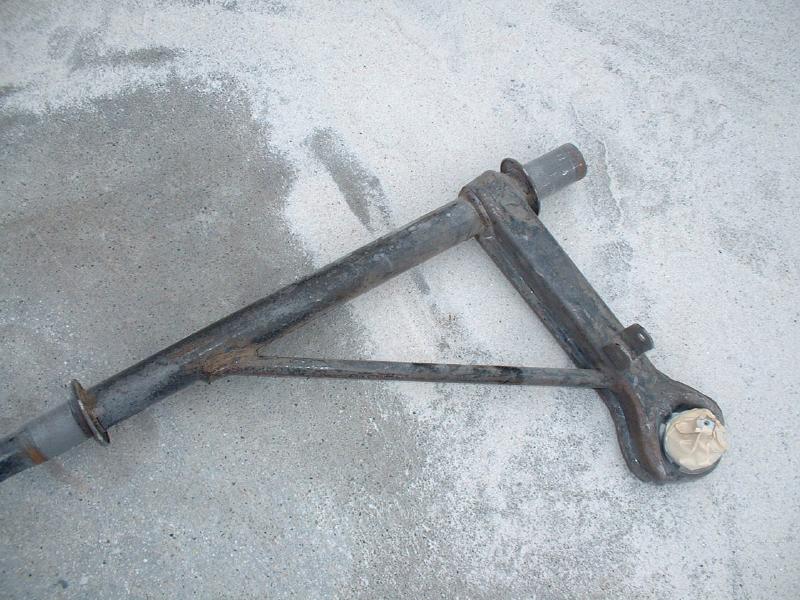
|
|
|
|
| Eric_Shea |
Apr 6 2004, 09:03 AM
Post
#8
|
|
PMB Performance Group: Admin Posts: 19,304 Joined: 3-September 03 From: Salt Lake City, UT Member No.: 1,110 Region Association: Rocky Mountains |
Cleaned...
Attached image(s) 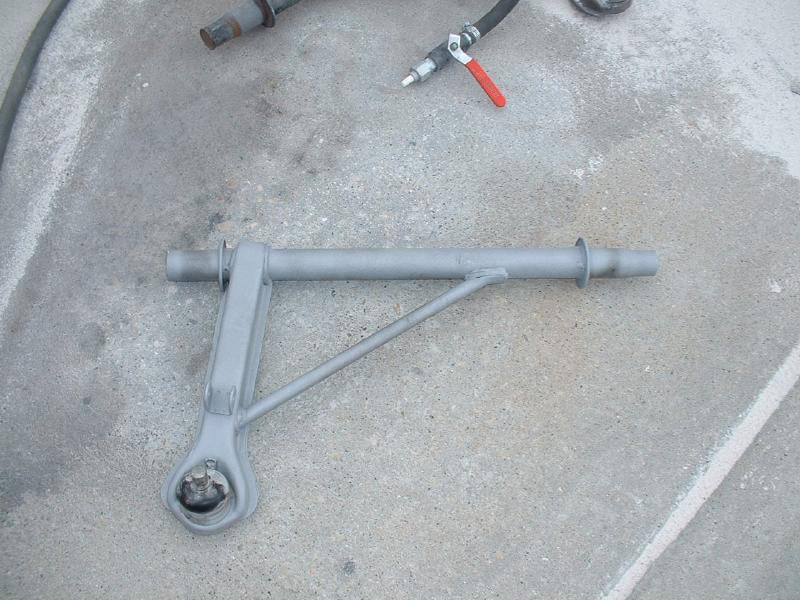
|
|
|
|
| Eric_Shea |
Apr 6 2004, 09:11 AM
Post
#9
|
|
PMB Performance Group: Admin Posts: 19,304 Joined: 3-September 03 From: Salt Lake City, UT Member No.: 1,110 Region Association: Rocky Mountains |
Look down toward the bottom in this shot and you'll get an idea what it looks like with the POR-15 applied... Done.
Attached image(s) 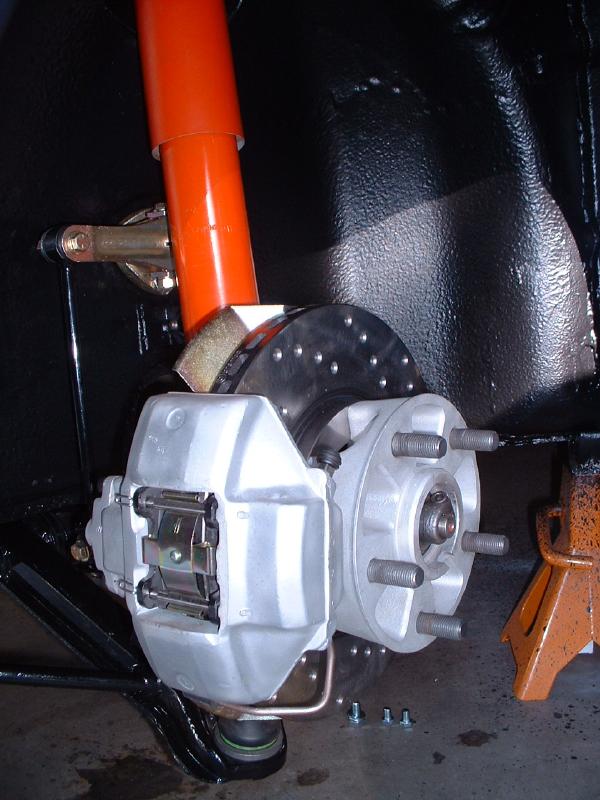
|
|
|
|
| jonwatts |
Apr 6 2004, 09:29 AM
Post
#10
|
|
no rules, just wrong Group: Benefactors Posts: 2,321 Joined: 13-January 03 From: San Jose, CA Member No.: 141 |
But if it doesn't bind how are you supposed to get that squeak that tells everybody you have upgraded bushings?
Eric, pretty picture. What caliper paint did you use? |
|
|
|
| Mueller |
Apr 6 2004, 09:39 AM
Post
#11
|
|
914 Freak! Group: Members Posts: 17,155 Joined: 4-January 03 From: Antioch, CA Member No.: 87 Region Association: None |
damn Eric......building a museum piece or what??? LOL
looks nice (IMG:style_emoticons/default/smile.gif) Craftsman sells a nice 1" diameter drum sanding roll that attaches to your drill motor, it works great for the inside diameter of the bushing. Make sure that the weldments are fairly round and not oblong due to abuse. |
|
|
|
| Eric_Shea |
Apr 6 2004, 09:45 AM
Post
#12
|
|
PMB Performance Group: Admin Posts: 19,304 Joined: 3-September 03 From: Salt Lake City, UT Member No.: 1,110 Region Association: Rocky Mountains |
Thanks guys...
QUOTE Eric, pretty picture. What caliper paint did you use? Stock... S-calipers (aluminum) beadblasted. Yea, yea... getting a little picky but I "gau-ron-tee" it will be a daily driver. I just figure, while the damn suspension is off why not spend the $50 to make it right so it will last another 30 years? Cheap insurance. (IMG:style_emoticons/default/blink.gif) |
|
|
|
| Brad Roberts |
Apr 6 2004, 09:49 AM
Post
#13
|
|
914 Freak! Group: Members Posts: 19,148 Joined: 23-December 02 Member No.: 8 Region Association: None |
Why is Mueller telling people how to install plastic bushings ?
B |
|
|
|
| Mueller |
Apr 6 2004, 09:52 AM
Post
#14
|
|
914 Freak! Group: Members Posts: 17,155 Joined: 4-January 03 From: Antioch, CA Member No.: 87 Region Association: None |
'cause I'm a nice guy (IMG:style_emoticons/default/smile.gif)
besides, when he realizes that plastic is only good for toys, he'll buy my bearings, LOL |
|
|
|
| Eric_Shea |
Apr 6 2004, 10:00 AM
Post
#15
|
|
PMB Performance Group: Admin Posts: 19,304 Joined: 3-September 03 From: Salt Lake City, UT Member No.: 1,110 Region Association: Rocky Mountains |
He's been drinking... (IMG:style_emoticons/default/drunk.gif)
Attached image(s) 
|
|
|
|
| Mueller |
Apr 6 2004, 10:02 AM
Post
#16
|
|
914 Freak! Group: Members Posts: 17,155 Joined: 4-January 03 From: Antioch, CA Member No.: 87 Region Association: None |
damn, I knew that picture would come back to haunt me (IMG:style_emoticons/default/smile.gif)
(IMG:style_emoticons/default/beer3.gif) |
|
|
|
| davep |
Apr 6 2004, 10:36 AM
Post
#17
|
|
914 Historian Group: Benefactors Posts: 5,289 Joined: 13-October 03 From: Burford, ON, N0E 1A0 Member No.: 1,244 Region Association: Canada |
I remember one fellow tell me, years ago, to:
1) make sure the holes are clean and round to start with 2) install bushings ( a tight fit ) 3) ream bushings to proper size! (this makes sure it is round afterwards) |
|
|
|
| SpecialK |
Apr 6 2004, 10:49 AM
Post
#18
|
|
aircraft surgeon Group: Benefactors Posts: 3,211 Joined: 15-March 04 From: Pacific, MO Member No.: 1,797 |
Thanks guy's! If it weren't for this, and other quality (PP) BBS's, I'd be driving a 914 with suspension like a skateboard! (IMG:style_emoticons/default/smile.gif) ....... a squeeky skateboard.
Attached image(s) 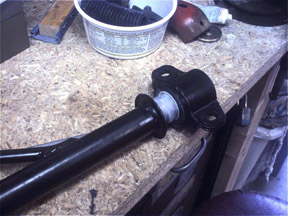
|
|
|
|
|
1 User(s) are reading this topic (1 Guests and 0 Anonymous Users)
0 Members:

|
Lo-Fi Version | Time is now: 8th July 2025 - 10:58 AM |
Invision Power Board
v9.1.4 © 2025 IPS, Inc.