|
|
|
Porsche, and the Porsche crest are registered trademarks of Dr. Ing. h.c. F. Porsche AG.
This site is not affiliated with Porsche in any way. Its only purpose is to provide an online forum for car enthusiasts. All other trademarks are property of their respective owners. |
|
|


| raw1298 |
 Jun 28 2010, 03:31 PM Jun 28 2010, 03:31 PM
Post
#21
|
|
Senior Member  Group: Members Posts: 616 Joined: 9-March 09 From: Rocklin,Ca. Member No.: 10,148 Region Association: Northern California |
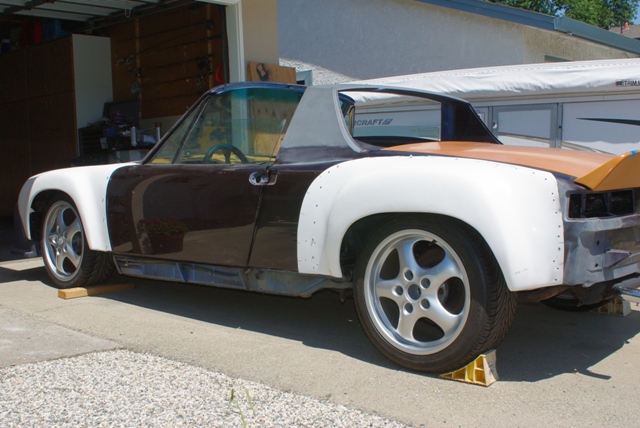
I bought this as a stripped down rolling chassis. The sller put wheels on it to get it on the trailer. That was 4 long years ago. I also had a son at the same time so working on the car has been a second priority. Now the engine is in and the brakes are on, I should be able to get some work done more quickly. I plan on firing this up within the next couple of weeks and taking on a drve by the end of July. I got the 3m adhesive today to get the fenders bonded on and then the fun stuff begins. Hope to get it completed in time for next years West Coast Ramble. Thanks to the support and motivation of the 914World. (IMG:style_emoticons/default/biggrin.gif)
 |
   |

 
|
Posts in this topic
 raw1298 on the ground! Jun 28 2010, 03:31 PM
 RobW :beer1: :beer1: Keep on making progress :trophy:... Jun 28 2010, 03:33 PM markb WooHoo! :beer2: Jun 28 2010, 03:34 PM raw1298 I forgot to add the picture :wacko: Jun 28 2010, 03:34 PM raw1298 Another view. I love the look of the 17" whee... Jun 28 2010, 03:52 PM markb Wow, you have a harlequin car. :D Jun 28 2010, 03:54 PM wallys914 Glad the adapters worked for ya! have fun :dri... Jun 28 2010, 03:56 PM raw1298 I couldn't find all the parts in the right col... Jun 28 2010, 03:59 PM BigDBass Very unique color scheme. :)
Now keep goin'... Jun 28 2010, 04:01 PM ConeDodger I thought the decklid I gave you was Signal Orange... Jun 28 2010, 04:02 PM raw1298 Just for the record, 17" wheels do fit with t... Jun 28 2010, 05:03 PM FourBlades That will be a killer looking car whatever color y... Jun 28 2010, 05:10 PM raw1298 I am leaning toward a color I saw on a scion. It i... Jun 28 2010, 07:34 PM Jerry ..Are you going to take any photos of how you are ... Jun 28 2010, 10:56 PM raw1298 Yes I will be taking pictures of the flares as the... Jun 29 2010, 03:21 PM raw1298 I was looking at an old set of axles I have and I ... Jul 7 2010, 10:01 PM bandjoey Careful. Yellow is a very slow color for 914... Jul 7 2010, 10:42 PM charliew Dang it's amazing how many different 17 wheels... Jul 8 2010, 03:28 PM
RobW :beer1: :beer1: Keep on making progress :trophy:... Jun 28 2010, 03:33 PM markb WooHoo! :beer2: Jun 28 2010, 03:34 PM raw1298 I forgot to add the picture :wacko: Jun 28 2010, 03:34 PM raw1298 Another view. I love the look of the 17" whee... Jun 28 2010, 03:52 PM markb Wow, you have a harlequin car. :D Jun 28 2010, 03:54 PM wallys914 Glad the adapters worked for ya! have fun :dri... Jun 28 2010, 03:56 PM raw1298 I couldn't find all the parts in the right col... Jun 28 2010, 03:59 PM BigDBass Very unique color scheme. :)
Now keep goin'... Jun 28 2010, 04:01 PM ConeDodger I thought the decklid I gave you was Signal Orange... Jun 28 2010, 04:02 PM raw1298 Just for the record, 17" wheels do fit with t... Jun 28 2010, 05:03 PM FourBlades That will be a killer looking car whatever color y... Jun 28 2010, 05:10 PM raw1298 I am leaning toward a color I saw on a scion. It i... Jun 28 2010, 07:34 PM Jerry ..Are you going to take any photos of how you are ... Jun 28 2010, 10:56 PM raw1298 Yes I will be taking pictures of the flares as the... Jun 29 2010, 03:21 PM raw1298 I was looking at an old set of axles I have and I ... Jul 7 2010, 10:01 PM bandjoey Careful. Yellow is a very slow color for 914... Jul 7 2010, 10:42 PM charliew Dang it's amazing how many different 17 wheels... Jul 8 2010, 03:28 PM
 raw1298
Dang it's amazing how many different 17 wheel... Jul 12 2010, 06:10 AM scotty b Maybe you should dare to be different :D
I kno... Jul 8 2010, 04:52 PM scotty b :headbanger: The more I think about it that blue w... Jul 8 2010, 04:58 PM nathansnathan
:headbanger: The more I think about it that blue ... Feb 9 2011, 11:44 AM raw1298 Yes Scotty! That is the color! :Qarl: You ... Jul 8 2010, 05:21 PM scotty b
Yes Scotty! That is the color! :Qarl: You... Jul 9 2010, 03:03 PM Lennies914 I agree, that color would look sharp on your car. ... Jul 8 2010, 07:28 PM raw1298 wooohooo!!!! After some help findi... Jul 11 2010, 05:42 PM raw1298 Ok, more progress after regress. The mentioned def... Oct 3 2010, 09:53 AM raw1298 I figured it out on my own. The outer you turn cou... Oct 3 2010, 04:07 PM nsr-jamie Looking good, that would be nice to see the car do... Oct 3 2010, 08:45 PM raw1298 After a final check this past week. The car was dr... Oct 9 2010, 06:05 PM raw1298 I decided I would get some of the pics up of the p... Dec 13 2010, 09:57 AM raw1298 Couple of different angles. It takes about a tube ... Dec 13 2010, 10:03 AM raw1298 The drivers side before taking off excess glue. Fr... Dec 13 2010, 11:36 AM raw1298 Just a couple more angles. The flares from QRS see... Dec 13 2010, 06:22 PM raw1298 Since it has been raining I decided to test fit th... Dec 29 2010, 04:43 PM raw1298 I guess I should say that I will not be bonding th... Dec 29 2010, 05:49 PM raw1298 Had some nice weather and a few spare hours so I m... Feb 9 2011, 11:15 AM charliew I don't use kitty hair for the final skim coat... Feb 9 2011, 11:31 AM raw1298 I am using a final coat of a thin putty, cant reme... Feb 9 2011, 11:43 AM charliew Don't try to use the scratch filler to replace... Feb 9 2011, 11:57 AM raw1298
Don't try to use the scratch filler to replac... Feb 9 2011, 02:10 PM nsyr make sure you seal up the underside of the fenders... Feb 9 2011, 01:07 PM raw1298 Dodging rain today long enough to bond front fende... Apr 7 2011, 01:56 PM raw1298 One side left. Apr 7 2011, 02:00 PM raw1298 Last fender bonded on!! The car is startin... May 3 2011, 05:09 PM nsr-jamie Cool to see some more progress. Are you going to m... May 4 2011, 08:39 AM raw1298
Cool to see some more progress. Are you going to ... May 4 2011, 03:16 PM raw1298 After smoothing down the edges there is very littl... May 5 2011, 08:57 AM charliew I'm betting that will need to be filled all th... May 5 2011, 02:55 PM raw1298
I'm betting that will need to be filled all t... May 5 2011, 06:00 PM charliew If I were trying to do this application, I would u... May 6 2011, 03:32 PM raw1298
If I were trying to do this application, I would ... May 6 2011, 05:54 PM raw1298 Well it has been awhile so I thought I would give ... Aug 20 2011, 03:07 PM raw1298 I should post this in the slackers thread. :D I s... Nov 9 2011, 07:20 AM raw1298 I thought I would give a quick update. WCR is comi... Jan 16 2012, 09:19 PM raw1298 Well, its back on jack stands and I am getting rea... Aug 2 2014, 05:32 PM raw1298 The past two years we remodeled the old house to g... Aug 2 2014, 05:42 PM bcheney
The past two years we remodeled the old house to ... Aug 3 2014, 07:03 PM raw1298 Starting to fabricate flares into the bumpers. Usi... Nov 14 2015, 03:22 PM raw1298 After forming the foam and coating with bondo its ... Apr 6 2016, 01:26 PM raw1298 Starting rear bumper mods. Apr 6 2016, 01:28 PM raw1298 Rockers are next. Apr 6 2016, 01:29 PM raw1298 Started on rear bumper today. Two step process. Fi... Apr 7 2016, 03:15 PM raw1298 A little filler.... Apr 7 2016, 03:18 PM raw1298 Few rough patches, but not bad for a rookie like m... Apr 7 2016, 03:48 PM raw1298 Ran somE 40 grit over it to smooth out. I have som... Apr 7 2016, 04:14 PM raw1298 Side view. Apr 7 2016, 04:21 PM raw1298 I am really liking the way this is heading. Time f... Apr 7 2016, 04:35 PM raw1298 One more. :D Apr 7 2016, 04:40 PM raw1298 After attempting to get the rockers to line up I d... Apr 8 2016, 02:39 PM raw1298 Another view. Apr 8 2016, 02:41 PM raw1298 Used foil tape over the fiberglass rockers then gl... Apr 8 2016, 02:45 PM raw1298 I am installing front sway bar today. Should I gre... May 14 2016, 10:46 AM rhodyguy You should make a mold off of those rockers. Odds ... May 14 2016, 10:53 AM raw1298 One side down. May 14 2016, 01:00 PM raw1298 #2 on the way. May 14 2016, 01:15 PM raw1298 New bolts for the rest and finished. May 14 2016, 02:04 PM raw1298 Next project getting started. Mar 5 2017, 02:51 PM tygaboy I really like the looks of the exhaust. Just seems... Mar 5 2017, 02:58 PM raw1298 Thanks. I have learned way more than I thought I w... Mar 5 2017, 03:17 PM raw1298 Measure 10 times, shave off a little at a time. :) Mar 5 2017, 04:00 PM raw1298 :sawzall: Mar 5 2017, 04:03 PM 914pipe I see you are doing the 240sx conversion. I was wo... Mar 5 2017, 10:44 PM raw1298 Looks great. I had already been checking your buil... Mar 5 2017, 11:11 PM raw1298 Starting to get close. Apr 17 2017, 05:05 PM raw1298 Side view Apr 17 2017, 05:07 PM ConeDodger Fantastic progress Randy! :headbanger: Apr 17 2017, 05:18 PM raw1298 Thanks Rob. Life is getting simpler, more time to ... Apr 17 2017, 05:41 PM raw1298 Starting to get real close. Apr 18 2017, 05:00 PM raw1298 Other side Apr 18 2017, 05:02 PM papajohn123 Thanks for all the pictures you took mate! Mak... Apr 22 2017, 03:44 AM LowBridge solid job and soon you'll have the bad boy hot... Apr 22 2017, 04:05 PM
raw1298
Dang it's amazing how many different 17 wheel... Jul 12 2010, 06:10 AM scotty b Maybe you should dare to be different :D
I kno... Jul 8 2010, 04:52 PM scotty b :headbanger: The more I think about it that blue w... Jul 8 2010, 04:58 PM nathansnathan
:headbanger: The more I think about it that blue ... Feb 9 2011, 11:44 AM raw1298 Yes Scotty! That is the color! :Qarl: You ... Jul 8 2010, 05:21 PM scotty b
Yes Scotty! That is the color! :Qarl: You... Jul 9 2010, 03:03 PM Lennies914 I agree, that color would look sharp on your car. ... Jul 8 2010, 07:28 PM raw1298 wooohooo!!!! After some help findi... Jul 11 2010, 05:42 PM raw1298 Ok, more progress after regress. The mentioned def... Oct 3 2010, 09:53 AM raw1298 I figured it out on my own. The outer you turn cou... Oct 3 2010, 04:07 PM nsr-jamie Looking good, that would be nice to see the car do... Oct 3 2010, 08:45 PM raw1298 After a final check this past week. The car was dr... Oct 9 2010, 06:05 PM raw1298 I decided I would get some of the pics up of the p... Dec 13 2010, 09:57 AM raw1298 Couple of different angles. It takes about a tube ... Dec 13 2010, 10:03 AM raw1298 The drivers side before taking off excess glue. Fr... Dec 13 2010, 11:36 AM raw1298 Just a couple more angles. The flares from QRS see... Dec 13 2010, 06:22 PM raw1298 Since it has been raining I decided to test fit th... Dec 29 2010, 04:43 PM raw1298 I guess I should say that I will not be bonding th... Dec 29 2010, 05:49 PM raw1298 Had some nice weather and a few spare hours so I m... Feb 9 2011, 11:15 AM charliew I don't use kitty hair for the final skim coat... Feb 9 2011, 11:31 AM raw1298 I am using a final coat of a thin putty, cant reme... Feb 9 2011, 11:43 AM charliew Don't try to use the scratch filler to replace... Feb 9 2011, 11:57 AM raw1298
Don't try to use the scratch filler to replac... Feb 9 2011, 02:10 PM nsyr make sure you seal up the underside of the fenders... Feb 9 2011, 01:07 PM raw1298 Dodging rain today long enough to bond front fende... Apr 7 2011, 01:56 PM raw1298 One side left. Apr 7 2011, 02:00 PM raw1298 Last fender bonded on!! The car is startin... May 3 2011, 05:09 PM nsr-jamie Cool to see some more progress. Are you going to m... May 4 2011, 08:39 AM raw1298
Cool to see some more progress. Are you going to ... May 4 2011, 03:16 PM raw1298 After smoothing down the edges there is very littl... May 5 2011, 08:57 AM charliew I'm betting that will need to be filled all th... May 5 2011, 02:55 PM raw1298
I'm betting that will need to be filled all t... May 5 2011, 06:00 PM charliew If I were trying to do this application, I would u... May 6 2011, 03:32 PM raw1298
If I were trying to do this application, I would ... May 6 2011, 05:54 PM raw1298 Well it has been awhile so I thought I would give ... Aug 20 2011, 03:07 PM raw1298 I should post this in the slackers thread. :D I s... Nov 9 2011, 07:20 AM raw1298 I thought I would give a quick update. WCR is comi... Jan 16 2012, 09:19 PM raw1298 Well, its back on jack stands and I am getting rea... Aug 2 2014, 05:32 PM raw1298 The past two years we remodeled the old house to g... Aug 2 2014, 05:42 PM bcheney
The past two years we remodeled the old house to ... Aug 3 2014, 07:03 PM raw1298 Starting to fabricate flares into the bumpers. Usi... Nov 14 2015, 03:22 PM raw1298 After forming the foam and coating with bondo its ... Apr 6 2016, 01:26 PM raw1298 Starting rear bumper mods. Apr 6 2016, 01:28 PM raw1298 Rockers are next. Apr 6 2016, 01:29 PM raw1298 Started on rear bumper today. Two step process. Fi... Apr 7 2016, 03:15 PM raw1298 A little filler.... Apr 7 2016, 03:18 PM raw1298 Few rough patches, but not bad for a rookie like m... Apr 7 2016, 03:48 PM raw1298 Ran somE 40 grit over it to smooth out. I have som... Apr 7 2016, 04:14 PM raw1298 Side view. Apr 7 2016, 04:21 PM raw1298 I am really liking the way this is heading. Time f... Apr 7 2016, 04:35 PM raw1298 One more. :D Apr 7 2016, 04:40 PM raw1298 After attempting to get the rockers to line up I d... Apr 8 2016, 02:39 PM raw1298 Another view. Apr 8 2016, 02:41 PM raw1298 Used foil tape over the fiberglass rockers then gl... Apr 8 2016, 02:45 PM raw1298 I am installing front sway bar today. Should I gre... May 14 2016, 10:46 AM rhodyguy You should make a mold off of those rockers. Odds ... May 14 2016, 10:53 AM raw1298 One side down. May 14 2016, 01:00 PM raw1298 #2 on the way. May 14 2016, 01:15 PM raw1298 New bolts for the rest and finished. May 14 2016, 02:04 PM raw1298 Next project getting started. Mar 5 2017, 02:51 PM tygaboy I really like the looks of the exhaust. Just seems... Mar 5 2017, 02:58 PM raw1298 Thanks. I have learned way more than I thought I w... Mar 5 2017, 03:17 PM raw1298 Measure 10 times, shave off a little at a time. :) Mar 5 2017, 04:00 PM raw1298 :sawzall: Mar 5 2017, 04:03 PM 914pipe I see you are doing the 240sx conversion. I was wo... Mar 5 2017, 10:44 PM raw1298 Looks great. I had already been checking your buil... Mar 5 2017, 11:11 PM raw1298 Starting to get close. Apr 17 2017, 05:05 PM raw1298 Side view Apr 17 2017, 05:07 PM ConeDodger Fantastic progress Randy! :headbanger: Apr 17 2017, 05:18 PM raw1298 Thanks Rob. Life is getting simpler, more time to ... Apr 17 2017, 05:41 PM raw1298 Starting to get real close. Apr 18 2017, 05:00 PM raw1298 Other side Apr 18 2017, 05:02 PM papajohn123 Thanks for all the pictures you took mate! Mak... Apr 22 2017, 03:44 AM LowBridge solid job and soon you'll have the bad boy hot... Apr 22 2017, 04:05 PM  |
1 User(s) are reading this topic (1 Guests and 0 Anonymous Users)
0 Members:

|
Lo-Fi Version | Time is now: 9th May 2025 - 06:35 PM |
Invision Power Board
v9.1.4 © 2025 IPS, Inc.