|
|
|
Porsche, and the Porsche crest are registered trademarks of Dr. Ing. h.c. F. Porsche AG.
This site is not affiliated with Porsche in any way. Its only purpose is to provide an online forum for car enthusiasts. All other trademarks are property of their respective owners. |
|
|

  |

| Cheapsnake |
 Nov 8 2010, 07:54 AM Nov 8 2010, 07:54 AM
Post
#1
|
|
Member  Group: Members Posts: 419 Joined: 15-November 07 From: Door County, WI Member No.: 8,341 |
I've got a tear in the side of an otherwise perfect seat that needs repair. I see vinyl repair kits all over the place and if they actually work they seem to be the ticket.
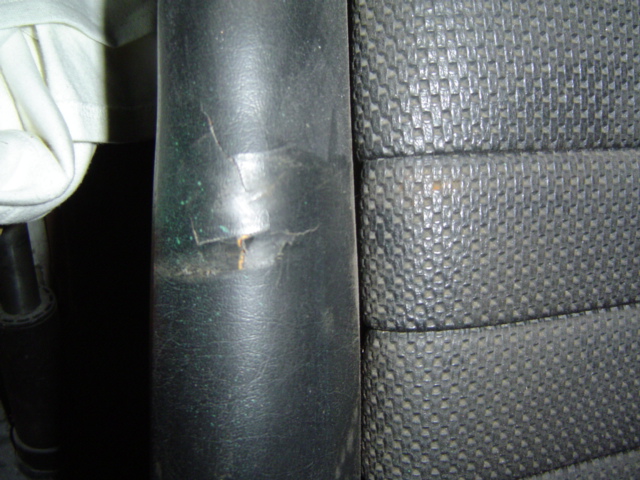 Has anybody done a DIY repair and how did it come out? Any tips? Thanks. Tom |
   |

 
|
| PanelBilly |
Nov 8 2010, 09:01 AM
Post
#2
|
|
914 Guru Group: Members Posts: 5,805 Joined: 23-July 06 From: Kent, Wa Member No.: 6,488 Region Association: Pacific Northwest |
I've worked with the liquid filled that you heat with a texture pad to cure and they are a pain in the ass. Even a small are is hard to do and make it look right. For an area the size of yours, I'd have the panel replaced by a pro
|
|
|
|
| kfish914 |
Nov 8 2010, 11:40 AM
Post
#3
|
|
Member Group: Members Posts: 161 Joined: 7-May 08 From: Osceola, Indiana Member No.: 9,026 Region Association: Upper MidWest |
I have used this:
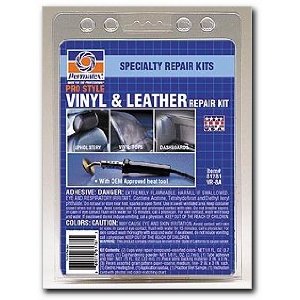 With really good results on small to med tears and holes. You just have to take your time and fill with a small amount and build on it. Let the heat tool do it's job and not press down to much. I have done repairs on my car that my friends and wife can't tell there was ever a tear in the seat. However I agree, with a area that size it would be hard to heat up an area that size evenly enough for it to turn out well with out being able to see the edges of the repair. |
|
|
|
| underthetire |
Nov 8 2010, 12:13 PM
Post
#4
|
|
914 Guru Group: Members Posts: 5,062 Joined: 7-October 08 From: Brentwood Member No.: 9,623 Region Association: Northern California |
Did my back pad. May get better, but will not go away. The little heat stamp they give you is a joke, I used a model airplane iron on mine.
|
|
|
|
| windforfun |
Nov 8 2010, 08:39 PM
Post
#5
|
|
Senior Member Group: Members Posts: 1,780 Joined: 17-December 07 From: Blackhawk, CA Member No.: 8,476 Region Association: None |
I bought a brand new backpad from Porsche. I had to rebuild the damn thing because it was so poorly made. What an idiot.
|
|
|
|
| srb7f |
Nov 8 2010, 10:47 PM
Post
#6
|
|
Member Group: Members Posts: 157 Joined: 17-May 04 From: Roswell, GA Member No.: 2,077 Region Association: None |
My experience...frustrating. You can make it look nice if you take your time and are super meticulous, but the 30+ year old vinyl flexes differently than the new material. After a few hops down on the seat and a few afternoons in the sun, the cracks will be back. Certainly the cheapest option though.
|
|
|
|
| Rand |
Nov 8 2010, 10:53 PM
Post
#7
|
|
Cross Member Group: Members Posts: 7,409 Joined: 8-February 05 From: OR Member No.: 3,573 Region Association: None |
QUOTE(srb7f @ Nov 8 2010, 09:47 PM)  the 30+ year old vinyl flexes differently than the new material. Exactly. Don't cheap out Cheapsnake. Band aids aren't going to cut it in a spot like that. |
|
|
|
| Mark Henry |
Nov 9 2010, 08:04 AM
Post
#8
|
|
that's what I do! Group: Members Posts: 20,065 Joined: 27-December 02 From: Port Hope, Ontario Member No.: 26 Region Association: Canada |
Has anyone tried this on a dash?
In my case perfect except for one small crack in the usual spot. |
|
|
|
| Tom_T |
Nov 10 2010, 11:57 AM
Post
#9
|
|
TMI.... Group: Members Posts: 8,318 Joined: 19-March 09 From: Orange, CA Member No.: 10,181 Region Association: Southern California |
QUOTE(Cheapsnake @ Nov 8 2010, 06:54 AM) I've got a tear in the side of an otherwise perfect seat that needs repair. I see vinyl repair kits all over the place and if they actually work they seem to be the ticket. Has anybody done a DIY repair and how did it come out? Any tips? Thanks. Tom Tom - you're lucky it's black, since close match & factory material is still available, as well as full seat reupholstery kits from AA, & 914A&P's & others' reupholstery services. I have a similar but worse tear on mine, but it's the NLA Beige & otherwise the interior is in great condition. I've done some leather working (making moccasins, buckskin necessaries bags, etc.), so I got a Beige backpad/wall with good unfaded/untorn areas behind the seats (Beige is NLA & new stuff won't match), & plan to cut out those bolster panels, use the old for patterns to cut sections from the backpad & sew those back in. The sell "Glovers' Needles" & Upholstery thread at Tandy & most fabric & craft shops (Jo Ann, Michael's, local shops, etc.) There's a seam at the back corner of the seats, then under the rear & seat inserts (edge) & between the upper & lower bolsters, so you can piece in one or both of those after pulling the leatherette off the seat shell. No need to remove the entire leatherette piece - just as much as needed to cut the seams & resew in the new piece. Then use 3M interior/upholstery spray adhesive to reglue the repaired area back to the seat shell. If you're comfortable with your skills, then you can try it yourself, or else take the materials to a quality local auto upholstery shop to have them do it. The vinyl repair kits don't get good color matches, & only temporarily stops the spread, but it will crop up later just next to or in the repair. I tried it on my DD 85 325e & it spread shortly after with DD use. . Mark - for your dash top question, there is a plastic welding technique covered in "Auto Restorer" Magazine a few months back, if you can find the proper plastic material used in the factory covering (maybe George/AA or Craig/CAMP914 knows), then match to the proper solvent & find some excess dask/pad cover material to melt as the weld material. But it will be hard to get the look & texture in your "patch/weld" & the dash will eventually crack elsewhere. Back in the day I was able to stop some spider cracks at the instrument pod junctures L&R of the flat top with some polystyrene model glue (tube not liquid), but it looked a bit shiny from the dash top pad finish, & it eventually cracked big time at the ashtray notch. So you can temporarily stop the cracks, but only a quality recover will fix it permanently. |
|
|
|
| Andyrew |
Nov 10 2010, 11:59 AM
Post
#10
|
|
Spooling.... Please wait Group: Members Posts: 13,376 Joined: 20-January 03 From: Riverbank, Ca Member No.: 172 Region Association: Northern California |
Black electrical tape works for the time being...
|
|
|
|
| flipb |
Nov 10 2010, 12:16 PM
Post
#11
|
|
Senior Member Group: Members Posts: 1,722 Joined: 2-September 09 From: Fairfax, VA Member No.: 10,752 Region Association: MidAtlantic Region |
QUOTE(kfish914 @ Nov 8 2010, 01:40 PM) I have used this: With really good results on small to med tears and holes. You just have to take your time and fill with a small amount and build on it. Let the heat tool do it's job and not press down to much. I have done repairs on my car that my friends and wife can't tell there was ever a tear in the seat. However I agree, with a area that size it would be hard to heat up an area that size evenly enough for it to turn out well with out being able to see the edges of the repair. I used the same kit to mend a divot in my center console lid. The brown matched my mahogany interior pretty well. After some frustration, I finally got it looking pretty good... Then, one day, I pressed down on the center console while climbing in or out of the car... killed it. The stuff isn't very durable for areas that get pressed upon. |
|
|
|
| Cheapsnake |
Nov 10 2010, 03:54 PM
Post
#12
|
|
Member Group: Members Posts: 419 Joined: 15-November 07 From: Door County, WI Member No.: 8,341 |
Thanks for all the replies, good info from all sides of the issue. Well, I ended up going with the Permatex kit simply because it was cheap and quick and if it didn't work I always have the upholsterer to fall back on. After several attempts that didn't work so well, my final attempt looks like this:
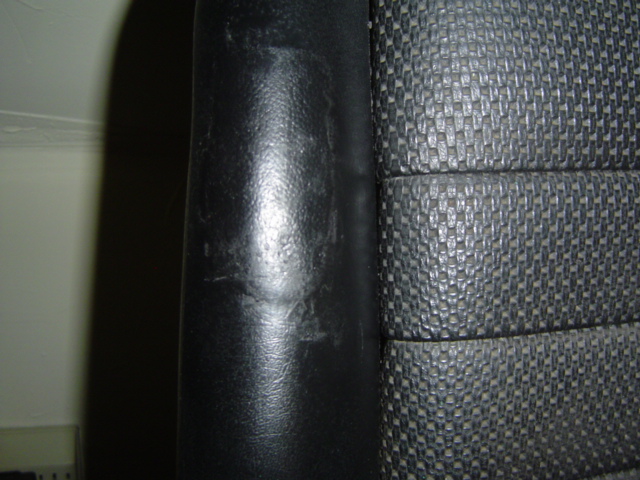 The good: * It looks a whole lot better than it was. * The repair will be on the interior side of the driver's seat, where it will not be subject to a lot of flex or scuffing. * The repair is surprisingly strong. It's slightly stiffer than the surrounding vinyl but I can press real hard on the repair with my thumb with no sign of it cracking or lifting. * Did I mention that it looks a whole lot better than it did before? The not-so-good: * It's very hard to keep the repair from creating a raised area around the patch. * None of the grain textures they give you really quite match the original. I tried making my own out of a patch of vinyl I cut off the bottom of the seat but it tended to not release from the patch, even when I coated it with PAM. + The repair is shinier than the surrounding vinyl. I partially fixed this by spraying the area with SEM black upholstery/carpet dye, let it dry and buffed it out. Pretty close match. * I don't know how it will age. I think it will age well, but time will tell. If I were to do it again I'd cut the entire area out and cut a patch to fit from excess material at the bottom of the seat and trim it for a very close fit. This way, all you'd have to repair is the joint between patch and original, Since it would be a very small area the grain pattern would not be an issue. Also, by giving yourself a little more room to insert backing material you can get a very good bond with the original material. I think you could actually make a 95% invisible repair this way. On the downside, you have to make that cut. All in all, I'm happy with the repair for a DD. It's cheap and fast and nothing says I can't take it to a pro later on. Tom |
|
|
|
|
1 User(s) are reading this topic (1 Guests and 0 Anonymous Users)
0 Members:

|
Lo-Fi Version | Time is now: 14th May 2024 - 04:20 AM |
Invision Power Board
v9.1.4 © 2024 IPS, Inc.