|
|
|
Porsche, and the Porsche crest are registered trademarks of Dr. Ing. h.c. F. Porsche AG.
This site is not affiliated with Porsche in any way. Its only purpose is to provide an online forum for car enthusiasts. All other trademarks are property of their respective owners. |
|
|

  |

| nathansnathan |
 Dec 3 2010, 05:22 PM Dec 3 2010, 05:22 PM
Post
#1
|
|
Senior Member  Group: Members Posts: 1,052 Joined: 31-May 10 From: Laguna Beach, CA Member No.: 11,782 Region Association: None |
(IMG:http://www.914world.com/bbs2/uploads_offsite/www.914club.com-11782-1291418830.1.jpg)
I changed the title of the thread, so it's incognito now. (IMG:style_emoticons/default/wink.gif) - Sort of to do with the midengined-ness, my username, and of course the 420 914 thing. (IMG:style_emoticons/default/smoke.gif) The car was very original, but quite trashed when I bought it. It's a 49 state car, purchased in Colorado judging by the sticker that was on the back opposite the badge, Bob Hagestad Dealerhip. I don't have a picture of that unfortunately... Both bumpers had 1975 UCLA parking permit stickers. It is an appearance group car, tan square weave, late enough to get 2 real tan basket weave seats. Original adriatic blue paint, no repaints. The snowplow early rear valence. It has the original red heater lever pull which I don't see very much. Everything was there without having been hacked/modified (besides the door panels). Unmodified but fairly trashed. 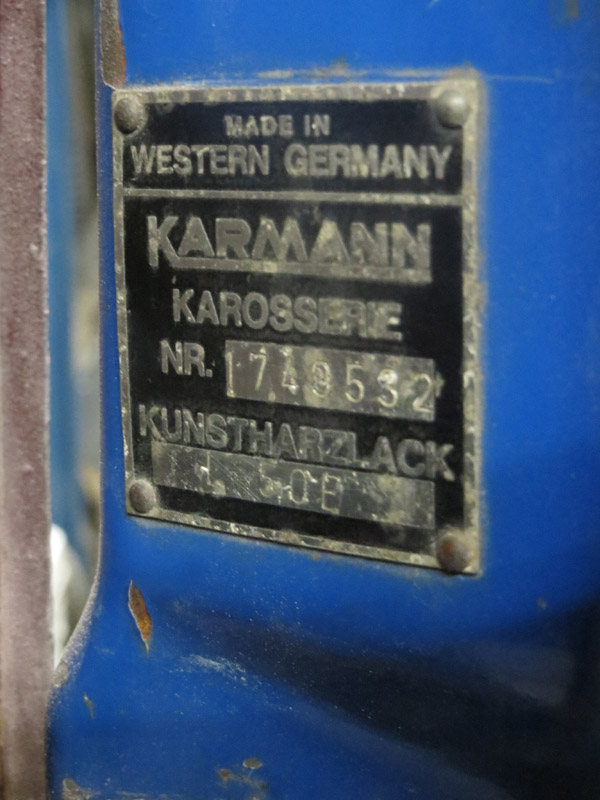 Chassis # 174932 -Meaning the chassis was built the 17th week of the year 1972 (I think it is the 17th week with a Monday the way they count it), the 4th day of that week, Thursday April 27th, 1972. -I thought it was 4/20 but I must concede it was probably a week later, the chassis production. (IMG:http://www.914world.com/bbs2/uploads/post-179-1307065668.jpg) It is odd, though, the dash doesn't match. 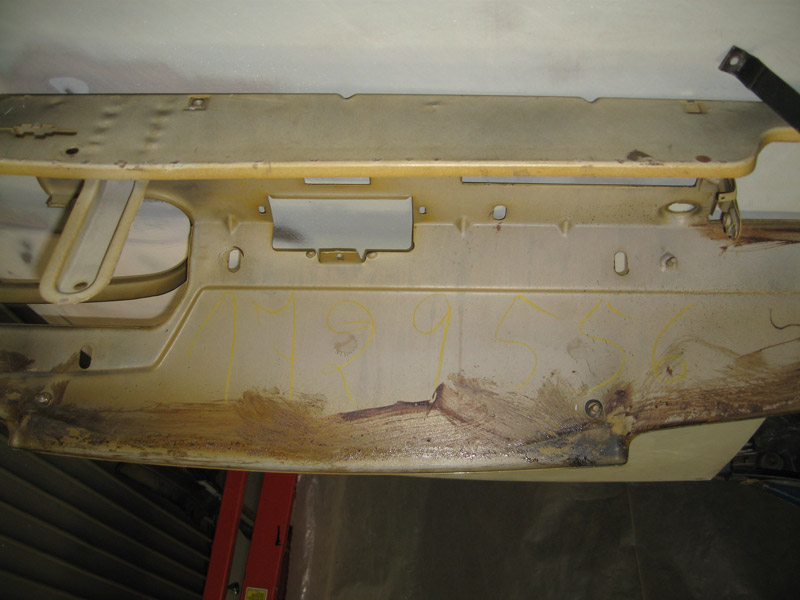 1729556 vs 1749532 which is on the Karmann plate and the trunk. It would be from just 2 days earlier, but then I was thinking, if it was from another car, it could theoretically be from a 73 or a 74 car, too. It seems like it is original, though, as peple always bodge everything and it was fairly unmolested, the wiring, and hardware of the dash. 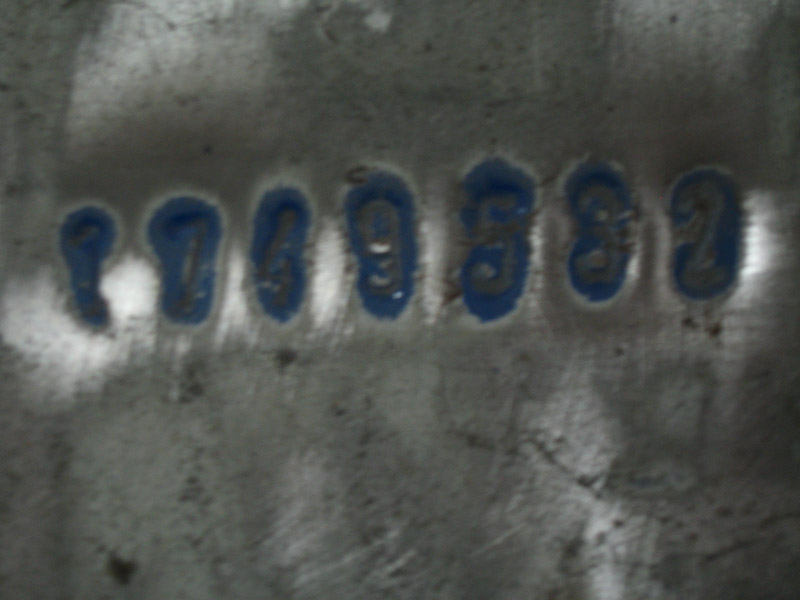 (IMG:http://www.914world.com/bbs2/uploads_offsite/www.914club.com-11782-1291418830.2.jpg) 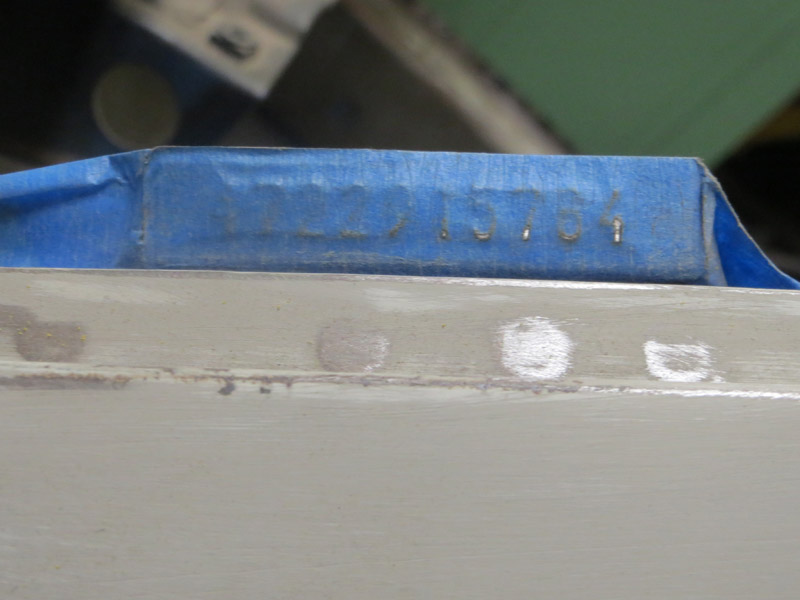 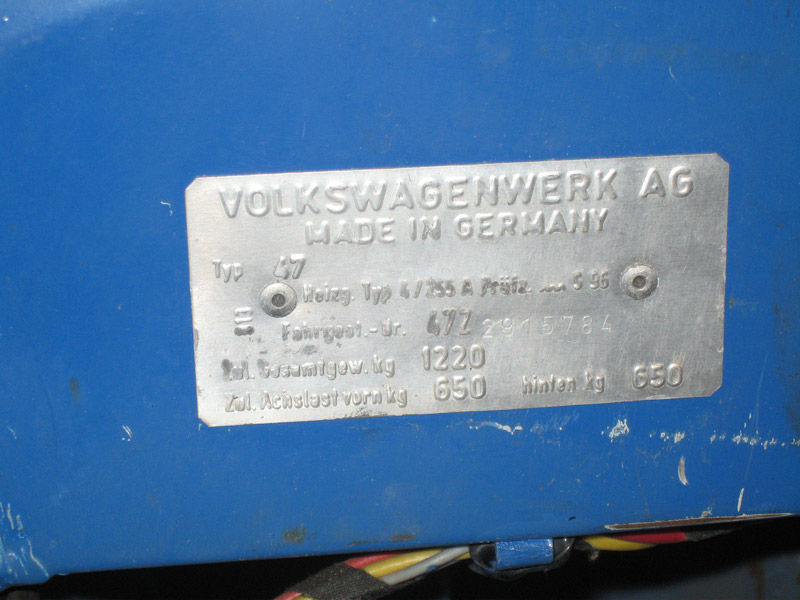 The engine number... (IMG:http://www.914world.com/bbs2/uploads_offsite/www.914club.com-11782-1296535790.12.jpg) |
   |

 
|
| nathansnathan |
Dec 3 2010, 05:27 PM
Post
#2
|
|
Senior Member Group: Members Posts: 1,052 Joined: 31-May 10 From: Laguna Beach, CA Member No.: 11,782 Region Association: None |
These are the first pics I saw, back in June on craigslist. The guy I got it from had bought it from a police auction on the holiday. (IMG:style_emoticons/default/smoke.gif) and they paint the date of the auction (?) on the window. I bought it now'ed off eBay for $1250. I probably could have got it for $900 if I'de have got to it sooner. There were already bids for it up to $750. I'd driven all the way up to Santa Monica in my bus and back, 60 miles, and despite what anyone might say, I think it was worth it. The guy's shop was at 2420 Lincoln (IMG:style_emoticons/default/biggrin.gif) "bought it now"-ed, after having driven 60 miles to see it and back.
(IMG:http://www.914world.com/bbs2/uploads_offsite/www.914club.com-11782-1291418830.3.jpg) Original engine djet "will run when given starting fluid" is what the craigslist ad said. (IMG:http://www.914world.com/bbs2/uploads_offsite/www.914club.com-11782-1291418831.4.jpg) .. speaker holes in the door panels. (IMG:style_emoticons/default/headbang.gif) (IMG:http://www.914world.com/bbs2/uploads_offsite/www.914club.com-11782-1291418831.5.jpg) (IMG:http://www.914world.com/bbs2/uploads_offsite/www.914club.com-11782-1291418831.6.jpg) The driver door is nasty-looking. At first I thought someone had hyperextended it reversing into something while it was open, but I think it may have come open rounding a corner, flew open, and got damaged that way. At one point I was thinking just find a door of the same color, and drive her. But of course that was not to be. The hole right there is the tip of the ice berg (IMG:http://www.914world.com/bbs2/uploads_offsite/www.914club.com-11782-1291418831.7.jpg) Another iceberg (IMG:http://www.914world.com/bbs2/uploads_offsite/www.914club.com-11782-1291418835.8.jpg) There was a temporary registration window sticker I found in the car. It's funny it was dated April 19, 200? (the stamped date of the last digit of the year wasn't legible) I had AAA, but basic gives you only 7 miles of towing. I did not know this. The 53 other miles... 420 dollars it cost to get it back to Laguna. |
|
|
|
| nathansnathan |
Dec 3 2010, 05:28 PM
Post
#3
|
|
Senior Member Group: Members Posts: 1,052 Joined: 31-May 10 From: Laguna Beach, CA Member No.: 11,782 Region Association: None |
I sort of wanted to get it running just to see what was up, but it didn't take long after a compression test came up bad that I tore the engine out.
I constructed a platform on top of my atv jack for this. I didn't have a camera at that time, so I've just got the pics I had my friend take for hose documentation for that part . (IMG:http://www.914world.com/bbs2/uploads_offsite/www.914club.com-11782-1291418888.1.jpg) (IMG:http://www.914world.com/bbs2/uploads_offsite/www.914club.com-11782-1291418888.2.jpg) (IMG:http://www.914world.com/bbs2/uploads_offsite/www.914club.com-11782-1291418889.3.jpg) Impressively original hoses and even the routing. The spark plug wires even look vintage. The guy said this was registered as operational up to right before he got it in April. The case has never been split. I wish I could get red and green braided metric vacuum hose new. |
|
|
|
| nathansnathan |
Dec 3 2010, 05:29 PM
Post
#4
|
|
Senior Member Group: Members Posts: 1,052 Joined: 31-May 10 From: Laguna Beach, CA Member No.: 11,782 Region Association: None |
I've been stalling on updating the blog in hopes of giving the impression that I'm moving right along, when in fact I have been a bit stuck on my hell hole. I'm gonna get the metal to brace it at the doors this weekend, I think, put that together next week, and get the major cutting started probably next weekend. (IMG:style_emoticons/default/boom.gif)
But for now, here's some madness I performed on my rusty-looking cowl/ fender/ door frame. (IMG:http://www.914world.com/bbs2/uploads_offsite/www.914club.com-11782-1291419166.1.jpg) Another shot. This side actually looks better than the passenger side. (IMG:style_emoticons/default/icon8.gif) (IMG:http://www.914world.com/bbs2/uploads_offsite/www.914club.com-11782-1291419166.2.jpg) It's gotten below, to the inner fender well (IMG:http://www.914world.com/bbs2/uploads_offsite/www.914club.com-11782-1291419167.3.jpg) (IMG:http://www.914world.com/bbs2/uploads_offsite/www.914club.com-11782-1291419167.4.jpg) Some nastiness at the corner of the headlight bucket where the front lid seal goes.. Now just how did they expect water to exit from there? (IMG:http://www.914world.com/bbs2/uploads_offsite/www.914club.com-11782-1291419168.5.jpg) Water made its own way (IMG:http://www.914world.com/bbs2/uploads_offsite/www.914club.com-11782-1291419168.6.jpg) I didn't get shots of this before I scraped out all the sealer, but I can tell you it looked pretty decent hidden by the inches of the white stuff all dressed up in paint. (IMG:http://www.914world.com/bbs2/uploads_offsite/www.914club.com-11782-1291419168.7.jpg) So I contemplated for a few weeks what to do about all that, so many layers all coming together in a rusty mess right there, and both sides to be taken care of. Thought about cutting out just what seemed bad, but the challenge of getting it all back together and the fear of not going deep enough, I opted to remove the entire fender. (IMG:style_emoticons/default/screwy.gif) (IMG:style_emoticons/default/smash.gif) drumroll..... (IMG:style_emoticons/default/hitfan[1].gif) (IMG:http://www.914world.com/bbs2/uploads_offsite/www.914club.com-11782-1291431278.1.jpg) They sure put the sealer on thick, about an inch of it there (IMG:http://www.914world.com/bbs2/uploads_offsite/www.914club.com-11782-1291419169.8.jpg) (IMG:http://www.914world.com/bbs2/uploads_offsite/www.914club.com-11782-1291419169.9.jpg) A close up. -not done, of course, but better. You can see what's going on at least without all the rusty rusty (IMG:http://www.914world.com/bbs2/uploads_offsite/www.914club.com-11782-1291419169.10.jpg) Some of the undercoat removed, some more to go. I straghtened the lip with hammer and dolly. (IMG:http://www.914world.com/bbs2/uploads_offsite/www.914club.com-11782-1291419170.11.jpg) Same for the fender itself :aktion035: (IMG:http://www.914world.com/bbs2/uploads_offsite/www.914club.com-11782-1291419170.12.jpg) I thought I'd need a right angle drill to get at the spotwelds in the crevice inside the fender to the pillar, but that piece can come off 2 ways; the other not requiring the angle drill is what I went with. Still, quite the struggle. (IMG:http://www.914world.com/bbs2/uploads_offsite/www.914club.com-11782-1291419171.13.jpg) |
|
|
|
| nathansnathan |
Dec 3 2010, 05:35 PM
Post
#5
|
|
Senior Member Group: Members Posts: 1,052 Joined: 31-May 10 From: Laguna Beach, CA Member No.: 11,782 Region Association: None |
I woke up at 4:30 in the morning to go to the 914 swap meet in Riverside.
It was awesome. I met a lot of cool people, saw a lot of really cool 914's, and got a lot of smokin' deals on some parts. B) 2 brand new 1.7 fuel injectors, a free almost perfect early driver door that is somehow strangely tweaked out at the bottom. Hopefully I can figure out how to fix that. Perfect lower dash pad, also free, white headlight surround. New German aluminum windshield surround (minus the bottom piece, but what can you do for...), perfect right side front turn signal lens 2 front turn signal bases along with hardware for the rear deck lid, the little plastic covers for the screws all in the cabin, the little stainless trim the targa top sits on on the rollbar (1 side only, perfect), and also the aluminum piece that holds the rubber in back of the door. A less-blemished rear passenger tail lens, uncracked relay board cover, good fuel pressure regulator and a bunch of very misc parts, 2 used mahle pistons and cylinders. I've been looking for one of these for years, both parts of the taco plate and the original oil temperature sender. (IMG:http://www.914world.com/bbs2/uploads_offsite/www.914club.com-11782-1291419311.3.jpg) Some cool rides, it was sort of unreeal to see them actually moving as they drove before me through the parking lot to their places, instead of just sitting on jackstands like mine does. |
|
|
|
| nathansnathan |
Dec 3 2010, 05:37 PM
Post
#6
|
|
Senior Member Group: Members Posts: 1,052 Joined: 31-May 10 From: Laguna Beach, CA Member No.: 11,782 Region Association: None |
So first things first, like many-a-914, put her up on jack stands.
I had a bit of a mental dilemma about it initially. I had a dream where the car was up on my dad's lift back in Buffalo. My (now ex) girlfriend was under there with me, like bracing it. She was using this screw jack thing. She's like, "all set!" and I look back to my horror that she's suspended the car from the anti-sway bar (I don't have an anti-sway bar). I'm like, "get out from under there!", but before there was any time to for anything, the car came down right on top of her. Somehow I got He-man strength in this part of the dream and was able to fairly easily lift/ throw the car right off her, but it was too late. Totally fucking traumatizing, I can assure you, holding your crushed (ex) girlfriend's lifeless body in your arms. This was the day after the leveling stands came in the mail and a day before the flat tops came. (IMG:http://www.914world.com/bbs2/uploads_offsite/www.914club.com-11782-1291419439.1.jpg) The sticker on the side of those pretty much invalidates the whole premise of a flat top jack stand. What it says is, in rather uncertain terms, not to lift up both ends of a car at the same time. So, if you're lifting one end only, pretty much everything flat on the bottom of the car would be at some angle, only the very corner of the pad would be supporting anything, and the whole stand would seemingly want to fall over I should think. The very reason I got them was with this end in mind, to get the whole thing up. It took me like days of pondering and forum posts and research to get over the dream and do the deed. It turns out that pretty much any jack stand on the market has this same lame disclosure: http://www.norcoind.com/norco/downloads/manuals/JackStand_Manual.pdf ://http://www.norcoind.com/norco/downl...and_Manual.pdf ://http://www.norcoind.com/norco/downl...and_Manual.pdf ://http://www.norcoind.com/norco/downl...and_Manual.pdf Although jack stands are individually rated, they are to be used in a matched pair to support one end of a vehicle only. Stands are not to be used to simultaneously support both ends or one side of a vehicle. :bs: (IMG:http://www.914world.com/bbs2/uploads_offsite/www.914club.com-11782-1291419444.2.jpg) The flat ones are in front; I had this set previously. Funny that they are color matched to the car. (IMG:style_emoticons/default/happy11.gif) First here (IMG:http://www.914world.com/bbs2/uploads_offsite/www.914club.com-11782-1291419447.3.jpg) and then here when I got the jack point (IMG:http://www.914world.com/bbs2/uploads_offsite/www.914club.com-11782-1291419453.4.jpg) off (IMG:http://www.914world.com/bbs2/uploads_offsite/www.914club.com-11782-1291419462.5.jpg) |
|
|
|
| nathansnathan |
Dec 3 2010, 05:40 PM
Post
#7
|
|
Senior Member Group: Members Posts: 1,052 Joined: 31-May 10 From: Laguna Beach, CA Member No.: 11,782 Region Association: None |
Unbelievable how much undercoat was used at the factory on these cars. My bus isn't built like that, thank god! What where they thinking? -probably about sound dampening. (IMG:style_emoticons/default/screwy.gif)
I read that the cars delivered to Porsche for completion as 6's, the sealer was applied a lot less liberally and by hand. I'm planning on using a brush on epoxy seam sealer more like a 6. Forget this gobs of bumpy white rubbery crap. With it being softer than the paint on top of it, there's no wonder there are so many problems. The slightest penetration, the tiniest breach in the paint shell, sometimes unnoticeable on the surface even, would create a sort of spider of rust radiating out from it underneath. I'm scraping it ALL off, me my heat gun and my big dull screwdriver (IMG:style_emoticons/default/happy11.gif) I don't have a pic of what the rear trunk originally looked like, a bit of surface rust at the back. Here's a pic of it after the initial scraping (quite conservative compared to stage 2 (IMG:style_emoticons/default/ar15.gif) ) The trunk did not come with this pristine pair of ssi heater boxes, unfortunately, I had to put them in there. :-) I don't seem to have a more relevant picture of pre stage 2 for some reason. (IMG:http://www.914world.com/bbs2/uploads_offsite/www.914club.com-11782-1291419587.1.jpg) -They're hard not to look at aren't they? (IMG:style_emoticons/default/hijacked.gif) This took me awhile (IMG:http://www.914world.com/bbs2/uploads_offsite/www.914club.com-11782-1291419588.2.jpg) (IMG:http://www.914world.com/bbs2/uploads_offsite/www.914club.com-11782-1291419589.3.jpg) (IMG:http://www.914world.com/bbs2/uploads_offsite/www.914club.com-11782-1291419590.4.jpg) The thick-ass tar on the floor of the interior may have taken longer even. I got a few blisters getting that shite out. Here's before: (IMG:http://www.914world.com/bbs2/uploads_offsite/www.914club.com-11782-1291419591.5.jpg) and after (IMG:http://www.914world.com/bbs2/uploads_offsite/www.914club.com-11782-1291419594.6.jpg) (IMG:http://www.914world.com/bbs2/uploads_offsite/www.914club.com-11782-1291419597.7.jpg) (IMG:http://www.914world.com/bbs2/uploads_offsite/www.914club.com-11782-1291419598.8.jpg) That's the weapon of choice right there, Made in Taiwan. (IMG:style_emoticons/default/post-2-1117899824.gif) It is full-tang though. It got so intense, the scrapin' scrapin' scrapin' that the tang started to slide in the handle, pushing the impact plate out the back of it periodically. -Still the weapon of choice though, the tip has been through so much scraping (IMG:http://www.914world.com/bbs2/uploads_offsite/www.914club.com-11782-1291419598.9.jpg) it'll take of undercoat without (barely) damaging the paint beneath. (IMG:http://www.914world.com/bbs2/uploads_offsite/www.914club.com-11782-1291419600.10.jpg) (IMG:http://www.914world.com/bbs2/uploads_offsite/www.914club.com-11782-1291419601.11.jpg) Some paint thinner will make it look pristine under there. I can't wait to take off the exhaust heat shield. Next step, brace the doors.... |
|
|
|
| nathansnathan |
Dec 3 2010, 05:41 PM
Post
#8
|
|
Senior Member Group: Members Posts: 1,052 Joined: 31-May 10 From: Laguna Beach, CA Member No.: 11,782 Region Association: None |
I've got one of these bad boys done so far. It's been quite a chore, as the arms are quite an assemblage.
It took me a few days of pondering before I figured out how I was even gonna do it. I had some extra 3/4 inch black pipe around, some 3/4 inch fine threaded rod, and some 3/4 inch course threaded bolts and nuts from other projects so 3/4 inch is what I decided on. I ordered the goodies from McMaster-Carr, left handed threaded rod, right and left-handed 3/4 inch tube nuts, as well as 3/4 inch blank rod ends. (IMG:http://www.914world.com/bbs2/uploads_offsite/www.914club.com-11782-1291419662.1.jpg) This bit of metal I got from Industrial Metal Supply which is an insanely awesome place that is right by my work. (IMG:http://www.914world.com/bbs2/uploads_offsite/www.914club.com-11782-1291419662.2.jpg) 6 inch by 1 1/2 inch, 1/4 inch wall, it's about all my band saw can handle. I got this saw off craigslist for $100. I'm building the shop as I build the car. (IMG:http://www.914world.com/bbs2/uploads_offsite/www.914club.com-11782-1291419666.3.jpg) (IMG:http://www.914world.com/bbs2/uploads_offsite/www.914club.com-11782-1291419667.4.jpg) (IMG:http://www.914world.com/bbs2/uploads_offsite/www.914club.com-11782-1291419667.5.jpg) (IMG:http://www.914world.com/bbs2/uploads_offsite/www.914club.com-11782-1291419667.6.jpg) I had dreamed of getting such a welder as this for years. (IMG:style_emoticons/default/welder.gif) It's an air- cooled (IMG:style_emoticons/default/smile.gif) Miller Tig with high frequency start, pulse, dig, fully digital. Synchrowave 200. (IMG:http://www.914world.com/bbs2/uploads_offsite/www.914club.com-11782-1291419668.7.jpg) A bit of fitting up, I turned the 3/4 inch bolt (now a stud) to 5/8 inch at 1 end, put a bit of a groove around the hole it sits in with the 3/4 inch drill in order to hold the weld/ increase penetration/ minimize grinding to achieve a flat mounting. I used the door hinges as a template. (IMG:http://www.914world.com/bbs2/uploads_offsite/www.914club.com-11782-1291419668.8.jpg) (IMG:http://www.914world.com/bbs2/uploads_offsite/www.914club.com-11782-1291419668.9.jpg) This is my 1932 South Bend Lathe, that was a project for a bit, bringing it back. (IMG:http://www.914world.com/bbs2/uploads_offsite/www.914club.com-11782-1291419672.10.jpg) I was going to use flat heads all around to solve the clearance issues, but These 5/8 inch flat heads through the 1/4 inch wall clevis parts wasn't going to work even if I did have a countersink big enough. I opted, instead, to modify the bolts and make my own low profile socket head cap screws. (IMG:http://www.914world.com/bbs2/uploads_offsite/www.914club.com-11782-1291419673.11.jpg) I had to do the 8mm ones for the mounts also, just at the edges, since the mounting plates are on the small side, and, well, I've only got a 1/2 inch countersink at the moment. I made the ones on the left out of the ones on the right. I went with stainless. (IMG:http://www.914world.com/bbs2/uploads_offsite/www.914club.com-11782-1291419674.12.jpg) And there it is (IMG:http://www.914world.com/bbs2/uploads_offsite/www.914club.com-11782-1291419674.13.jpg) The tensioner (IMG:http://www.914world.com/bbs2/uploads_offsite/www.914club.com-11782-1291419674.14.jpg) And the tensioner assembly (IMG:http://www.914world.com/bbs2/uploads_offsite/www.914club.com-11782-1291419678.15.jpg) Here's the whole of it (IMG:http://www.914world.com/bbs2/uploads_offsite/www.914club.com-11782-1292382402.1.jpg) (IMG:http://www.914world.com/bbs2/uploads_offsite/www.914club.com-11782-1292382402.2.jpg) Just 3 more to go, and then we can really start cutting! |
|
|
|
| nathansnathan |
Dec 3 2010, 05:42 PM
Post
#9
|
|
Senior Member Group: Members Posts: 1,052 Joined: 31-May 10 From: Laguna Beach, CA Member No.: 11,782 Region Association: None |
Ok, so I'm caught up to the blog over at 914club, and I'll go forward only right here on this thread. I've got the Passenger rear fender off; I'll post pics of that next. :-)
|
|
|
|
| McMark |
Dec 3 2010, 05:48 PM
Post
#10
|
|
914 Freak! Group: Retired Admin Posts: 20,180 Joined: 13-March 03 From: Grand Rapids, MI Member No.: 419 Region Association: None |
Cool! (IMG:style_emoticons/default/sunglasses.gif) Looking forward to more!
|
|
|
|
| SirAndy |
Dec 3 2010, 06:07 PM
Post
#11
|
|
Resident German Group: Admin Posts: 42,479 Joined: 21-January 03 From: Oakland, Kalifornia Member No.: 179 Region Association: Northern California |
QUOTE(McMark @ Dec 3 2010, 03:48 PM)  (IMG:style_emoticons/default/agree.gif) That actually looks like a pretty good tub! (IMG:style_emoticons/default/thumb3d.gif) |
|
|
|
| Mark Henry |
Dec 3 2010, 06:53 PM
Post
#12
|
|
that's what I do! Group: Members Posts: 20,065 Joined: 27-December 02 From: Port Hope, Ontario Member No.: 26 Region Association: Canada |
From the title I thought you were restoring a 914 for Tommy Chong.
|
|
|
|
| FourBlades |
Dec 3 2010, 07:21 PM
Post
#13
|
|
From Wreck to Rockin Group: Members Posts: 2,056 Joined: 3-December 07 From: Brevard, FL Member No.: 8,414 Region Association: South East States |
Very nice work! You have done this before?
I love Adriatic Blue as well. Best 914 color. This first picture is of the car I restored. The girl is my wife's friend from Germany. Picture Thread of Adriatic Blue Cars John |
|
|
|
| palmer_md |
Dec 3 2010, 07:42 PM
Post
#14
|
|
Member Group: Members Posts: 110 Joined: 15-November 10 From: Hermosa Beach, CA Member No.: 12,389 Region Association: Northern California |
QUOTE(Mark Henry @ Dec 3 2010, 04:53 PM) From the title I thought you were restoring a 914 for Tommy Chong. HaHa, I had the same thought. or maybe just some tie-die paint scheme. |
|
|
|
| Mark Henry |
Dec 3 2010, 09:12 PM
Post
#15
|
|
that's what I do! Group: Members Posts: 20,065 Joined: 27-December 02 From: Port Hope, Ontario Member No.: 26 Region Association: Canada |
QUOTE(palmer_md @ Dec 3 2010, 08:42 PM) QUOTE(Mark Henry @ Dec 3 2010, 04:53 PM) From the title I thought you were restoring a 914 for Tommy Chong. HaHa, I had the same thought. or maybe just some tie-die paint scheme. Far out man. (IMG:style_emoticons/default/smoke.gif) |
|
|
|
| nathansnathan |
Dec 3 2010, 09:27 PM
Post
#16
|
|
Senior Member Group: Members Posts: 1,052 Joined: 31-May 10 From: Laguna Beach, CA Member No.: 11,782 Region Association: None |
QUOTE(palmer_md @ Dec 3 2010, 05:42 PM) QUOTE(Mark Henry @ Dec 3 2010, 04:53 PM) From the title I thought you were restoring a 914 for Tommy Chong. HaHa, I had the same thought. or maybe just some tie-die paint scheme. There were a lot of instances in acquiring the car and going through it that the number ... made itself known. The spray paint on the window was the date it was processed at the police auction, still on when I got it 2 months later. There was actually quite a bit of shake, stems and whatnot all around the center console up in front of the seats under the carpet there. Also, found a 'Police Line Do Not Cross' bit of plastic around under the seat. The driver door window smashed maybe in some drug bust chase? The engine number is 41908. I remember and wish I would have taken a pic of the bolts at the side of the dashboard holding it in. They said '4 20' on them. It was jumping out at me everywhere. (IMG:style_emoticons/default/WTF.gif) (IMG:style_emoticons/default/smoke.gif) It's all quite 'lined up' and pointing in that direction. |
|
|
|
| nathansnathan |
Dec 3 2010, 09:28 PM
Post
#17
|
|
Senior Member Group: Members Posts: 1,052 Joined: 31-May 10 From: Laguna Beach, CA Member No.: 11,782 Region Association: None |
QUOTE(FourBlades @ Dec 3 2010, 05:21 PM) Very nice work! You have done this before? I love Adriatic Blue as well. Best 914 color. This first picture is of the car I restored. The girl is my wife's friend from Germany. Picture Thread of Adriatic Blue Cars John Thanks, it is my first time doing real metal working kind of bodywork and first 914. I've painted some cars before, but just bondo, sanding, mig welded panels and door skins. This will be my first time working on this since 1996 and I'm hoping to do a waay more professional job this time, hopefully no need for any bondo at all. (IMG:style_emoticons/default/biggrin.gif) I love the L50E. People ask me what color I'm going to paint it. Adriatic Blue! ..of course. The car, in the link, the color looks great. It is surprising how few there seem to be in adriatic blue. At first I liked the color of it all faded more than the actual darker color. Now I just hope that the new paint will be the right hue more than the tint. (IMG:http://www.914world.com/bbs2/uploads_offsite/www.porschemania.it-11782-1336056096.1.jpg) (IMG:style_emoticons/default/biggrin.gif) (IMG:http://www.914world.com/bbs2/uploads_offsite/www.porschemania.it-11782-1336056098.2.jpg) Just like mine (IMG:style_emoticons/default/wub.gif) except the badge. no badge. (IMG:style_emoticons/default/grouphug.gif) (IMG:http://www.914world.com/bbs2/uploads_offsite/harrietelvidge.files.wordpress.com-11782-1336056099.3.jpg) (IMG:http://www.914world.com/bbs2/uploads_offsite/farm3.static.flickr.com-11782-1336056100.4.jpg) (IMG:http://www.914world.com/bbs2/uploads_offsite/germancarsforsaleblog.com-11782-1336056100.5.jpg) It seems to me that adriatic blue has gotten lighter over the years, though. (IMG:http://www.914world.com/bbs2/uploads_offsite/www.imcdb.org-11782-1336056100.6.jpg) I think people match new paint to the faded? For the interior, redone tan interiors always seem to be lighter, the later color and less camel. It is imperative that the interior be camel and not the later tan. (IMG:style_emoticons/default/dry.gif) (IMG:http://www.914world.com/bbs2/uploads_offsite/germancarsforsaleblog.com-11782-1336056102.7.jpg) |
|
|
|
| nathansnathan |
Dec 3 2010, 09:31 PM
Post
#18
|
|
Senior Member Group: Members Posts: 1,052 Joined: 31-May 10 From: Laguna Beach, CA Member No.: 11,782 Region Association: None |
QUOTE(SirAndy @ Dec 3 2010, 04:07 PM) QUOTE(McMark @ Dec 3 2010, 03:48 PM) (IMG:style_emoticons/default/agree.gif) That actually looks like a pretty good tub! (IMG:style_emoticons/default/thumb3d.gif) It is good in many areas; in others not so good. The just-after-I-got it off pic got turned into an 'h' before? so I've put that up, one even rustier-looking than was on the blog. (IMG:style_emoticons/default/barf.gif) Here's some of the worst of the carnage in the multi-tiered hell hole. (IMG:http://www.914world.com/bbs2/uploads_offsite/www.eggscollective.org-11782-1291433480.1.jpg) (IMG:http://www.914world.com/bbs2/uploads_offsite/www.eggscollective.org-11782-1291433482.2.jpg) (IMG:http://www.914world.com/bbs2/uploads_offsite/www.914club.com-11782-1291433484.3.jpg) Going into the inner suspension console ear; it took me a bit to muster the will for it. That's the current state of things right there. It's weird the car must have spent awhile sitting level or other than the usual slanted toward passenger side as it's the inner passenger long that's messed up. I am contemplating/ leaning toward removing, sandblasting the outer suspension support, probably I can reuse it. The jack point seems really decent. I'm thinking of something less invasive there. The inner though, I'm thinking it might be easier to cut out part of the firewall to get to the inner inner long, than to get the jackoint, and bothe layers of the outer long out to get at this business: (IMG:http://www.914world.com/bbs2/uploads_offsite/www.eggscollective.org-11782-1291433485.4.jpg) (IMG:http://www.914world.com/bbs2/uploads_offsite/www.eggscollective.org-11782-1291433486.5.jpg) (IMG:http://www.914world.com/bbs2/uploads_offsite/www.eggscollective.org-11782-1291433487.6.jpg) Besides these areas, up by the fresh air vent in the door wells ... There are areas that look remarkably good. Tunnel vision inspires me to want to get it to the point of wet sanding it. For now, my tetanus shot is current. (IMG:style_emoticons/default/beerchug.gif) |
|
|
|
| SirAndy |
Dec 3 2010, 09:35 PM
Post
#19
|
|
Resident German Group: Admin Posts: 42,479 Joined: 21-January 03 From: Oakland, Kalifornia Member No.: 179 Region Association: Northern California |
Aha! That's more like a real 914 ... (IMG:style_emoticons/default/biggrin.gif)
We've all been there. (IMG:style_emoticons/default/dry.gif) |
|
|
|
| silver74insocal |
Dec 3 2010, 09:41 PM
Post
#20
|
|
Senior Member Group: Members Posts: 736 Joined: 26-November 09 From: rancho cucamonga Member No.: 11,073 Region Association: Southern California |
(IMG:style_emoticons/default/welcome.png) keep on going and for gods sake repaint those stands so they dont get permanenlty attached to that little car!
good luck and if you need someone to help you make a mess just let me know Dave (IMG:style_emoticons/default/beerchug.gif) hey whered you get those stands btw..thanks |
|
|
|
|
4 User(s) are reading this topic (4 Guests and 0 Anonymous Users)
0 Members:

|
Lo-Fi Version | Time is now: 8th May 2026 - 07:01 PM |
Invision Power Board
v9.1.4 © 2026 IPS, Inc.