![]() |
|
Porsche, and the Porsche crest are registered trademarks of Dr. Ing. h.c. F. Porsche AG.
This site is not affiliated with Porsche in any way. Its only purpose is to provide an online forum for car enthusiasts. All other trademarks are property of their respective owners. |
|
![]() ![]() |
![]() |
76-914 |
![]()
Post
#1
|
Repeat Offender & Resident Subaru Antagonist ![]() ![]() ![]() ![]() ![]() ![]() ![]() ![]() ![]() ![]() Group: Members Posts: 13,700 Joined: 23-January 09 From: Temecula, CA Member No.: 9,964 Region Association: Southern California ![]() ![]() |
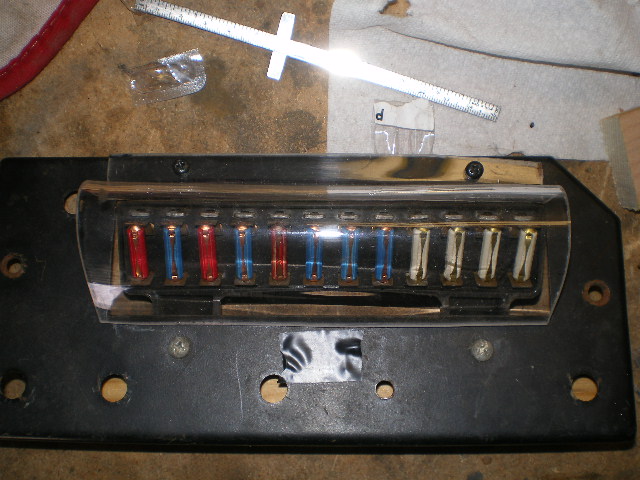
First; thanks to Joe Sharpe and Saun Malloy for the effort to provide me with a panel, with which to practice. Second; fuses are placed at random and are not emblematic of a correct installation. Thirdly; this item is for CSOB's and not Pebble Beach. That being said, here is the first attempt. My goal is to provide you with info on "how to" make one of these in a few min's with materials that are free (already in your inventory) or quite cheap and the instructions to do so. Also, I want to develope two different methods for forming these. One using a heat gun and the other using your oven (in case you don't own a heat gun). I haven't got all the details down for the oven method complete but hope to have that completed in the next week. You will see that I have drilled 2 holes in the board 11mm apart to secure it. This spacing is used so you can use the existing 2 screws holding the fuse block if you don't want to drill your board. Either way, you will need a screwdriver to remove it in order to R&R a fuse. I'm pretty sure most of us carry a screwdriver in our 914, anyway. Will update this in the next few days.
![]() ![]() ![]() |
dr914@autoatlanta.com |
![]()
Post
#2
|
914 Guru ![]() ![]() ![]() ![]() ![]() Group: Members Posts: 8,161 Joined: 3-January 07 From: atlanta georgia Member No.: 7,418 Region Association: None ![]() |
Neat idea!!!! Has it been "KNEE" tested yet??
First; thanks to Joe Sharpe and Saun Malloy for the effort to provide me with a panel, with which to practice. Second; fuses are placed at random and are not emblematic of a correct installation. Thirdly; this item is for CSOB's and not Pebble Beach. That being said, here is the first attempt. My goal is to provide you with info on "how to" make one of these in a few min's with materials that are free (already in your inventory) or quite cheap and the instructions to do so. Also, I want to develope two different methods for forming these. One using a heat gun and the other using your oven (in case you don't own a heat gun). I haven't got all the details down for the oven method complete but hope to have that completed in the next week. You will see that I have drilled 2 holes in the board 11mm apart to secure it. This spacing is used so you can use the existing 2 screws holding the fuse block if you don't want to drill your board. Either way, you will need a screwdriver to remove it in order to R&R a fuse. I'm pretty sure most of us carry a screwdriver in our 914, anyway. Will update this in the next few days. ![]() ![]() ![]() |
Drums66 |
![]()
Post
#3
|
914 Rudiments ![]() ![]() ![]() ![]() ![]() Group: Members Posts: 5,321 Joined: 15-January 03 From: Coronado,Cali Member No.: 151 Region Association: Southwest Region ![]() |
....that looks like it has some promise.....eager to see how they turn
out.?...looks fine so far ! (IMG:style_emoticons/default/flag.gif) (IMG:style_emoticons/default/shades.gif) (IMG:style_emoticons/default/bye1.gif)(hey George(AA)I still have 1 I purchased from you (90's) |
flipb |
![]()
Post
#4
|
Senior Member ![]() ![]() ![]() Group: Members Posts: 1,810 Joined: 2-September 09 From: Fairfax, VA Member No.: 10,752 Region Association: MidAtlantic Region ![]() ![]() |
(IMG:style_emoticons/default/clap56.gif)
Fantastic! My fuse cover was cracked when I bought the car... took me about 3 months to completely snap it in half after a few brushes with my size 12. Could it be attached with small wing screws to make it easier to remove in a hurry? |
rfuerst911sc |
![]()
Post
#5
|
Advanced Member ![]() ![]() ![]() ![]() Group: Members Posts: 2,158 Joined: 4-May 06 From: Dahlonega , Georgia Member No.: 5,980 Region Association: South East States ![]() |
Maybe velcro ?
|
zonedoubt |
![]()
Post
#6
|
Canadian Member ![]() ![]() ![]() Group: Members Posts: 668 Joined: 14-May 03 From: Vancouver, BC Member No.: 696 Region Association: Canada ![]() |
...or you can just buy the cheap VW one which fits: http://www.cip1.ca/ProductDetails.asp?Prod...2D937%2D555%2DM
|
76-914 |
![]()
Post
#7
|
Repeat Offender & Resident Subaru Antagonist ![]() ![]() ![]() ![]() ![]() ![]() ![]() ![]() ![]() ![]() Group: Members Posts: 13,700 Joined: 23-January 09 From: Temecula, CA Member No.: 9,964 Region Association: Southern California ![]() ![]() |
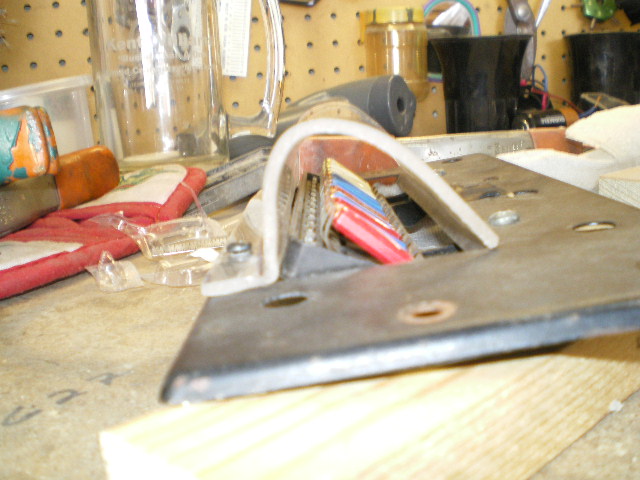
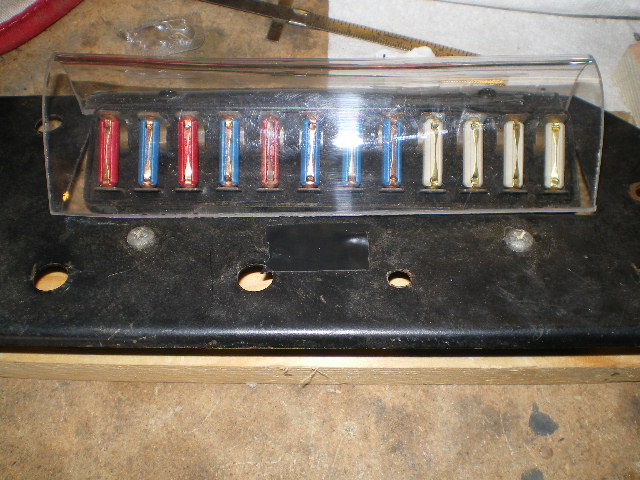
So here are a few shots of a finished cover. The jig is working so next is to make a few in Lexan (polycarbonate), as this might be more available. Also, want to try a 1/16" version. If 1/16" proves strong enough I will continue with the oven method. May take a few more days of tinkering. More pic's w/ jig (fancy word for wood blocks) later.
Front view. Piece was narrowed and is now tucked inside: ![]() Underside. If you look closely you can see how the piece tucks in and below: ![]() End view. Close up: ![]() |
Mike Bellis |
![]()
Post
#8
|
Resident Electrician ![]() ![]() ![]() ![]() ![]() Group: Members Posts: 8,347 Joined: 22-June 09 From: Midlothian TX Member No.: 10,496 Region Association: None ![]() ![]() ![]() |
It looks great but... If you blow a fuse on the road, you need a screwdriver to fix it. How about just some hook/loop attachment in lieu of the screws?
|
silver74insocal |
![]()
Post
#9
|
Senior Member ![]() ![]() ![]() Group: Members Posts: 736 Joined: 26-November 09 From: rancho cucamonga Member No.: 11,073 Region Association: Southern California ![]() |
(IMG:style_emoticons/default/smilie_pokal.gif) lookin good Kent..
|
RJMII |
![]()
Post
#10
|
Jim McIntosh ![]() ![]() ![]() ![]() Group: Members Posts: 3,125 Joined: 11-September 07 From: Sandy, Utah Member No.: 8,112 Region Association: None ![]() |
It looks great but... If you blow a fuse on the road, you need a screwdriver to fix it. How about just some hook/loop attachment in lieu of the screws? Or wingnuts on theaded studs? Slots? Big thumb screws like the Engman kit? (which the group buy is coming to a close soon, btw) Looks great, Kent. Thanks for sharing! |
76-914 |
![]()
Post
#11
|
Repeat Offender & Resident Subaru Antagonist ![]() ![]() ![]() ![]() ![]() ![]() ![]() ![]() ![]() ![]() Group: Members Posts: 13,700 Joined: 23-January 09 From: Temecula, CA Member No.: 9,964 Region Association: Southern California ![]() ![]() |
It looks great but... If you blow a fuse on the road, you need a screwdriver to fix it. How about just some hook/loop attachment in lieu of the screws? Yea, I mentioned that you would need a screwdriver. Most of us won't leave home w/o a toolbox in the trunk (IMG:style_emoticons/default/happy11.gif) . The real purpose of this is to get guys making their own covers, (including the jig) in < 1 hr and to experience making something from scratch. If we didn't like working on cars we wouldn't own 914's, would we? (IMG:style_emoticons/default/lol-2.gif) BTW, I'm going to slot the mounting holes on the next one. Then I won't need to use the screwdriver. But really; if you blow a fuse......you will need more than a screwdriver. After you find that you can manipulate the forms that these plastics can take on, you will find other projects for your new found skill. Eventually, I think I'll post a quick video on Youtube for those of us that are easily distracted. I have to go clean out a space for Lew's car now. We're going to Pertronix his ass. Al's bringing his 914, too. Should be a great Sunday! |
RJMII |
![]()
Post
#12
|
Jim McIntosh ![]() ![]() ![]() ![]() Group: Members Posts: 3,125 Joined: 11-September 07 From: Sandy, Utah Member No.: 8,112 Region Association: None ![]() |
Kent, it's not necessarily that one might blow a fuse, but one might need to twist the fuse and get it to 'reseat' from corrosion/oxidization. I had that issue almost as much as kicking them out on entry of the vehicle.
|
Mike Bellis |
![]()
Post
#13
|
Resident Electrician ![]() ![]() ![]() ![]() ![]() Group: Members Posts: 8,347 Joined: 22-June 09 From: Midlothian TX Member No.: 10,496 Region Association: None ![]() ![]() ![]() |
How about some self adhesive magnetic strip on the plexi? That would make it quick release.
|
76-914 |
![]()
Post
#14
|
Repeat Offender & Resident Subaru Antagonist ![]() ![]() ![]() ![]() ![]() ![]() ![]() ![]() ![]() ![]() Group: Members Posts: 13,700 Joined: 23-January 09 From: Temecula, CA Member No.: 9,964 Region Association: Southern California ![]() ![]() |
How about some self adhesive magnetic strip on the plexi? That would make it quick release. That's the great thing. Everyone get's to make theirs to suit themselves. I Just want to show how easy and cheap it is to form these up. I didn't have much time to tinker today but I did discover one thing. (IMG:style_emoticons/default/ar15.gif) SCREW Lexan. That stuff is a bitch to work with. I got one made in the time it take to make 10 from acrylic. Nor do I see any advantage in using polycarbonate. I'll update in a few days and will list materials list, cost, where to buy's and pic's of jig and how to use it. |
![]() ![]() |
![]() |
Lo-Fi Version | Time is now: 9th May 2025 - 05:53 PM |
All rights reserved 914World.com © since 2002 |
914World.com is the fastest growing online 914 community! We have it all, classifieds, events, forums, vendors, parts, autocross, racing, technical articles, events calendar, newsletter, restoration, gallery, archives, history and more for your Porsche 914 ... |