|
|
|
Porsche, and the Porsche crest are registered trademarks of Dr. Ing. h.c. F. Porsche AG.
This site is not affiliated with Porsche in any way. Its only purpose is to provide an online forum for car enthusiasts. All other trademarks are property of their respective owners. |
|
|

  |

| Andyrew |
 May 8 2011, 09:12 AM May 8 2011, 09:12 AM
Post
#144
|
|
Spooling.... Please wait  Group: Members Posts: 13,380 Joined: 20-January 03 From: Riverbank, Ca Member No.: 172 Region Association: Northern California |
Dad came over and helped me quite a bit yesterday.
We were able to make the majority of the changes to the rear bumper. Cut slots in the top in order to curve the bumper more properly, cut relief slots in the license plate area as well. Spent about 2 hrs trimming the side to match the body somewhat, Still need to add some material (maybe...). I also need to mess with the piece below the flare to match the lines. I think i'll do that some today. (IMG:http://www.914world.com/bbs2/uploads_offsite/i1210.photobucket.com-172-1304867537.1.jpg) (IMG:http://www.914world.com/bbs2/uploads_offsite/i1210.photobucket.com-172-1304867537.2.jpg) (IMG:http://www.914world.com/bbs2/uploads_offsite/i1210.photobucket.com-172-1304867537.3.jpg) (IMG:http://www.914world.com/bbs2/uploads_offsite/i1210.photobucket.com-172-1304867538.4.jpg) Sanded down the front bumper past 2 layers of paint and started getting it ready for filler. (IMG:http://www.914world.com/bbs2/uploads_offsite/i1210.photobucket.com-172-1304867538.5.jpg) Sanded the front trunk down and noticed that the area where the crest is was dented pretty bad. Hammered it up, and layed 1/4" of bondo and sanded it down, probably max 1/8" now. Layed some of the epoxy primer down. You can see now why I had such a hard time going over the epoxy with paint, it is SO much darker than the polyester primer. (IMG:http://www.914world.com/bbs2/uploads_offsite/i1210.photobucket.com-172-1304867538.6.jpg) (IMG:http://www.914world.com/bbs2/uploads_offsite/i1210.photobucket.com-172-1304867539.7.jpg) Also primered the front of the rear spoiler. (IMG:http://www.914world.com/bbs2/uploads_offsite/i1210.photobucket.com-172-1304867539.8.jpg) The front trunk and spoiler will be guide sanded down then primed over with grey primer, then sanded and painted. I have set a DD for paint on the body for NEXT SUNDAY. I have a lot to do in that time, but If its not then, its next month.. And I cant wait that long. |
   |

 
|
| Andyrew |
May 8 2011, 09:23 AM
Post
#145
|
|
Spooling.... Please wait Group: Members Posts: 13,380 Joined: 20-January 03 From: Riverbank, Ca Member No.: 172 Region Association: Northern California |
QUOTE(arkitect @ May 8 2011, 07:53 AM)  Andrew, Are you painting today? No, I dont think im going to paint any today. Pretty sure im just going to work on the bumpers and hopefully get those done. Besides its mothers day so i'll be limited on time. |
|
|
|
| computers4kids |
May 9 2011, 07:51 AM
Post
#147
|
|
Love these little cars! Group: Members Posts: 2,443 Joined: 11-June 05 From: Port Townsend, WA Member No.: 4,253 Region Association: None |
Andrew, your car is really shaping up. I can't believe the amount of hours you have poured into your car in the recent months...it's really starting to show. Hopefully this cooler spell lasts a bit longer...perfect for painting. We all know, we're one day away from the valley going to "hot as...." (IMG:style_emoticons/default/blink.gif)
|
|
|
|
| Andyrew |
May 9 2011, 12:21 PM
Post
#148
|
|
Spooling.... Please wait Group: Members Posts: 13,380 Joined: 20-January 03 From: Riverbank, Ca Member No.: 172 Region Association: Northern California |
Planning to shoot this sunday.. Weather shows rain and 70 deg. I have mixed feelings about it.
|
|
|
|
| Andyrew |
May 10 2011, 12:14 AM
Post
#149
|
|
Spooling.... Please wait Group: Members Posts: 13,380 Joined: 20-January 03 From: Riverbank, Ca Member No.: 172 Region Association: Northern California |
And I got 3 hours in tonight.
Heres a pic from last night. Hood. (IMG:http://www.914world.com/bbs2/uploads_offsite/i1210.photobucket.com-172-1305008048.1.jpg) Focused on the bumper. (IMG:http://www.914world.com/bbs2/uploads_offsite/i1210.photobucket.com-172-1305008049.2.jpg) You can barely see the black area that im cutting off. Cutting this off for 1: design and 2. airflow. Thats a serious amount of lift on the rear end at over 100mph... I have plans for an underbody tray, I might do it someday.. (IMG:http://www.914world.com/bbs2/uploads_offsite/i1210.photobucket.com-172-1305008049.3.jpg) The piece cut off. (IMG:http://www.914world.com/bbs2/uploads_offsite/i1210.photobucket.com-172-1305008049.4.jpg) (IMG:http://www.914world.com/bbs2/uploads_offsite/i1210.photobucket.com-172-1305008050.5.jpg) (IMG:http://www.914world.com/bbs2/uploads_offsite/i1210.photobucket.com-172-1305008050.6.jpg) Good old kitty hair. Works really well for these kind of things (I HATE working with fiberglass and resin...). Ground flat with bumper with grinder.. (IMG:http://www.914world.com/bbs2/uploads_offsite/i1210.photobucket.com-172-1305008050.7.jpg) (IMG:http://www.914world.com/bbs2/uploads_offsite/i1210.photobucket.com-172-1305008050.8.jpg) (IMG:http://www.914world.com/bbs2/uploads_offsite/i1210.photobucket.com-172-1305008051.9.jpg) A bit of trimming done. Still a little more to do. Ignore the exhaust tips, they will get straightened later. (IMG:http://www.914world.com/bbs2/uploads_offsite/i1210.photobucket.com-172-1305008051.10.jpg) Filled pinholes and a couple of chips in the fiberglass. Sanded down (arg, I hate sanding..) Thats all for tonight.. This stuff just takes to much time. Bumpers will not be sprayed with the body but I am OK with that. I can spray them any time. Looking for 3 hours tomorrow... Tomorrow im going to start on sanding the body down to the 400 grit I need to paint over. Same on Wed. Thursday I start cleaning the garage for painting on Sunday as I dont have any time to work on anything on Friday and Saturday. |
|
|
|
| sawtooth |
May 10 2011, 08:03 AM
Post
#150
|
|
Member Group: Members Posts: 297 Joined: 25-June 08 From: Boise, ID Member No.: 9,211 Region Association: Intermountain Region |
Bumper is looking great Andrew, gonna be beautiful.
|
|
|
|
| Andyrew |
May 11 2011, 10:41 AM
Post
#151
|
|
Spooling.... Please wait Group: Members Posts: 13,380 Joined: 20-January 03 From: Riverbank, Ca Member No.: 172 Region Association: Northern California |
Ordered some tires for the rear. 285 35 18's. (Fronts have 1k miles on them, but are 5 years old, rears are goooooone)
Received the seals from 914rubber.com Sanded down the drivers side last night as well. It hit me that I have to paint under the targa bar prior to painting the rest of the car.. Soooo Im going to try and enlist some help tonight to get the car sanded quick enough to paint under the targa bar tonight.. Ahhh, I havent spent this kind of money in a while... Glad I have some 914 parts to sell to fund it! |
|
|
|
| McMark |
May 11 2011, 11:07 AM
Post
#152
|
|
914 Freak! Group: Retired Admin Posts: 20,180 Joined: 13-March 03 From: Grand Rapids, MI Member No.: 419 Region Association: None |
You'd be surprised how many people forget under the targa bar. Glad you caught it now! (IMG:style_emoticons/default/biggrin.gif) Lookin' good.
|
|
|
|
| Andyrew |
May 11 2011, 11:21 AM
Post
#153
|
|
Spooling.... Please wait Group: Members Posts: 13,380 Joined: 20-January 03 From: Riverbank, Ca Member No.: 172 Region Association: Northern California |
Its either now or after paint on the rest of the car and I figure I'd rather do it now than later as it can sit for 3 days drying then I can properly mask over the paint..
Oh and I found out that dollar tree has 10'x12' (Thin..) painters plastic tarps. They worked well painting the hood, I'll pick up 5 or so for these little spot jobs. Probably use 3 to cover the car for this... |
|
|
|
| Andyrew |
May 11 2011, 10:43 PM
Post
#154
|
|
Spooling.... Please wait Group: Members Posts: 13,380 Joined: 20-January 03 From: Riverbank, Ca Member No.: 172 Region Association: Northern California |
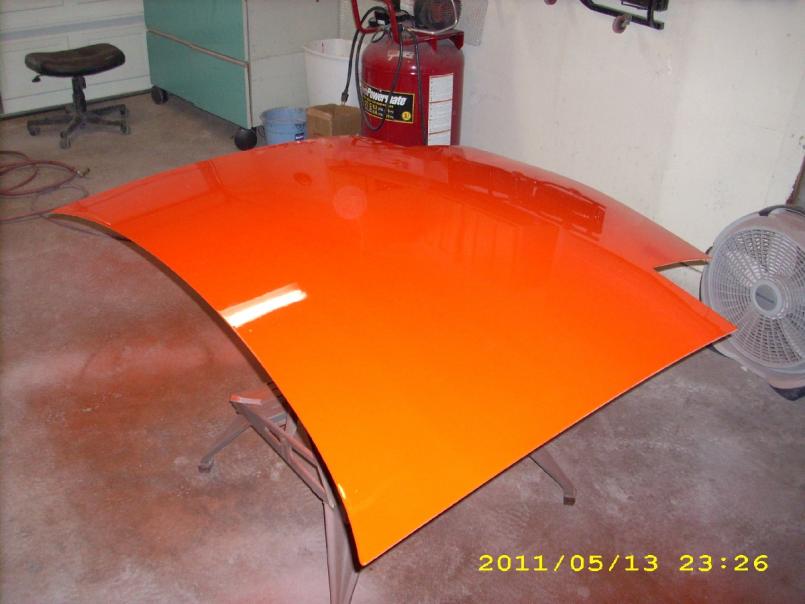
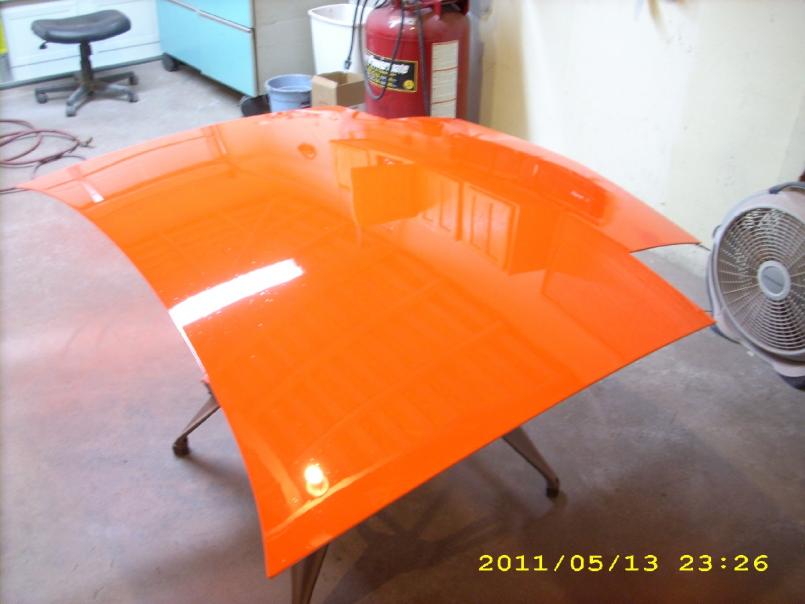
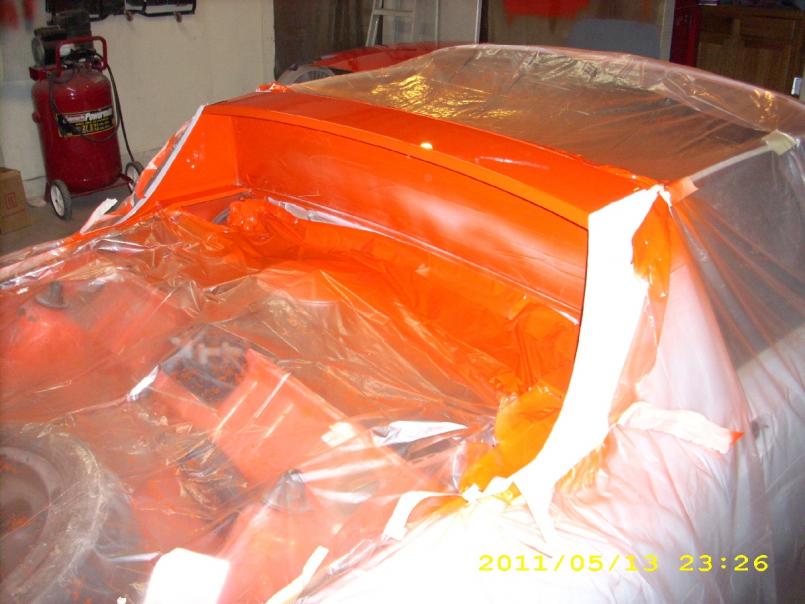
Dad came over this afternoon and helped me get the rest of the car sanded. All set now to start prepping for paint tomorrow and to paint under the targa bar (And paint the front hood, I decided I will paint the front hood off the car as well so I can get to the fenders and the cowl area without worries).
I'll have some time on Friday morning as well so that might be when I paint those area's to keep the bugs away... But then again I might do it tomorrow night (Now that im thinking about it, probably not). |
|
|
|
| Brent |
May 11 2011, 11:25 PM
Post
#155
|
|
Every month is Oktober Group: Members Posts: 1,360 Joined: 16-December 04 From: North San Jose Member No.: 3,291 Region Association: Northern California |
The Modesto heat should be cool for a few days too. Hoping for bug free spray! Looks great Andrew!
|
|
|
|
| Andyrew |
May 12 2011, 05:12 PM
Post
#156
|
|
Spooling.... Please wait Group: Members Posts: 13,380 Joined: 20-January 03 From: Riverbank, Ca Member No.: 172 Region Association: Northern California |
So apparently Tire Rack delivers within 24 hours of placing an order...
Pictures at 11. (IMG:style_emoticons/default/tongue.gif) |
|
|
|
| Andyrew |
May 14 2011, 05:09 PM
Post
#157
|
|
Spooling.... Please wait Group: Members Posts: 13,380 Joined: 20-January 03 From: Riverbank, Ca Member No.: 172 Region Association: Northern California |
|
|
|
|
| Andyrew |
May 14 2011, 05:28 PM
Post
#158
|
|
Spooling.... Please wait Group: Members Posts: 13,380 Joined: 20-January 03 From: Riverbank, Ca Member No.: 172 Region Association: Northern California |
 |
|
|
|
| Andyrew |
May 14 2011, 05:29 PM
Post
#159
|
|
Spooling.... Please wait Group: Members Posts: 13,380 Joined: 20-January 03 From: Riverbank, Ca Member No.: 172 Region Association: Northern California |
 |
|
|
|
| Andyrew |
May 14 2011, 05:32 PM
Post
#160
|
|
Spooling.... Please wait Group: Members Posts: 13,380 Joined: 20-January 03 From: Riverbank, Ca Member No.: 172 Region Association: Northern California |
 |
|
|
|
| Andyrew |
May 14 2011, 05:34 PM
Post
#161
|
|
Spooling.... Please wait Group: Members Posts: 13,380 Joined: 20-January 03 From: Riverbank, Ca Member No.: 172 Region Association: Northern California |
|
|
|
|

| Mike Bellis |
May 14 2011, 06:26 PM
Post
#162
|
|
Resident Electrician Group: Members Posts: 8,348 Joined: 22-June 09 From: Midlothian TX Member No.: 10,496 Region Association: None |
Wow. It's going to look great! Keep it up.
|
|
|
|
| arkitect |
May 14 2011, 11:10 PM
Post
#163
|
|
Senior Member Group: Members Posts: 617 Joined: 3-March 10 From: Stockton, CA Member No.: 11,426 Region Association: None |
Great work on the painting, nice to see the fresh paint after you have done so many hours of sanding.
|
|
|
|
|
3 User(s) are reading this topic (3 Guests and 0 Anonymous Users)
0 Members:

|
Lo-Fi Version | Time is now: 28th March 2026 - 08:00 AM |
Invision Power Board
v9.1.4 © 2026 IPS, Inc.