|
|
|
Porsche, and the Porsche crest are registered trademarks of Dr. Ing. h.c. F. Porsche AG.
This site is not affiliated with Porsche in any way. Its only purpose is to provide an online forum for car enthusiasts. All other trademarks are property of their respective owners. |
|
|

  |

| matteyp |
 Jan 31 2011, 07:23 PM Jan 31 2011, 07:23 PM
Post
#1
|
|
Nothing a little JB Weld can't fix...  Group: Members Posts: 263 Joined: 8-June 09 From: WA Member No.: 10,450 Region Association: Pacific Northwest |
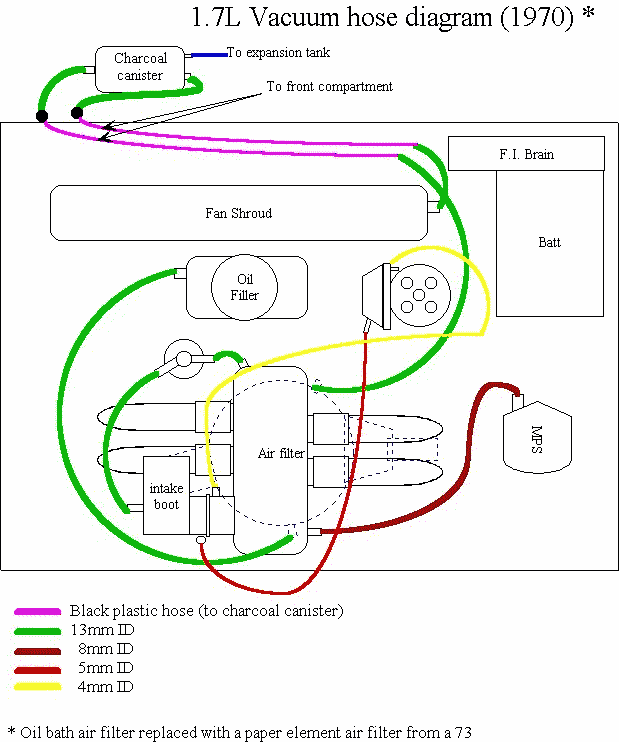
Does anyone know where I can find a vaccum hose diagram for a 73 1.7? Bowlsby's diagrams have been very helpful but he only has a diagram for a 71. My air cleaner only has only two ports and the 71 diagram looks like it has 3. Thanks for the help.
Matt |
   |

 
|
| 914 shifter |
Jan 31 2011, 07:30 PM
Post
#2
|
|
airhead Group: Members Posts: 266 Joined: 28-August 10 From: ny/nj Member No.: 12,111 Region Association: North East States |
try tech article on pelican site (IMG:style_emoticons/default/idea.gif)
|
|
|
|
| matteyp |
Jan 31 2011, 07:52 PM
Post
#3
|
|
Nothing a little JB Weld can't fix... Group: Members Posts: 263 Joined: 8-June 09 From: WA Member No.: 10,450 Region Association: Pacific Northwest |
Pelican uses the same diagram as bowlsby. I know the lines aren't that different from a 71 to a 73 but there are extra hoses that I don't know where they go.
|
|
|
|
| detoxcowboy |
Jan 31 2011, 07:57 PM
Post
#4
|
|
Senior Member Group: Members Posts: 1,294 Joined: 30-January 08 Member No.: 8,642 Region Association: Africa |
 |
|
|
|
| detoxcowboy |
Jan 31 2011, 08:04 PM
Post
#5
|
|
Senior Member Group: Members Posts: 1,294 Joined: 30-January 08 Member No.: 8,642 Region Association: Africa |
if you need an extra port these can come into play.. decel valve? on '73?
  Part Number: 022 133 083 Part Number: 022 133 083 D both available at German Supply.. http://www.germansupply.com/home/customer/home.php?cat=348 |
|
|
|
| matteyp |
Jan 31 2011, 08:18 PM
Post
#6
|
|
Nothing a little JB Weld can't fix... Group: Members Posts: 263 Joined: 8-June 09 From: WA Member No.: 10,450 Region Association: Pacific Northwest |
Man those are expensive for some stupid rubber peices. Hopefully rich will have one laying around.
|
|
|
|
| detoxcowboy |
Jan 31 2011, 10:00 PM
Post
#7
|
|
Senior Member Group: Members Posts: 1,294 Joined: 30-January 08 Member No.: 8,642 Region Association: Africa |
QUOTE(matteyp @ Jan 31 2011, 06:18 PM)  Man those are expensive for some stupid rubber peices. Hopefully rich will have one laying around. Oh you can get them elsewhere that was mainly to show you what they are and they you can connect piggy back and that they are out there available.. you will have better pricing and availablity with vw sites and shops.. |
|
|
|
| detoxcowboy |
Feb 1 2011, 08:46 AM
Post
#8
|
|
Senior Member Group: Members Posts: 1,294 Joined: 30-January 08 Member No.: 8,642 Region Association: Africa |
QUOTE(matteyp @ Jan 31 2011, 05:23 PM) Does anyone know where I can find a vaccum hose diagram for a 73 1.7? Bowlsby's diagrams have been very helpful but he only has a diagram for a 71. My air cleaner only has only two ports and the 71 diagram looks like it has 3. Thanks for the help. Matt OK lets Start Over, there is only 2 vac hoses to the air cleaner in the posted diagram,.. Just start copying that diagram and if you end up with an extra hose.. post that issue.. If while doing that you have a problem identifying a hose or part, post that too,. Once you dig you will see.. |
|
|
|
| detoxcowboy |
Feb 1 2011, 08:59 AM
Post
#9
|
|
Senior Member Group: Members Posts: 1,294 Joined: 30-January 08 Member No.: 8,642 Region Association: Africa |
Just to get you seeing what I see is the oil filler and the charcoal cannister are the only 2 hoses at the air filter (green in diagram) the vacumm retard from your distributor is not at the air cleaner though it may appear so (yellow in diagram).. Some hoses recyle air (air cleaner) and some hoses are from parts sensing vacaum (throttle body/housing) and then there is the aar which is a controlled vaccum leak (only othe green hoses in diagram, also from intake bootle to throotle housing).. just a head start.. good luck..
|
|
|
|
| matteyp |
Feb 1 2011, 05:00 PM
Post
#10
|
|
Nothing a little JB Weld can't fix... Group: Members Posts: 263 Joined: 8-June 09 From: WA Member No.: 10,450 Region Association: Pacific Northwest |
Ok man so heres some pics i shot today, hopefully you can tell what im looking at
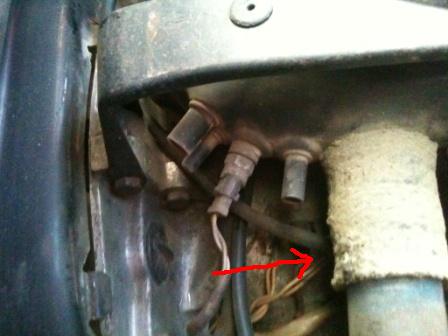
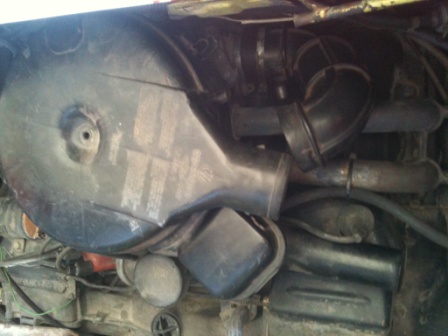 Ok so this pic I cant really figure out why the rubber peice is to short to fit onto the top of the air cleaner, do I have the wrong one or something? the large bottom fitting i assume attaches to the hose that comes up from flapper boxes under the engine shelf? Correct me here cuz im just guessing.  Ok this picture shows the hook up onto the oil fill which is shown in the pelican diagram, but there is also another connection there just in front of the oil fill which is not shown in the diagram. I have a line connected to it just for reference, Where does that go? 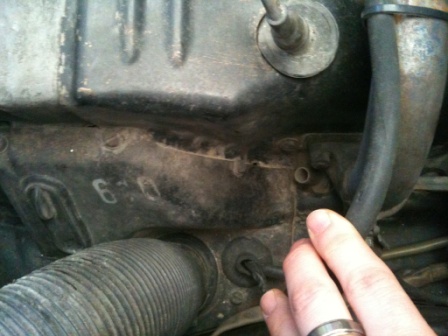 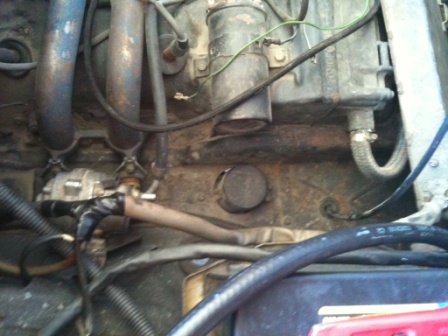 These two pictures are from both sides of the motor. Each has an input just in front of the spark plug. Sorry the second pic is a little harder to see. what hooks to these? 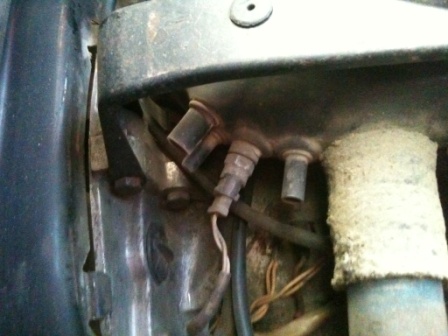 Now this last picture there are 3 hook ups under the air cleaner which are also not pictured in the pelican diagram. What lines hook to these 3 input? thanks for the help |
|
|
|
| matteyp |
Feb 1 2011, 05:09 PM
Post
#11
|
|
Nothing a little JB Weld can't fix... Group: Members Posts: 263 Joined: 8-June 09 From: WA Member No.: 10,450 Region Association: Pacific Northwest |
Oh and one last thing. I have a total of two hook ups on my air cleaner box and one on the rubber pipe. Also in the second to last picture the heater flapper which comes up just in front of the coil and is blocked, im assuming hooks up somewhere right? Man I thought wiring my car was difficult, wish i had a correct diagram...
|
|
|
|
| detoxcowboy |
Feb 1 2011, 08:16 PM
Post
#12
|
|
Senior Member Group: Members Posts: 1,294 Joined: 30-January 08 Member No.: 8,642 Region Association: Africa |
 \\ \\(IMG:style_emoticons/default/biggrin.gif) Is that a wrist sweat band? (IMG:style_emoticons/default/biggrin.gif) Just kidding.. Looks like you have confunction going on and I have been thinking what is the best way to help you straighten this out to some understanding for you.. My email is detoxcowboy@gmail.com send me all the above pics plus take one or two of the whole enchilada, back it up a bit so I can see what you dealing with and what you or have not.. I will draw on them and send them back to you with explanation.. and possible request another photo or 2.. Joe |
|
|
|
| type47 |
Feb 5 2011, 02:02 PM
Post
#13
|
|
Viermeister Group: Members Posts: 4,254 Joined: 7-August 03 From: Vienna, VA Member No.: 994 Region Association: MidAtlantic Region |
QUOTE(matteyp @ Feb 1 2011, 03:00 PM) Ok this picture shows the hook up onto the oil fill which is shown in the pelican diagram, but there is also another connection there just in front of the oil fill which is not shown in the diagram. I have a line connected to it just for reference, Where does that go? the thing in front of the oil fill is an "anti-flashback" valve. The connection already on the valve and then there are 2 others below; one goes to the port on the head in the pic below, your finger is almost pointing to it, it's a small tube that comes out of the head. There is another port on the other head. |
|
|
|
| sail2fast |
Feb 11 2012, 05:49 PM
Post
#14
|
|
Newbie Group: Members Posts: 1 Joined: 5-February 12 From: san francisco Member No.: 14,094 Region Association: None |
For anyone else needing help with this, I found the Haynes diagram (pg 40) to be almost exactly like my stock '73 1.7L, including the positions of various connection points.
|
|
|
|
|
1 User(s) are reading this topic (1 Guests and 0 Anonymous Users)
0 Members:

|
Lo-Fi Version | Time is now: 15th May 2024 - 12:11 PM |
Invision Power Board
v9.1.4 © 2024 IPS, Inc.