|
|
|
Porsche, and the Porsche crest are registered trademarks of Dr. Ing. h.c. F. Porsche AG.
This site is not affiliated with Porsche in any way. Its only purpose is to provide an online forum for car enthusiasts. All other trademarks are property of their respective owners. |
|
|


| Jeffs9146 |
 Feb 28 2011, 06:26 PM Feb 28 2011, 06:26 PM
Post
#1
|
|
Ski Bum  Group: Members Posts: 4,062 Joined: 10-January 03 From: Discovery Bay, Ca Member No.: 128 |
OK I got my Maddog mount and it looks like I am still having to do more than just weld it in!
What did you guys do with the Brake Proportioning Valve? Also, how high do I mount this? It looks like it will have to be high to clear the heater pulls? Attached thumbnail(s) 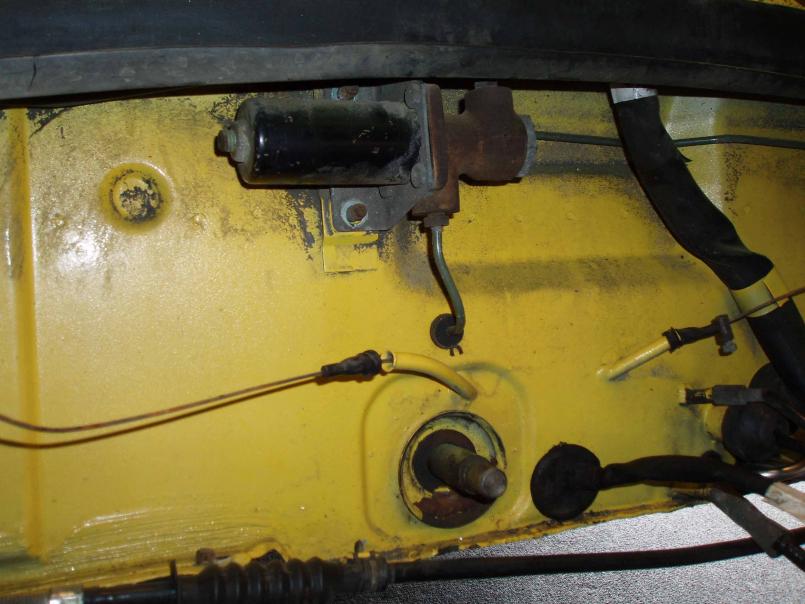 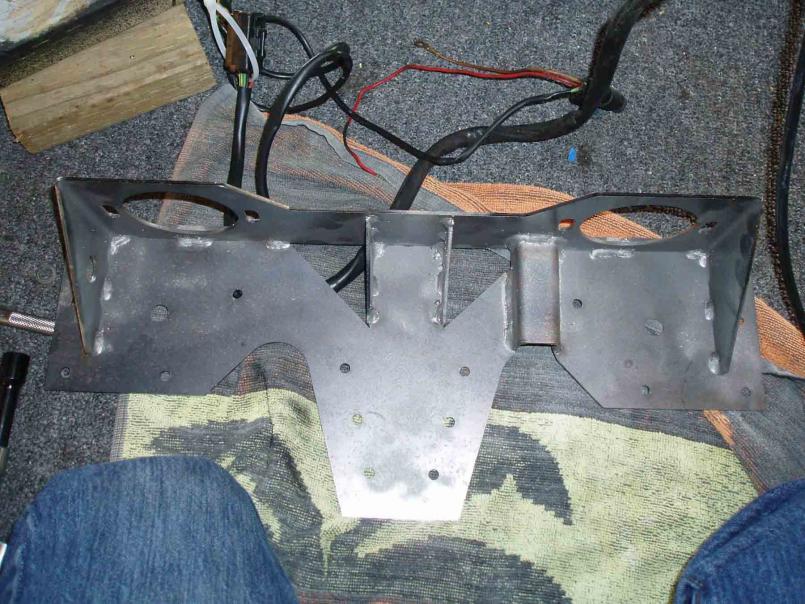
|
   |

 
|
Posts in this topic
 Jeffs9146 Bulkhead 6 Motor Mount! Feb 28 2011, 06:26 PM
 McMark 70-74 cars have the P-valve mounted on this rib. Feb 28 2011, 06:30 PM Jeffs9146 So what should I do for my 75? :idea:
Maddog adve... Feb 28 2011, 06:35 PM
McMark 70-74 cars have the P-valve mounted on this rib. Feb 28 2011, 06:30 PM Jeffs9146 So what should I do for my 75? :idea:
Maddog adve... Feb 28 2011, 06:35 PM
 MDG
So what should I do for my 75? :idea:
Maddog adv... Feb 28 2011, 06:54 PM SLITS Depending upon what you are going to run ....
Car... Feb 28 2011, 06:39 PM sww914 I'm already dead once from that. I was a nice ... Feb 28 2011, 06:45 PM Jeffs9146
7" would put the lower part of the mount be... Feb 28 2011, 06:51 PM SLITS
7" would put the lower part of the mount b... Feb 28 2011, 07:09 PM kconway I'm doing this too. Eric sent me these for pl... Feb 28 2011, 07:01 PM 9146986 K. Conway has a Rich Johnson mount, not Maddog. Feb 28 2011, 07:24 PM kconway
K. Conway has a Rich Johnson mount, not Maddog.
... Feb 28 2011, 07:41 PM MikeSpraggi I don't have a Maddog mount and I am running a... Feb 28 2011, 07:54 PM Eric_Shea
They are basically. All copies of the Vellious ... Feb 28 2011, 07:58 PM Jeffs9146
Lennie and I just decided that we have everyth... Feb 28 2011, 08:09 PM Eric_Shea
This isn't about bias on a 914. It's ab... Feb 28 2011, 08:12 PM Eric_Shea
Mock install the lines and let them be your guid... Feb 28 2011, 08:14 PM Lennies914
Mock install the lines and let them be your gui... Feb 28 2011, 08:24 PM Jeffs9146
Mock install the lines and let them be your gu... Feb 28 2011, 08:31 PM Jeffs9146
Thanks Eric! :asskiss: :DRUNK:
I ment t... Feb 28 2011, 08:17 PM Eric_Shea
Hmmmmmmmm... hard to say with that one. As you ... Feb 28 2011, 08:21 PM SLITS I've had both the RJ and the Maddog .... nothi... Feb 28 2011, 08:42 PM John I made my own bulkhead mount. It's easy espec... Feb 28 2011, 09:54 PM John more
Feb 28 2011, 09:56 PM Jeffs9146 Interesting!!
I guess I could cut the Mad... Feb 28 2011, 11:15 PM John
Interesting!!
I guess I could cut the Ma... Feb 28 2011, 11:39 PM McMark If you wanna move your P-valve, I'm happy to p... Feb 28 2011, 11:19 PM Jeffs9146
If you wanna move your P-valve, I'm happy to ... Feb 28 2011, 11:50 PM maddog Jeff,
You are correct, you will have to re-locate... Mar 1 2011, 06:08 AM McMark The top mounting hole is about 1.5" down from... Mar 1 2011, 11:05 AM Jeffs9146
The top mounting hole is about 1.5" down fro... Mar 1 2011, 11:41 AM McMark
;) Mar 1 2011, 11:57 AM Eric_Shea Dave, for your documentaion, a lot of 74 cars have... Mar 1 2011, 04:22 PM Jeffs9146 After spending some time test fitting and cutting ... Mar 1 2011, 09:15 PM Jeffs9146 Here is a914guys for comparison!
Maddogs woul... Mar 1 2011, 09:23 PM Jeffs9146 Well, here it is installed with the first coat of ... Mar 4 2011, 10:58 AM Jeffs9146 Todays progress!
I have now installed the ear... Mar 7 2011, 08:07 PM Lennies914 Damn Jeff, You sure get alot done when I'm not... Mar 7 2011, 08:50 PM kconway Can anybody provide the dimension from the top of ... Mar 7 2011, 09:58 PM moparrob
Can anybody provide the dimension from the top of... Mar 7 2011, 10:42 PM kconway
Can anybody provide the dimension from the top o... Mar 7 2011, 11:09 PM Jeffs9146 Everyone told me to mount it 7" from the bott... Mar 7 2011, 10:10 PM Jeffs9146 I know, I had to trust those who posted the 7... Mar 7 2011, 11:35 PM RiqueMar
I know, I had to trust those who posted the 7... Mar 16 2011, 07:51 PM
MDG
So what should I do for my 75? :idea:
Maddog adv... Feb 28 2011, 06:54 PM SLITS Depending upon what you are going to run ....
Car... Feb 28 2011, 06:39 PM sww914 I'm already dead once from that. I was a nice ... Feb 28 2011, 06:45 PM Jeffs9146
7" would put the lower part of the mount be... Feb 28 2011, 06:51 PM SLITS
7" would put the lower part of the mount b... Feb 28 2011, 07:09 PM kconway I'm doing this too. Eric sent me these for pl... Feb 28 2011, 07:01 PM 9146986 K. Conway has a Rich Johnson mount, not Maddog. Feb 28 2011, 07:24 PM kconway
K. Conway has a Rich Johnson mount, not Maddog.
... Feb 28 2011, 07:41 PM MikeSpraggi I don't have a Maddog mount and I am running a... Feb 28 2011, 07:54 PM Eric_Shea
They are basically. All copies of the Vellious ... Feb 28 2011, 07:58 PM Jeffs9146
Lennie and I just decided that we have everyth... Feb 28 2011, 08:09 PM Eric_Shea
This isn't about bias on a 914. It's ab... Feb 28 2011, 08:12 PM Eric_Shea
Mock install the lines and let them be your guid... Feb 28 2011, 08:14 PM Lennies914
Mock install the lines and let them be your gui... Feb 28 2011, 08:24 PM Jeffs9146
Mock install the lines and let them be your gu... Feb 28 2011, 08:31 PM Jeffs9146
Thanks Eric! :asskiss: :DRUNK:
I ment t... Feb 28 2011, 08:17 PM Eric_Shea
Hmmmmmmmm... hard to say with that one. As you ... Feb 28 2011, 08:21 PM SLITS I've had both the RJ and the Maddog .... nothi... Feb 28 2011, 08:42 PM John I made my own bulkhead mount. It's easy espec... Feb 28 2011, 09:54 PM John more
Feb 28 2011, 09:56 PM Jeffs9146 Interesting!!
I guess I could cut the Mad... Feb 28 2011, 11:15 PM John
Interesting!!
I guess I could cut the Ma... Feb 28 2011, 11:39 PM McMark If you wanna move your P-valve, I'm happy to p... Feb 28 2011, 11:19 PM Jeffs9146
If you wanna move your P-valve, I'm happy to ... Feb 28 2011, 11:50 PM maddog Jeff,
You are correct, you will have to re-locate... Mar 1 2011, 06:08 AM McMark The top mounting hole is about 1.5" down from... Mar 1 2011, 11:05 AM Jeffs9146
The top mounting hole is about 1.5" down fro... Mar 1 2011, 11:41 AM McMark
;) Mar 1 2011, 11:57 AM Eric_Shea Dave, for your documentaion, a lot of 74 cars have... Mar 1 2011, 04:22 PM Jeffs9146 After spending some time test fitting and cutting ... Mar 1 2011, 09:15 PM Jeffs9146 Here is a914guys for comparison!
Maddogs woul... Mar 1 2011, 09:23 PM Jeffs9146 Well, here it is installed with the first coat of ... Mar 4 2011, 10:58 AM Jeffs9146 Todays progress!
I have now installed the ear... Mar 7 2011, 08:07 PM Lennies914 Damn Jeff, You sure get alot done when I'm not... Mar 7 2011, 08:50 PM kconway Can anybody provide the dimension from the top of ... Mar 7 2011, 09:58 PM moparrob
Can anybody provide the dimension from the top of... Mar 7 2011, 10:42 PM kconway
Can anybody provide the dimension from the top o... Mar 7 2011, 11:09 PM Jeffs9146 Everyone told me to mount it 7" from the bott... Mar 7 2011, 10:10 PM Jeffs9146 I know, I had to trust those who posted the 7... Mar 7 2011, 11:35 PM RiqueMar
I know, I had to trust those who posted the 7... Mar 16 2011, 07:51 PM  |
1 User(s) are reading this topic (1 Guests and 0 Anonymous Users)
0 Members:

|
Lo-Fi Version | Time is now: 2nd April 2026 - 07:57 AM |
Invision Power Board
v9.1.4 © 2026 IPS, Inc.