|
|
|
Porsche, and the Porsche crest are registered trademarks of Dr. Ing. h.c. F. Porsche AG.
This site is not affiliated with Porsche in any way. Its only purpose is to provide an online forum for car enthusiasts. All other trademarks are property of their respective owners. |
|
|

  |

| mgphoto |
 Mar 2 2011, 05:23 PM Mar 2 2011, 05:23 PM
Post
#1
|
|
"If there is a mistake it will find me"  Group: Members Posts: 1,339 Joined: 1-April 09 From: Los Angeles, CA Member No.: 10,225 Region Association: Southern California |
Hello,
I am slowly redoing the rubber surrounding my windows, I am about to replace the "gasket for roll bar" as they are called in the PET, part #'s 914 531 143 10 and 914 531 144 10, more commonly know as the roll bar to window seals. I have the factory repair manuals but I can not find any section related to the roll bar coverings, seals or the anodised trim for that matter. It seems like there might be a channel for the rubber to slide into? Any advice would be greatly appreciated. Thanks, Mike |
   |

 
|
| luskesq |
Mar 2 2011, 10:39 PM
Post
#2
|
|
Member Group: Members Posts: 276 Joined: 24-October 10 From: Fresno, CA Member No.: 12,303 Region Association: Central California |
QUOTE(mgphoto @ Mar 2 2011, 03:23 PM)  Hello, I am slowly redoing the rubber surrounding my windows, I am about to replace the "gasket for roll bar" as they are called in the PET, part #'s 914 531 143 10 and 914 531 144 10, more commonly know as the roll bar to window seals. I have the factory repair manuals but I can not find any section related to the roll bar coverings, seals or the anodised trim for that matter. It seems like there might be a channel for the rubber to slide into? Any advice would be greatly appreciated. Thanks, Mike If what you are referring to is the gaskets that are on what I call the leading edge of the sail panel and the rear of the door windows, there is a trim piece the goes there secured by 3 or 4 screws. The trim piece has a lip on both sides (i.e. vertically if that makes sense) that the rubber goes into. It is a fairly easy install if you push one side in from top to bottom (or vis-a-versa) and use a little silicon grease on the other side and use something like a popsicle stick to press it in. Hope that helps. Keith |
|
|
|
| mgphoto |
Mar 8 2011, 01:54 PM
Post
#3
|
|
"If there is a mistake it will find me" Group: Members Posts: 1,339 Joined: 1-April 09 From: Los Angeles, CA Member No.: 10,225 Region Association: Southern California |
QUOTE(luskesq @ Mar 2 2011, 08:39 PM) QUOTE(mgphoto @ Mar 2 2011, 03:23 PM) Hello, I am slowly redoing the rubber surrounding my windows, I am about to replace the "gasket for roll bar" as they are called in the PET, part #'s 914 531 143 10 and 914 531 144 10, more commonly know as the roll bar to window seals. I have the factory repair manuals but I can not find any section related to the roll bar coverings, seals or the anodised trim for that matter. It seems like there might be a channel for the rubber to slide into? Any advice would be greatly appreciated. Thanks, Mike If what you are referring to is the gaskets that are on what I call the leading edge of the sail panel and the rear of the door windows, there is a trim piece the goes there secured by 3 or 4 screws. The trim piece has a lip on both sides (i.e. vertically if that makes sense) that the rubber goes into. It is a fairly easy install if you push one side in from top to bottom (or vis-a-versa) and use a little silicon grease on the other side and use something like a popsicle stick to press it in. Hope that helps. Keith Hey Keith, Thanks for the reply, I tried to do it but the new rubber is much to stiff for a popsicle stick, I worked it for an hour and got about 2 inches into it and broke 2 sticks (although the ice cream treat is a welcome diversion) , I replace the old gasket using the popsicle stick method without problem. I will look for something a bit sturdier than the stick and I think I may need to take off the interior piece so I can work it from inside out, the outside lip of the gasket curls around the trim piece making it very awkward to push the edge into the groove. Hope that makes sense. More suggestions are very welcome. Thanks again, Mike |
|
|
|
| mrdkrantz |
Mar 8 2011, 02:23 PM
Post
#4
|
|
Newbie Group: Members Posts: 35 Joined: 28-December 10 From: Eastern Shore MD Member No.: 12,532 Region Association: North East States |
I had to use some flange pliers to straighten out my channels before I could replace mine. I re-bent the aluminun channels out a little bigger, slid the rubber in, then re-bent the channel back over. I used a rubber mallet and a wood "dolley" to support the metal as I shaped it tight to the rubber. I didnt bend the channel out a lot to make the rubber slide in, maybe a 1/32? It still took some elbow gease to push it in the channel. Took about 20mins for the first side, about 15 mins for the second. My car isnt perfect and Im not planning on winning any awards. I am happy with the results, My car doesnt leak anymore. Hope this helps
|
|
|
|
| bandjoey |
Mar 8 2011, 04:01 PM
Post
#5
|
|
bandjoey Group: Members Posts: 4,926 Joined: 26-September 07 From: Bedford Tx Member No.: 8,156 Region Association: Southwest Region |
I used PB Blaster. Really slick stuff. I also opened the channels and re-crimped them after the install. Using a small rubber mallet I hit downward glancing blows and that total made the install about 10 minutes start to finish. (IMG:style_emoticons/default/smash.gif)
|
|
|
|
| mgphoto |
Mar 11 2011, 01:58 PM
Post
#6
|
|
"If there is a mistake it will find me" Group: Members Posts: 1,339 Joined: 1-April 09 From: Los Angeles, CA Member No.: 10,225 Region Association: Southern California |
Thanks everyone for the great advice, I did use Astroglide as a lube for the rubber, and I fashioned a tool to push the rubber lip into the channel, see photo below (a one inch wood chisel with the point blunted). It took all of my 250 lbs weight behind it, pushing maybe an 1/8 inch at a time. And if I ever do it again, I think a modification to the tool, a protrusion of about 1/4 inch on one side of the tool will help it push the lip further into the channel without a lot of twisting.
Good luck and I hope it helps someone else, Mike 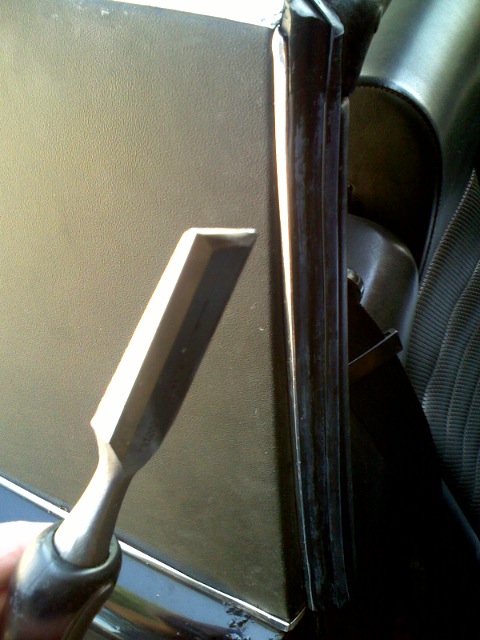 |
|
|
|
| Pat Garvey |
Mar 11 2011, 05:29 PM
Post
#7
|
|
Do I or don't I...........? Group: Members Posts: 5,899 Joined: 24-March 06 From: SE PA, near Philly Member No.: 5,765 Region Association: North East States |
QUOTE(mgphoto @ Mar 11 2011, 02:58 PM) Thanks everyone for the great advice, I did use Astroglide as a lube for the rubber, and I fashioned a tool to push the rubber lip into the channel, see photo below (a one inch wood chisel with the point blunted). It took all of my 250 lbs weight behind it, pushing maybe an 1/8 inch at a time. And if I ever do it again, I think a modification to the tool, a protrusion of about 1/4 inch on one side of the tool will help it push the lip further into the channel without a lot of twisting. Good luck and I hope it helps someone else, Mike Good ole Astroglide! I actually used bar soap when I did mine last. Worked OK & only had two bloody knuckles! Pat |
|
|
|
|
1 User(s) are reading this topic (1 Guests and 0 Anonymous Users)
0 Members:

|
Lo-Fi Version | Time is now: 17th May 2024 - 04:21 PM |
Invision Power Board
v9.1.4 © 2024 IPS, Inc.