|
|
|
Porsche, and the Porsche crest are registered trademarks of Dr. Ing. h.c. F. Porsche AG.
This site is not affiliated with Porsche in any way. Its only purpose is to provide an online forum for car enthusiasts. All other trademarks are property of their respective owners. |
|
|

  |

| Rob-O |
 Mar 6 2011, 01:52 PM Mar 6 2011, 01:52 PM
Post
#1
|
|
Senior Member  Group: Members Posts: 1,252 Joined: 5-December 03 From: Mansfield, TX Member No.: 1,419 Region Association: Southwest Region |
I've looked in the member vendor section and see that we have some folks who restore gauges. But I'm kind of wanting to tackle this one myself. I'll replace the plastic lense with glass, but there are two areas I'm unsure about.
One, has anybody painted their needles themselves? I notice that when I pull the gauges apart (the fuel sender for example) the color of the needle is more of a red. The part that is exposed to sunlight is usually more of an orange. If you've done this, chime in. Have you kept the needle on the gauge or removed it (I've read that removing can be bad for speedo, etc.). How did you paint it if it was still on the gauge? What type of paint did you use? The other area that I was giving some though to was the little 'low fuel' window that is on the fuel gauge. All the ones I've seen are almost a clear now, but originally they were red as well. Those restored by North Hollywood and others usually have this redone as well. But other than that I've not seen these. I've taken apart the gauges and the covering for the little window looks like a little piece of transparent plastic that is taped in place. The tape holding it on the gauge looks pretty stout. But other than that it doesn't appear there is much to it. If you've replaced the window, what did you use? 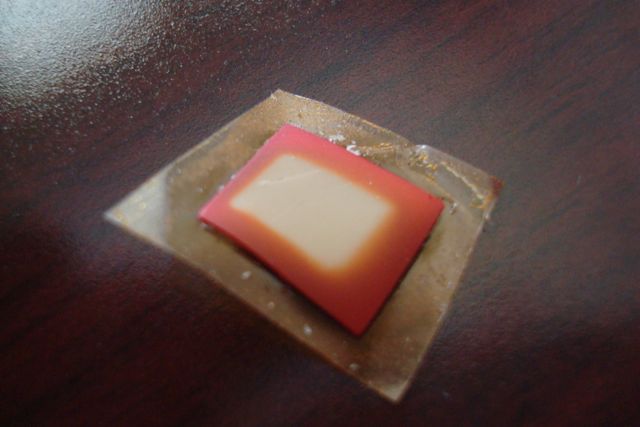 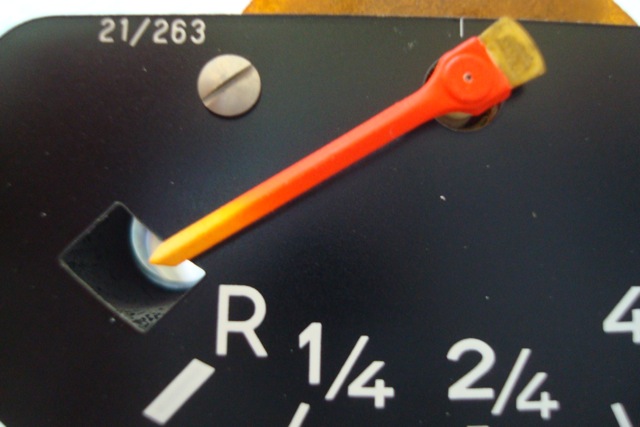 |
   |

 
|
| John |
Mar 6 2011, 02:16 PM
Post
#2
|
|
member? what's a member? Group: Members Posts: 3,393 Joined: 30-January 04 From: Evansville, IN (SIRPCA) Member No.: 1,615 Region Association: None |
I'm prepared for the flaming to begin, but, I use a small section of a red SOLO plastic cup (disposable plastic cup) for the translucent plastic and I use clear packing tape cut to size for the tape. It has held up ok for me.
I have never painted the needles. I would assume that they are some DAYGLOW orange color. I would be afraid to try to match the existing color. If you find a good match for the color, post it. That would be good information. |
|
|
|
| Rob-O |
Mar 6 2011, 02:47 PM
Post
#3
|
|
Senior Member Group: Members Posts: 1,252 Joined: 5-December 03 From: Mansfield, TX Member No.: 1,419 Region Association: Southwest Region |
Thanks for the reply John. I probably won't use the red Solo cup (although it is ingenious). But I will check the Internet to see what I can come up with on pieces of red transparent plastic.
I used to be a painter, so I can find the color of reddish orange (it does look like a Dayglow color). But as of yet I haven't pulled the needle from the gauge. Don't want to tear anything up! |
|
|
|
| dadaDaveed |
Mar 6 2011, 02:59 PM
Post
#4
|
|
Member Group: Members Posts: 111 Joined: 19-February 09 From: San Antonio, TX Member No.: 10,071 Region Association: Southwest Region |
I recently repaint my needles. Used Model Master "Flourescent Red" from a hobby shop. It's a great match for the original color. I kept the needles on and taped around them.
 |
|
|
|
| dadaDaveed |
Mar 6 2011, 03:04 PM
Post
#5
|
|
Member Group: Members Posts: 111 Joined: 19-February 09 From: San Antonio, TX Member No.: 10,071 Region Association: Southwest Region |
Oh, and use a small brush that's wider than the needles. The more strokes you use for coverage, the more gummed up the texture will be.
-DB QUOTE(dadaDaveed @ Mar 6 2011, 02:59 PM)  I recently repaint my needles. Used Model Master "Flourescent Red" from a hobby shop. It's a great match for the original color. I kept the needles on and taped around them. |
|
|
|
| Rob-O |
Mar 6 2011, 03:07 PM
Post
#6
|
|
Senior Member Group: Members Posts: 1,252 Joined: 5-December 03 From: Mansfield, TX Member No.: 1,419 Region Association: Southwest Region |
Nice, I thought about the model paint. Just wasn't sure if that would hold up. Guess it doesn't matter the car sees limited time in the sun.
Did you paint the 'red line' portion of your gauge? The color there also looks pretty good compared to my faded orange 'red line' area. Also, did you repaint your own rings? They look really good. |
|
|
|
| dadaDaveed |
Mar 6 2011, 03:17 PM
Post
#7
|
|
Member Group: Members Posts: 111 Joined: 19-February 09 From: San Antonio, TX Member No.: 10,071 Region Association: Southwest Region |
The redline area on the tach is original.
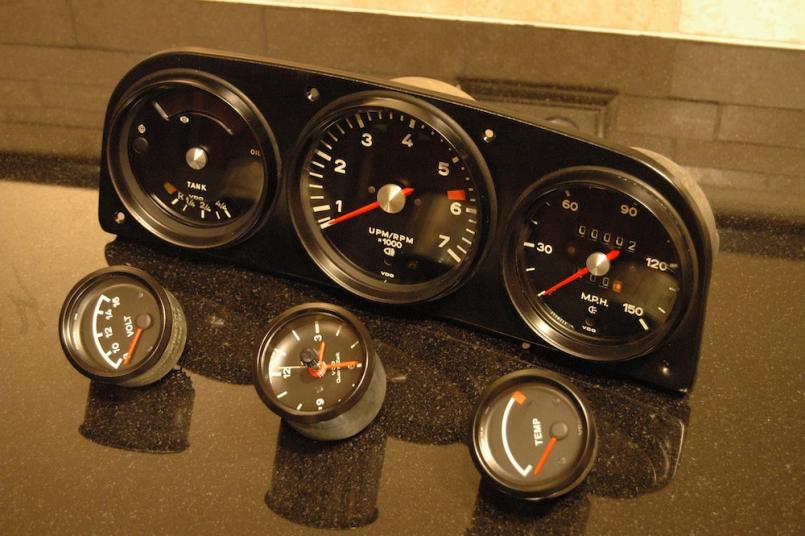
I still have to address the gas warning light. Mine is faded pretty badly. I was thinking just some clear red tape, like they sell at auto parts stores. For the rings, I hit them with #3 and 0000 steel wool, then a tiny brass wire wheel on a Dremel to get the remaining surface rust. Then painted with Duplicolor semi gloss black. 2 light coats, then 1 medium/heavy. Two of the console gauges had significant rust on the rings, so I used a sanding wheel on the dremel to smooth them out. |
|
|
|
| dadaDaveed |
Mar 6 2011, 03:30 PM
Post
#8
|
|
Member Group: Members Posts: 111 Joined: 19-February 09 From: San Antonio, TX Member No.: 10,071 Region Association: Southwest Region |
It may be too late for this... but also notice how the trim ring on my speedometer is all chewed up, but the others aren't? (None of them have been resealed yet) That's because the speedo had been opened once before with a screw driver.
For the others, I used a paint can opener... I ground the nose of it on a grinding wheel until it was sharp enough to fit between the trim ring and gauge housing. Go slowly with it and it'll leave the trim rings in pretty decent shape. |
|
|
|
| Rob-O |
Mar 6 2011, 03:52 PM
Post
#9
|
|
Senior Member Group: Members Posts: 1,252 Joined: 5-December 03 From: Mansfield, TX Member No.: 1,419 Region Association: Southwest Region |
I didn't notice the ring until you brought it up. I *thought* the early gauge (silver button) rings were different than the later gauges (no silver button). Your rings seem to stand proud of the gauges more than mine do.
I used to have a set around of the early gauges and the trim rings looked like a real bear to get off. Mine weren't too bad on these later gauges. I just used a small screwdriver and pried a little bit as I worked my way around the circumference of the gauge. I've pulled that transparent piece off my gauge already. I just took a micrometer to it and it looks like it's about .035 mm thick. I may take a look at the local auto parts store and see what they have available for rear tail light lens repair kits. Maybe the thickness of that stuff is similar. I also like the fact that since tail lights are on the outside of the car, that the repair kit pieces may have some type of UV stabilization. I like the idea of just hitting the rings with some paint form the local hardware store, but I'm afraid of how well they'll hold up. I may just get some professional automotive paint and shot them with that. It should be a little more robust so the paint doesn't come off when cleaning the area around the gauges. Besides, my plan is to get some 'crinkle' paint for the gauge cluster holder. I just heard back from the local glass guy here in town and he's working on a quote to make up pieces of glass for the gauges so I can replace the plastic. |
|
|
|
| Rob-O |
Mar 6 2011, 04:55 PM
Post
#10
|
|
Senior Member Group: Members Posts: 1,252 Joined: 5-December 03 From: Mansfield, TX Member No.: 1,419 Region Association: Southwest Region |
Well, here's what I've done so far. I actually started looking around the Internet for some red transparent plastic that was roughly the same thickness as the piece that was on the instrument originally. I could've dug deeper but one promising route was to get a sample of a red transparent business card. They have them in different thicknesses but I didn't think it would be nice to have them ship me out a sample when I had no intention of purchasing product from them.
Another was binder covers for reports. You typically find these at Staples and other office supply stores. Then I thought about the little tabs go on hanging file folders. I knew we had some around the house and lo and behold, we had some of the red tabs! I pulled one of the extras that we had and cut it to size and taped it into the gauge. It isn't quite as thick as the original, but it's close. It isn't as dark or as saturated as the original either, but it looks much better than what was in there. Pic below. Now I just need to pick up some hobby paint and get the needle painted. 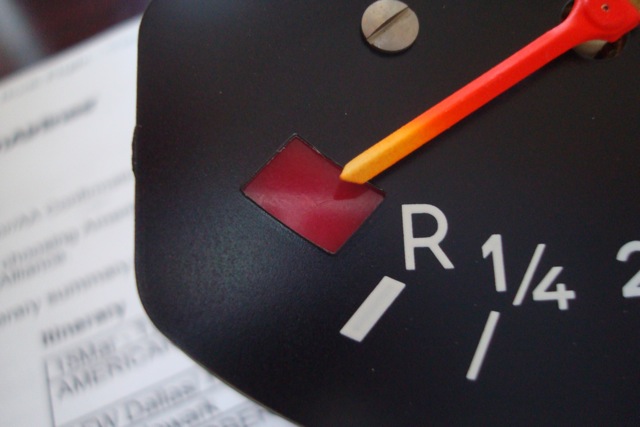 |
|
|
|
| zonedoubt |
Mar 7 2011, 12:38 AM
Post
#11
|
|
Canadian Member Group: Members Posts: 668 Joined: 14-May 03 From: Vancouver, BC Member No.: 696 Region Association: Canada |
Good idea! How does it look lit up?
|
|
|
|
| biggy72 |
Apr 14 2011, 12:10 AM
Post
#12
|
|
Member Group: Members Posts: 209 Joined: 14-January 06 From: Olympia, WA Member No.: 5,418 Region Association: Pacific Northwest |
I know this thing has been dead for a little while, but I just pulled mine out tonight to clean up.
So in order to get the trim ring and glass off you just pry the trim ring gently from the back side? I just want to be sure before I accidently hurt one. |
|
|
|
| Valy |
Apr 14 2011, 12:31 AM
Post
#13
|
|
Senior Member Group: Members Posts: 1,676 Joined: 6-April 10 From: Sunnyvale, CA Member No.: 11,573 Region Association: Northern California |
QUOTE(Rob-O @ Mar 6 2011, 03:55 PM) Now I just need to pick up some hobby paint and get the needle painted. I used Rustoleum 1954830 - Fluorescent Orange spray for the needles. Perfect match! (IMG:http://www.914world.com/bbs2/uploads_offsite/www.rustoleum.com-11573-1302762667.1.jpg) |
|
|
|
| Bartlett 914 |
Apr 14 2011, 05:53 AM
Post
#14
|
|
Advanced Member Group: Members Posts: 2,216 Joined: 30-August 05 From: South Elgin IL Member No.: 4,707 Region Association: Upper MidWest |
I would suggest before you close the thing up that you illuminate the lamp to see what it looks like when on. I was doing similar work on my high beam light. I used blue plastic shim stock. Off and it looked great but on it was almost transparent. I think I ended up using 2 layers.
QUOTE(Rob-O @ Mar 6 2011, 05:55 PM) Well, here's what I've done so far. I actually started looking around the Internet for some red transparent plastic that was roughly the same thickness as the piece that was on the instrument originally. I could've dug deeper but one promising route was to get a sample of a red transparent business card. They have them in different thicknesses but I didn't think it would be nice to have them ship me out a sample when I had no intention of purchasing product from them. Another was binder covers for reports. You typically find these at Staples and other office supply stores. Then I thought about the little tabs go on hanging file folders. I knew we had some around the house and lo and behold, we had some of the red tabs! I pulled one of the extras that we had and cut it to size and taped it into the gauge. It isn't quite as thick as the original, but it's close. It isn't as dark or as saturated as the original either, but it looks much better than what was in there. Pic below. Now I just need to pick up some hobby paint and get the needle painted. |
|
|
|
| Rob-O |
Apr 14 2011, 08:18 AM
Post
#15
|
|
Senior Member Group: Members Posts: 1,252 Joined: 5-December 03 From: Mansfield, TX Member No.: 1,419 Region Association: Southwest Region |
Hey Biggy, yes, you can just pullthe trim ring. It deforms slightly when you pry on the edge of it where it meets the metal of the gauge itself. You just kind of work your way around the trim ring, prying a little at a time. Personally I used a pick. One end was straight and the other had a little 90 degree bend in it. It was perfect for getting between the trim ring and the gauge and lifting the trim ring a little.
On another note, I haven't put the dash lights in to check it, but I did put an LED light behind it to see what it would look like. I will most likely need to put another sheet of the red in as the low level looks somewhat pink when lit up from behind. Probably wouldn't look as bad with just the dash lights (the led flashlight was definitely brighter than the dash lights), but just to be on the safe side I'll ad another layer of the red sheet. |
|
|
|
| markb |
Apr 14 2011, 12:27 PM
Post
#16
|
|
914less :( Group: Members Posts: 5,449 Joined: 22-January 03 From: Nipomo, CA Member No.: 180 Region Association: Central California |
I used Flourescent Red model paint on my needles as well, putting a post-it under the needle to keep the paint off the rest of the gauge. For the clear red/orange window, I found some paint at the hobby store used for making fake stained glass. It came out nice. Sorry, no pics.
|
|
|
|
| bandjoey |
Apr 14 2011, 01:27 PM
Post
#17
|
|
bandjoey Group: Members Posts: 4,926 Joined: 26-September 07 From: Bedford Tx Member No.: 8,156 Region Association: Southwest Region |
If U search there are multiple write up's on guage rebuilds. Several also covered adding additional lights inside. There might be a World vendor doing this too. Check the venderthread.
|
|
|
|
| Markl |
Apr 15 2011, 10:31 PM
Post
#18
|
|
Member Group: Members Posts: 75 Joined: 14-September 09 From: Colorado Member No.: 10,802 Region Association: Rocky Mountains |
Check VW vendors - they sell, or at least used to, kits with all the plastic (red, blue, green) and tape, just like factory.
|
|
|
|
| Dr Evil |
Apr 16 2011, 05:57 AM
Post
#19
|
|
Send me your transmission! Group: Members Posts: 23,000 Joined: 21-November 03 From: Loveland, OH 45140 Member No.: 1,372 Region Association: MidAtlantic Region |
I always customize my gauges. I like white needles and blue LED lights. Blue lights suck with red needles.
I also used the model paint. For the plastic, I use what ever works. Plastic cup is fine with me. |
|
|
|
|
1 User(s) are reading this topic (1 Guests and 0 Anonymous Users)
0 Members:

|
Lo-Fi Version | Time is now: 20th May 2024 - 10:11 PM |
Invision Power Board
v9.1.4 © 2024 IPS, Inc.