|
|
|
Porsche, and the Porsche crest are registered trademarks of Dr. Ing. h.c. F. Porsche AG.
This site is not affiliated with Porsche in any way. Its only purpose is to provide an online forum for car enthusiasts. All other trademarks are property of their respective owners. |
|
|


| Engman |
 May 22 2004, 02:52 PM May 22 2004, 02:52 PM
Post
#21
|
|
Zoisite  Group: Benefactors Posts: 1,349 Joined: 25-March 03 From: New Albany, IN Member No.: 475 |
Well after several months, $ and patience they are done. Brad has a set - hopefully he will post some better pics of the layout. Please see http://engmanparts.com for details
Attached image(s) 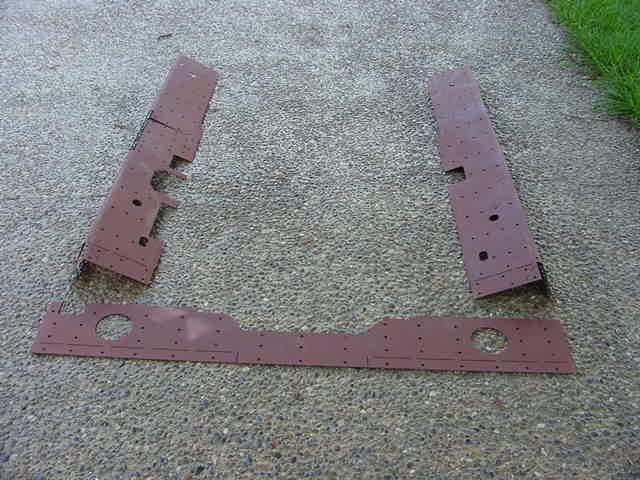
|
   |

 
|
Posts in this topic
 Engman Inner Long Reinforcement Kits May 22 2004, 02:52 PM
 Engman Another.... May 22 2004, 02:53 PM Engman More May 22 2004, 02:54 PM Engman asdf May 22 2004, 02:55 PM Engman zxcv May 22 2004, 02:57 PM Engman Packaged! May 22 2004, 02:58 PM neo914-6 Mark,
Is this the "U" bracing Brad recommended in ... May 22 2004, 11:16 PM seanery Dude!
those look sweet!!! May 23 2004, 07:19 AM Engman These are 16g BTW. Today I performed some measurem... May 23 2004, 12:38 PM Pnambic I may be wrong here, but I think I remember Brad t... May 24 2004, 03:18 PM Rob Ways This looks cool..... but does it work? Has it been... May 24 2004, 10:24 PM seanery ... May 25 2004, 07:48 AM JmuRiz So do you have to tack all those holes? Just chec... May 25 2004, 11:13 AM soloracer If you are installing a roll cage would these be n... May 27 2004, 08:46 AM Engman Yes this was developed based upon Brads input - He... May 27 2004, 01:28 PM Brad Roberts Mark nailed this kit EXACTLY like I envisioned. I ... Jun 18 2004, 08:38 PM trekkor :chow: Jun 19 2004, 12:20 AM Lawrence Mark,
Does your kit interfere with the reinstalla... Jun 19 2004, 11:13 PM Engman Nope - hole is in it for the screw on the long.
... Jun 20 2004, 11:15 AM trekkor Do you recommend installing these plates with the ... Jun 20 2004, 09:25 PM Engman You definately want the pressure off the longs - u... Jun 22 2004, 09:38 AM seanery quick question about carpet fit.
Does a stock carp... Jun 22 2004, 10:00 AM Engman Yes - these vitually mold to the longs.
M Jun 22 2004, 10:14 AM goobu How much do they weigh? Jun 27 2004, 07:40 PM McMark When trekkor installed his he mentioned they were ... Jun 28 2004, 12:17 AM trekkor I stepped on the bathroom scale, took note of my l... Jun 28 2004, 08:21 AM RAR Do these require the removal of any interior sheet... Jun 28 2004, 07:23 PM Engman No removal of any metal inside is required. You do... Jun 28 2004, 08:30 PM Gint Mark,
I need to prder one of your kits and have i... Jun 30 2004, 08:08 AM corpselaurel Mark I sent you an email and PM. Jul 12 2004, 06:51 AM Engman PM sent - I currently have some in stock.
M Jul 12 2004, 02:12 PM trekkor see the complete install photo documentary:here... Jul 19 2004, 12:56 AM retro74 Looks good. Working on my 71 and these might be a... Aug 12 2004, 06:24 PM jgiroux67 Do you make them only in 16 gauge? Would 18 be too... Aug 12 2004, 07:32 PM jgiroux67 Also, do you need to strip the paint on the longs ... Aug 12 2004, 07:37 PM Engman 16G is the way to go. 18G could be used but the fl... Aug 12 2004, 07:44 PM trekkor <... Aug 13 2004, 08:48 PM Engman I just got another batch of these run for those th... Sep 28 2004, 08:07 PM ewdysar Received my inner long kit, good looking product. ... Jan 4 2005, 06:14 PM MecGen Hi
I just sent a PM regarding that inner kit... ma... Feb 13 2005, 10:51 AM trekkor This kit is a great way to upgrade the overall fee... Feb 13 2005, 10:50 PM Lawrence Does that 6 hours include all the prep work, tar r... Feb 14 2005, 08:26 AM Lawrence Feb 14 2005, 08:29 AM spunone Heh Mark Paypal has been sent thanks again I add i... Feb 14 2005, 04:14 PM trekkor
Engman Another.... May 22 2004, 02:53 PM Engman More May 22 2004, 02:54 PM Engman asdf May 22 2004, 02:55 PM Engman zxcv May 22 2004, 02:57 PM Engman Packaged! May 22 2004, 02:58 PM neo914-6 Mark,
Is this the "U" bracing Brad recommended in ... May 22 2004, 11:16 PM seanery Dude!
those look sweet!!! May 23 2004, 07:19 AM Engman These are 16g BTW. Today I performed some measurem... May 23 2004, 12:38 PM Pnambic I may be wrong here, but I think I remember Brad t... May 24 2004, 03:18 PM Rob Ways This looks cool..... but does it work? Has it been... May 24 2004, 10:24 PM seanery ... May 25 2004, 07:48 AM JmuRiz So do you have to tack all those holes? Just chec... May 25 2004, 11:13 AM soloracer If you are installing a roll cage would these be n... May 27 2004, 08:46 AM Engman Yes this was developed based upon Brads input - He... May 27 2004, 01:28 PM Brad Roberts Mark nailed this kit EXACTLY like I envisioned. I ... Jun 18 2004, 08:38 PM trekkor :chow: Jun 19 2004, 12:20 AM Lawrence Mark,
Does your kit interfere with the reinstalla... Jun 19 2004, 11:13 PM Engman Nope - hole is in it for the screw on the long.
... Jun 20 2004, 11:15 AM trekkor Do you recommend installing these plates with the ... Jun 20 2004, 09:25 PM Engman You definately want the pressure off the longs - u... Jun 22 2004, 09:38 AM seanery quick question about carpet fit.
Does a stock carp... Jun 22 2004, 10:00 AM Engman Yes - these vitually mold to the longs.
M Jun 22 2004, 10:14 AM goobu How much do they weigh? Jun 27 2004, 07:40 PM McMark When trekkor installed his he mentioned they were ... Jun 28 2004, 12:17 AM trekkor I stepped on the bathroom scale, took note of my l... Jun 28 2004, 08:21 AM RAR Do these require the removal of any interior sheet... Jun 28 2004, 07:23 PM Engman No removal of any metal inside is required. You do... Jun 28 2004, 08:30 PM Gint Mark,
I need to prder one of your kits and have i... Jun 30 2004, 08:08 AM corpselaurel Mark I sent you an email and PM. Jul 12 2004, 06:51 AM Engman PM sent - I currently have some in stock.
M Jul 12 2004, 02:12 PM trekkor see the complete install photo documentary:here... Jul 19 2004, 12:56 AM retro74 Looks good. Working on my 71 and these might be a... Aug 12 2004, 06:24 PM jgiroux67 Do you make them only in 16 gauge? Would 18 be too... Aug 12 2004, 07:32 PM jgiroux67 Also, do you need to strip the paint on the longs ... Aug 12 2004, 07:37 PM Engman 16G is the way to go. 18G could be used but the fl... Aug 12 2004, 07:44 PM trekkor <... Aug 13 2004, 08:48 PM Engman I just got another batch of these run for those th... Sep 28 2004, 08:07 PM ewdysar Received my inner long kit, good looking product. ... Jan 4 2005, 06:14 PM MecGen Hi
I just sent a PM regarding that inner kit... ma... Feb 13 2005, 10:51 AM trekkor This kit is a great way to upgrade the overall fee... Feb 13 2005, 10:50 PM Lawrence Does that 6 hours include all the prep work, tar r... Feb 14 2005, 08:26 AM Lawrence Feb 14 2005, 08:29 AM spunone Heh Mark Paypal has been sent thanks again I add i... Feb 14 2005, 04:14 PM trekkor 


