|
|
|
Porsche, and the Porsche crest are registered trademarks of Dr. Ing. h.c. F. Porsche AG.
This site is not affiliated with Porsche in any way. Its only purpose is to provide an online forum for car enthusiasts. All other trademarks are property of their respective owners. |
|
|


| saigon71 |
 May 2 2011, 07:33 PM May 2 2011, 07:33 PM
Post
#41
|
|
Advanced Member  Group: Members Posts: 2,026 Joined: 1-June 09 From: Dillsburg, PA Member No.: 10,428 Region Association: MidAtlantic Region |
I have now attended the Hershey Porsche show three times without an operational teener...NOT being part of the caravan is getting old. (IMG:style_emoticons/default/mad.gif)
Finally got my new inner long welded in with doubler plates on all seams. Verified the incline of the new long with an incline gauge (with the car level) following Jeff Hails build thread. Door operates well! Entire inner long has been coated with rust encapsulator. Still have a long way to go but I am hoping that this was the toughest part. Thanks to Scotty B, Jeff Hail, and everyone else who has posted a build thread on this topic. I have read all of them & learned a lot. (IMG:style_emoticons/default/beerchug.gif) Bob 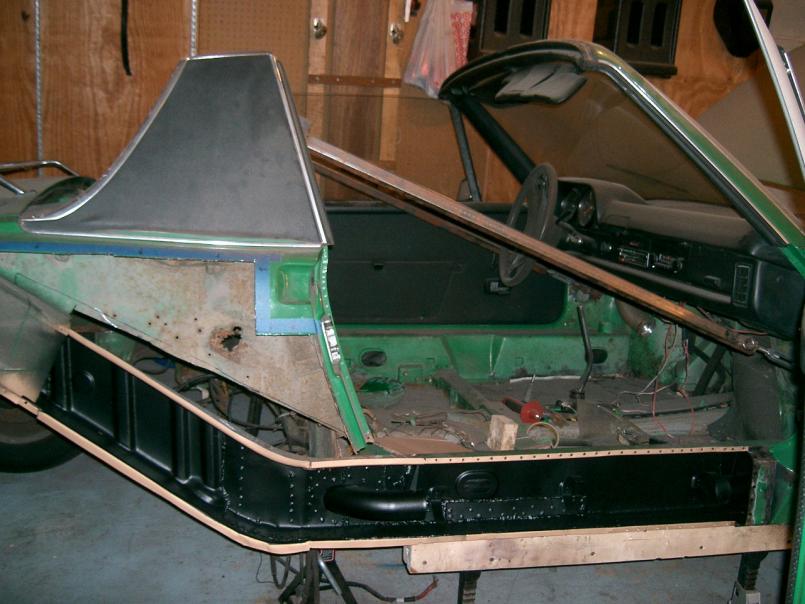 |
   |

 
|
Posts in this topic
saigon71 Progress May 2 2011, 07:33 PM Racer Chris That looks real good Bob!
:cheer: May 2 2011, 08:17 PM
Racer Chris That looks real good Bob!
:cheer: May 2 2011, 08:17 PM
 saigon71
That looks real good Bob!
:cheer:
Thanks C... May 2 2011, 08:42 PM Racer Chris
...I need to stay away from drunken cupcake displ... May 3 2011, 09:48 PM mrgjones That long is a thing of beauty. Good job May 2 2011, 08:44 PM Scarlet75 Looking good Bob. Keep up the momentum. Remember o... May 3 2011, 03:13 AM hot_shoe914 Looking good Bob, stay focused and keep up the goo... May 3 2011, 10:25 AM rallysport70 Bob, I agree, your work looks great :worship: . Ke... May 3 2011, 10:33 AM scotty b Nice job Bob, ya hob nob snob:) :first: May 3 2011, 10:00 PM saigon71
Nice job Bob, ya hob nob snob:) :first:
I am c... May 6 2011, 09:02 AM PanelBilly I think you should post some action shots next tim... May 3 2011, 11:07 PM saigon71
I think you should post some action shots next ti... May 8 2011, 07:11 PM scotty b is it done yet ? :poke: May 5 2011, 07:55 PM MikeSpraggi Bob, that is a thing of beauty! I'm kinda ... May 5 2011, 08:23 PM jsayre914 :cheer:
Looks great!
Now drive it down here ... May 5 2011, 09:44 PM saigon71 Finished reinforceing plate:
Cutting back end of... May 8 2011, 07:17 PM saigon71 Got some more work done over the weekend.
New cha... May 8 2011, 07:28 PM Vacca Rabite Holy crap!
Fantastic!
Zach May 8 2011, 07:31 PM saigon71 More weekend progress...outer clam shell welded on... May 8 2011, 07:50 PM Scarlet75 Looks like someone is gaining a little bit of mome... May 9 2011, 03:43 AM hot_shoe914 Very nice Bob, you look like you have been taking ... May 9 2011, 09:04 AM saigon71
Very nice Bob, you look like you have been taking... May 9 2011, 01:50 PM Ian Stott Beautiful work like that is the reason we never wa... May 9 2011, 03:31 PM saigon71
Beautiful work like that is the reason we never w... May 23 2011, 08:22 PM saigon71 While waiting on the inner "ply" for the... May 15 2011, 06:32 PM saigon71 Cutting - continued:
Luckily, it looks like the ... May 15 2011, 06:42 PM draganc
Cutting - continued:
Luckily, it looks like the... May 21 2011, 03:46 PM saigon71
Cutting - continued:
Luckily, it looks like th... May 23 2011, 08:26 PM saigon71 Fabrication - continued:
Finally finished the fr... May 15 2011, 06:49 PM saigon71 Shingle tar plug glued in:
May 15 2011, 06:50 PM kg6dxn Nice work! :first: May 15 2011, 09:45 PM Scarlet75 Looking good Bob keep it up :welder: May 16 2011, 03:26 AM saigon71 Thanks gents!
11 months till Hershey...11 mon... May 16 2011, 05:22 AM type47 Like Spraggi says, don't set yourself a deadli... May 16 2011, 06:14 AM saigon71 Zipped up the seams on the replacement floorpan pi... May 17 2011, 07:10 PM saigon71 Found another large spot of rust where the front t... May 17 2011, 07:23 PM mepstein
Found another large spot of rust where the front ... May 17 2011, 07:53 PM saigon71 Restoration Design shipped me the inner ply for th... May 23 2011, 07:26 PM saigon71 Dropped the rusty fuel tank off at the radiator sh... May 23 2011, 07:27 PM saigon71 The area where the front hood release was rusted s... May 23 2011, 07:48 PM saigon71 With the burn thru problem and the fact that it wa... May 23 2011, 07:50 PM saigon71 I am not sure my liver can survive the rush of 40t... May 30 2011, 07:16 PM saigon71 Everything lined up pretty well, except for one se... May 30 2011, 07:32 PM saigon71 DAMNIT!!! After filling about 7 roset... May 30 2011, 07:48 PM saigon71 Picked up my gas tank from the radiator shop last ... Jun 5 2011, 07:06 AM Scarlet75 Looking good Bob keep with it. Hershey is right ar... Jun 5 2011, 07:14 AM saigon71
Looking good Bob keep with it. Hershey is right a... Jun 5 2011, 07:34 AM saigon71 Welded up the seams on the outer wheelhouse, then ... Jun 5 2011, 07:21 AM saigon71 Progress continues at a slow, but steady pace.
Co... Jun 12 2011, 09:15 AM saigon71 Put the tank back together with a new Foley fuel s... Jun 12 2011, 09:26 AM saigon71 I wasn't in the mood to spray primer yesterday... Jun 12 2011, 09:34 AM saigon71 Shed - continued:
Jun 12 2011, 09:38 AM saigon71 RE: Progress Jun 12 2011, 09:39 AM scotty b FWIW the panel fit issues you have encounterd are ... Jun 12 2011, 11:24 AM saigon71
FWIW the panel fit issues you have encounterd are... Jun 22 2011, 03:45 PM saigon71 Got a decent amount done last weekend. Installed ... Jun 22 2011, 03:24 PM saigon71 RE: Progress Jun 22 2011, 03:26 PM saigon71 RE: Progress Jun 22 2011, 03:29 PM saigon71
I was also able to get the rear chunk of floorpa... Jun 22 2011, 03:32 PM saigon71 Finished up the repair of the front hood cable att... Jun 22 2011, 03:37 PM jsayre914 :trophy:
Wow Bob, your almost done, Looks great... Jun 22 2011, 04:13 PM dlee6204 Wow, keep up the good work! :trophy: Jun 22 2011, 04:19 PM Series9 It's nice to watch someone else work. B:)
... Jun 23 2011, 07:05 PM scotty b
It's nice to watch someone else work. B:)
... Jun 23 2011, 07:24 PM saigon71 Problems with both the Mazda and motorcycle have c... Jul 20 2011, 02:37 PM saigon71 Ended up with a bit of a mess where the floorpan m... Jul 20 2011, 02:47 PM saigon71
Outer firewall patch:
Jul 20 2011, 02:52 PM saigon71 For the front firewall patch, I opted to make a te... Jul 20 2011, 02:56 PM Scarlet75 Bob you are making great progress keep it up Jul 20 2011, 06:16 PM saigon71 Welded in the lower inner vertical firewall piece:... Aug 2 2011, 07:45 PM Jon Fernandes Nice work :trophy: Aug 2 2011, 07:55 PM hot_shoe914 Looking good Bob, I better see this car at Hershey... Aug 2 2011, 08:31 PM saigon71 Seeing two stellar teeners at Matt's cookout a... Aug 30 2011, 06:04 PM saigon71 My welding skills have improved significantly, but... Sep 4 2011, 05:22 AM FourBlades Great progress! :trophy:
You are getting t... Sep 4 2011, 11:38 AM saigon71 Shot two coats of primer on the rebuilt pass side ... Sep 5 2011, 07:04 PM Cairo94507 Very nice work; you should be proud. Sep 5 2011, 07:19 PM Scarlet75 :Qarl: :Qarl: Looking good Bob whats the current... Sep 19 2011, 04:02 AM saigon71 The outer suspension console and engine mount were... Oct 14 2011, 05:47 PM trojanhorsepower Great Job!
Keep it up! Oct 14 2011, 06:37 PM saigon71 Got the inner suspension console tack welded in pl... Oct 26 2011, 08:14 PM saigon71 Before finishing all the welding on this piece, I ... Nov 4 2011, 08:51 PM scotty b :) :first: Well done my man Nov 5 2011, 04:53 AM maf914 Beautiful work! Thanks for posting all of you... Nov 5 2011, 11:15 AM saigon71 Indexing the right engine bar mount took some time... Nov 17 2011, 08:18 PM pete-stevers impressive!!! :Qarl: Nov 17 2011, 08:29 PM Scarlet75 :stick: Looking good Bob dont make me break out th... Nov 18 2011, 05:00 AM saigon71
:stick: Looking good Bob dont make me break out t... Nov 18 2011, 09:57 AM type47
... as the car will be at Hershey. :D
Oh, de... Nov 20 2011, 07:20 AM saigon71 Fitted the engine shelf yesterday & today. Thi... Nov 19 2011, 07:54 PM saigon71 Fabricated and installed the section of rear firew... Nov 25 2011, 10:20 AM rallysport70 Very nice work, keep the pics coming. Nov 25 2011, 07:50 PM saigon71 Got some more done today. Started treating rust on... Nov 25 2011, 08:09 PM Socalandy Awsome work, Keep :smash: away
we are on the sam... Nov 25 2011, 09:24 PM saigon71
Awsome work, Keep :smash: away
we are on the sa... Nov 26 2011, 07:11 PM Socalandy Thanks Andy...do you have a build thread going? I ... Nov 26 2011, 07:26 PM saigon71 With the nice weather, I had to finish some painti... Nov 26 2011, 07:21 PM saigon71 Welded the doubler plate that I fabricated for the... Dec 11 2011, 09:22 AM scotty b :first:
SO you'll be driving it to Hershey i... Dec 11 2011, 11:49 AM saigon71 Got some quality shop time in today. Fabricated th... Dec 11 2011, 02:33 PM
saigon71
That looks real good Bob!
:cheer:
Thanks C... May 2 2011, 08:42 PM Racer Chris
...I need to stay away from drunken cupcake displ... May 3 2011, 09:48 PM mrgjones That long is a thing of beauty. Good job May 2 2011, 08:44 PM Scarlet75 Looking good Bob. Keep up the momentum. Remember o... May 3 2011, 03:13 AM hot_shoe914 Looking good Bob, stay focused and keep up the goo... May 3 2011, 10:25 AM rallysport70 Bob, I agree, your work looks great :worship: . Ke... May 3 2011, 10:33 AM scotty b Nice job Bob, ya hob nob snob:) :first: May 3 2011, 10:00 PM saigon71
Nice job Bob, ya hob nob snob:) :first:
I am c... May 6 2011, 09:02 AM PanelBilly I think you should post some action shots next tim... May 3 2011, 11:07 PM saigon71
I think you should post some action shots next ti... May 8 2011, 07:11 PM scotty b is it done yet ? :poke: May 5 2011, 07:55 PM MikeSpraggi Bob, that is a thing of beauty! I'm kinda ... May 5 2011, 08:23 PM jsayre914 :cheer:
Looks great!
Now drive it down here ... May 5 2011, 09:44 PM saigon71 Finished reinforceing plate:
Cutting back end of... May 8 2011, 07:17 PM saigon71 Got some more work done over the weekend.
New cha... May 8 2011, 07:28 PM Vacca Rabite Holy crap!
Fantastic!
Zach May 8 2011, 07:31 PM saigon71 More weekend progress...outer clam shell welded on... May 8 2011, 07:50 PM Scarlet75 Looks like someone is gaining a little bit of mome... May 9 2011, 03:43 AM hot_shoe914 Very nice Bob, you look like you have been taking ... May 9 2011, 09:04 AM saigon71
Very nice Bob, you look like you have been taking... May 9 2011, 01:50 PM Ian Stott Beautiful work like that is the reason we never wa... May 9 2011, 03:31 PM saigon71
Beautiful work like that is the reason we never w... May 23 2011, 08:22 PM saigon71 While waiting on the inner "ply" for the... May 15 2011, 06:32 PM saigon71 Cutting - continued:
Luckily, it looks like the ... May 15 2011, 06:42 PM draganc
Cutting - continued:
Luckily, it looks like the... May 21 2011, 03:46 PM saigon71
Cutting - continued:
Luckily, it looks like th... May 23 2011, 08:26 PM saigon71 Fabrication - continued:
Finally finished the fr... May 15 2011, 06:49 PM saigon71 Shingle tar plug glued in:
May 15 2011, 06:50 PM kg6dxn Nice work! :first: May 15 2011, 09:45 PM Scarlet75 Looking good Bob keep it up :welder: May 16 2011, 03:26 AM saigon71 Thanks gents!
11 months till Hershey...11 mon... May 16 2011, 05:22 AM type47 Like Spraggi says, don't set yourself a deadli... May 16 2011, 06:14 AM saigon71 Zipped up the seams on the replacement floorpan pi... May 17 2011, 07:10 PM saigon71 Found another large spot of rust where the front t... May 17 2011, 07:23 PM mepstein
Found another large spot of rust where the front ... May 17 2011, 07:53 PM saigon71 Restoration Design shipped me the inner ply for th... May 23 2011, 07:26 PM saigon71 Dropped the rusty fuel tank off at the radiator sh... May 23 2011, 07:27 PM saigon71 The area where the front hood release was rusted s... May 23 2011, 07:48 PM saigon71 With the burn thru problem and the fact that it wa... May 23 2011, 07:50 PM saigon71 I am not sure my liver can survive the rush of 40t... May 30 2011, 07:16 PM saigon71 Everything lined up pretty well, except for one se... May 30 2011, 07:32 PM saigon71 DAMNIT!!! After filling about 7 roset... May 30 2011, 07:48 PM saigon71 Picked up my gas tank from the radiator shop last ... Jun 5 2011, 07:06 AM Scarlet75 Looking good Bob keep with it. Hershey is right ar... Jun 5 2011, 07:14 AM saigon71
Looking good Bob keep with it. Hershey is right a... Jun 5 2011, 07:34 AM saigon71 Welded up the seams on the outer wheelhouse, then ... Jun 5 2011, 07:21 AM saigon71 Progress continues at a slow, but steady pace.
Co... Jun 12 2011, 09:15 AM saigon71 Put the tank back together with a new Foley fuel s... Jun 12 2011, 09:26 AM saigon71 I wasn't in the mood to spray primer yesterday... Jun 12 2011, 09:34 AM saigon71 Shed - continued:
Jun 12 2011, 09:38 AM saigon71 RE: Progress Jun 12 2011, 09:39 AM scotty b FWIW the panel fit issues you have encounterd are ... Jun 12 2011, 11:24 AM saigon71
FWIW the panel fit issues you have encounterd are... Jun 22 2011, 03:45 PM saigon71 Got a decent amount done last weekend. Installed ... Jun 22 2011, 03:24 PM saigon71 RE: Progress Jun 22 2011, 03:26 PM saigon71 RE: Progress Jun 22 2011, 03:29 PM saigon71
I was also able to get the rear chunk of floorpa... Jun 22 2011, 03:32 PM saigon71 Finished up the repair of the front hood cable att... Jun 22 2011, 03:37 PM jsayre914 :trophy:
Wow Bob, your almost done, Looks great... Jun 22 2011, 04:13 PM dlee6204 Wow, keep up the good work! :trophy: Jun 22 2011, 04:19 PM Series9 It's nice to watch someone else work. B:)
... Jun 23 2011, 07:05 PM scotty b
It's nice to watch someone else work. B:)
... Jun 23 2011, 07:24 PM saigon71 Problems with both the Mazda and motorcycle have c... Jul 20 2011, 02:37 PM saigon71 Ended up with a bit of a mess where the floorpan m... Jul 20 2011, 02:47 PM saigon71
Outer firewall patch:
Jul 20 2011, 02:52 PM saigon71 For the front firewall patch, I opted to make a te... Jul 20 2011, 02:56 PM Scarlet75 Bob you are making great progress keep it up Jul 20 2011, 06:16 PM saigon71 Welded in the lower inner vertical firewall piece:... Aug 2 2011, 07:45 PM Jon Fernandes Nice work :trophy: Aug 2 2011, 07:55 PM hot_shoe914 Looking good Bob, I better see this car at Hershey... Aug 2 2011, 08:31 PM saigon71 Seeing two stellar teeners at Matt's cookout a... Aug 30 2011, 06:04 PM saigon71 My welding skills have improved significantly, but... Sep 4 2011, 05:22 AM FourBlades Great progress! :trophy:
You are getting t... Sep 4 2011, 11:38 AM saigon71 Shot two coats of primer on the rebuilt pass side ... Sep 5 2011, 07:04 PM Cairo94507 Very nice work; you should be proud. Sep 5 2011, 07:19 PM Scarlet75 :Qarl: :Qarl: Looking good Bob whats the current... Sep 19 2011, 04:02 AM saigon71 The outer suspension console and engine mount were... Oct 14 2011, 05:47 PM trojanhorsepower Great Job!
Keep it up! Oct 14 2011, 06:37 PM saigon71 Got the inner suspension console tack welded in pl... Oct 26 2011, 08:14 PM saigon71 Before finishing all the welding on this piece, I ... Nov 4 2011, 08:51 PM scotty b :) :first: Well done my man Nov 5 2011, 04:53 AM maf914 Beautiful work! Thanks for posting all of you... Nov 5 2011, 11:15 AM saigon71 Indexing the right engine bar mount took some time... Nov 17 2011, 08:18 PM pete-stevers impressive!!! :Qarl: Nov 17 2011, 08:29 PM Scarlet75 :stick: Looking good Bob dont make me break out th... Nov 18 2011, 05:00 AM saigon71
:stick: Looking good Bob dont make me break out t... Nov 18 2011, 09:57 AM type47
... as the car will be at Hershey. :D
Oh, de... Nov 20 2011, 07:20 AM saigon71 Fitted the engine shelf yesterday & today. Thi... Nov 19 2011, 07:54 PM saigon71 Fabricated and installed the section of rear firew... Nov 25 2011, 10:20 AM rallysport70 Very nice work, keep the pics coming. Nov 25 2011, 07:50 PM saigon71 Got some more done today. Started treating rust on... Nov 25 2011, 08:09 PM Socalandy Awsome work, Keep :smash: away
we are on the sam... Nov 25 2011, 09:24 PM saigon71
Awsome work, Keep :smash: away
we are on the sa... Nov 26 2011, 07:11 PM Socalandy Thanks Andy...do you have a build thread going? I ... Nov 26 2011, 07:26 PM saigon71 With the nice weather, I had to finish some painti... Nov 26 2011, 07:21 PM saigon71 Welded the doubler plate that I fabricated for the... Dec 11 2011, 09:22 AM scotty b :first:
SO you'll be driving it to Hershey i... Dec 11 2011, 11:49 AM saigon71 Got some quality shop time in today. Fabricated th... Dec 11 2011, 02:33 PM  |
2 User(s) are reading this topic (2 Guests and 0 Anonymous Users)
0 Members:

|
Lo-Fi Version | Time is now: 11th June 2026 - 12:10 PM |
Invision Power Board
v9.1.4 © 2026 IPS, Inc.