|
|
|
Porsche, and the Porsche crest are registered trademarks of Dr. Ing. h.c. F. Porsche AG.
This site is not affiliated with Porsche in any way. Its only purpose is to provide an online forum for car enthusiasts. All other trademarks are property of their respective owners. |
|
|

  |

| eric9144 |
 May 15 2011, 09:34 PM May 15 2011, 09:34 PM
Post
#1
|
|
Advanced Member  Group: Members Posts: 2,734 Joined: 30-March 11 From: San Diego, CA Member No.: 12,876 Region Association: Southern California |
One of my trunk rollers exploded and I have the replacements in hand, thought the process would be pretty easy--push down the tortion rod and bingo, WRONG...those suckers are a b!tch!
What's the secret, I know someone's done these? How do I get the new rollers in place? |
   |

 
|
| Dave_Darling |
May 16 2011, 01:21 AM
Post
#2
|
|
914 Idiot Group: Members Posts: 14,986 Joined: 9-January 03 From: Silicon Valley / Kailua-Kona Member No.: 121 Region Association: Northern California |
You can use a ~1/4" deep well socket and an extension to get leverage on the end of the torsion rod. Then you can slide the wheel into the right location.
They do pack a punch! Don't use a box-end wrench as a lever. They can slip, and that can be very bad news for anything in the way of the torsion rod. --DD |
|
|
|
| ellisor3 |
May 16 2011, 04:44 AM
Post
#3
|
|
HPWhore Group: Members Posts: 811 Joined: 23-October 08 From: Fleming Island, Florida Member No.: 9,683 Region Association: South East States |
QUOTE(eric9144 @ May 15 2011, 11:34 PM)  One of my trunk rollers exploded and I have the replacements in hand, thought the process would be pretty easy--push down the tortion rod and bingo, WRONG...those suckers are a b!tch! What's the secret, I know someone's done these? How do I get the new rollers in place? The easiest method I have seen and used it to take a piece of 2x4 roughly 8" long. Open the trunk fully. Stand the piece on end so that the vertical end is the 4". Wedge that between the tension arm and under the area where the rain tray would be. The wood will spread out the tension and not bend that area. Once it is wedged in place simply close the trunk lid and the tension arm will be held by the piece of wood. From there, simply slide the new roller on. I did this in about 2 minutes. |
|
|
|
| TheCabinetmaker |
May 16 2011, 07:00 AM
Post
#4
|
|
I drive my car everyday Group: Members Posts: 8,300 Joined: 8-May 03 From: Tulsa, Ok. Member No.: 666 |
I agree with DD (hi Dave). 1/4" drive, 10mm deep socket and a 10" extension. Slip it over the end of the rod, push down, place new roller, release tension, done!
|
|
|
|
| steveherman |
May 16 2011, 07:23 AM
Post
#5
|
|
Member Group: Members Posts: 380 Joined: 12-September 09 From: Kissimmee Florida Member No.: 10,799 Region Association: South East States |
QUOTE(vsg914 @ May 16 2011, 09:00 AM) I agree with DD (hi Dave). 1/4" drive, 10mm deep socket and a 10" extension. Slip it over the end of the rod, push down, place new roller, release tension, done! I COULD NOT GET THIS WAY TO WORK FOR ME AND FEEL SAFE So... here is what i did and what i used. it took longer to cut the slot in the breaker bar than to replace the rollers. i just slid the spring in the slot pushed the breaker bar forward and viola!!! HOPE THIS HELPS!!!!! I can not express enough how easy this was and how safe i felt doing it this way. (IMG:http://www.914world.com/bbs2/uploads_offsite/i806.photobucket.com-10799-1305552196.1.jpg) |
|
|
|
| jaxdream |
May 16 2011, 07:47 AM
Post
#6
|
|
Senior Member Group: Members Posts: 974 Joined: 8-July 08 From: North Central Tennessee Member No.: 9,270 Region Association: South East States |
Some folks use the ring end of an adjustable wrench ( notch cut into the ring like a C to slide out ) to do this procedure , I have used the deep 10mm socket / extention with success , there are a few different ways to do it . Different ways work for different folks , as long as the mission is accomplished .
Jack / Jaxdream |
|
|
|
| eric9144 |
May 16 2011, 08:12 AM
Post
#7
|
|
Advanced Member Group: Members Posts: 2,734 Joined: 30-March 11 From: San Diego, CA Member No.: 12,876 Region Association: Southern California |
Thanks for the input guys, I'll take another crack at it this week...
|
|
|
|
| underthetire |
May 16 2011, 08:30 AM
Post
#8
|
|
914 Guru Group: Members Posts: 5,062 Joined: 7-October 08 From: Brentwood Member No.: 9,623 Region Association: Northern California |
QUOTE(vsg914 @ May 16 2011, 06:00 AM) I agree with DD (hi Dave). 1/4" drive, 10mm deep socket and a 10" extension. Slip it over the end of the rod, push down, place new roller, release tension, done! (IMG:style_emoticons/default/agree.gif) Took 3 minutes. |
|
|
|
| lsintampa |
Apr 15 2013, 02:17 PM
Post
#9
|
|
Senior Member Group: Members Posts: 520 Joined: 28-January 13 From: Tampa, FL Member No.: 15,441 Region Association: South East States |
QUOTE(Dave_Darling @ May 16 2011, 03:21 AM) You can use a ~1/4" deep well socket and an extension to get leverage on the end of the torsion rod. Then you can slide the wheel into the right location. They do pack a punch! Don't use a box-end wrench as a lever. They can slip, and that can be very bad news for anything in the way of the torsion rod. --DD OK, I'm gonna have to bite on this one. I'm trying to replace one exploded roller. I understand fitting a deep socket on the end, but by push down, I assume you mean towards the front or forward. The issue is that the extension ends up hitting the deck lid above where the roller needs to go. I can see that the grill end piece can be removed, but there still is a welded brace that goes across and blocks your forward motion. SO, I'm either not understanding something or there must be some other way. I totally don't understand the 2X4 method. The ring end of an adjustable wrench makes sense, but seems to me it would slip off before you got it far enough forward to place the roller on. Very confusing. Anyone have pictures or a link that shows how you're doing this? Thanks, Len |
|
|
|
| saigon71 |
Apr 15 2013, 02:29 PM
Post
#10
|
|
Senior Member Group: Members Posts: 1,999 Joined: 1-June 09 From: Dillsburg, PA Member No.: 10,428 Region Association: MidAtlantic Region |
QUOTE(lsintampa @ Apr 15 2013, 04:17 PM) QUOTE(Dave_Darling @ May 16 2011, 03:21 AM) You can use a ~1/4" deep well socket and an extension to get leverage on the end of the torsion rod. Then you can slide the wheel into the right location. They do pack a punch! Don't use a box-end wrench as a lever. They can slip, and that can be very bad news for anything in the way of the torsion rod. --DD OK, I'm gonna have to bite on this one. I'm trying to replace one exploded roller. I understand fitting a deep socket on the end, but by push down, I assume you mean towards the front or forward. The issue is that the extension ends up hitting the deck lid above where the roller needs to go. I can see that the grill end piece can be removed, but there still is a welded brace that goes across and blocks your forward motion. SO, I'm either not understanding something or there must be some other way. I totally don't understand the 2X4 method. The ring end of an adjustable wrench makes sense, but seems to me it would slip off before you got it far enough forward to place the roller on. Very confusing. Anyone have pictures or a link that shows how you're doing this? Thanks, Len Len, I just used the 1/4" socket, 6" extension method. I wore gloves. Push down on the extension toward the floor to relieve the pressure on the roller (or lack thereof) and slide the new one on with a dab of grease. 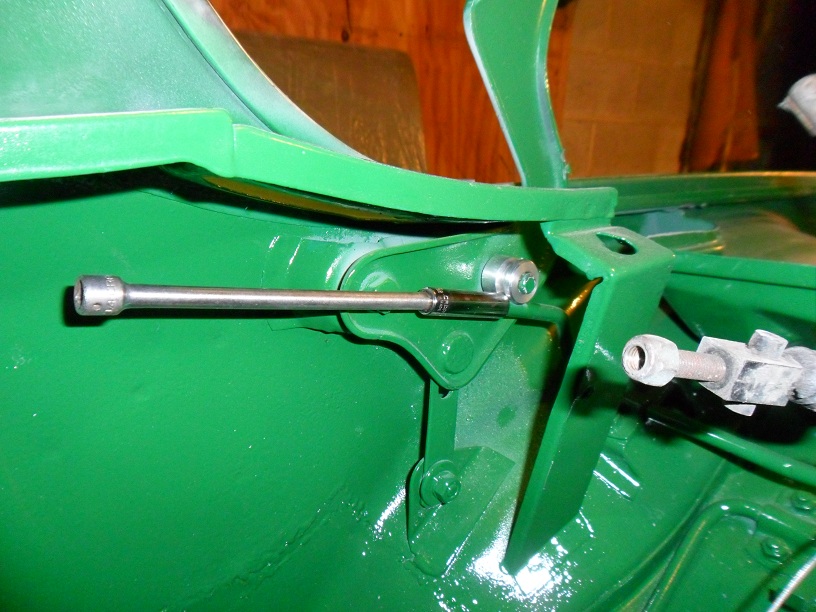 |
|
|
|
| lsintampa |
Apr 15 2013, 03:00 PM
Post
#11
|
|
Senior Member Group: Members Posts: 520 Joined: 28-January 13 From: Tampa, FL Member No.: 15,441 Region Association: South East States |
QUOTE(saigon71 @ Apr 15 2013, 04:29 PM) QUOTE(lsintampa @ Apr 15 2013, 04:17 PM) QUOTE(Dave_Darling @ May 16 2011, 03:21 AM) You can use a ~1/4" deep well socket and an extension to get leverage on the end of the torsion rod. Then you can slide the wheel into the right location. They do pack a punch! Don't use a box-end wrench as a lever. They can slip, and that can be very bad news for anything in the way of the torsion rod. --DD OK, I'm gonna have to bite on this one. I'm trying to replace one exploded roller. I understand fitting a deep socket on the end, but by push down, I assume you mean towards the front or forward. The issue is that the extension ends up hitting the deck lid above where the roller needs to go. I can see that the grill end piece can be removed, but there still is a welded brace that goes across and blocks your forward motion. SO, I'm either not understanding something or there must be some other way. I totally don't understand the 2X4 method. The ring end of an adjustable wrench makes sense, but seems to me it would slip off before you got it far enough forward to place the roller on. Very confusing. Anyone have pictures or a link that shows how you're doing this? Thanks, Len Len, I just used the 1/4" socket, 6" extension method. I wore gloves. Push down on the extension toward the floor to relieve the pressure on the roller (or lack thereof) and slide the new one on with a dab of grease. OK, I see how you got it into position. What I'm curious about is how you managed to get it past the welded brace that holds the side grill? The end of my bar is behind that brace. |
|
|
|
| saigon71 |
Apr 15 2013, 03:27 PM
Post
#12
|
|
Senior Member Group: Members Posts: 1,999 Joined: 1-June 09 From: Dillsburg, PA Member No.: 10,428 Region Association: MidAtlantic Region |
Sounds like the torsion bar slipped off completely and wedged itself under that piece. Never went through that. Can you post a pic?
|
|
|
|
| dirk9141973 |
Apr 15 2013, 07:44 PM
Post
#13
|
|
Unregistered |
(IMG:style_emoticons/default/biggrin.gif) this works great 3/8 socket bar grind open hole create slot
Attached image(s) 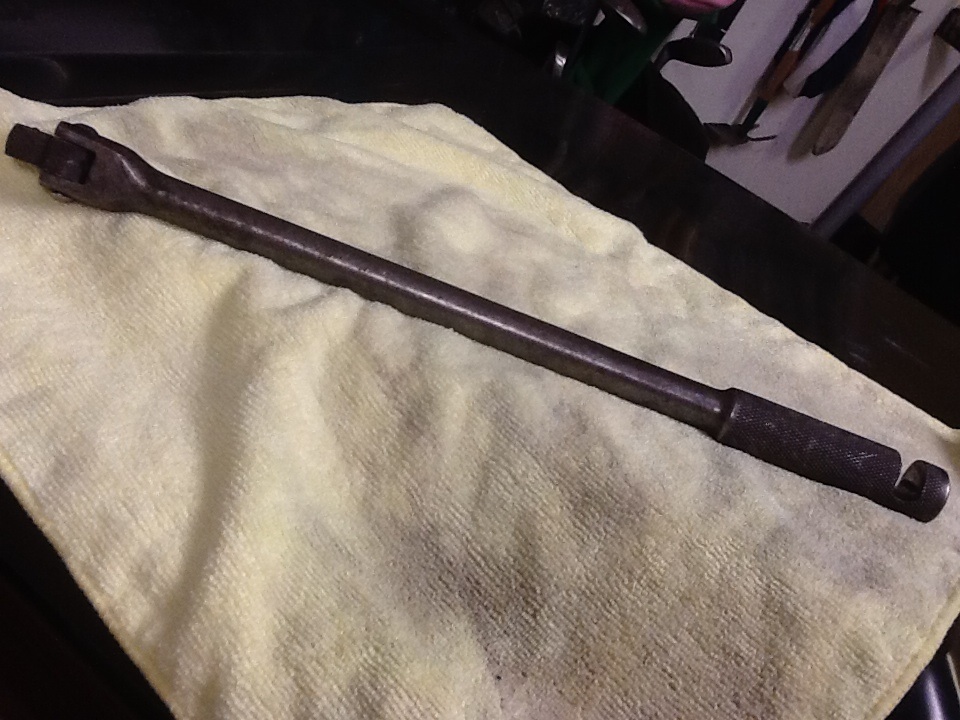
|
|
|
|
| JmuRiz |
Apr 15 2013, 08:33 PM
Post
#14
|
|
914 Guru Group: Members Posts: 5,427 Joined: 30-December 02 From: NoVA Member No.: 50 Region Association: MidAtlantic Region |
QUOTE(saigon71 @ Apr 15 2013, 01:27 PM) Sounds like the torsion bar slipped off completely and wedged itself under that piece. Never went through that. Can you post a pic? That's what mine is like too...my car is out getting worked on. Bar end is flat on the back-side of the trunk indent. |
|
|
|
| lsintampa |
Apr 16 2013, 12:18 PM
Post
#15
|
|
Senior Member Group: Members Posts: 520 Joined: 28-January 13 From: Tampa, FL Member No.: 15,441 Region Association: South East States |
QUOTE(saigon71 @ Apr 15 2013, 05:27 PM) Sounds like the torsion bar slipped off completely and wedged itself under that piece. Never went through that. Can you post a pic? Sure enuf.... I think I need to lift the bend off the wheel well, then get some sort of tool around the bent part to push forward. 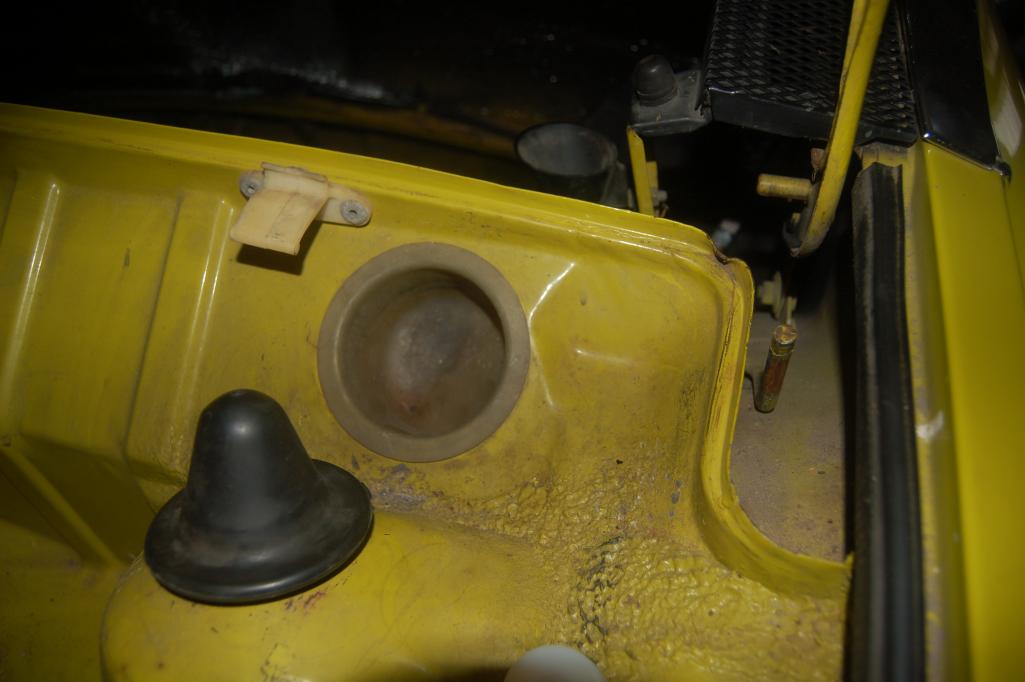 |
|
|
|
| JmuRiz |
Apr 16 2013, 12:27 PM
Post
#16
|
|
914 Guru Group: Members Posts: 5,427 Joined: 30-December 02 From: NoVA Member No.: 50 Region Association: MidAtlantic Region |
Yep, that's just what mine looks like too...I'll let you know if I figure something out...I have yet to find something that works though.
|
|
|
|
| lsintampa |
Apr 19 2013, 08:25 AM
Post
#17
|
|
Senior Member Group: Members Posts: 520 Joined: 28-January 13 From: Tampa, FL Member No.: 15,441 Region Association: South East States |
QUOTE(JmuRiz @ Apr 16 2013, 02:27 PM) Yep, that's just what mine looks like too...I'll let you know if I figure something out...I have yet to find something that works though. I think it is a two step process... 1) use long socket and extension to lift the bar off of the wheel cover 2) slip second tool onto the bar that "was" resting on the wheel cover to push the thing forward I think step two is using something that can slip over the bar from the side so you can slip it off once you have the roller on CAREFUL though, if it slips off early, I imagine it can be an issue and cause some damage - either to you or the car - looks like fun. |
|
|
|
| rhodyguy |
Apr 19 2013, 02:46 PM
Post
#18
|
|
Chimp Sanctuary NW. Check it out. Group: Members Posts: 22,080 Joined: 2-March 03 From: Orion's Bell. The BELL! Member No.: 378 Region Association: Galt's Gulch |
don't forget to open the open the lid and take the pressure off the small torsion springs first. you don't need to bury the socket on the springs, just enough to ensure purchase. with the trunk still open grab the socket with a set of vice grips and you should be able to tap/drive the socket off. don't forget to lube the pin the wheel goes on and the pivot for the trunk arm.
k |
|
|
|
|
1 User(s) are reading this topic (1 Guests and 0 Anonymous Users)
0 Members:

|
Lo-Fi Version | Time is now: 18th May 2024 - 09:19 PM |
Invision Power Board
v9.1.4 © 2024 IPS, Inc.