|
|
|
Porsche, and the Porsche crest are registered trademarks of Dr. Ing. h.c. F. Porsche AG.
This site is not affiliated with Porsche in any way. Its only purpose is to provide an online forum for car enthusiasts. All other trademarks are property of their respective owners. |
|
|

  |

| Eric_Shea |
 May 19 2011, 11:03 AM May 19 2011, 11:03 AM
Post
#1
|
|
PMB Performance  Group: Admin Posts: 19,275 Joined: 3-September 03 From: Salt Lake City, UT Member No.: 1,110 Region Association: Rocky Mountains |
Collective soul...
Looking for your thoughts on using a stock GT wheel with the hockey puck on a quick release assembly "and" retaining the horn. Not opposed to having the coily wire (which I've seen, but a Google search didn't net results) wrapping the colum. I think Elliott has something of the sort with a red button on the Zonker. I was thinking of something "similar" but retaining the original GT (early 911) horn button. Would love to know more about that setup to see if it's adaptable. Any other thoughts? There was a guy on PP that did a custom mod on a 911 but I'm not sure of the application with the hockey puck. Again, I don't mind and might even prefer the coil chord vs. a ton of machining. Anyone BTDT? (IMG:style_emoticons/default/confused24.gif) |
   |

 
|
| Elliot Cannon |
May 19 2011, 12:44 PM
Post
#2
|
|
914 Guru Group: Retired Members Posts: 8,487 Joined: 29-December 06 From: Paso Robles Ca. (Central coast) Member No.: 7,407 Region Association: None |
The Zonker is out at the airport in my hangar but I need to go there today to take pics for a prospective buyer. I'll take some pics of the steering wheel and hub.
Cheers, Elliot |
|
|
|
| DBCooper |
May 19 2011, 03:09 PM
Post
#3
|
|
14's in the 13's with ATTITUDE Group: Members Posts: 3,079 Joined: 25-August 04 From: Dazed and Confused Member No.: 2,618 Region Association: Northern California |
Excellent. I have a quick release wheel but horn button on the dash. Looking forward to seeing what slick solution you come up with so I can shamelessly copy it.
|
|
|
|
| Kirmizi |
May 19 2011, 03:11 PM
Post
#4
|
|
Senior Member Group: Members Posts: 836 Joined: 12-February 06 From: Wyoming, US Member No.: 5,568 Region Association: None |
Happy Motoring E! (IMG:style_emoticons/default/biggrin.gif)
Attached image(s) 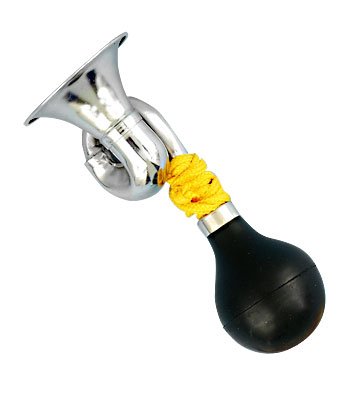 
|
|
|
|
| Eric_Shea |
May 19 2011, 03:21 PM
Post
#5
|
|
PMB Performance Group: Admin Posts: 19,275 Joined: 3-September 03 From: Salt Lake City, UT Member No.: 1,110 Region Association: Rocky Mountains |
Woa! Awesome... that solves that problem! Next. LOL
|
|
|
|
| Elliot Cannon |
May 19 2011, 10:51 PM
Post
#6
|
|
914 Guru Group: Retired Members Posts: 8,487 Joined: 29-December 06 From: Paso Robles Ca. (Central coast) Member No.: 7,407 Region Association: None |
I'm not sure how "slick" this solution is but it worked for me. I made an adapter out of a piece of aluminum and screwed it to the wheel. I had a stock steering wheel and pried off the copper looking flat disc that the horn brushes would contact while the wheel is being turned and epoxied it onto the adapter I had made. Here are some pics that might make more sense than my explanation.
Cheers, Elliot Attached thumbnail(s) 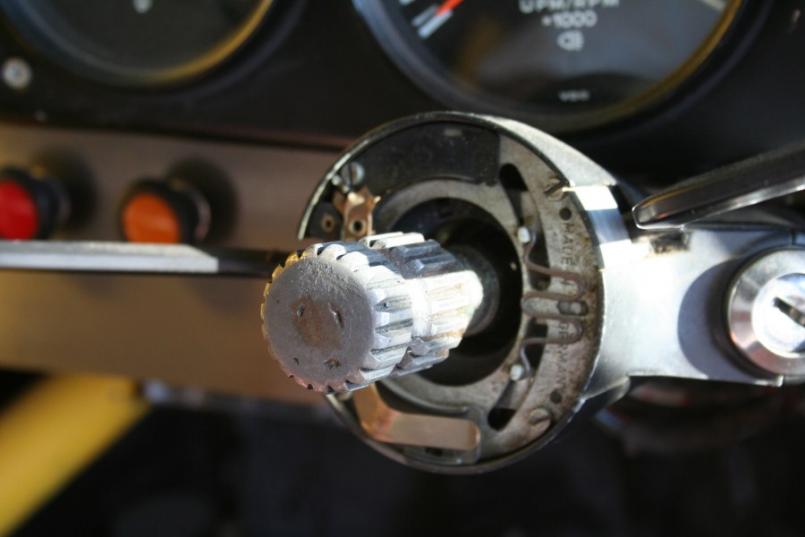 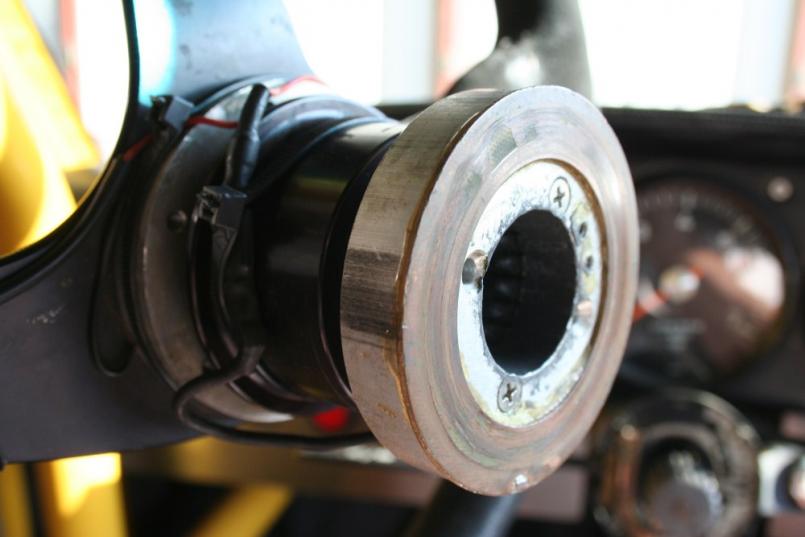 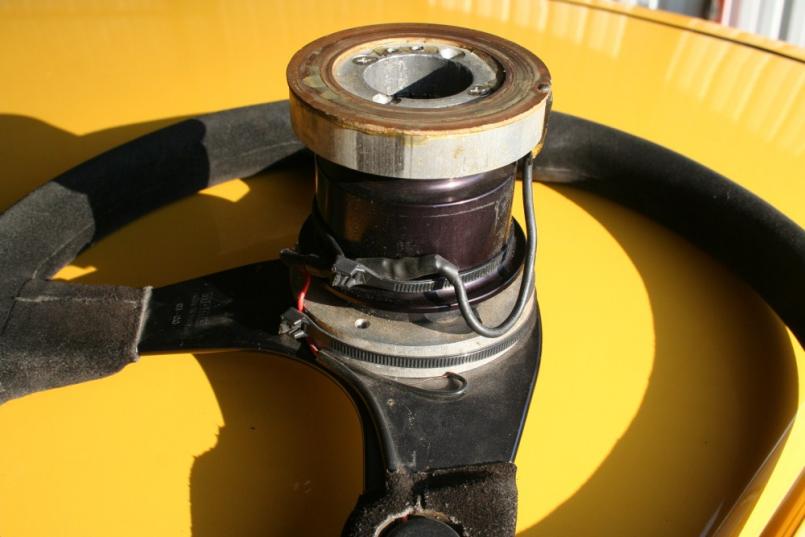 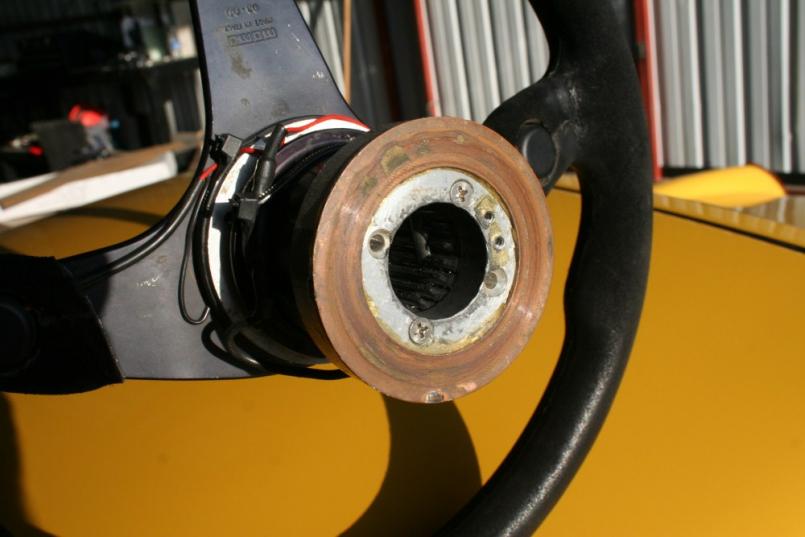
|
|
|
|
| Elliot Cannon |
May 19 2011, 10:53 PM
Post
#7
|
|
914 Guru Group: Retired Members Posts: 8,487 Joined: 29-December 06 From: Paso Robles Ca. (Central coast) Member No.: 7,407 Region Association: None |
One more.
Attached thumbnail(s) 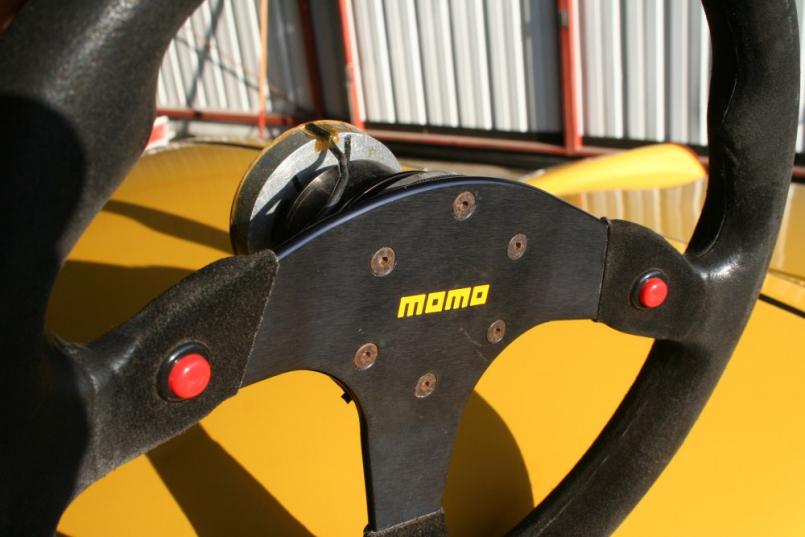
|
|
|
|
| Mike Bellis |
May 19 2011, 11:12 PM
Post
#8
|
|
Resident Electrician Group: Members Posts: 8,345 Joined: 22-June 09 From: Midlothian TX Member No.: 10,496 Region Association: None |
I run a modified 924 Turbo wheel on a Momo hub with a quick release. I use the stock wire on the stock terminal on the wheel. I only had to put some shrink tube on the bare spade connector. When I pull the wheel, the wire simply un plugs. It pops right off. I have to plug the wire back on the wheel when I reinstall. Very easy and very simple... Works great!
 I cut the factory hub off the back of the wheel, drilled the 6 holes and made spacers to square up the wheel to the hub. 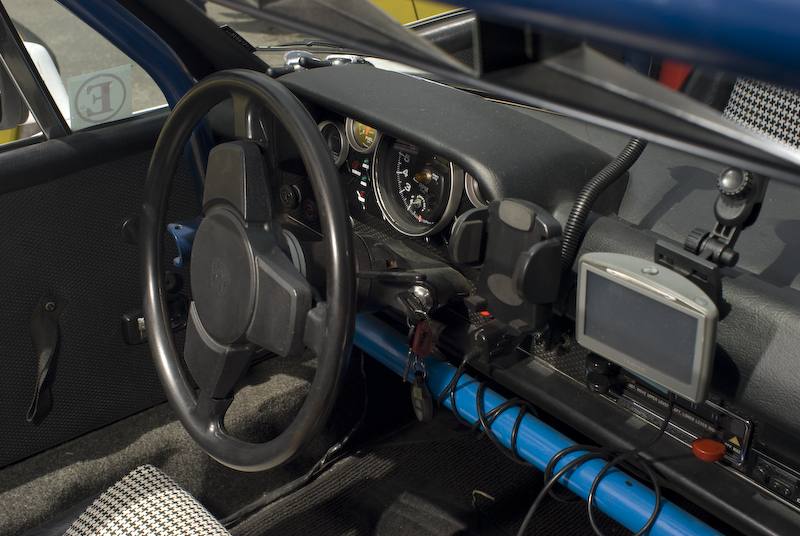  Don't really have a good pic inside the hub but you can imagine the factory horn wire with shrink tube to insulate the connector. |
|
|
|
| rick 918-S |
May 20 2011, 04:56 AM
Post
#9
|
|
Hey nice rack! -Celette Group: Members Posts: 20,456 Joined: 30-December 02 From: Now in Superior WI Member No.: 43 Region Association: Northstar Region |
Elliots looks like the spring loaded pin rides on the copper plate to make contact for the power wire to the horn. With a stock wheel the wire could easily be hidden and a copper plate could be machined smaller to be a little more discrete.
BTW: I would love to pull a mold off that horn button. (IMG:style_emoticons/default/idea.gif) |
|
|
|
| Eric_Shea |
May 22 2011, 09:48 AM
Post
#10
|
|
PMB Performance Group: Admin Posts: 19,275 Joined: 3-September 03 From: Salt Lake City, UT Member No.: 1,110 Region Association: Rocky Mountains |
OK... here's where we stand for now:
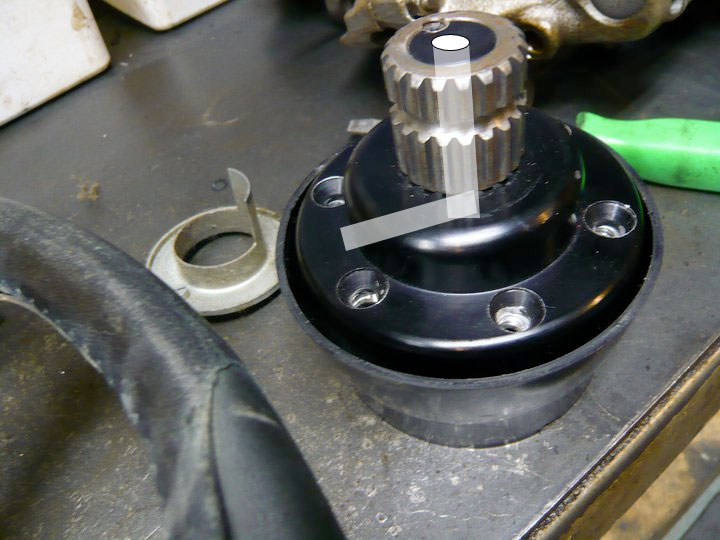
Here's the wheel mounted to the outer 1/2 of the quick release: (IMG:http://www.914world.com/bbs2/uploads_offsite/fbcdn-sphotos-a.akamaihd.net-1110-1306079293.1.jpg) I'm planning on removing the factory mount from another wheel I have to mount the hockey puck.: (IMG:http://www.914world.com/bbs2/uploads_offsite/fbcdn-sphotos-a.akamaihd.net-1110-1306079409.1.jpg) Maybe use the factory base (with a modified wheel plate) and turn signal cancelling device. (IMG:http://www.914world.com/bbs2/uploads_offsite/fbcdn-sphotos-a.akamaihd.net-1110-1306079294.3.jpg) Here's the plate off the previous wheel: (IMG:http://www.914world.com/bbs2/uploads_offsite/fbcdn-sphotos-a.akamaihd.net-1110-1306079295.4.jpg) Back 1/2 of the quick release on the plate and base: (IMG:http://www.914world.com/bbs2/uploads_offsite/fbcdn-sphotos-a.akamaihd.net-1110-1306079295.5.jpg) And, the mock assembly: (IMG:http://www.914world.com/bbs2/uploads_offsite/fbcdn-sphotos-a.akamaihd.net-1110-1306079296.6.jpg) So, everything assembles fine but, the factory contact will not work with this quick release so I'm thinking the only thing left is to figure out a contact system for the factory hockey puck... |
|
|
|
| sixnotfour |
May 22 2011, 12:02 PM
Post
#11
|
|
914 Wizard Group: Members Posts: 10,430 Joined: 12-September 04 From: Life Elevated..planet UT. Member No.: 2,744 Region Association: Rocky Mountains |
911R push button, I doubt you will even want to dare push on your 45 year old leather hockey puck. (IMG:style_emoticons/default/idea.gif)
anyhow that stack you have there will surely give you the nastycar (NASCAR)style of wheel placement (IMG:style_emoticons/default/stirthepot.gif) BTW was that an early 914 wheel you modified ? And I will take my medication now. Attached image(s) 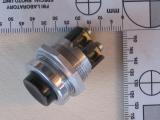
|
|
|
|
| McMark |
May 22 2011, 12:49 PM
Post
#12
|
|
914 Freak! Group: Retired Admin Posts: 20,179 Joined: 13-March 03 From: Grand Rapids, MI Member No.: 419 Region Association: None |
I think you should modify the black aluminum (?) piece by drilling down through the center and the milling a channel into the base for a wire to run. Then use 914-347-831-00 in the hole to provide a spring loaded contact between the column and the wheel.
 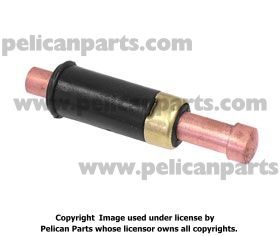 914-347-831-00 Then machine a delrin plug with a steel center plug which will fit into the steering wheel and contact the pin when installed and have a wire out the top to connect to the hockey puck. 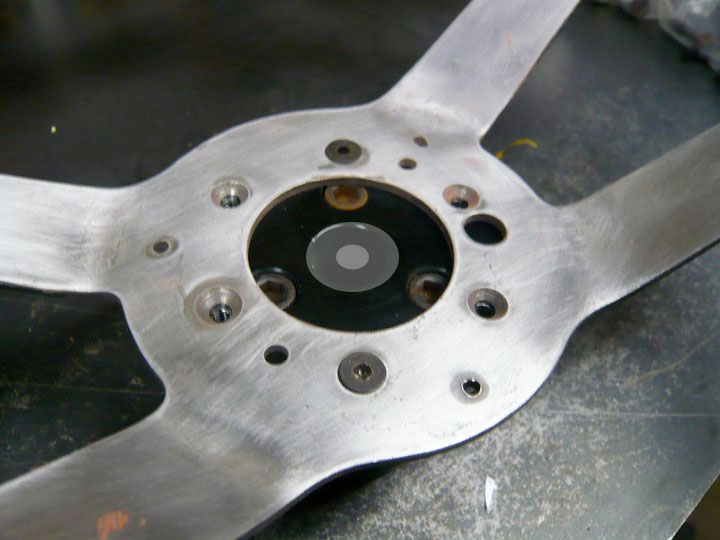 Hopefully I translated my idea somewhat clearly. |
|
|
|
| Eric_Shea |
May 22 2011, 01:34 PM
Post
#13
|
|
PMB Performance Group: Admin Posts: 19,275 Joined: 3-September 03 From: Salt Lake City, UT Member No.: 1,110 Region Association: Rocky Mountains |
QUOTE BTW was that an early 914 wheel you modified ? Got all the bits like this... I've yet to modify a wheel (or check the part numbers) to be honest with ya. I like the wheel a tad closer as well so, it might work. Thanks Mark... I had a thought to drill that piece as well. Your ideas take it a bit further though. Cool. Thanks. |
|
|
|
| Eric_Shea |
May 22 2011, 02:28 PM
Post
#14
|
|
PMB Performance Group: Admin Posts: 19,275 Joined: 3-September 03 From: Salt Lake City, UT Member No.: 1,110 Region Association: Rocky Mountains |
Part numbers on both wheels:
914.347.088.10 914.347.806.10 |
|
|
|
| sixnotfour |
May 22 2011, 02:41 PM
Post
#15
|
|
914 Wizard Group: Members Posts: 10,430 Joined: 12-September 04 From: Life Elevated..planet UT. Member No.: 2,744 Region Association: Rocky Mountains |
stazak list
914.347.803.10-hard rubber 914-6 70-71 914.347.804.10-hard rubber 914-4 70-71 914.347.804.11-hard rubber 72 up 914.347.805.10-leather 914-4 70-71 914.347.805.11-leather 914-6 and 914-4 72 up 914.347.806.10-leather 914-6 70-71 & RS 914.347.809.00-fake leather 72 up |
|
|
|
| Eric_Shea |
May 22 2011, 02:53 PM
Post
#16
|
|
PMB Performance Group: Admin Posts: 19,275 Joined: 3-September 03 From: Salt Lake City, UT Member No.: 1,110 Region Association: Rocky Mountains |
Well... The one they "boofed" was the 806.10 wheel. (IMG:style_emoticons/default/sad.gif)
|
|
|
|
| rick 918-S |
May 22 2011, 05:09 PM
Post
#17
|
|
Hey nice rack! -Celette Group: Members Posts: 20,456 Joined: 30-December 02 From: Now in Superior WI Member No.: 43 Region Association: Northstar Region |
QUOTE(McMark @ May 22 2011, 01:49 PM)  I think you should modify the black aluminum (?) piece by drilling down through the center and the milling a channel into the base for a wire to run. Then use 914-347-831-00 in the hole to provide a spring loaded contact between the column and the wheel. 914-347-831-00 Then machine a delrin plug with a steel center plug which will fit into the steering wheel and contact the pin when installed and have a wire out the top to connect to the hockey puck. Hopefully I translated my idea somewhat clearly. Yup (IMG:style_emoticons/default/agree.gif) Use the spring pin setup and drill it like McMark showed. |
|
|
|
| SirAndy |
May 22 2011, 05:14 PM
Post
#18
|
|
Resident German Group: Admin Posts: 41,636 Joined: 21-January 03 From: Oakland, Kalifornia Member No.: 179 Region Association: Northern California |
QUOTE(McMark @ May 22 2011, 11:49 AM) 914-347-831-00 I asked this a while ago, what's the best way to get rid of the "scraping" noise from the pin? Is there some sort of conductive grease one could use? (IMG:style_emoticons/default/idea.gif) |
 |
|
| jaxdream |
May 22 2011, 05:26 PM
Post
#19
|
|
Senior Member Group: Members Posts: 974 Joined: 8-July 08 From: North Central Tennessee Member No.: 9,270 Region Association: South East States |
QUOTE(SirAndy @ May 22 2011, 03:14 PM) QUOTE(McMark @ May 22 2011, 11:49 AM) 914-347-831-00 I asked this a while ago, what's the best way to get rid of the "scraping" noise from the pin? Is there some sort of conductive grease one could use? (IMG:style_emoticons/default/idea.gif) Possibly , if can be found , tuner cleaner / lube . Maybe check with a ham radio shop for something of this nature .Just a WAG on my part. Jack |
|
|
|
| Eric_Shea |
May 22 2011, 05:33 PM
Post
#20
|
|
PMB Performance Group: Admin Posts: 19,275 Joined: 3-September 03 From: Salt Lake City, UT Member No.: 1,110 Region Association: Rocky Mountains |
The only problem I see with going down that road is the integrity of that part once it's drilled. I have the old contact here and the diameter is rather large in comparison to the stem.
|
|
|
|
|
1 User(s) are reading this topic (1 Guests and 0 Anonymous Users)
0 Members:

|
Lo-Fi Version | Time is now: 13th May 2024 - 11:30 PM |
Invision Power Board
v9.1.4 © 2024 IPS, Inc.