|
|
|
Porsche, and the Porsche crest are registered trademarks of Dr. Ing. h.c. F. Porsche AG.
This site is not affiliated with Porsche in any way. Its only purpose is to provide an online forum for car enthusiasts. All other trademarks are property of their respective owners. |
|
|

  |

| Rex-n-effect |
 May 31 2011, 09:53 AM May 31 2011, 09:53 AM
Post
#1
|
|
Newbie  Group: Members Posts: 44 Joined: 4-February 11 From: Missoula, MT Member No.: 12,659 Region Association: None |
Ok, I bought the battery tray kit from AA and need to install it. I figured out that i need to bend the engine side tab towards the frame rail and then break it again to get it flat so that i can weld it to the rail. I also am going to drill some holes through the battery tray to weld it to the support bracket.
My question is this. How are you guys attaching the tray to the inner qtr panel? Welding or bolting through? If you weld, where are you welding it etc. I want to get it right the first time. Thanks for the help. Rex |
   |

 
|
| McMark |
May 31 2011, 10:23 AM
Post
#2
|
|
914 Freak! Group: Retired Admin Posts: 20,179 Joined: 13-March 03 From: Grand Rapids, MI Member No.: 419 Region Association: None |
I'm not sure what bending you're talking about, but I've never needed to bend a replacement battery tray. Of course, I always get mine from DANSK, via SSF, so I'm not sure if there's a difference.
I start the project by painting the back sides of both parts. Then drill holes in the support. Bolt the top and support together and weld a flange nut onto the stand so battery hold down removal/tightening isn't a two hand operation. With the pieces bolted together I hold everything in place, line it up where I like it, and start welding the support into place on the vertical part of the frame. Then I remove the top and weld the left and right sides to the top of the frame. Once that cools, I prepaint the inside since there won't be access again. 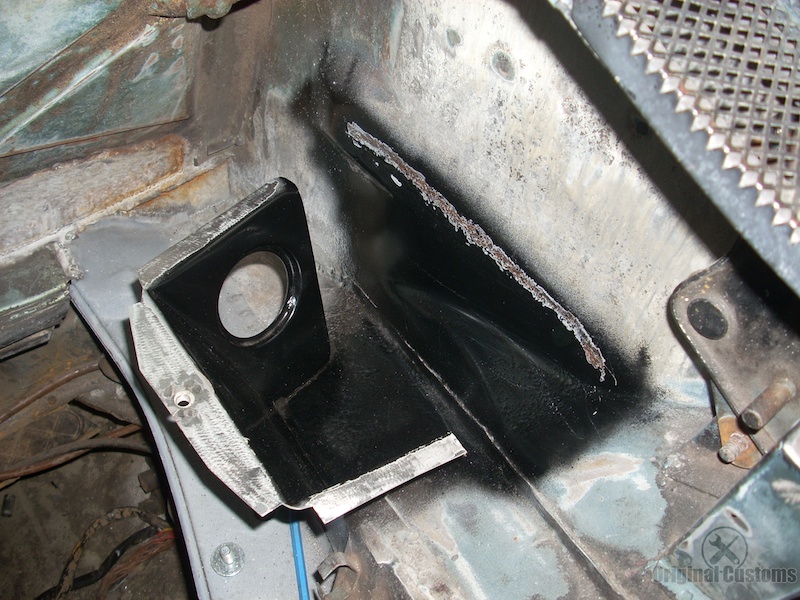 Then I once again bolt the tray onto the stand and trace the stand top flanges onto the underside of the tray, remove everything and drill holes in the tray. Then I prep everything, bolt it back in again and then start welding everything. I run one long bead along the back of the tray. Attached image(s) 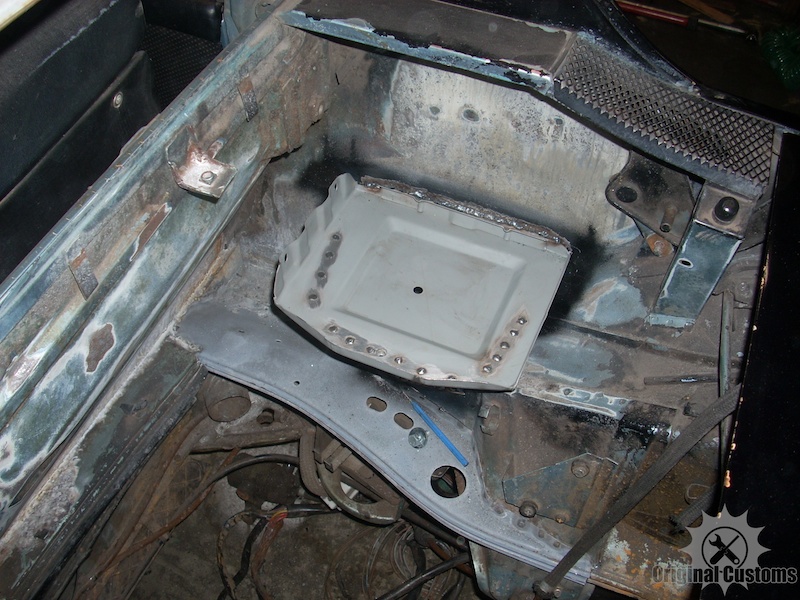 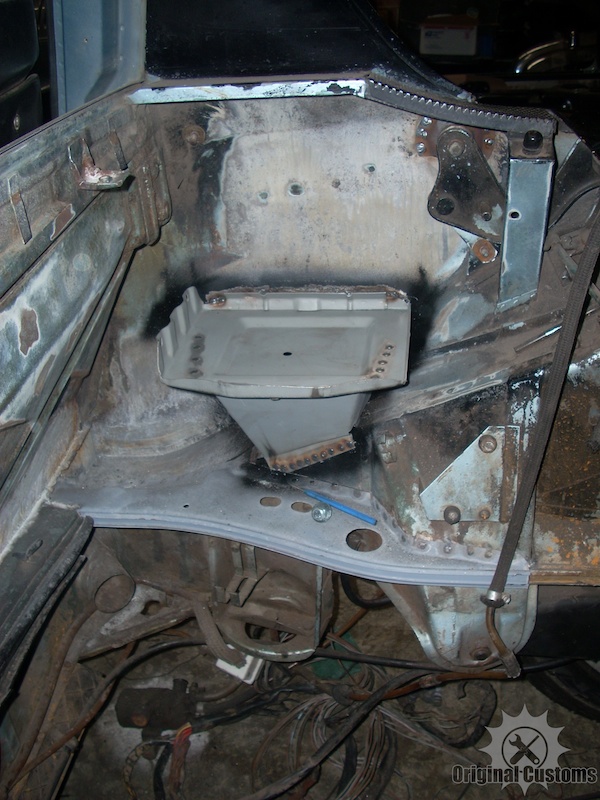
|
|
|
|
| Rex-n-effect |
May 31 2011, 01:59 PM
Post
#3
|
|
Newbie Group: Members Posts: 44 Joined: 4-February 11 From: Missoula, MT Member No.: 12,659 Region Association: None |
That's what i needed to see. The part i am talking about bending is in the third picture. The lower support that welds to the vertical frame rail. On my bracket, after i bolt the battery tray on and then position it, the lower support is about 1 inch away from the frame rail where it would be welded. I need to bend it in and then bend it down so that i get contact on the rail. My tray is different then the one that you show in your picture. It has a well reinforced lip on the body side that the battery slips under. There is not enough room to weld like you show. I think that what i will do is massage the metal back there so that i can get contact on the upper edge of the tray. Then i should have something to weld to.
Thank you very much McMark. I knew someone would have pics of this. Rex |
|
|
|
|
1 User(s) are reading this topic (1 Guests and 0 Anonymous Users)
0 Members:

|
Lo-Fi Version | Time is now: 17th May 2024 - 07:11 PM |
Invision Power Board
v9.1.4 © 2024 IPS, Inc.