

 malaga_red75 Paint thread, by Andyrew, The End! Pictures page 9 malaga_red75 Paint thread, by Andyrew, The End! Pictures page 9 |
|
|

|
Porsche, and the Porsche crest are registered trademarks of Dr. Ing. h.c. F. Porsche AG.
This site is not affiliated with Porsche in any way. Its only purpose is to provide an online forum for car enthusiasts. All other trademarks are property of their respective owners. |
|
|
  |
| 914itis |
 Aug 8 2011, 06:26 AM Aug 8 2011, 06:26 AM
Post
#121
|
|
Advanced Member  Group: Members Posts: 2,892 Joined: 9-October 10 From: New York City Member No.: 12,256 Region Association: North East States  |
QUOTE(Andyrew @ Aug 8 2011, 01:30 AM)  8 hours in today. Car is block sanded and 99% ready for paint. We have to clean the gutters out to make sure no crap flied up while spraying like what happened in my car . (IMG:style_emoticons/default/dry.gif) Sprayed under the trunks and engine lid, the jams, and under the targa bar. The targa bar was a PITA and some of it came out dry. I'll be respraying this this week with my touch up gun. Rest of it came out clean. Really wish I did the jambs for my car (IMG:style_emoticons/default/smile.gif) The color is amazing and is the correct color no doubt. However getting the 914's both in the garage was a little bit of a task... But I managed. Great Job Andy, I am planing on painting my jambs Thursday and full paint Saturday. You are almost there. What's next? |
   |

 
|
| malaga_red75 |
Aug 8 2011, 09:39 AM
Post
#122
|
|
'74 2.5L N/A Subie Group: Members Posts: 454 Joined: 5-March 06 From: Menlo Park, CA Member No.: 5,674 Region Association: None |
the pictures do not do this paint justice. The difference between sunlight and shade is immense.
As far as what is next... I'll do my best to create a list: - prep/clean garage... and then clean it again. - air blow car to get rid of all surface dust - prep car - de-grease car x2 Then primer base, and then paint it. That is for the car; for the bumpers... I think they are mostly done except the front valence which needs a little lovin' then matte black paint. Im sure I forgot a few things, but that is a general idea. |
|
|
|
| Andyrew |
Aug 9 2011, 09:59 PM
Post
#123
|
|
Spooling.... Please wait Group: Members Posts: 13,381 Joined: 20-January 03 From: Riverbank, Ca Member No.: 172 Region Association: Northern California 
|
Today was full of anguish...
For those of you following along at home, there is a lesson to be learned. Harbor freight 1.4 spray guns do not do a good job at primer. They do an OK job at paint, but your money is well spent on a $100 dollar paint gun vs a $15 paint gun. I was going to do a wet/wet with the sealer and paint on the engine lid and the doors today. However here are the issues I had in order. 1. I mixed up my spare hardner for my spare reducer when mixing the first batch of primer. Primer was ruined. 2. I mixed up to much harder in my second batch of primer (Doing a small quantity its hard to eyeball it in the larger cups that I had). Primer hardened as I was straining it in the gun aka it hardened in the gun as well. 30 minutes to clean out the damn gun. 3. I learned that the Harbor freight gun really is what has been causing my dry mist issue that I have been having on the car this whole time. As I was laying down the primer on the first door and seeing how dry the overspray was coming out, I decided to thin out the primer a tad bit, then proceed to use my good gun. HOLY CRAP! I forgot how much of a difference there was!! This gun immediately solved all my problems and laid out the primer perfectly. However in my hurry to try and get door clean of the dust from the adjacent door spray I cleaned the door with wax/grease remover and didnt wipe it down with a dry towel afterwards. Thus creating a not so good layer of primer. So, End of the day. Tomorrow I am going to sand down the primer sealer I just laid to 320 grit and proceed to laying color on those area's. This is why we do test samples.. Sigh... At least I learned something... |
|
|
|
| malaga_red75 |
Aug 10 2011, 12:03 PM
Post
#124
|
|
'74 2.5L N/A Subie Group: Members Posts: 454 Joined: 5-March 06 From: Menlo Park, CA Member No.: 5,674 Region Association: None |
Glad you got it all figured out andrew. I'm sure it was frustrating but we can all relate to those evenings in the garage where nothing goes right.
keep at it! looking forward to this weekend. (IMG:style_emoticons/default/beerchug.gif) |
|
|
|
| Andyrew |
Aug 11 2011, 06:33 AM
Post
#125
|
|
Spooling.... Please wait Group: Members Posts: 13,381 Joined: 20-January 03 From: Riverbank, Ca Member No.: 172 Region Association: Northern California
|
Last night I sprayed the engine lid, doors, and inside the targa sails.
Everything went off pretty much without a hitch. One thing to note is the top coat smoothed out really well however it looks like it has tiny dust particles or it evaporated quickly. I think this might have been because I left the fans running all night but I am not worried at all it looks really nice and will wet sand to a really nice finish. 5 coats. |
|
|
|
| scotty b |
Aug 11 2011, 07:14 AM
Post
#126
|
|
rust free you say ? Group: Members Posts: 16,375 Joined: 7-January 05 From: richmond, Va. Member No.: 3,419 Region Association: None |
QUOTE(Andyrew @ Aug 11 2011, 04:33 AM) Last night I sprayed the engine lid, doors, and inside the targa sails. Everything went off pretty much without a hitch. One thing to note is the top coat smoothed out really well however it looks like it has tiny dust particles or it evaporated quickly. I think this might have been because I left the fans running all night but I am not worried at all it looks really nice and will wet sand to a really nice finish. 5 coats. Unless you have too much draw the fans had nothing to do with it drying to quickly. You are more likely to have issues without fans than you are with. As the paint dries, the solvents rise to the surface and nee airflow to be carried away from the paint. Without that airflow you get solvent poping. Most likely what you have are small dust particles, a good wet sanding will knock them out. Again, you get what you pay for in this business, hence the 15.00 paint gun experience. Next time buy a small mixing cup, or a measuring stick, it's only a couple bucks and it makes mixing small amounts much easier (IMG:style_emoticons/default/beerchug.gif) |
|
|
|
| malaga_red75 |
Aug 11 2011, 09:49 AM
Post
#127
|
|
'74 2.5L N/A Subie Group: Members Posts: 454 Joined: 5-March 06 From: Menlo Park, CA Member No.: 5,674 Region Association: None |
(IMG:style_emoticons/default/beerchug.gif)
nice andrew! What are we going to do about the bumpers? Are you thinking rattle can or the flat black from home depot? |
|
|
|
| Andyrew |
Aug 11 2011, 12:23 PM
Post
#128
|
|
Spooling.... Please wait Group: Members Posts: 13,381 Joined: 20-January 03 From: Riverbank, Ca Member No.: 172 Region Association: Northern California
|
Scotty, great advice! I didnt notice any solevent pop and it really look like its just small dirt particles. Im pretty sure itll polish out really nice! I think ill give it a try on monday before Peter takes it home.
Peter, its totally up to you, i think either will work just fine. If you want we can try the home depot stuff the. If that doesnt work topcoat it with rattlecan. |
|
|
|
| malaga_red75 |
Aug 11 2011, 12:52 PM
Post
#129
|
|
'74 2.5L N/A Subie Group: Members Posts: 454 Joined: 5-March 06 From: Menlo Park, CA Member No.: 5,674 Region Association: None |
QUOTE(Andyrew @ Aug 11 2011, 11:23 AM) Scotty, great advice! I didnt notice any solevent pop and it really look like its just small dirt particles. Im pretty sure itll polish out really nice! I think ill give it a try on monday before Peter takes it home. Peter, its totally up to you, i think either will work just fine. If you want we can try the home depot stuff the. If that doesnt work topcoat it with rattlecan. yea, that sounds good. We will probably get a better, even coat out of the spray gun. so lets try the home depot stuff. do you wanna shoot it the same day as the car? I thought we were going to shoot it a different day? also, i think on friday night i want to acetone the engine bay and spray with rattle can or green (still debating). But I dont wan't to leave it as is. we can figure it out. |
|
|
|
| Andyrew |
Aug 11 2011, 11:35 PM
Post
#130
|
|
Spooling.... Please wait Group: Members Posts: 13,381 Joined: 20-January 03 From: Riverbank, Ca Member No.: 172 Region Association: Northern California
|
QUOTE(scotty b @ Aug 11 2011, 06:14 AM) QUOTE(Andyrew @ Aug 11 2011, 04:33 AM) Last night I sprayed the engine lid, doors, and inside the targa sails. Everything went off pretty much without a hitch. One thing to note is the top coat smoothed out really well however it looks like it has tiny dust particles or it evaporated quickly. I think this might have been because I left the fans running all night but I am not worried at all it looks really nice and will wet sand to a really nice finish. 5 coats. Unless you have too much draw the fans had nothing to do with it drying to quickly. You are more likely to have issues without fans than you are with. As the paint dries, the solvents rise to the surface and nee airflow to be carried away from the paint. Without that airflow you get solvent poping. Most likely what you have are small dust particles, a good wet sanding will knock them out. Tested the engine lid with a wet sand and polish. Tiny holes were still there. Wet sanded more, and the holes were more pronounced. Looked over the jambs and the rest of the car and there are these little holes all through it. Im pissed. Nothing is going right in this final stage. I am going to take the engine lid to my material supplier and show them what their paint is doing. This is totally unacceptable. My paint was well more than 1/2 what I had to buy this paint for and I never had a single problem with the actual material. 15-20 minute flash time @ 75-80 deg. Pressure @ 35-40psi on the gun, Perfect pattern, 50% overlay, Mixed exactly per specs. Very little dust in the air at all (actually was really nice...). Sigh. Im going to grab a beer now.. |
|
|
|
| Andyrew |
Aug 11 2011, 11:37 PM
Post
#131
|
|
Spooling.... Please wait Group: Members Posts: 13,381 Joined: 20-January 03 From: Riverbank, Ca Member No.: 172 Region Association: Northern California
|
Oh I forgot to mention, Tomorrow I will spray the engine lid again (If the materials do NOT turn out the be the problem) and make any changes I can think of. If this does not turn out, we are NOT spraying the car until I get this resolved.
|
|
|
|
| barada |
Aug 12 2011, 04:15 AM
Post
#132
|
|
Member Group: Members Posts: 257 Joined: 5-October 08 From: Atlanta Member No.: 9,613 Region Association: None |
Sounds like solvent pop. What temp reducer are you using?
Phillip |
|
|
|
| scotty b |
Aug 12 2011, 05:21 AM
Post
#133
|
|
rust free you say ? Group: Members Posts: 16,375 Joined: 7-January 05 From: richmond, Va. Member No.: 3,419 Region Association: None |
QUOTE(barada @ Aug 12 2011, 02:15 AM) Sounds like solvent pop. What temp reducer are you using? Phillip (IMG:style_emoticons/default/agree.gif) You can bitch at your supplier all you want, but the chance of the paint being the problem are slim to none. There is no reason for the paint itself to leave " holes" in the finish. You're using the wrong temp hardener, reducer or don't have enough airflow, or are applying coats too quickly. What gun are you using ? You are shooting at 35-40 psi which is WAY too high for a HVLP. 35-40 is conventional gun pressure, you should have no more than 20 with a HVLP |
|
|
|
| Andyrew |
Aug 12 2011, 08:31 AM
Post
#134
|
|
Spooling.... Please wait Group: Members Posts: 13,381 Joined: 20-January 03 From: Riverbank, Ca Member No.: 172 Region Association: Northern California
|
Im pretty sure its medium temp. The paint store didnt even ask me what I wanted.
Its a Huffy HDS590 No more than 20ps? Were talking at the regulator right? I think thats to low, im reading closer to 25psi right now. I sprayed my car at 30-35 iirc and it liked it much better when I was spraying at higher psi. My gun says 40psi max on the side of the gun. I think your right this could definitely be my problem. I will test spray tonight with all the recommendations I can get to see if I can fix these issues. Thanks all!!! Andrew |
|
|
|
| barada |
Aug 12 2011, 08:35 AM
Post
#135
|
|
Member Group: Members Posts: 257 Joined: 5-October 08 From: Atlanta Member No.: 9,613 Region Association: None |
QUOTE(Andyrew @ Aug 12 2011, 10:31 AM) Im pretty sure its medium temp. The paint store didnt even ask me what I wanted. Its a Huffy HDS590 No more than 20ps? Were talking at the regulator right? I think thats to low, im reading closer to 25psi right now. I sprayed my car at 30-35 iirc and it liked it much better when I was spraying at higher psi. My gun says 40psi max on the side of the gun. I think your right this could definitely be my problem. I will test spray tonight with all the recommendations I can get to see if I can fix these issues. Thanks all!!! Andrew Andrew, If you can get a photo the blemishes we can try and help. |
|
|
|
| Andyrew |
Aug 12 2011, 09:13 AM
Post
#136
|
|
Spooling.... Please wait Group: Members Posts: 13,381 Joined: 20-January 03 From: Riverbank, Ca Member No.: 172 Region Association: Northern California
|
My camera's batteries were dead. I was charging them last night. Photos in a sec.
|
|
|
|
| Andyrew |
Aug 12 2011, 09:17 AM
Post
#137
|
|
Spooling.... Please wait Group: Members Posts: 13,381 Joined: 20-January 03 From: Riverbank, Ca Member No.: 172 Region Association: Northern California
|
The worst photo is where I wet sanded down quite a bit. Probably through a layer and a half. The other area is a typical surface wet sand.
Attached image(s) 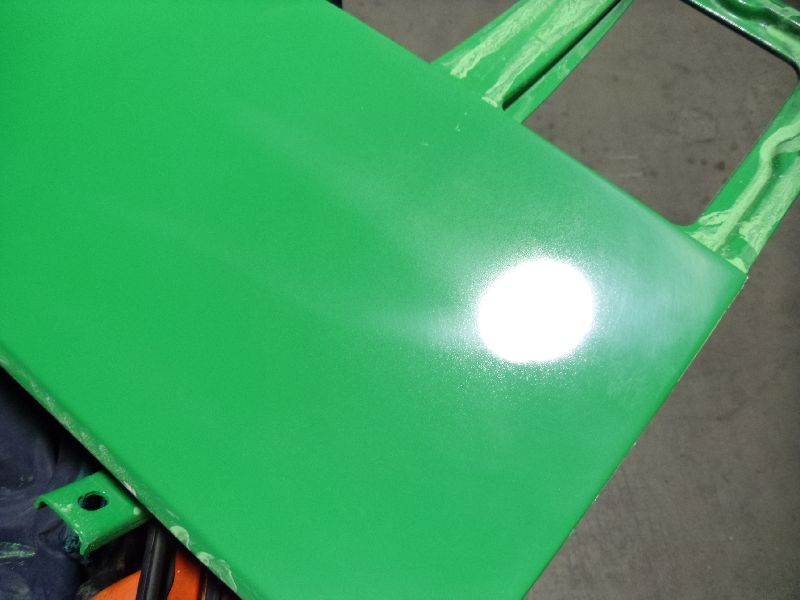 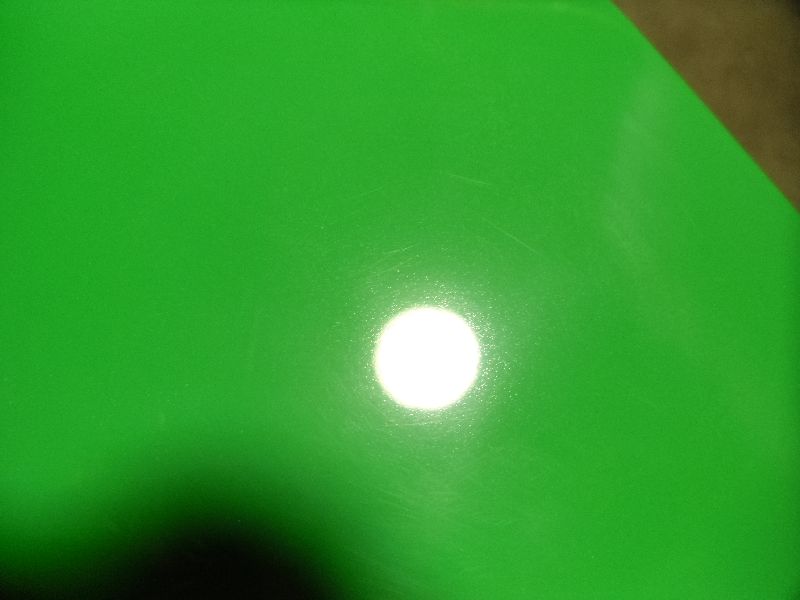
|
|
|
|
| barada |
Aug 12 2011, 09:25 AM
Post
#138
|
|
Member Group: Members Posts: 257 Joined: 5-October 08 From: Atlanta Member No.: 9,613 Region Association: None |
QUOTE(Andyrew @ Aug 12 2011, 11:17 AM) The worst photo is where I wet sanded down quite a bit. Probably through a layer and a half. The other area is a typical surface wet sand. Awesome color. It does look like solvent pop. May need a higher temp reducer as a 1st step. Phillip |
|
|
|
| Andyrew |
Aug 12 2011, 09:41 AM
Post
#139
|
|
Spooling.... Please wait Group: Members Posts: 13,381 Joined: 20-January 03 From: Riverbank, Ca Member No.: 172 Region Association: Northern California
|
Now this was sprayed at 75-80 (Might have been 85 deg.. but that would have been on the first coat).
We still plan to spray tomorrow starting @ 9am. I can move that around however I want. I anticipate it taking 3 hours to actually spray and an hour to prep. Here are the temps through the day. 7=64 8=67 9=71 10=75 11=80 12=82 1=85 2=88 My thoughts are to go to the paint store and swap out my full medium reducer for a high temp reducer. If we start at 9, Spray at 10 and I use the high temp reducer then I will be in the high temp range throught the day, right? Or should I start out with the medium reducer and then go to the high temp reducer @ 11 or when the garage gets over say 78 deg? |
|
|
|
| scotty b |
Aug 12 2011, 12:09 PM
Post
#140
|
|
rust free you say ? Group: Members Posts: 16,375 Joined: 7-January 05 From: richmond, Va. Member No.: 3,419 Region Association: None |
I'd go with a medium reducer in the base and a slow hardener in the clear. If you reduce the clear, the medium will be fine, the hardener is what makes the real difference. Using the slow hardener will also allow the paint more time to flow out, you just need to adjust how soon you apply additional coats. 20 psi at the gun, the HVLP guns are designed to drop pressure internally so the 20 will get cut own to around 16 at the cap. Too much pressure will force air past the reduction points and you will get to much at the tip. It also has the potential to blow out seals with too much pressure.
|
|
|
|
|
1 User(s) are reading this topic (1 Guests and 0 Anonymous Users)
0 Members:

|
Lo-Fi Version | Time is now: 3rd October 2026 - 04:58 PM |
Invision Power Board
v9.1.4 © 2026 IPS, Inc.