|
|
|
Porsche, and the Porsche crest are registered trademarks of Dr. Ing. h.c. F. Porsche AG.
This site is not affiliated with Porsche in any way. Its only purpose is to provide an online forum for car enthusiasts. All other trademarks are property of their respective owners. |
|
|

  |

| CptTripps |
 Jan 25 2005, 07:48 AM Jan 25 2005, 07:48 AM
Post
#21
|
|
:: Punch and Pie ::  Group: Members Posts: 3,586 Joined: 26-December 04 From: Tuscaloosa, AL and Akron, OH Member No.: 3,342 Region Association: Upper MidWest |
Sorry to dig up a way-old topic, but I needed info like this and found it by 'searching the old stuff'.
Wow. This is the most amazingly helpfull post I've seen here. Why in the world isn't in the 'Classics'? I'm alwaysed impressed that you all take the time to help out the 'new guy' with WAY more information than they asked for. I'd say it's like you can read minds...but you just know the question that'll come next and answer it anyway. Bravo... ...ok, enough a$$ kissing. Back to my sceptical face. |
   |

 
|
| SirAndy |
Jan 25 2005, 10:47 AM
Post
#22
|
|
Resident German Group: Admin Posts: 42,488 Joined: 21-January 03 From: Oakland, Kalifornia Member No.: 179 Region Association: Northern California |
alright, renamed it and moved it to the classics ...
(IMG:http://www.914world.com/bbs2/html/emoticons/cool.gif) Andy |
|
|
|
| Gint |
Jan 30 2011, 10:12 AM
Post
#23
|
|
Mike Ginter Group: Admin Posts: 16,108 Joined: 26-December 02 From: Denver CO. Member No.: 20 Region Association: Rocky Mountains |
New information added to this subject by Jeff Bowlsby can be found in this thread:
http://www.914world.com/bbs2/index.php?showtopic=114932 QUOTE(Jeff Bowlsby @ Jan 24 2011, 06:04 PM)  I'll suggest a couple of revisions to the chassis wiring harness removal/installation thread to make things easier. It is easiest and best to take apart or remove a couple of the larger connector housings to ease the process and avoid damage to either the car, the wires, wire terminals or the connector housings, especially at the chassis holes where the harness passes through. Reinstallation is a 'snap'. 1. Don’t cut anything, there is never a need to cut wiring just for removal or reinstallation Connectors with housings easily disassemble. Make a diagram for where specific wires go in the housing before disassembling connector housings, for later use during reassembly. See diagram below to access the wire terminal release tangs. 2. Remove the plastic housings from the headlight branches. 3. Remove the cover and base from the 14-pin connector housing. 4. Remove the single pole box cover at the oil temp wire near the battery on the 1973-76 cars. 5. Avoid putting stress or severely bending any wire terminal or portion of the harness. Avoid nicking or chafing the wire insulation or casing by liberal use of a lubricant. Applying a lubricant like glycerine really helps pass it through the tight spots and can avoid damage. Glycerine is non-oily and wipes off easily, find it inexpensively at your local pharmacy and use it regularly on your other rubber trim parts to keep them fresh and prevent them from drying out. 6. The rubber double grommet conduit (‘snorkel’) is hard to deal with. Assuming it is on the harness already, leave it on the harness, do not slice it (unless is badly deteriorated). There are no new replacements at this time for this grommet. Lube this up to save it if at all possible. (IMG:http://www.914world.com/bbs2/uploads/post-104-1295917445.jpg) |
|
|
|
| Frank S |
Sep 16 2016, 02:17 AM
Post
#24
|
|
Member Group: Members Posts: 135 Joined: 15-April 15 From: Wiesbaden, Germany Member No.: 18,632 Region Association: Germany |
QUOTE(SirAndy @ Jun 24 2004, 10:48 PM) one more: I'm a bid confused, is the red line on the pic showing the routing of the early or the late car? Thanks, Frank 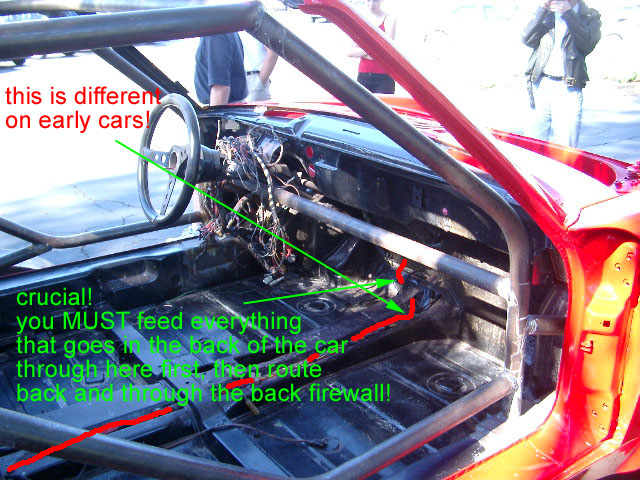 |
|
|
|
| rgalla9146 |
Sep 16 2016, 07:19 AM
Post
#25
|
|
Advanced Member Group: Members Posts: 4,984 Joined: 23-November 05 From: Paramus NJ Member No.: 5,176 Region Association: None |
Dave, Andy you will both be rewarded in the afterlife.......but not too soon please. |
|
|
|
| SirAndy |
Sep 16 2016, 11:16 AM
Post
#26
|
|
Resident German Group: Admin Posts: 42,488 Joined: 21-January 03 From: Oakland, Kalifornia Member No.: 179 Region Association: Northern California |
QUOTE(Frank S @ Sep 16 2016, 01:17 AM) I'm a bid confused, is the red line on the pic showing the routing of the early or the late car? The car shown is an early car ... (IMG:style_emoticons/default/bye1.gif) |
|
|
|
| Frank S |
Sep 17 2016, 03:33 AM
Post
#27
|
|
Member Group: Members Posts: 135 Joined: 15-April 15 From: Wiesbaden, Germany Member No.: 18,632 Region Association: Germany |
QUOTE(SirAndy @ Sep 16 2016, 07:16 PM) QUOTE(Frank S @ Sep 16 2016, 01:17 AM) I'm a bid confused, is the red line on the pic showing the routing of the early or the late car? The car shown is an early car ... (IMG:style_emoticons/default/bye1.gif) Thanks! |
|
|
|
| Daryl32 |
Feb 19 2020, 08:44 AM
Post
#28
|
|
Member Group: Members Posts: 133 Joined: 14-January 20 From: Southern California Member No.: 23,827 Region Association: Southern California |
QUOTE(SirAndy @ Jun 24 2004, 12:48 PM) one more: Thank you Andy!!!!! I am working on a 73 V8 conversion and had to run another harness through the car. Your labeling of the harness will help with some of the "what are these and where do they go "?'s" I have. Still not sure how to tie-up/mount the bundle of wires near the fuse panel. This is with the harness in the engine bay done and up to the shifter. 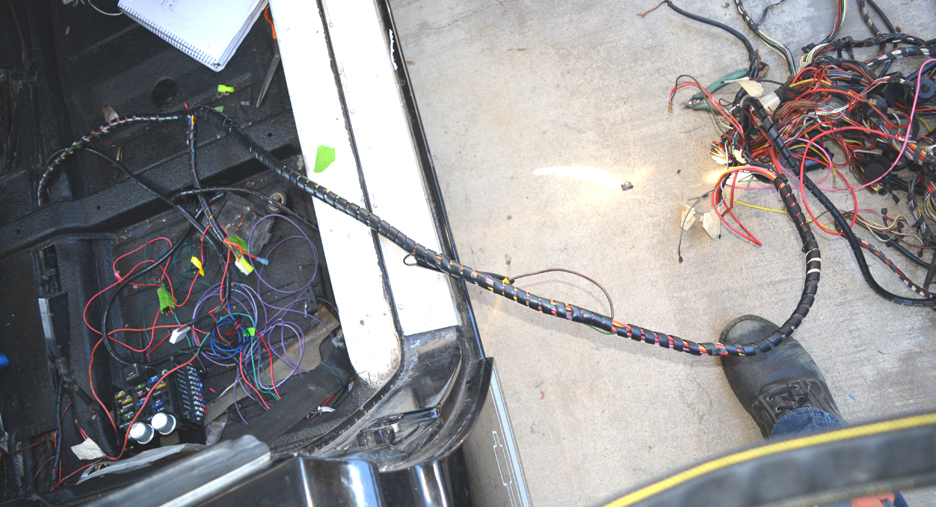 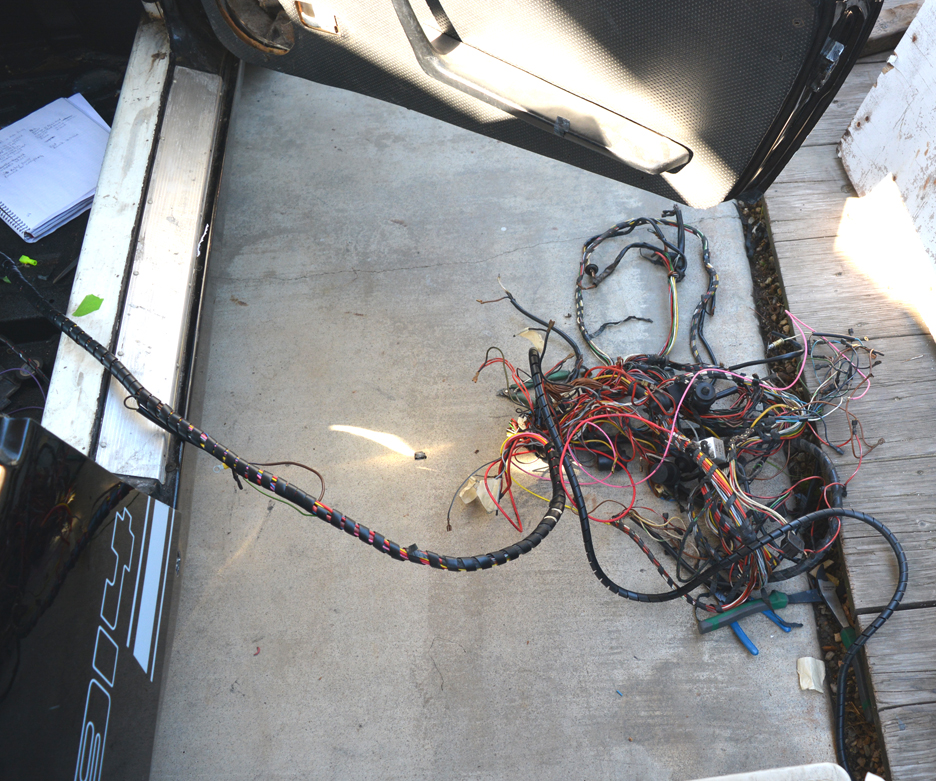 This is with harness through front bulkhead and the rats nest zip tied up waiting for stuffing and hook up. 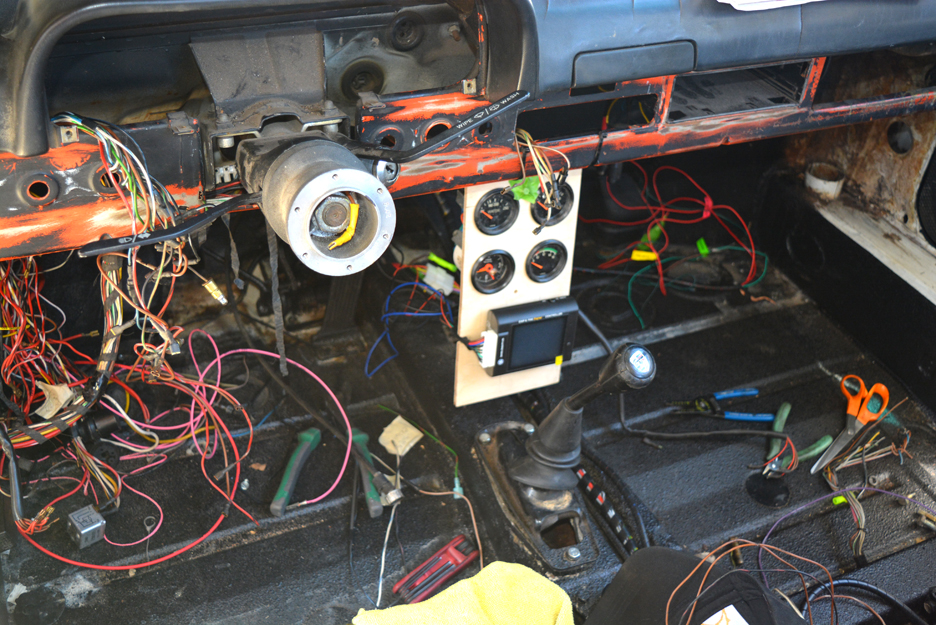 |
|
|
|
| SirAndy |
Feb 19 2020, 11:38 AM
Post
#29
|
|
Resident German Group: Admin Posts: 42,488 Joined: 21-January 03 From: Oakland, Kalifornia Member No.: 179 Region Association: Northern California |
QUOTE(Daryl32 @ Feb 19 2020, 06:44 AM) Still not sure how to tie-up/mount the bundle of wires near the fuse panel. @Daryl32 There should be metal tabs on the body going up to that area to help keeping the harness in place. Installing a main harness is one of those things that always looks daunting no matter how carefully you plan ahead. (IMG:style_emoticons/default/biggrin.gif) |
|
|
|
| Daryl32 |
Feb 22 2020, 10:20 AM
Post
#30
|
|
Member Group: Members Posts: 133 Joined: 14-January 20 From: Southern California Member No.: 23,827 Region Association: Southern California |
@SirAndy
Thank you - I will be getting back at it Monday. Had to take a week off away from it so I could see the trees even while in the forest! Do you coil up the extra harness near the fuse panel? Sorry for adding to an older thread. |
|
|
|
| SirAndy |
Feb 22 2020, 11:47 AM
Post
#31
|
|
Resident German Group: Admin Posts: 42,488 Joined: 21-January 03 From: Oakland, Kalifornia Member No.: 179 Region Association: Northern California |
QUOTE(Daryl32 @ Feb 22 2020, 08:20 AM) Do you coil up the extra harness near the fuse panel? There should be no "extra" if it is routed correctly ... (IMG:style_emoticons/default/idea.gif) |
|
|
|
| Daryl32 |
Feb 22 2020, 11:52 AM
Post
#32
|
|
Member Group: Members Posts: 133 Joined: 14-January 20 From: Southern California Member No.: 23,827 Region Association: Southern California |
QUOTE(SirAndy @ Feb 22 2020, 09:47 AM) QUOTE(Daryl32 @ Feb 22 2020, 08:20 AM) Do you coil up the extra harness near the fuse panel? There should be no "extra" if it is routed correctly ... (IMG:style_emoticons/default/idea.gif) (IMG:style_emoticons/default/idea.gif) (IMG:style_emoticons/default/headbang.gif) Back to the floor position. LOL I have a lot. |
|
|
|
| SirAndy |
Feb 22 2020, 12:24 PM
Post
#33
|
|
Resident German Group: Admin Posts: 42,488 Joined: 21-January 03 From: Oakland, Kalifornia Member No.: 179 Region Association: Northern California |
QUOTE(Daryl32 @ Feb 22 2020, 09:52 AM) QUOTE(SirAndy @ Feb 22 2020, 09:47 AM) QUOTE(Daryl32 @ Feb 22 2020, 08:20 AM) Do you coil up the extra harness near the fuse panel? There should be no "extra" if it is routed correctly ... (IMG:style_emoticons/default/idea.gif) (IMG:style_emoticons/default/idea.gif) (IMG:style_emoticons/default/headbang.gif) Back to the floor position. LOL I have a lot. There should be metal tabs on the body from the location where the harness exits the front of the center tunnel, behind(ish) the pedal board and up to the fuse panel location. If you follow those tabs with the harness, there should be no extra by the time the fuse panel is mounted. (IMG:style_emoticons/default/popcorn[1].gif) |
|
|
|
| Mikey914 |
Feb 22 2020, 05:34 PM
Post
#34
|
|
The rubber man Group: Members Posts: 12,782 Joined: 27-December 04 From: Hillsboro, OR Member No.: 3,348 Region Association: None |
Perfect timing. Taylor just shot some color on the car so he can get it off the rotisserie. The final paint will be shot once most of the work is done. We were just looking at the harness he took out and this is a great reference.
Thanks again Andy Attached image(s) 
|
|
|
|
| Archie |
May 28 2020, 02:49 PM
Post
#35
|
|
Member Group: Members Posts: 197 Joined: 23-September 09 From: Western Canada Member No.: 10,844 Region Association: Pacific Northwest |
QUOTE(SirAndy @ Jun 24 2004, 01:41 PM) a few tips about installation: the whole harness must be installed from inside the cabin! everything that goes to the back of the car, rear trunk, engine comp, center tunnel has to be fiddled in from the FRONT of the center tunnel backwards! meaning, the taillight wires first, then string the whole back end through. NOTE: in the front part of the center tunnel, the harness routing is *different* for early/late cars! don't miss that first hoop or you won't be able to fit the mount for the floor board! it's a lot easier to fiddle the big connectors through tight holes FIRST, even if they're not the first thing in the harness, if you feed the smaller wires first, the bigger connectors won't fit anymore. this will take some practice (IMG:style_emoticons/default/biggrin.gif) yes, all the engine and rear trunk stuff fits through the rear firewall hole, even the big rubber boot! trust me, you can do it! btw. it *REALLY* helps having a second person sitting in the engine comp while you feed the stuff through! once the rear is in place, feed the front part through the front firewall (left from the steering wheel). same here, feed bigger connectors first! (IMG:style_emoticons/default/smash.gif) Andy Thanks a tremendous bunch for this, Your Excellency! I'm at the removing stage and you've just stopped a lot of head scratching! (Mine!) |
|
|
|
| porschetub |
May 29 2020, 10:17 PM
Post
#36
|
|
914 Guru Group: Members Posts: 5,141 Joined: 25-July 15 From: New Zealand Member No.: 18,995 Region Association: None |
QUOTE(i love porsche @ Jun 25 2004, 01:13 PM) wow...thanks so much! that is going to be so helpful yeah, i have the haynes manual...but im not very good at reading the wiring diagrams...what is nice is that there is already a bet up wiring harness in the car...so i have that for some reference..but what i want to do is put lables on the parts of the wiring to make it easier for me, i cant thank you guys enough for your help! Get the whole thing and "pin it out" on a 8x4 sheet of plywood and label what you already know,you will then be over to repair or replace cut connectors,you have the info to get in to this on this forum,Andy has got you started. Did a VW CIS to Dijifant conversion loom this way a while back and it made it real easy. Don't worry about the engine loom as they kinda sort themselves due to plugs mostly fitting one way. Good luck,not something I would do but I'am and old fart and too cautious (IMG:style_emoticons/default/lol-2.gif) . |
|
|
|
|
1 User(s) are reading this topic (1 Guests and 0 Anonymous Users)
0 Members:

|
Lo-Fi Version | Time is now: 22nd July 2026 - 06:44 PM |
Invision Power Board
v9.1.4 © 2026 IPS, Inc.