|
|
|
Porsche, and the Porsche crest are registered trademarks of Dr. Ing. h.c. F. Porsche AG.
This site is not affiliated with Porsche in any way. Its only purpose is to provide an online forum for car enthusiasts. All other trademarks are property of their respective owners. |
|
|

  |

| jdogg |
 Aug 18 2004, 03:51 PM Aug 18 2004, 03:51 PM
Post
#21
|
|
Member  Group: Members Posts: 431 Joined: 28-January 03 From: Youngsville, NC Member No.: 204 |
Ok, Root.....Say someone "accidentally" removed the cover on the seatbelt retractors, and the spring sprung all over the place.....how does it go back together? Best I can tell, the spring gets wound back on "against the grain" of its coil...Any tricks to getting this done, other than pitching them and getting new retractors???
|
   |

 
|
| BGman |
Aug 19 2004, 08:56 AM
Post
#22
|
|
Greg Group: Members Posts: 87 Joined: 18-January 04 From: Owensboro, KY Member No.: 1,575 Region Association: None |
Thanks Eric- I completely understand now and see t in your pictures. My window did not have any factory tape on ot when it came out.
jdogg- I know another guy who did the same thing as you! My fingers were sore for a week as I was cussing myself for wanting to "see inside"!!! I can't tell you exactly how I did it without opening it back up- and that is not going to happen! It seems to me that you do have to wind it from the outside in and against the natural spring tension to get it to work. Good luck. I feel for ya. -g |
|
|
|
| Root_Werks |
Aug 19 2004, 10:30 AM
Post
#23
|
|
Village Idiot Group: Members Posts: 8,996 Joined: 25-May 04 From: About 15NM from Canada Member No.: 2,105 Region Association: Pacific Northwest |
QUOTE(jdogg @ Aug 18 2004, 01:51 PM) Ok, Root.....Say someone "accidentally" removed the cover on the seatbelt retractors, and the spring sprung all over the place.....how does it go back together? Best I can tell, the spring gets wound back on "against the grain" of its coil...Any tricks to getting this done, other than pitching them and getting new retractors??? Jdogg! What have you done!? (IMG:style_emoticons/default/ohmy.gif) Yeah, prepare for sore fingers. I have done the same thing and if you are thinking like I am, the spring goes "against the grain" so to speak. It took me a couple of tries before figuring it out. VW I think still makes the springs new? If it has sprung appart, might be worth checking out a local VW dealer and pop in a new one. I replaced both springs once, wow, seatbelts retracted, strongly I might add. (IMG:style_emoticons/default/wink.gif) But I haven't done it since becuase of the time I spent winding the &$#@!*! springs back in. Make one slip and they look like spagetti. (IMG:style_emoticons/default/ohmy.gif) |
|
|
|
| StratPlayer |
Aug 21 2004, 07:55 PM
Post
#24
|
|
StratPlayer Group: Members Posts: 3,372 Joined: 27-December 02 From: SLC, Utah Member No.: 27 Region Association: Rocky Mountains |
Thanks for this thread, got my rear window resealed today. I got my new seat covers finally, had to have them special made and took the seats out to put them on. Hell, had the seats out might as well tackle the rear window. Had no problem getting the window out didn't need any knives or guitar strings, it just came out, don't know what the hell was holding it in place. So the window is now in and fits nice and snug. I used butyl tape to reinstall the window.
So tomorrow I will put the new seat covers on the seats and enjoy the ride. Glad this little project is behind me. |
|
|
|
| CptTripps |
May 26 2005, 08:09 AM
Post
#25
|
|
:: Punch and Pie :: Group: Members Posts: 3,586 Joined: 26-December 04 From: Tuscaloosa, AL and Akron, OH Member No.: 3,342 Region Association: Upper MidWest |
Why isn't this in the "Classic Threads" section?
It's a prefect 'How-To' |
|
|
|
| Gint |
May 26 2005, 08:23 AM
Post
#26
|
||
|
Mike Ginter Group: Admin Posts: 16,108 Joined: 26-December 02 From: Denver CO. Member No.: 20 Region Association: Rocky Mountains |
Because I've never seen it before! |
||
|
|
|
||
| JRust |
Nov 19 2011, 07:03 PM
Post
#27
|
|
914 Guru Group: Members Posts: 6,317 Joined: 10-January 03 From: Albany Oregon Member No.: 129 Region Association: Pacific Northwest |
Damned if I didn't use the search feature to perfection (IMG:style_emoticons/default/evilgrin.gif) . I need to redo the one in my LE. I'll go buy the tape tomorrow. Thanks for the write up (IMG:style_emoticons/default/piratenanner.gif)
|
|
|
|
| Meoshe |
Jan 20 2012, 12:08 AM
Post
#28
|
|
Newbie Group: Members Posts: 9 Joined: 21-December 11 From: Huntington Beach Member No.: 13,921 Region Association: Southern California |
Anyone know where the rubber that the glass sits on can be sourced. My car does not have them apparently, the glass is wedged in with some newspaper rolled up.
|
|
|
|
| euro911 |
Jan 20 2012, 01:28 AM
Post
#29
|
|
Retired & living the dream. God help me if I wake up! Group: Members Posts: 8,937 Joined: 2-December 06 From: So.Cal. & No.AZ (USA) Member No.: 7,300 Region Association: Southern California |
I looked at Mark's site, 914rubber.com, and saw some window setting blocks, but it looks like they're for the front windshield.
Don't know if they can be used for the rear as well. Maybe he'll see this thread and chime in? ... or you could PM him (mikey914) http://shop.914rubber.com/product.sc?produ...mp;categoryId=5 Oh, and yeah, nice write-up Eric (IMG:style_emoticons/default/beerchug.gif) |
|
|
|
| jpodesva |
Aug 9 2017, 08:57 PM
Post
#30
|
|
Newbie Group: Members Posts: 1 Joined: 7-December 15 From: Carbondale IL Member No.: 19,439 Region Association: Upper MidWest |
13 years on, this is still a great how-to. Thanks, Eric!
|
|
|
|
| Mikey914 |
Aug 9 2017, 09:11 PM
Post
#31
|
|
The rubber man Group: Members Posts: 12,782 Joined: 27-December 04 From: Hillsboro, OR Member No.: 3,348 Region Association: None |
Excellent how to. The setting blocks are just to ensure the glass doesn't contact the metal. It is possible to have it break as tempered glass can pop if the edge is hit.
I finally have the butyl and blocks. And now I even have the glass....with tint if you like. As well as the polycarbonate one. Id offer a $50 credit for some good pictures of one installed and some feedback on it. Attached image(s) 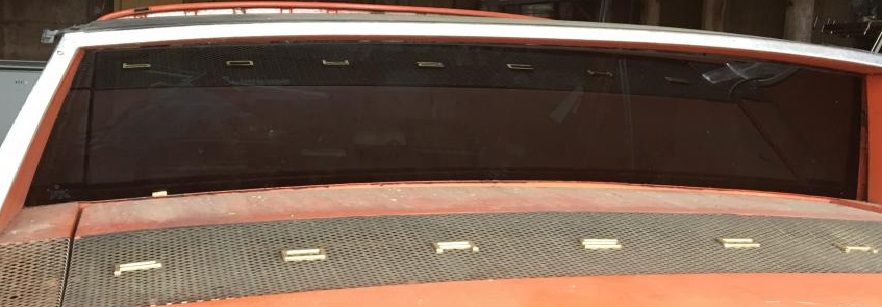 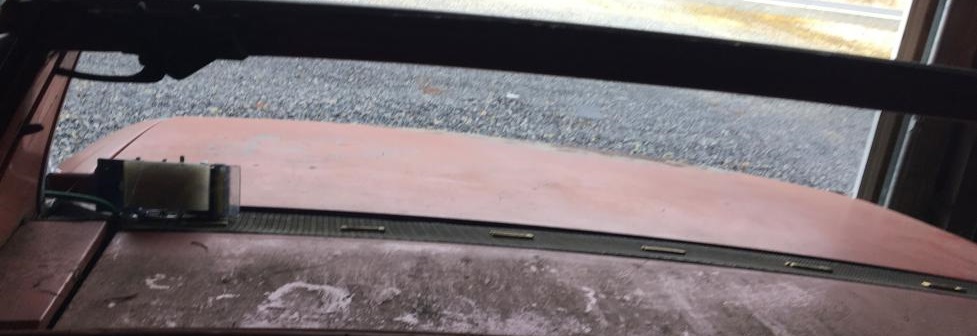
|
|
|
|
| Wyvern |
Aug 11 2017, 05:00 PM
Post
#32
|
|
Member Group: Members Posts: 324 Joined: 7-October 15 From: San Francisco (East Bay) Member No.: 19,245 Region Association: Northern California |
This and the Sail vinyl are on my list so just doing research.
I did discover and to answer a question asked ... that the Front Window Blocks & the Rear Window Blocks are the same part #. 91454190710 Spacer For Windscreen 91454190710 Spacer For Rear Window |
|
|
|
| Mikey914 |
Aug 11 2017, 05:33 PM
Post
#33
|
|
The rubber man Group: Members Posts: 12,782 Joined: 27-December 04 From: Hillsboro, OR Member No.: 3,348 Region Association: None |
Yep, and factory retail at $8 each so we made them.
|
|
|
|
| nine11speedster |
Aug 11 2017, 05:34 PM
Post
#34
|
|
Carson Group: Members Posts: 55 Joined: 8-February 08 From: Ca, USA Member No.: 8,686 Region Association: None |
i want to install the Polycarbonate window into my street/race 914. Does anyone know if i would just simply use the Butyl to hold the window? any clips or brackets? Thanks.
(Car has stripped interior) |
|
|
|
| 913B |
Aug 11 2017, 05:34 PM
Post
#35
|
|
Senior Member Group: Members Posts: 876 Joined: 25-April 05 From: South Bay/SoCal Member No.: 3,983 Region Association: None |
bookmarked for future reference (IMG:style_emoticons/default/aktion035.gif)
|
|
|
|
| Mikey914 |
Aug 11 2017, 05:37 PM
Post
#36
|
|
The rubber man Group: Members Posts: 12,782 Joined: 27-December 04 From: Hillsboro, OR Member No.: 3,348 Region Association: None |
QUOTE(nine11speedster @ Aug 11 2017, 04:34 PM)  i want to install the Polycarbonate window into my street/race 914. Does anyone know if i would just simply use the Butyl to hold the window? any clips or brackets? Thanks. (Car has stripped interior) Got Poly in stock. Urethane or butyl will both work. Mark |
|
|
|
| Lmaze |
May 9 2020, 09:58 AM
Post
#37
|
|
Newbie Group: Members Posts: 8 Joined: 3-May 20 From: Edmonton Alberta Member No.: 24,218 Region Association: Canada |
I had to laugh, I was only going to replace the outside rubber seal and draw a new bead of sealer on the bottom inside of rear window. When I removed the two side pads the window just plopped down, none of the original seal anywhere on the window's four sides was sealing anything. The old seal just pulled right off with zero effort needed.
Lesson - Just do it right and forget about any short cuts to sealing the rear window. These instructions are great and it's an easy project to take on. (IMG:style_emoticons/default/wacko.gif) |
|
|
|
| Cairo94507 |
Oct 28 2022, 03:02 PM
Post
#38
|
|
Michael Group: Members Posts: 10,663 Joined: 1-November 08 From: Auburn, CA Member No.: 9,712 Region Association: Northern California |
Getting ready to remove my existing heated rear glass and replace it with a new to me heated rear glass. My original has slight scratches and I wanted a better glass.
Thought I would give this thread a look so I know what to expect. Getting help with this from Greg T. in Tracy. Looking forward to a nice rear glass, sealed, (mine was not secure at the bottom) and going to take the opportunity to add the hi-mount 3rd brake light under the roll bar. Very excited to get this all done and buttoned up. Will try to get some pictures as we progress. (IMG:style_emoticons/default/beerchug.gif) |
|
|
|
| 76-914 |
Oct 28 2022, 03:30 PM
Post
#39
|
|
Repeat Offender & Resident Subaru Antagonist Group: Members Posts: 13,893 Joined: 23-January 09 From: Temecula, CA Member No.: 9,964 Region Association: Southern California |
Be sure both surfaces are clean. Also, I doubt this would apply to your 914, I like to offer the glass up against the frame before rolling out the Butylene cord. This way you can check for high & low spots. Watch the width of the tape as pressure increases against the glass. If the glass was equidistant from the frame before then the butyl cord will be an equal width all the way around once the glass is seated. It's a piece of cake and you'll Ace it! (IMG:style_emoticons/default/beerchug.gif)
|
|
|
|
| Cairo94507 |
Oct 29 2022, 06:14 AM
Post
#40
|
|
Michael Group: Members Posts: 10,663 Joined: 1-November 08 From: Auburn, CA Member No.: 9,712 Region Association: Northern California |
Sorry- should have mentioned we are going to use Urethane for the install. I have the electric gun a local shop let me borrow so it pushes out a nice ribbon. After the Butyl failed in about 1 year, I do not want to have to do this again. (IMG:style_emoticons/default/beerchug.gif)
OK, so here is the car with the upholstery out so we can do the glass tomorrow. Took about 1 1/4 hours to disassemble carefully.   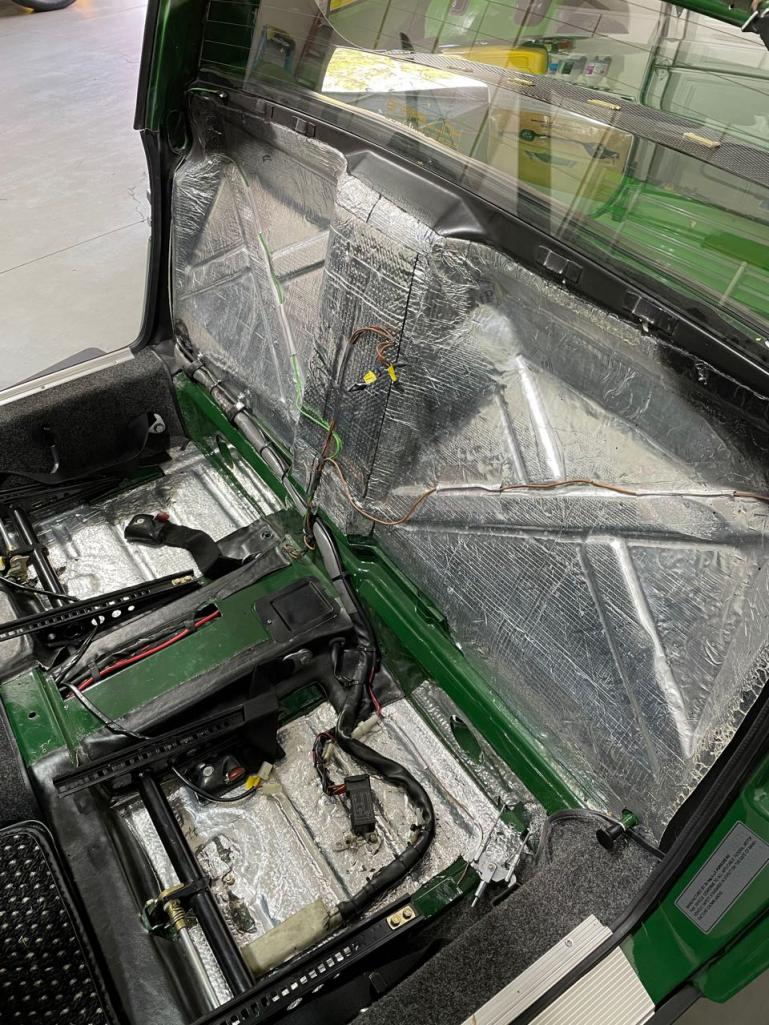 |
|
|
|
|
1 User(s) are reading this topic (1 Guests and 0 Anonymous Users)
0 Members:

|
Lo-Fi Version | Time is now: 8th June 2026 - 11:57 PM |
Invision Power Board
v9.1.4 © 2026 IPS, Inc.