|
|
|
Porsche, and the Porsche crest are registered trademarks of Dr. Ing. h.c. F. Porsche AG.
This site is not affiliated with Porsche in any way. Its only purpose is to provide an online forum for car enthusiasts. All other trademarks are property of their respective owners. |
|
|

  |

| malcolm2 |
 Dec 9 2011, 02:40 PM Dec 9 2011, 02:40 PM
Post
#1
|
|
Advanced Member  Group: Members Posts: 2,747 Joined: 31-May 11 From: Nashville Member No.: 13,139 Region Association: South East States |
I plan on installing my p/c next. I noticed that the wrist pin keepers are quite different. Is there a trick to install and removal of this type of clip?? The instructions say to pull it apart. It looks like a spring, but "don't spring it". not very clear.
Thanks, Clark 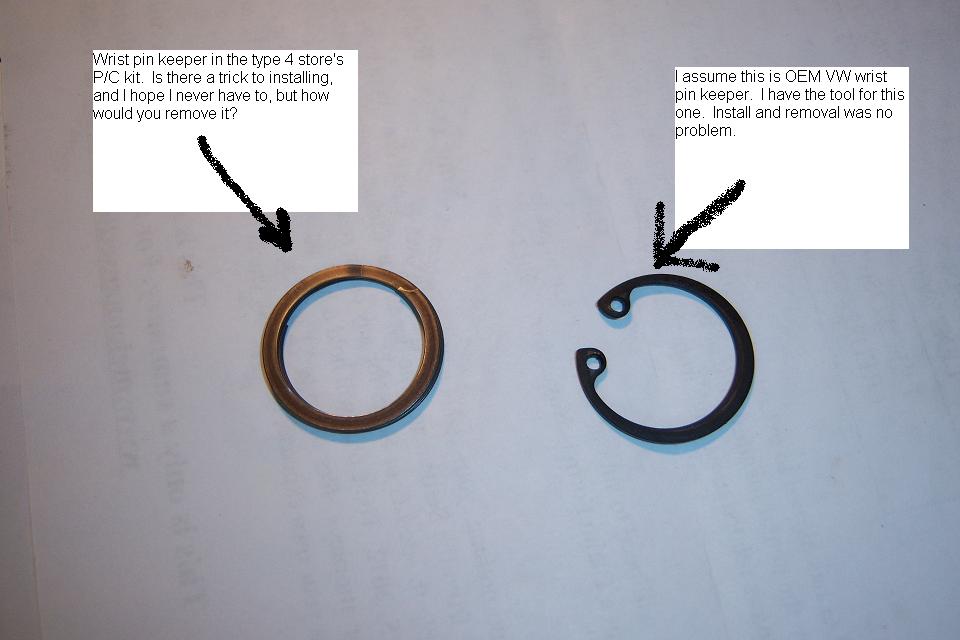 |
   |

 
|
| stugray |
Dec 9 2011, 02:47 PM
Post
#2
|
|
Advanced Member Group: Members Posts: 3,825 Joined: 17-September 09 From: Longmont, CO Member No.: 10,819 Region Association: None |
1 - go get a GOOD set of dental picks. Craftsman will work.
2 - To put in the new clip, you set it over the hole, then using the dental pick, get under the last "loop" of the clip in back. You should be able to push that down into the hole, then keep working your way around until it is all in there and the last bit will click in. 3 - to remove, see the little "notch" in the end of the clip ring? You would reach into the hole and grab that with the dental pick, and work it back out the reverse of how it went in. Stu |
|
|
|
| TheCabinetmaker |
Dec 9 2011, 02:50 PM
Post
#3
|
|
I drive my car everyday Group: Members Posts: 8,346 Joined: 8-May 03 From: Tulsa, Ok. Member No.: 666 |
I scratched my head at first, but its really pretty easy once you figure it out. I just stretched them out like a spring, worked them in a circular motion and kinda screwed them in. Removal just takes a small jewelers screwdriver to pry the end out of the groove where the notch on the end is.
|
|
|
|
| malcolm2 |
Dec 9 2011, 03:18 PM
Post
#4
|
|
Advanced Member Group: Members Posts: 2,747 Joined: 31-May 11 From: Nashville Member No.: 13,139 Region Association: South East States |
QUOTE(vsg914 @ Dec 9 2011, 02:50 PM)  I scratched my head at first, but its really pretty easy once you figure it out. I just stretched them out like a spring, worked them in a circular motion and kinda screwed them in. Removal just takes a small jewelers screwdriver to pry the end out of the groove where the notch on the end is. That was my 1st thought. As the spring is pulled apart to make a coil the OD of the whole thing will get smaller. Is that physics or geometry? First time i have thought about either in quite some time. |
|
|
|
| malcolm2 |
Dec 9 2011, 03:20 PM
Post
#5
|
|
Advanced Member Group: Members Posts: 2,747 Joined: 31-May 11 From: Nashville Member No.: 13,139 Region Association: South East States |
QUOTE(stugray @ Dec 9 2011, 02:47 PM) 1 - go get a GOOD set of dental picks. Craftsman will work. 2 - To put in the new clip, you set it over the hole, then using the dental pick, get under the last "loop" of the clip in back. You should be able to push that down into the hole, then keep working your way around until it is all in there and the last bit will click in. 3 - to remove, see the little "notch" in the end of the clip ring? You would reach into the hole and grab that with the dental pick, and work it back out the reverse of how it went in. Stu I bought a set from Lowe's to get the rear calipers dismantled. Can't be done without a pick of some sort. Now I get to use it again. |
|
|
|
| Van |
Dec 10 2011, 07:01 PM
Post
#6
|
|
Member Group: Members Posts: 199 Joined: 15-January 08 From: Hyde Park, NY Member No.: 8,571 |
Yeah, that's about how I did it when I rebuilt my engine: http://www.ephotomotion.com/914engine/page33.html
|
|
|
|
| VaccaRabite |
Dec 10 2011, 11:24 PM
Post
#7
|
|
En Garde! Group: Admin Posts: 13,757 Joined: 15-December 03 From: Dallastown, PA Member No.: 1,435 Region Association: MidAtlantic Region |
I just used a set of needle nosed plyers for the spiral clips. Start it in the slowly turn it into the groove. Push down on the last bits. The first side is easy the second side is not so easy. I also well oil the groove and clip to reduce friction.
Zach |
|
|
|
| malcolm2 |
Dec 11 2011, 09:52 PM
Post
#8
|
|
Advanced Member Group: Members Posts: 2,747 Joined: 31-May 11 From: Nashville Member No.: 13,139 Region Association: South East States |
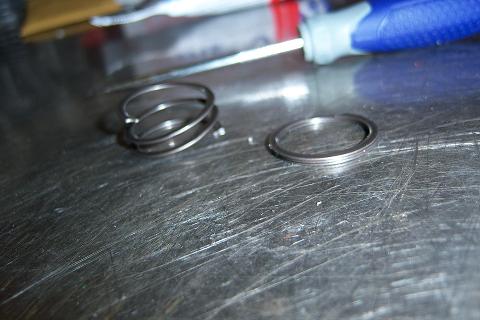
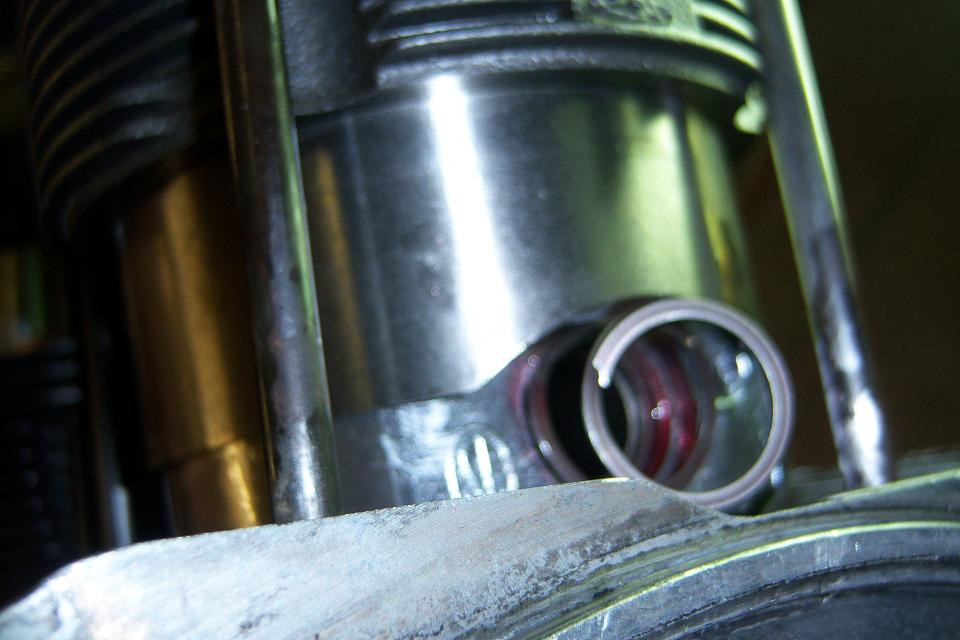
Turns out it was not too difficult after all. Thanks for the pointers. Not everyone does it the same way. I was a bit worried that I would drop one in the open engine, but I worked thru that too. A bit out of focus, but the clip is heading in.
  |
|
|
|
|
1 User(s) are reading this topic (1 Guests and 0 Anonymous Users)
0 Members:

|
Lo-Fi Version | Time is now: 18th July 2025 - 09:58 PM |
Invision Power Board
v9.1.4 © 2025 IPS, Inc.