|
|
|
Porsche, and the Porsche crest are registered trademarks of Dr. Ing. h.c. F. Porsche AG.
This site is not affiliated with Porsche in any way. Its only purpose is to provide an online forum for car enthusiasts. All other trademarks are property of their respective owners. |
|
|

  |

| ThePaintedMan |
 Jan 11 2012, 01:10 AM Jan 11 2012, 01:10 AM
Post
#41
|
|
Advanced Member  Group: Members Posts: 3,887 Joined: 6-September 11 From: St. Petersburg, FL Member No.: 13,527 Region Association: South East States |
A little update. So classes have started again. Ugh. Its going to be a rough semester of statistics, ecology and soil dynamics. Hoping to get up early in the mornings to get as much done as possible, and POTENTIALLY make it to Sebring with the car. We'll see.
The below picture is how the car ended December. Unfortunately I prematurely did my POR work, not remembering that the welds I was doing on the inside of the car were going to burn through the POR. I also coated this in cold galvanizing compound for a little added protection. Long story short, I think I'll end up stripping out a lot of this and doing it over. Especially when I weld in the inner long stiffeners I'm fabricating. Essentially they're a cheap rip-off of the Engman kit (sorry!) I'll get pics of that up soon. Attached thumbnail(s) 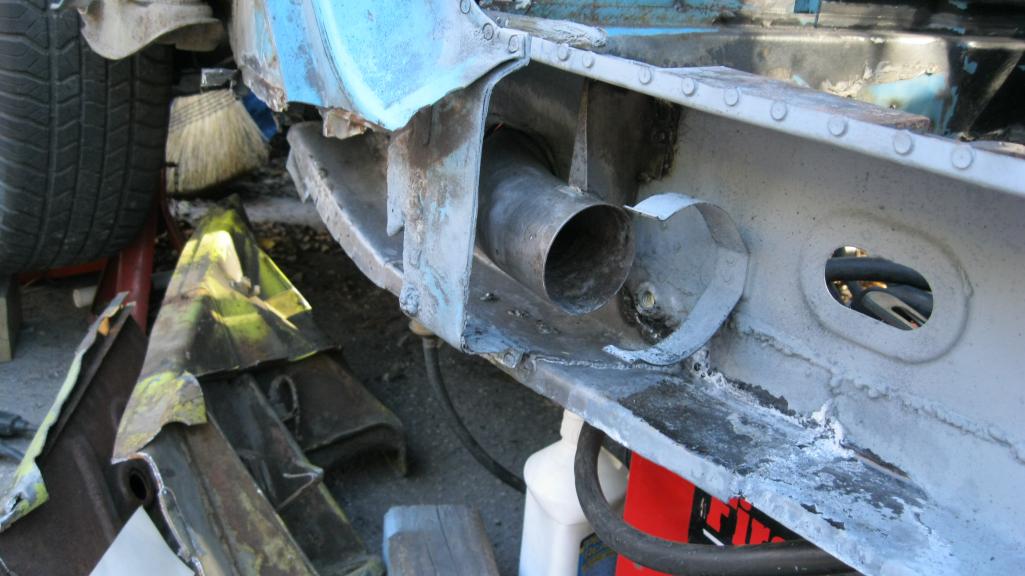
|
   |

 
|
| ThePaintedMan |
Jan 11 2012, 01:14 AM
Post
#42
|
|
Advanced Member Group: Members Posts: 3,887 Joined: 6-September 11 From: St. Petersburg, FL Member No.: 13,527 Region Association: South East States |
After entering the VIN in the database, I also found out that this car was owned not long ago by kevin311! We have done a little talking and I'm hoping to meet him soon. He seemed glad that the car isn't being crushed and may find a second wind (if I ever finish it).
My buddy Marc (and co-driver) came over the past weekend to do some work on the car. He had never welded before. But the piece he made looks good to me! Attached thumbnail(s) 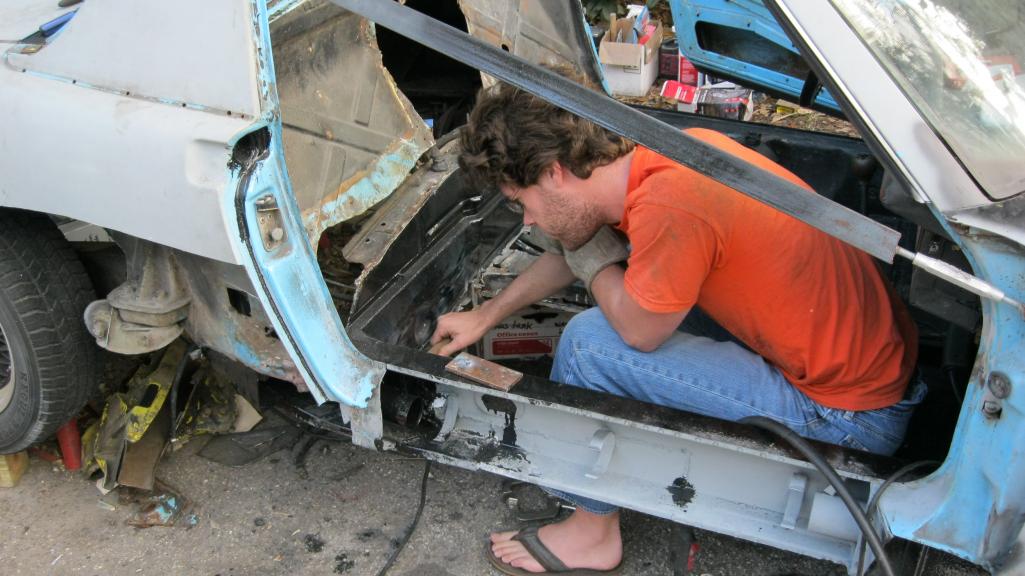 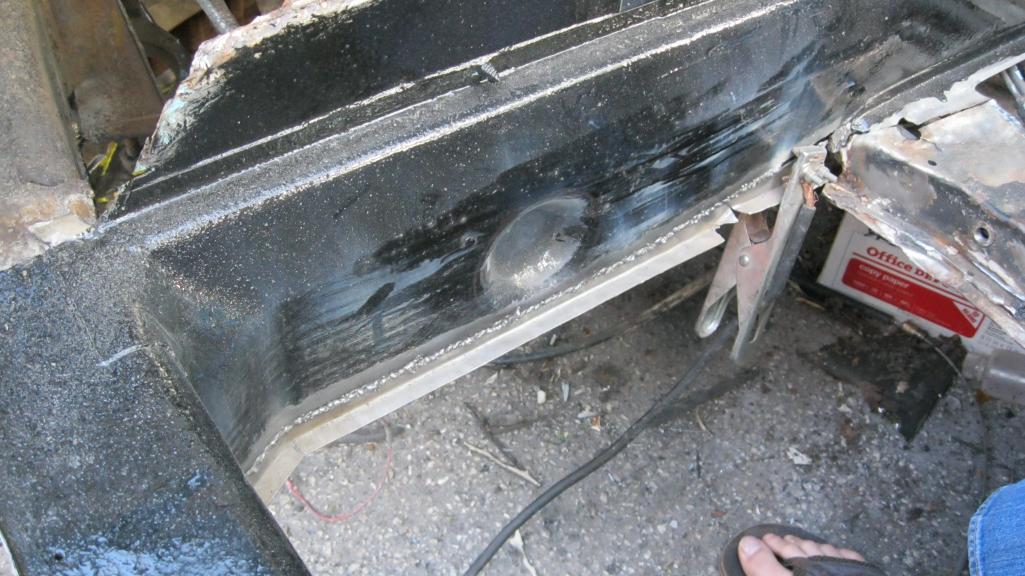
|
|
|
|
| ThePaintedMan |
Jan 11 2012, 01:22 AM
Post
#43
|
|
Advanced Member Group: Members Posts: 3,887 Joined: 6-September 11 From: St. Petersburg, FL Member No.: 13,527 Region Association: South East States |
Marc and I fabricated a new floorboard for the passenger side as well! I'll post a picture of that tomorrow. It ain't half bad for a couple of novices, or cheapskates, however you look at it.
We also got the pedal assembly out. Kevin, if you read this, how the HELL were you even able to drive this car? Glad we got to it when we did, otherwise this could have been bad... Attached thumbnail(s) 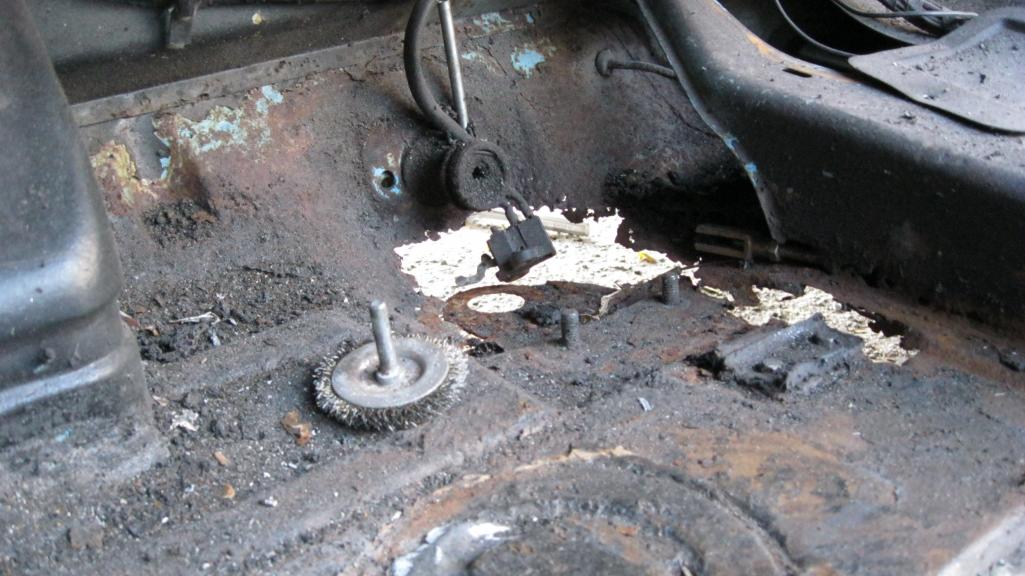
|
|
|
|
| billh1963 |
Jan 11 2012, 06:03 AM
Post
#44
|
|
Car Hoarder! Group: Members Posts: 3,408 Joined: 28-March 11 From: North Carolina Member No.: 12,871 Region Association: South East States |
Good looking progress!
Safety note: welding (and even turning a wrench) don't play well with flip flops. |
|
|
|
| ThePaintedMan |
Jan 11 2012, 11:14 AM
Post
#45
|
|
Advanced Member Group: Members Posts: 3,887 Joined: 6-September 11 From: St. Petersburg, FL Member No.: 13,527 Region Association: South East States |
Bill,
I have reminded him of this a million times. Marc is a beach bum from the east coast, but won't listen to someone who has already been burned a few times. At least I got him to wear a freakin helmet. Speaking of which, I don't know if I already mentioned this. After my first big day of welding I had the strangest sensation in my eyes before going to bed. Could not figure out what for. Then, by 3:45 in the morning, when I could not keep my eyes closed for more than a few seconds without searing pain, I began looking around on the computer. Sure enough, I had welders flash. Let me go ahead and tell everyone if it hasn't happened to you yet, you DON'T want to experience it. For me, it was the cheapo Harbor Freight helmet I was using. I think the batteries for the auto-darkening function were bad when I bought it new. So, I did the repair that this guy thought of http://www.pskl.us/wp/?p=648. Worked perfectly. I highly recommend that if you have this helmet you go ahead and just do it. It will save you money... and a lot of pain at some point. -George QUOTE(billh1963 @ Jan 11 2012, 07:03 AM)  Good looking progress! Safety note: welding (and even turning a wrench) don't play well with flip flops. |
|
|
|
| carr914 |
Jan 11 2012, 11:28 AM
Post
#46
|
|
Racer from Birth Group: Members Posts: 126,297 Joined: 2-February 04 From: Tampa,FL Member No.: 1,623 Region Association: South East States |
QUOTE(billh1963 @ Jan 11 2012, 07:03 AM) Good looking progress! Safety note: welding (and even turning a wrench) don't play well with flip flops. (IMG:style_emoticons/default/agree.gif) |
 |
|
| matthepcat |
Jan 11 2012, 11:35 AM
Post
#47
|
|
Meat Popsicle Group: Members Posts: 1,462 Joined: 13-December 09 From: Saratoga CA Member No.: 11,125 Region Association: Northern California |
Flip flop car work is a fine art.....just like flip flop weed whacking. In the warm states it has to be done from time to time.
|
|
|
|
| ThePaintedMan |
Jan 11 2012, 12:07 PM
Post
#48
|
|
Advanced Member Group: Members Posts: 3,887 Joined: 6-September 11 From: St. Petersburg, FL Member No.: 13,527 Region Association: South East States |
Thanks for the kind words fellas. Been raining all day so I couldn't get any work done on the car before classes this afternoon. However, I went out and took a few photos. This one is the passenger floorboard we made. Still needs some welding and a few more bends to be complete, but I think it'll do fine in the car. It was a full days worth of work to make, but for me, cost is everything. If you look at the welds, you can see how it was done. We cut a few slots lengthwise using a cutting wheel as well as one down the side for the seat channel. Then, bent those downward using channel steel and a ball peen hammer. Then, hammered this "V" shaped valley against bar steel to achieve more of a "U" shape. This left about an 1/8th to 1/4 in gap, which had to be welded closed. The only real problem was the warping, because I failed to mention to mark that he needed to put in all of his spot welds first. However, fitment wasn't bad, and since this car was destined for a scrap yard anyway, I think anything we do to it is an improvement. Once I'm out of college I'll find a nicer model to do everything the "right" way (IMG:style_emoticons/default/smile.gif)
Attached thumbnail(s) 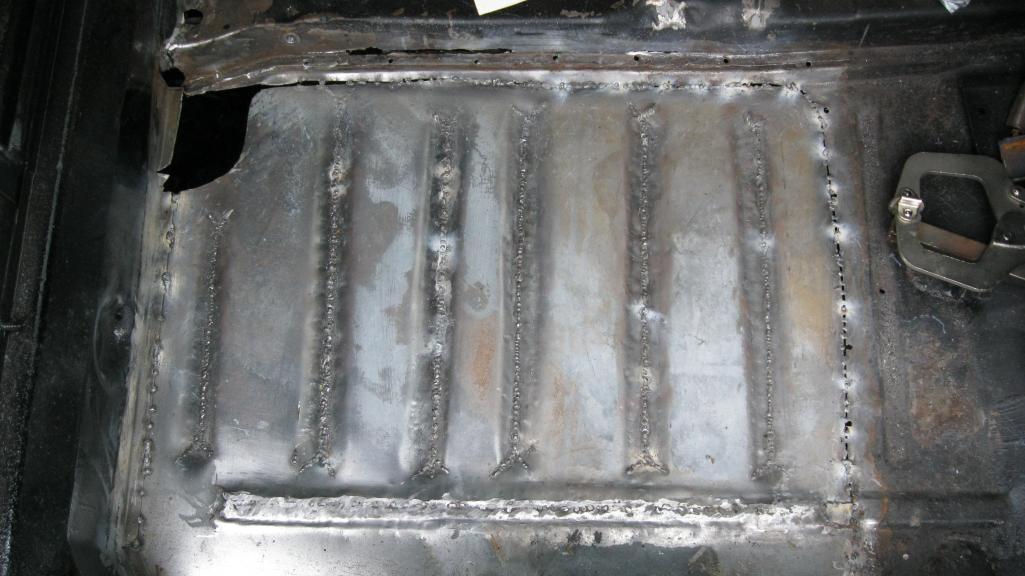
|
|
|
|
| ThePaintedMan |
Jan 11 2012, 12:14 PM
Post
#49
|
|
Advanced Member Group: Members Posts: 3,887 Joined: 6-September 11 From: St. Petersburg, FL Member No.: 13,527 Region Association: South East States |
I also pulled the pedal cluster apart yesterday. What a bitch. The roll pin was the least of the worry. On this car, the clutch pedal arm had rust-welded itself to the shaft that it rides on. I resorted to a pickle fork to get the thing off, which buggered up some of the metal and welds on the cluster. I'll have to do some re-shaping and welding once the replacement bushings get here. I'll also POR it at that point. Check out the bottom of the base and all the pitting. Yikes.
Of note, I used a product called EVAPO-Rust, commonly available at Autozone, Advance, etc. Man, this stuff is amazing. Its not acid-based as far as I can tell, and will not burn your hands. I got everything as clean as I could prior to dipping it, but once I did, this stuff found its way into every pit and hole in the metal. I'll still wirebrush and clean the metal before using POR, but I was really impressed. Especially since I've been getting AWFUL results with POR's "Prep and Ready." I haven't painted a piece yet that hasn't fish-eyed. Maybe this stuff will help. Attached thumbnail(s) 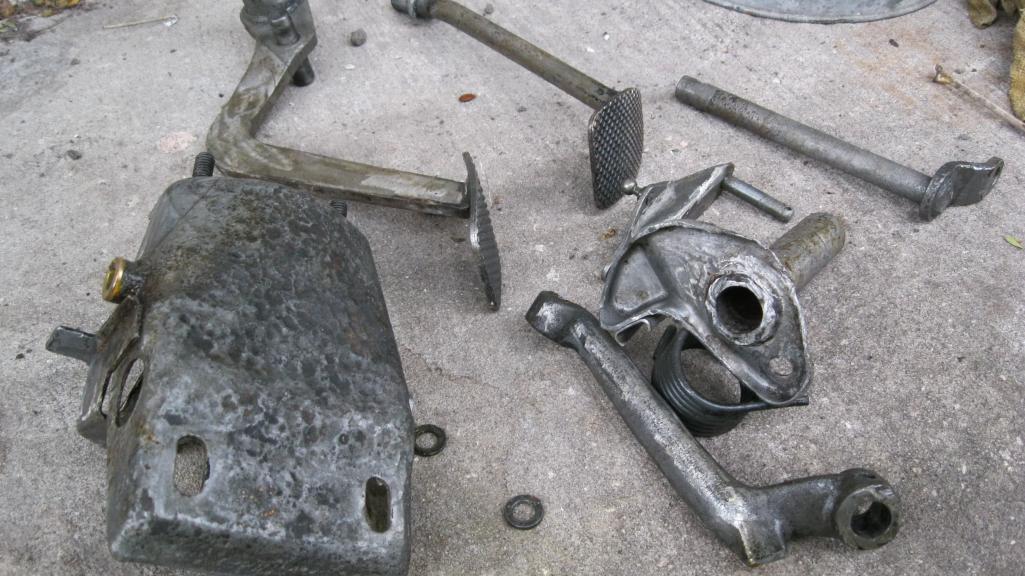
|
|
|
|
| kevin311 |
Jan 11 2012, 12:52 PM
Post
#50
|
|
Member Group: Members Posts: 105 Joined: 22-May 10 From: Tampa Bay Area Member No.: 11,752 Region Association: None |
Thats scary to look at and think that I drove it.. Its worse than I remember it to be. (IMG:style_emoticons/default/barf.gif)
Looks like it was holding together with hopes and dreams.. You are the man for taking this on, I cant wait to get over there to see the progress and drop off some stuff. See you some time this weekend (IMG:style_emoticons/default/beerchug.gif) |
|
|
|
| Krieger |
Jan 11 2012, 07:45 PM
Post
#51
|
|
Advanced Member Group: Members Posts: 4,809 Joined: 24-May 04 From: Santa Rosa CA Member No.: 2,104 Region Association: None |
Trash that pedal assembly. There isn't a whole lot of steel left in that pan. You are going to be kicking those pedals, but not for very long before something bad happens.
|
|
|
|
| rnellums |
Jan 11 2012, 08:58 PM
Post
#52
|
|
Professional Enthusiast Group: Members Posts: 1,673 Joined: 26-November 09 From: Littleton, CO Member No.: 11,072 Region Association: Rocky Mountains |
QUOTE(ThePaintedMan @ Dec 31 2011, 10:16 PM) Parts Needed As per Shoe's recommendation, I'll start a little list here of what parts I'm still looking for. Again, this car is kind of a weird mix of track and street. Its just a Chumpcar, but on the other hand I'd like something I can drive around and have fun with during the week. The best part about this is I'm not beholden to a perfect restoration and every last little perfect part. But there are some things that I'd like to get back on the car to give it the feel it had from the factory (namely heat!) So here it goes. I'll update this as I accrue things or think of something else. 1) Battery tray and support (just need it to make a template) 2) Pedal board and accelerator stop 3) All the front trunk heater stuff, I mean everything 4) Heater control for dash 5) Heater control lever 6) Late style parking brake lever 7) Gas tank (maybe, still trying to figure out if I'm going to just go ahead and do the fuel cell) 8) Alternator (this one was dying when I had the car running) 9) BMW front calipers and 19mm master cylinder 10) Firewall center hump (see the FS/WTB section) 11) Original 73 jack 12) Rain tray and hoses (any condition works for me) 13) Stiffer rear springs (originals are 100#, correct?) 14) Backpad (any condition works) Thats it for now, I think! Thanks again Shoe for the heads up. -George 2) Pedal board and accelerator stop got it 3) All the front trunk heater stuff, I mean everything Do you mean the fresh air vent or the flapper boxes? I think I have both anyways. 4) Heater control for dash got it 5) Heater control lever Might still have it 6) Late style parking brake lever Might still have it 11) Original 73 jack Got it 12) Rain tray and hoses (any condition works for me) Got em 13) Stiffer rear springs (originals are 100#, correct?) Brand new 100#ers I'm not going to use 14) Backpad (any condition works) Got it I am in my first year of my masters in Mechanical Engineering, specializing in energetic materials. I'm hoping to go for PhD if I can find the stamina. Right now its looking a little bleak. Shoe will be cheaper for shipping... He's closer, I'm up at Purdue. -Ross |
|
|
|
| ThePaintedMan |
Jan 12 2012, 06:59 AM
Post
#53
|
|
Advanced Member Group: Members Posts: 3,887 Joined: 6-September 11 From: St. Petersburg, FL Member No.: 13,527 Region Association: South East States |
QUOTE(Krieger @ Jan 11 2012, 08:45 PM) Trash that pedal assembly. There isn't a whole lot of steel left in that pan. You are going to be kicking those pedals, but not for very long before something bad happens. Yeah... thats what I was thinkin. Its pretty much pitted through in some spots. Not sure where to get another pedal assembly though. Don't want to pay for a completely rebuilt set. -George |
|
|
|
| ThePaintedMan |
Jan 12 2012, 07:05 AM
Post
#54
|
|
Advanced Member Group: Members Posts: 3,887 Joined: 6-September 11 From: St. Petersburg, FL Member No.: 13,527 Region Association: South East States |
QUOTE ThePaintedMan, Yes Virginia, you DO have a project! But BRAVO, you are rebuilding the bashed/rusted stuff the right way. I'm glad to see you are doing the welding. I got a MIG when I started my V8 conversion and it is the most valuable tool I have for all the repair and fabrication I've needed to do. Like anything, practice, practice and the welds will get better. My first recommendation is to install a FULL ROLLCAGE. The 914 chassis is a real flexy-flier new, not to mention 35 years later. After I welded mine in (including running tubes fore & afte to brace the suspension shock towers) I finally had a 914 that could be jacked up and the doors still open! As I see it, set the chassis so the dimensions are right, weld in the cage and then you will not have to worry about the effects of further repairs and welding distorting things. Speaking of doors: It is MANDATORY that you brace the door hing points against the latch point as the door opening with SHRINK when the rollcage welds cool! I got the tip from Brad Roberts and can testify that this WILL happen! BTW: Your girlfriend sounds like a very smart lady! I thinks she's a keeper! Best, Terry Hey Terry, Thanks for the kind words. We are going to get to the roll cage at some point once the major frame stuff is done. I don't think this is something I want to attempt myself, for a number of reasons. However, when I do get it done, I will certainly take your advice. That makes sense - since a roll cage ties the left/right and front/back sides together, I would certainly expect some shrinking in the doorway (as well as right/left, but I assume the bulkheads probably prevent most of that). If anyone knows of a good cage builder in the Tampa Bay area, let me know! -George |
|
|
|
| carr914 |
Jan 12 2012, 08:57 AM
Post
#55
|
|
Racer from Birth Group: Members Posts: 126,297 Joined: 2-February 04 From: Tampa,FL Member No.: 1,623 Region Association: South East States |
QUOTE(ThePaintedMan @ Jan 11 2012, 01:14 PM) I also pulled the pedal cluster apart yesterday. What a bitch. The roll pin was the least of the worry. On this car, the clutch pedal arm had rust-welded itself to the shaft that it rides on. I resorted to a pickle fork to get the thing off, which buggered up some of the metal and welds on the cluster. I'll have to do some re-shaping and welding once the replacement bushings get here. I'll also POR it at that point. Check out the bottom of the base and all the pitting. Yikes. Of note, I used a product called EVAPO-Rust, commonly available at Autozone, Advance, etc. Man, this stuff is amazing. Its not acid-based as far as I can tell, and will not burn your hands. I got everything as clean as I could prior to dipping it, but once I did, this stuff found its way into every pit and hole in the metal. I'll still wirebrush and clean the metal before using POR, but I was really impressed. Especially since I've been getting AWFUL results with POR's "Prep and Ready." I haven't painted a piece yet that hasn't fish-eyed. Maybe this stuff will help. Yep, Trash that George, I may have one or at least some good parts T.C. |
|
|
|
| ThePaintedMan |
Jan 12 2012, 10:35 AM
Post
#56
|
|
Advanced Member Group: Members Posts: 3,887 Joined: 6-September 11 From: St. Petersburg, FL Member No.: 13,527 Region Association: South East States |
T.C.,
If you do indeed find one, let me know. The base is really the only part that needs replacing. However, I did bend the clutch tube a little when I had to use a pickle ford to remove the clutch pedal arm. I think I got it bent back enough to be okay, but this part would help as well. Thanks brotha! -George QUOTE(carr914 @ Jan 12 2012, 09:57 AM) QUOTE(ThePaintedMan @ Jan 11 2012, 01:14 PM) I also pulled the pedal cluster apart yesterday. What a bitch. The roll pin was the least of the worry. On this car, the clutch pedal arm had rust-welded itself to the shaft that it rides on. I resorted to a pickle fork to get the thing off, which buggered up some of the metal and welds on the cluster. I'll have to do some re-shaping and welding once the replacement bushings get here. I'll also POR it at that point. Check out the bottom of the base and all the pitting. Yikes. Of note, I used a product called EVAPO-Rust, commonly available at Autozone, Advance, etc. Man, this stuff is amazing. Its not acid-based as far as I can tell, and will not burn your hands. I got everything as clean as I could prior to dipping it, but once I did, this stuff found its way into every pit and hole in the metal. I'll still wirebrush and clean the metal before using POR, but I was really impressed. Especially since I've been getting AWFUL results with POR's "Prep and Ready." I haven't painted a piece yet that hasn't fish-eyed. Maybe this stuff will help. Yep, Trash that George, I may have one or at least some good parts T.C. |
|
|
|
| bulitt |
Jan 12 2012, 11:43 AM
Post
#57
|
|
Achtzylinder Group: Members Posts: 4,189 Joined: 2-October 11 Member No.: 13,632 Region Association: South East States |
When Ferrari first started building cars there was a shortage of steel after the war so they had to improvise. The result was many missing street signs around Maranello!
(IMG:style_emoticons/default/lol-2.gif) |
|
|
|
| ThePaintedMan |
Jan 12 2012, 06:08 PM
Post
#58
|
|
Advanced Member Group: Members Posts: 3,887 Joined: 6-September 11 From: St. Petersburg, FL Member No.: 13,527 Region Association: South East States |
QUOTE(bulitt @ Jan 12 2012, 12:43 PM) When Ferrari first started building cars there was a shortage of steel after the war so they had to improvise. The result was many missing street signs around Maranello! (IMG:style_emoticons/default/lol-2.gif) LOL, good to know! |
|
|
|
| SUNAB914 |
Jan 13 2012, 01:01 PM
Post
#59
|
|
Senior Member Group: Members Posts: 698 Joined: 29-December 08 From: Fredericksburg VA Member No.: 9,880 Region Association: South East States |
Do not Por15 the pedal assembly when you get the parts, that stuff is thick and things might not work. Just sand blast parts and paint with rattle can.
|
|
|
|
| clow |
Jan 13 2012, 01:11 PM
Post
#60
|
|
The Kid Group: Members Posts: 164 Joined: 7-September 10 From: Ontario, Canada Member No.: 12,151 Region Association: Canada |
Its looking good. Keep up the great work. There will be times you wish you took the torches and cut the car to pieces but don't get discouraged. (I had a few of these days myself) The final product will be sweet! I understand the college budget, I am currently in school as well. Goodluck.
Clow |
|
|
|
|
1 User(s) are reading this topic (1 Guests and 0 Anonymous Users)
0 Members:

|
Lo-Fi Version | Time is now: 18th July 2025 - 07:09 PM |
Invision Power Board
v9.1.4 © 2025 IPS, Inc.