|
|

|
Porsche, and the Porsche crest are registered trademarks of Dr. Ing. h.c. F. Porsche AG.
This site is not affiliated with Porsche in any way. Its only purpose is to provide an online forum for car enthusiasts. All other trademarks are property of their respective owners. |
|
|
  |
| ThePaintedMan |
 Jan 21 2016, 08:57 PM Jan 21 2016, 08:57 PM
Post
#361
|
|
Advanced Member     Group: Members Posts: 3,887 Joined: 6-September 11 From: St. Petersburg, FL Member No.: 13,527 Region Association: South East States 
|
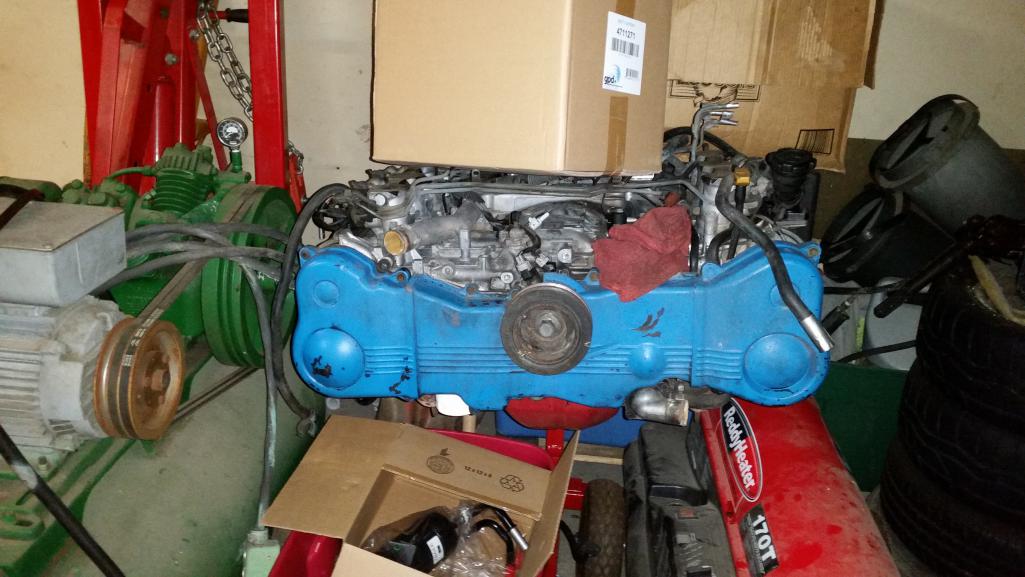
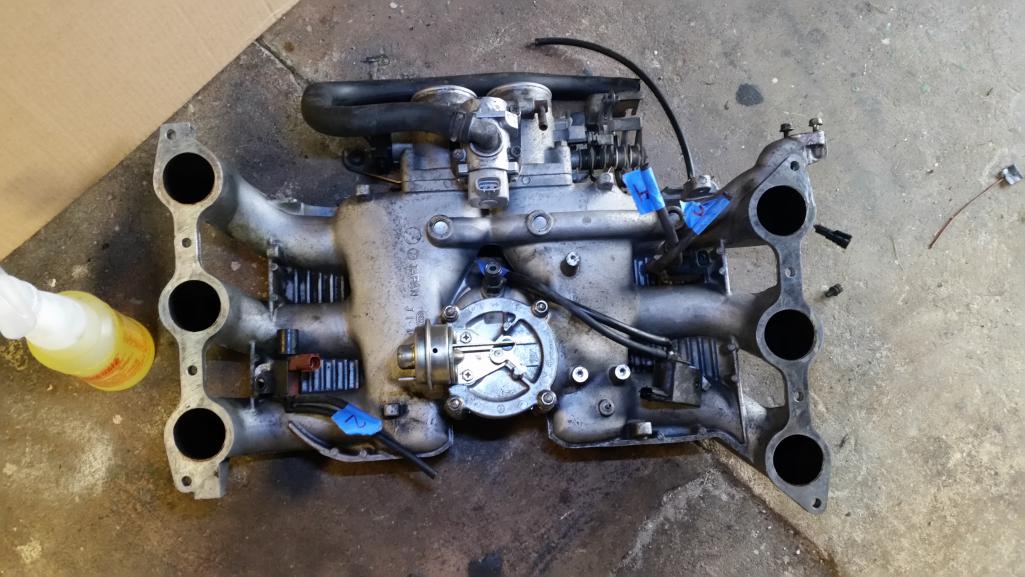
Sorry for the delay. 2015 ended up being quite the year - certainly the most "highs" and "lows" that I've ever had so close together. My first child was born in June, and I lost my dad shortly thereafter in September. But as I've had time, and for my own sanity, I've spent some more time working toward the swap. It's therapeutic in a lot of ways, I suppose. Anyhow, I started doing some work on the engine as time permits. So far cleaning it up, flipping the intake and getting the deck straight has been essentially free and now I have a better idea of what I need to save up for in the way of parts. I needed to open up the engine to figure out whether this thing was really as healthy as it sounded and if it was okay to proceed.
Getting it home was fun. These cars weigh a ton, and most of it was up front. 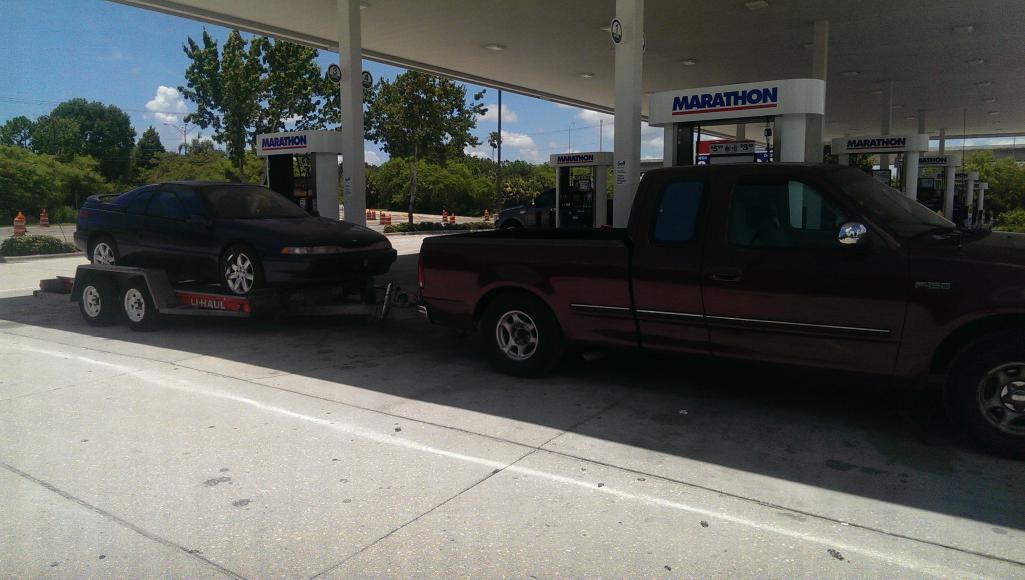 A ripped fuel pump line kept it from really running right, but it sounded good anyway. I later replaced that torn line in the tank and it ran like a top. https://www.youtube.com/watch?v=PzzivLrlwgs Spent about 3 hours and I had the engine out and on the stand. Don't be afraid to do it yourself rather than paying someone else if you find one of these cars. |
| ThePaintedMan |
 Jan 21 2016, 09:05 PM Jan 21 2016, 09:05 PM
Post
#362
|
|
Advanced Member     Group: Members Posts: 3,887 Joined: 6-September 11 From: St. Petersburg, FL Member No.: 13,527 Region Association: South East States 
|
|
| ThePaintedMan |
 Jan 21 2016, 09:12 PM Jan 21 2016, 09:12 PM
Post
#363
|
|
Advanced Member     Group: Members Posts: 3,887 Joined: 6-September 11 From: St. Petersburg, FL Member No.: 13,527 Region Association: South East States 
|
Several of these will simply swap to the other side of the intake and use existing bolt holes. I found that this nub (1) needed to be cut off in order to clear the air solenoid. Additionally, I had to hog out the holes for the air diverter (2) and rotate it ever so slightly to clear the coolant crossover tube on top of the block.
NOTE: About a week after I finished doing this stuff, I found out that there is a guy selling phenolic intake spacers which would eliminate having to do either of these. That link is here: http://www.subaru-svx.net/forum/showthread.php?t=63141 Attached thumbnail(s) 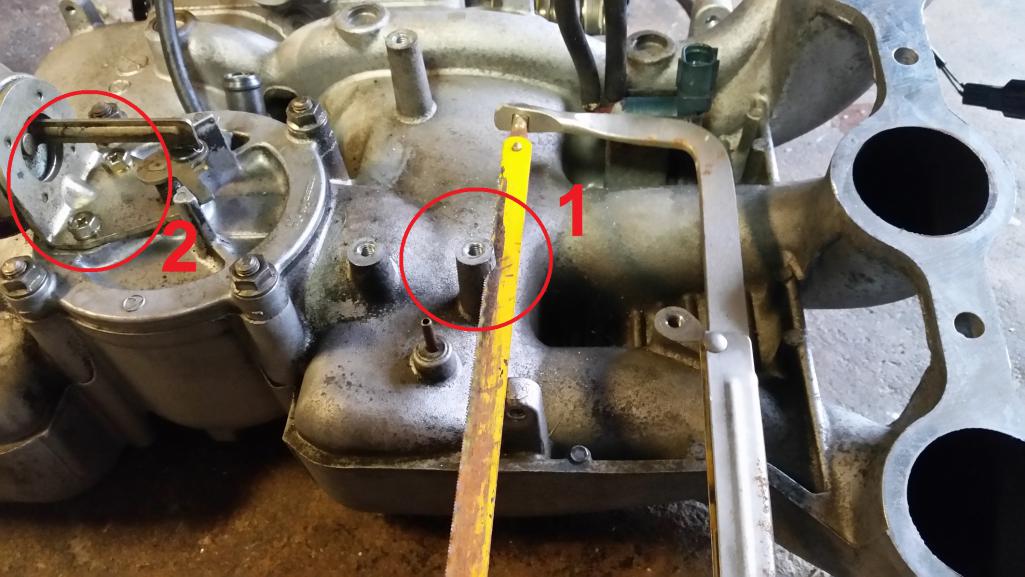
|
| ThePaintedMan |
 Jan 21 2016, 09:20 PM Jan 21 2016, 09:20 PM
Post
#364
|
|
Advanced Member     Group: Members Posts: 3,887 Joined: 6-September 11 From: St. Petersburg, FL Member No.: 13,527 Region Association: South East States 
|
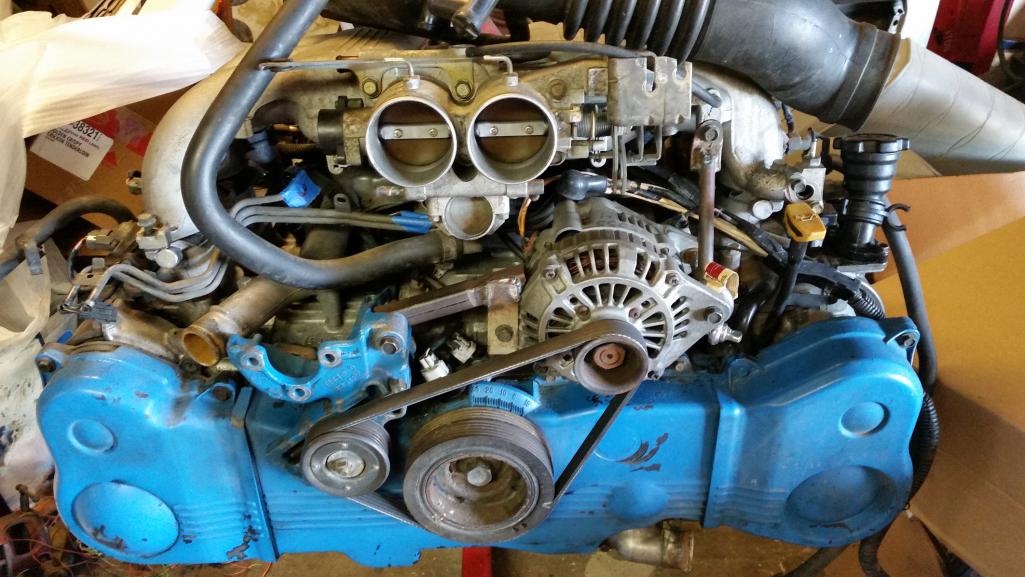
Next I moved onto fabbing up an alternator mount, using the stock belt tensioner. This will work for my application since I won't be using the power steering pump or the A/C compressor. I had just enough room without either to mount the alternator close to the stock location. However, it wasn't till after I finished it that I looked at the lack of "belt" wrap" on the crank. We'll see how much of an issue this is later on. I'm a little worried about the belt slipping, especially since this engine will see a lot of hard on/off throttle on the track. But it may work. If not, I'll have to get a little more creative.
 The other issue with flipping the intake and retaining the stock airbox and snorkel is that the whole thing occludes the path of the dipstick and the oil filler. I think I have a pretty easy fix for the oil filler neck, but the dipstick will require some bending. This probably isn't a big deal on a street car as you would simply loosen and move the snorkel to check and fill the oil. In an endurance race, it means more time lost in the pits... 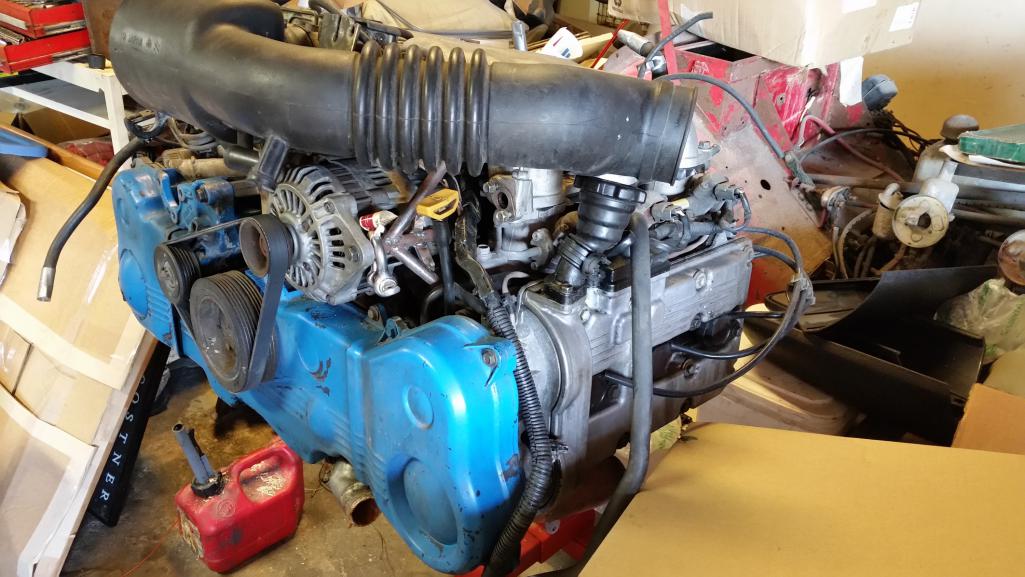 Other issues I can forsee are that the EGR tube inlet to the manifold is now on the wrong end of the engine. I'll come back to that one later and since I spent so much time making sure this engine had no codes when I pulled it, I'd like to keep it that way. I believe a new tube strategically bent and rewelded can probably solve this. Also, routing the intake over the fuel lines, which actually pass under and through the intake "spider legs" makes removing it a bit more of a PITA. But it can be done. The good news is with the intake flipped, there is no cutting of the trunk involved and the throttle cable routing is much closer to stock and much simplified. |
| ThePaintedMan |
 Jan 21 2016, 09:42 PM Jan 21 2016, 09:42 PM
Post
#365
|
|
Advanced Member     Group: Members Posts: 3,887 Joined: 6-September 11 From: St. Petersburg, FL Member No.: 13,527 Region Association: South East States 
|
At some point I decided with 180,000 miles on the engine and since I had made my money back parting the car out, that it would be a good time to start tearing it down and inspect it further. After pulling off the thermostat cover, and then the water pump, the rust and scale I saw convinced me that proactively replacing the head gaskets was a good idea. Though these are not "interference" engines, (i.e. the valves and pistons do not occupy the same space), it was good to see that the timing belt had been done at least somewhat recently. However, the pulleys and idlers did not turn quite as smoothly as one would hope, indicating that the belt was the only thing changed. The water pump also was a little bit sluggish. Glad I got in there.
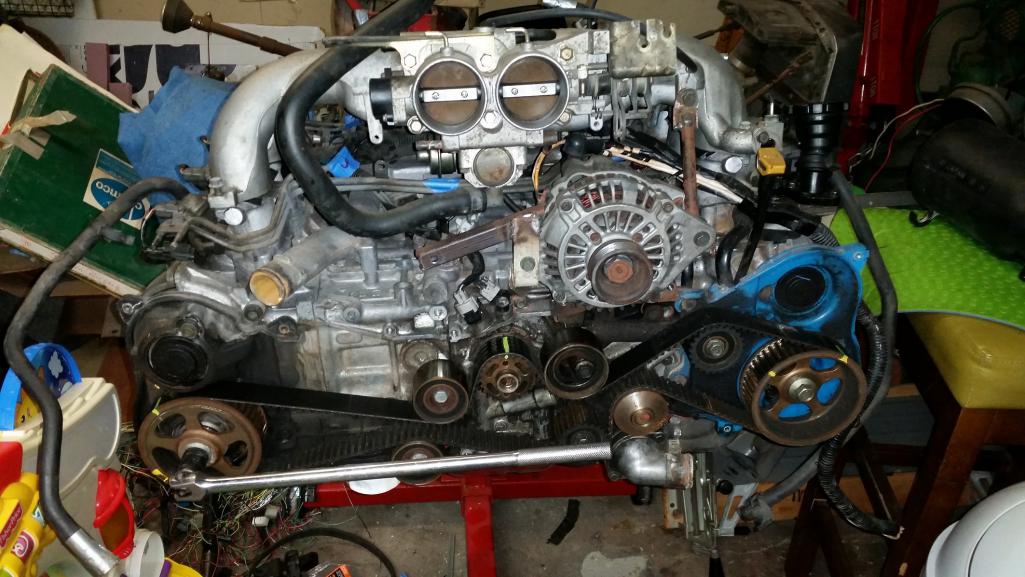 Be sure to follow the Subaru manual to the tee when disassembling these engines. They are assembled and machined to exacting tolerances and require a delicate hand when removing components. 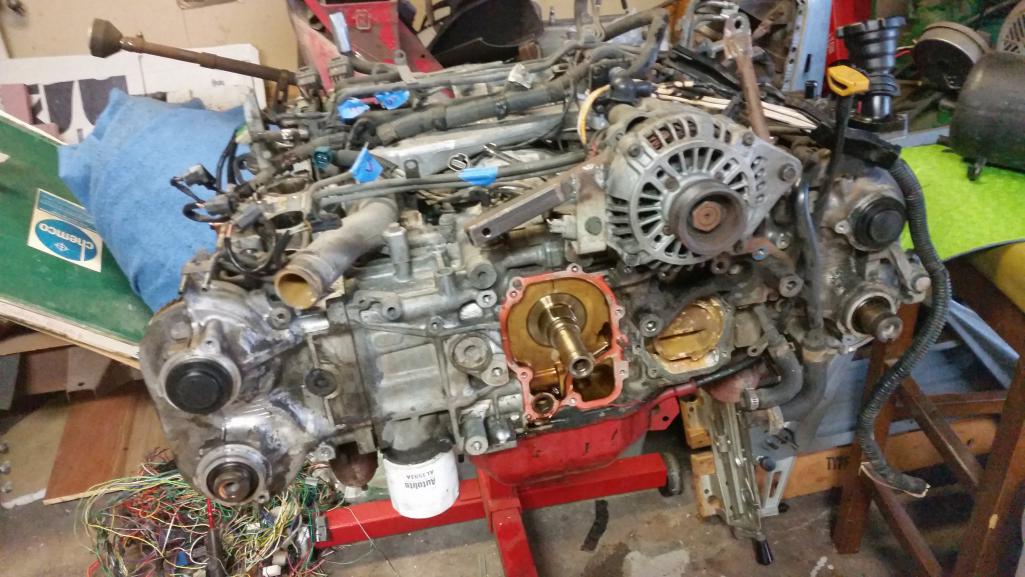 |
| ThePaintedMan |
 Jan 21 2016, 09:52 PM Jan 21 2016, 09:52 PM
Post
#366
|
|
Advanced Member     Group: Members Posts: 3,887 Joined: 6-September 11 From: St. Petersburg, FL Member No.: 13,527 Region Association: South East States 
|
The cams need to come out in a very methodical fashion, again outlined in the Subaru factory manual (thanks Chris H.).
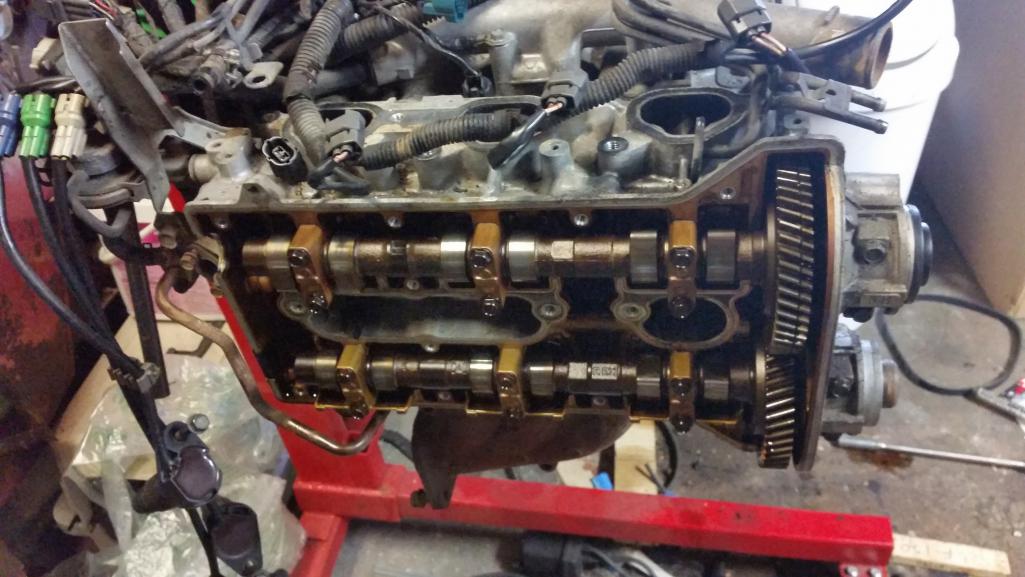 ... for example, the cam tower caps are all wear components, which like the rest of the valvetrain, have worn alongside their individual cam lobes. If you screw one up, the whole cam then needs to be replaced, and the cam towers reworked. Honestly I don't even know how one would go about that process. The COOLEST part is that the Subaru engineers are far the most forward-thinking of any I've experienced. They had the foresight to label almost every component on the engine with indentations, so you know where everything goes when it's reassembled. About the only thing I had to do on my own was keep the hydraulic lash adjusters organized (all 24 of them). 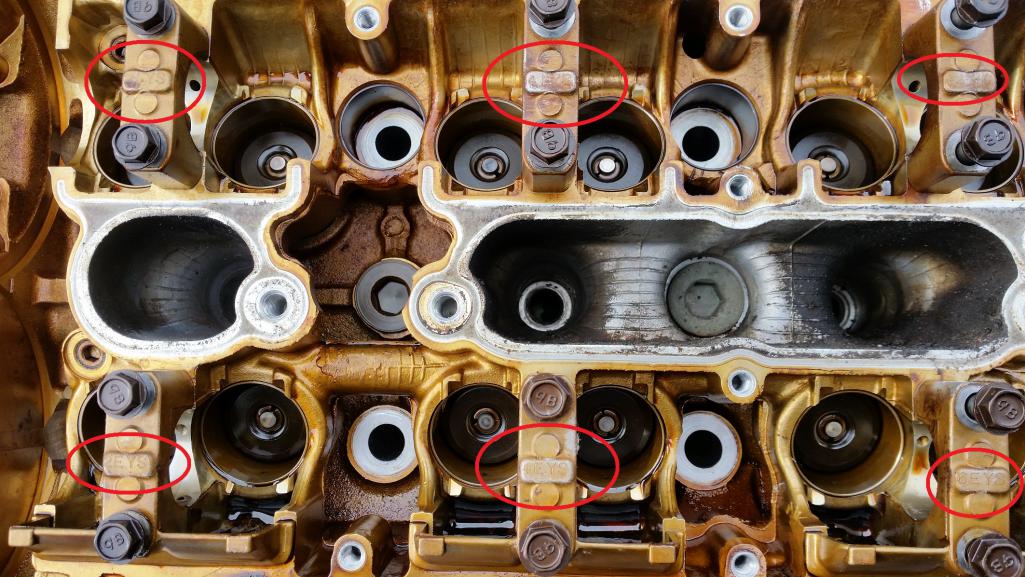 |
| Puebloswatcop |
 Jan 21 2016, 10:19 PM Jan 21 2016, 10:19 PM
Post
#367
|
|
Senior Member    Group: Members Posts: 1,683 Joined: 27-December 14 From: Mineola, Texas Member No.: 18,258 Region Association: Southwest Region |
|
| ThePaintedMan |
 Jan 22 2016, 09:07 PM Jan 22 2016, 09:07 PM
Post
#368
|
|
Advanced Member     Group: Members Posts: 3,887 Joined: 6-September 11 From: St. Petersburg, FL Member No.: 13,527 Region Association: South East States 
|
...Speaking of which, several folks have already asked me where I got the Subaru factory manuals. Chris H. has been my mentor through much of this and sent me a ton of stuff, so I made a promise to myself, if any of you want to do an SVX swap, I'll be happy to send you what he sent me. In the meantime, if you want to access the manuals online, a gentleman already has them posted here ->
http://phantomotaku.com/SVX/ This was my solution to organizing 24 individual hydraulic lash adjusters. It just so happens that Harbor Freight has a very handy organizer for about 3 or 4 bucks and has 24 compartments that just barely have enough room for each. Much better than trying to cut holes in cardboard or other media. 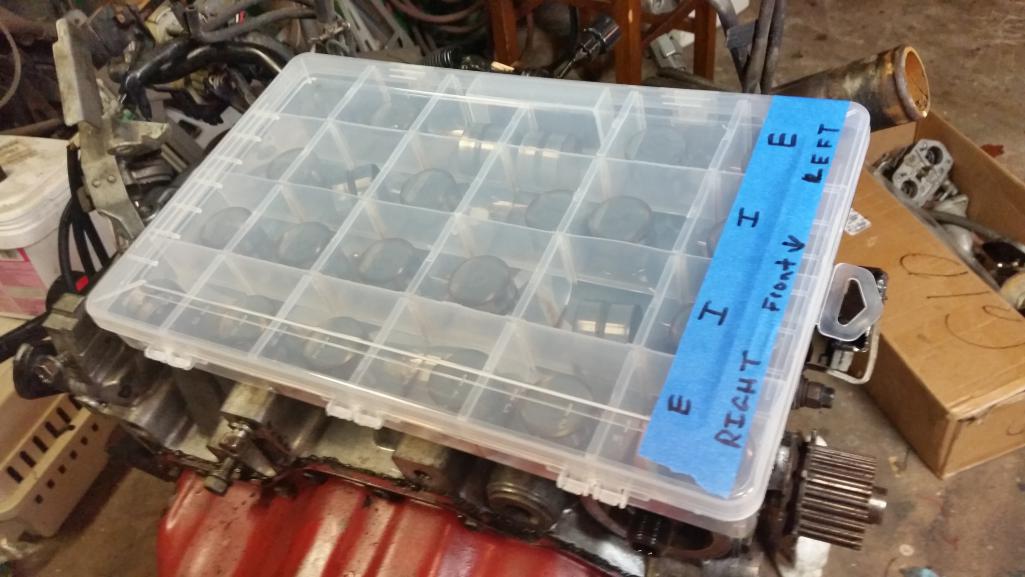 |
| r_towle |
 Jan 22 2016, 09:18 PM Jan 22 2016, 09:18 PM
Post
#369
|
|
Custom Member                Group: Members Posts: 24,705 Joined: 9-January 03 From: Taxachusetts Member No.: 124 Region Association: North East States 
|
George,
Alternator fan belt. What is the pulley to the left? Is that an idler pulley or a tensioner? I would consider losing that or move it up higher. If you lose it, you could use the alternator to add tension to a different belt... And, if you get close, send me a cardboard template of that thing you made and I will machine up something better... |
| G e o r g e |
 Jan 22 2016, 10:04 PM Jan 22 2016, 10:04 PM
Post
#370
|
|
Dr    Group: Members Posts: 1,905 Joined: 20-September 05 From: Southern Cal Member No.: 4,832 Region Association: None 
|
Impressive (IMG:style_emoticons/default/beerchug.gif)
|
| pete000 |
 Jan 22 2016, 11:33 PM Jan 22 2016, 11:33 PM
Post
#371
|
|
Senior Member    Group: Members Posts: 1,887 Joined: 23-August 10 From: Bradenton Florida Member No.: 12,094 Region Association: South East States |
How about running the alternator off the rear axle like Freddie Baker's Kool Bus did ?
|
| ThePaintedMan |
 Jan 23 2016, 08:58 AM Jan 23 2016, 08:58 AM
Post
#372
|
|
Advanced Member     Group: Members Posts: 3,887 Joined: 6-September 11 From: St. Petersburg, FL Member No.: 13,527 Region Association: South East States 
|
Rich, the pulley to the left is the stock tensioner pulley. I considered making the alternator bracket itself adjustable for belt tension, but I was somewhat limited by the length of 6 rib belts that are commonly available. The other issue is that the alternator really doesn't have a whole lot of room to be moved up or down in it's new location.
|
| ThePaintedMan |
 Feb 3 2016, 08:43 PM Feb 3 2016, 08:43 PM
Post
#373
|
|
Advanced Member     Group: Members Posts: 3,887 Joined: 6-September 11 From: St. Petersburg, FL Member No.: 13,527 Region Association: South East States 
|
Well, I've spoken with several Subaru specialists and have decided it's worth it to move forward with Cometic MLS (multi-layered steel) head gaskets. I wavered on this, given the fact that, as far as I can tell, the OEM gaskets lasted 180,000 miles. But given the work involved with tearing the engine down and it's intended track use, I might as well spend the extra money an do it the best it can be done. This is important because it also dictates a couple of other things in the meantime, namely the precision that the mating surfaces need to be machined/milled to and their roughness average (RA). Cometic requires an RA of 50 or better with their gaskets, which is drastically finer than the factory finish.
So I moved forward with the head removal... 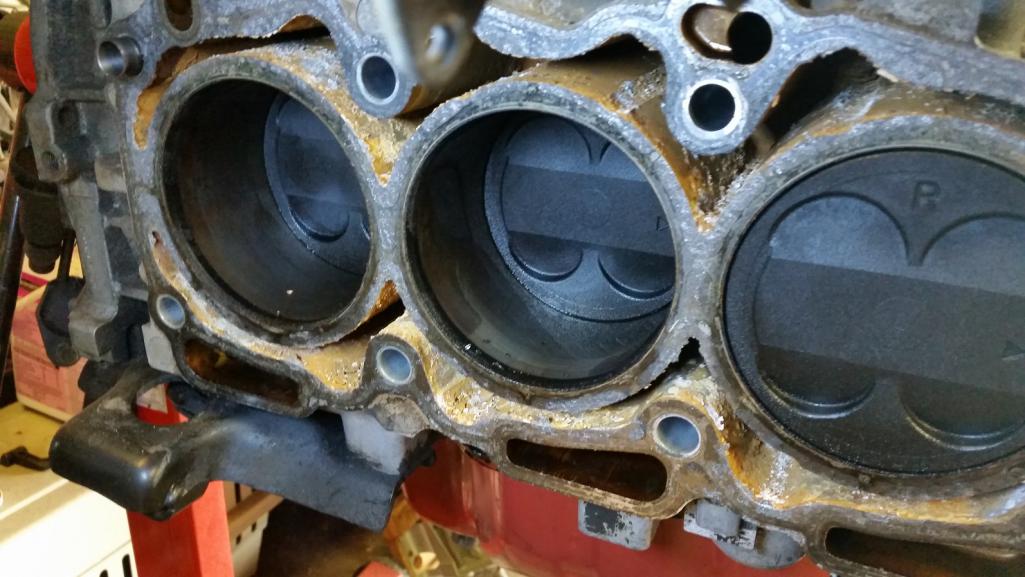 As can be seen above, the water jackets were pretty stuffed with rust, calcium deposits and other "gunk" Though it's not an indication that the head gaskets would have failed anytime soon, I feel like a thorough inspection, cleaning and head gasket change is peace of mind, particularly given the architecture of the Suby engine. Notice the fairly small sealing surfaces on the deck, both around the cylinder bores and the oil return passages. No wonder why these engines (moreso the 4 cylinders engines) eventually have problems with the HGs. Meanwhile, this also gave me a chance to inspect and clean the cylinders. As you can see below, there is still evidence of the factory honing, which again, isn't proof of a healthy engine, but it's nice to see. 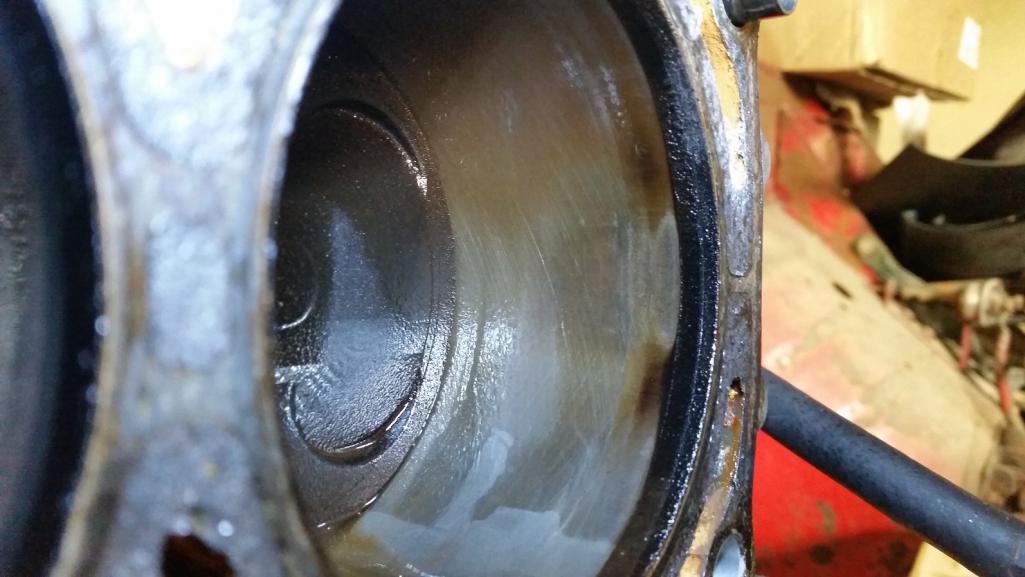 |
| ThePaintedMan |
 Feb 3 2016, 08:52 PM Feb 3 2016, 08:52 PM
Post
#374
|
|
Advanced Member     Group: Members Posts: 3,887 Joined: 6-September 11 From: St. Petersburg, FL Member No.: 13,527 Region Association: South East States 
|
While I save up for the engine gasket/seal kit, part of which I need before I can have the heads done, I figured it would be good chance to examine the deck and head for any potential issues.
First, in order to clean up the heads, I needed to remove the locating dowels from the top of each deck. Luckily, they are recessed with just enough space below them that a blind hole puller and slide hammer borrowed from AutoZone makes quick work of them. I decided to place the old head gasket back on top of the surface in case I slipped or screwed up otherwise. 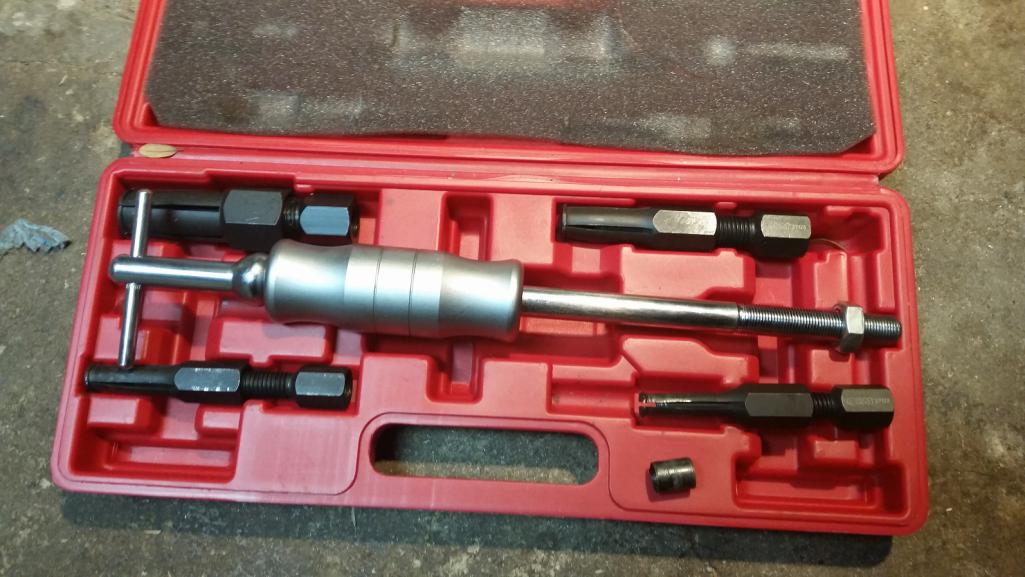 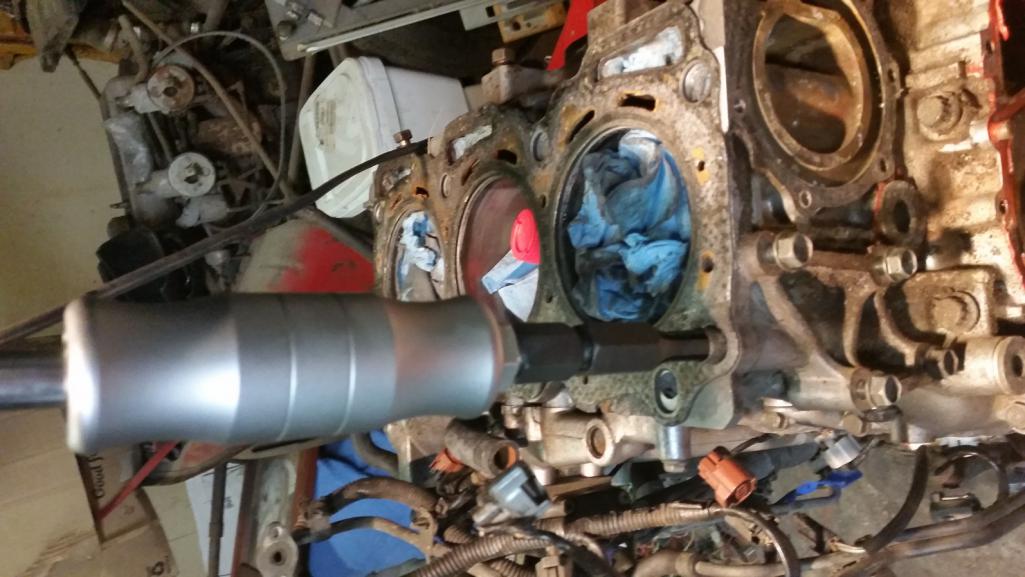 |
| ThePaintedMan |
 Feb 3 2016, 09:02 PM Feb 3 2016, 09:02 PM
Post
#375
|
|
Advanced Member     Group: Members Posts: 3,887 Joined: 6-September 11 From: St. Petersburg, FL Member No.: 13,527 Region Association: South East States 
|
Next, I spent several hours cleaning the heads and the deck with acetone and a scraper, as one does to remove the old gasket remnants. I went with this method after consulting with Suby experts and watching several videos. Using a "whizz-wheel" or Roloc disks is not advised for several reasons. All whizz-wheels, even the 3M rubberized versions are prone to rounding off sharp mating surfaces. With so little room to play on the deck, I didn't want to take and chances. Additionally, Roloc disks are apparently embedded with silicon carbide which inevitably comes off and ends up in the crevices and cavities. If that stuff makes it's way into the sump, goodbye bearings. Instead, acetone, a scraper and elbow grease and several hours of labor is the preferred method. Clearly there is more to be done - you can see some of the corrosion and/or material (rust?) deposited on the aluminum heads, particularly around the water jackets. However, I thought this would give me a good base to determine the amount/if any warp existed in the head and deck.
Attached thumbnail(s) 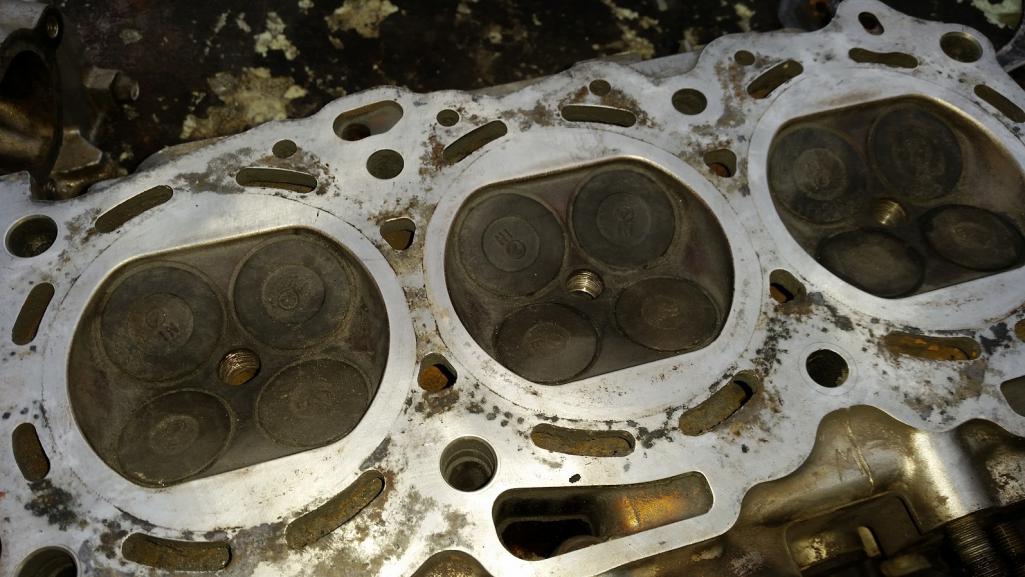
|
| ThePaintedMan |
 Feb 3 2016, 09:10 PM Feb 3 2016, 09:10 PM
Post
#376
|
|
Advanced Member     Group: Members Posts: 3,887 Joined: 6-September 11 From: St. Petersburg, FL Member No.: 13,527 Region Association: South East States 
|
What I found was interesting. There does indeed exist an air gap at the center of the head when it is placed back on the block without the gasket. How much is hard to tell, but it is visible with a flashlight on the other side. With a stock head gasket, this might even be acceptable.
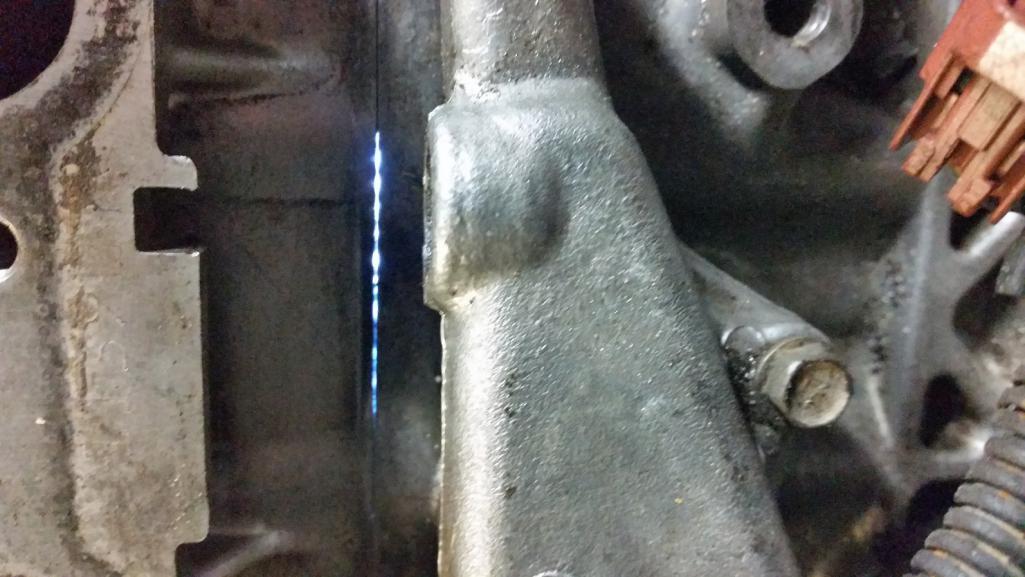 I was not quite able to fit my smallest feeler (.006) in this gap, but it at least confirms to me that the heads will be milled several thousandths and the deck probably needs a little massaging too. If I remember correctly, the Cometic requirements are .002 or less runout longitudinally. Hopefully I'm saying that right, but please correct my lingo if I'm wrong. 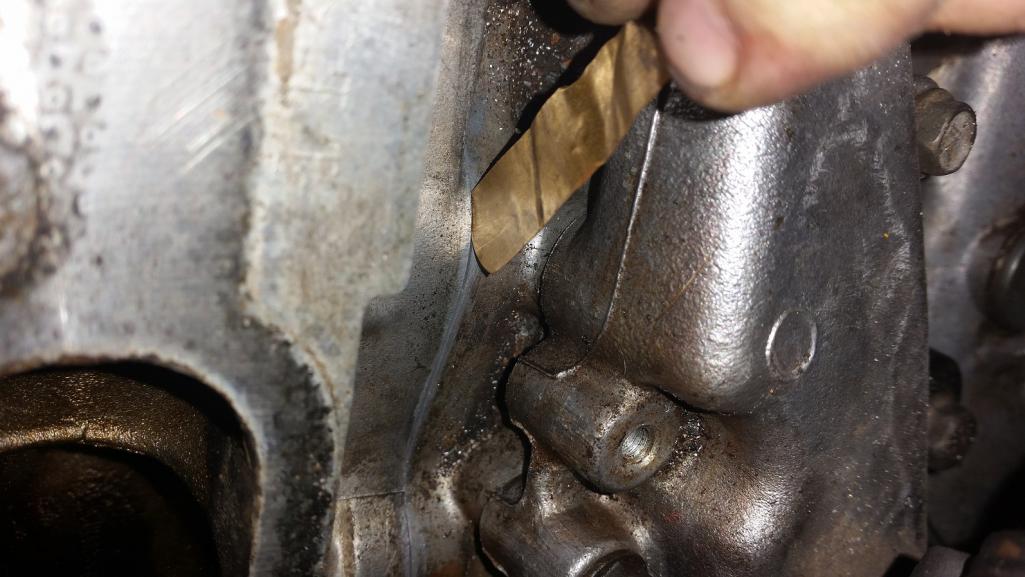 |
| ThePaintedMan |
 Feb 3 2016, 09:19 PM Feb 3 2016, 09:19 PM
Post
#377
|
|
Advanced Member     Group: Members Posts: 3,887 Joined: 6-September 11 From: St. Petersburg, FL Member No.: 13,527 Region Association: South East States 
|
So, since the heads are going to the shop, and I still need something to do, I moved on to working the deck surface. First, I plugged all oil passages, bolt holes and the cylinders with shop rags dabbed in Vasoline. I'm hoping that the Vasoline will help catch any debris and small particles that the shop rags can't.
I went to the local metal supply and found a good 3.5 x 30 aluminum block. I first block-sanded that with 320 grit paper and WD-40 to get, as best as I can tell, a truly flat surface. I then used spray adhesive and glued 320 grit paper to that. I soaked the paper and the deck in WD-40 and went to work in diagonal passes on the deck, slowly removing gasket remnants and a little material, observing any pits and valleys as they disappeared. 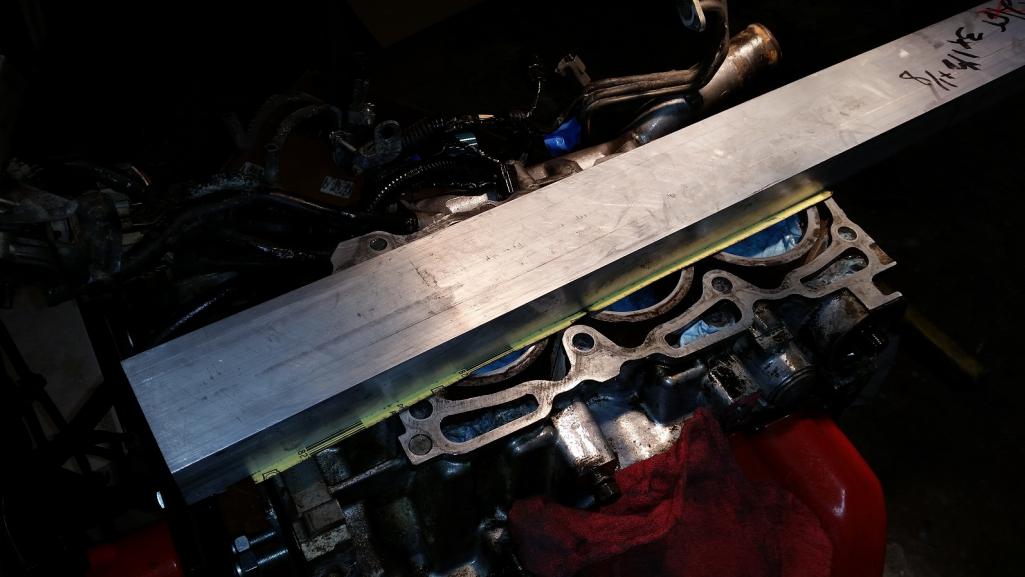 |
| r_towle |
 Feb 3 2016, 09:25 PM Feb 3 2016, 09:25 PM
Post
#378
|
|
Custom Member                Group: Members Posts: 24,705 Joined: 9-January 03 From: Taxachusetts Member No.: 124 Region Association: North East States 
|
Keep going. How much is the expensive gasket set versus the stock set?
I think it would depend upon the cost to me, experts always say go with the gold parts, they are better, but as you have seen here, lots of information is passed along with no real world knowledge, just something they read somewhere online. That gap is huge, just sayin. I would assume you will be having the heads machined, but what are you going to do if that gap is created by the case? An aluminum framing square from Home Depot might give you a good idea on the case. Oh, read up on acetone, wear the right respirator, that stuff is really bad for you. |
| ThePaintedMan |
 Feb 3 2016, 09:28 PM Feb 3 2016, 09:28 PM
Post
#379
|
|
Advanced Member     Group: Members Posts: 3,887 Joined: 6-September 11 From: St. Petersburg, FL Member No.: 13,527 Region Association: South East States 
|
The first passes revealed a fairly obvious recess in the deck surface, though not excessive in my opinion. I continued forward till most of that was gone. You can see some of the cross hatching below. The key is to go slow, alternating diagonal motions and allowing the block and paper to do the work.
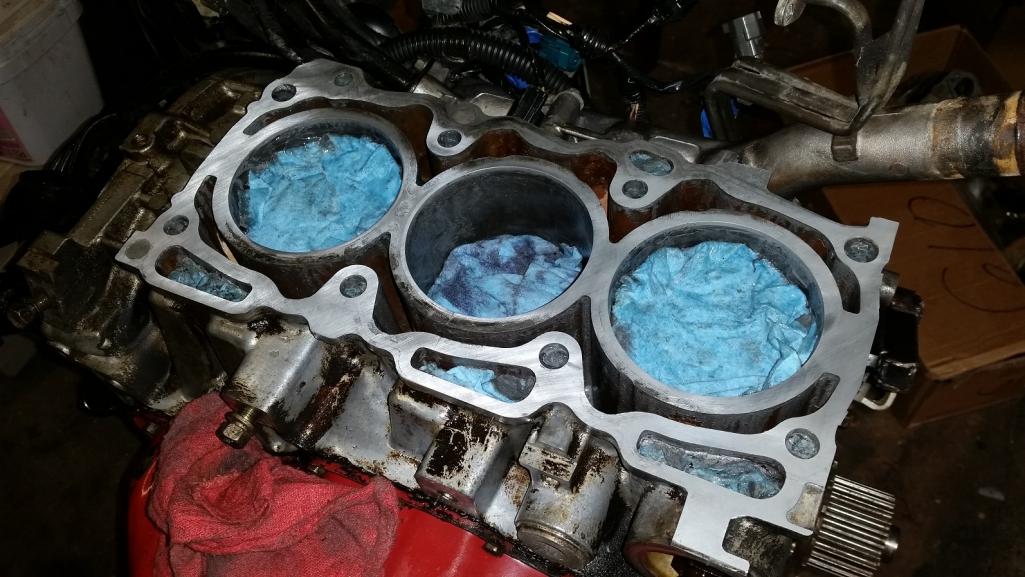 Then I switched paper to 400, then eventually 600. I consulted several references, and while I could get no straight answer, 600 grit paper on aluminum should equate to a 15 RA finish or better, exceeding the Cometic specs. I theory one could continue to 800 or 1000 grit, but from what I understand, some "tooth" on the surface is desirable for good gasket adhesion. In fact, more grit would be desirable for an OEM composite gasket. 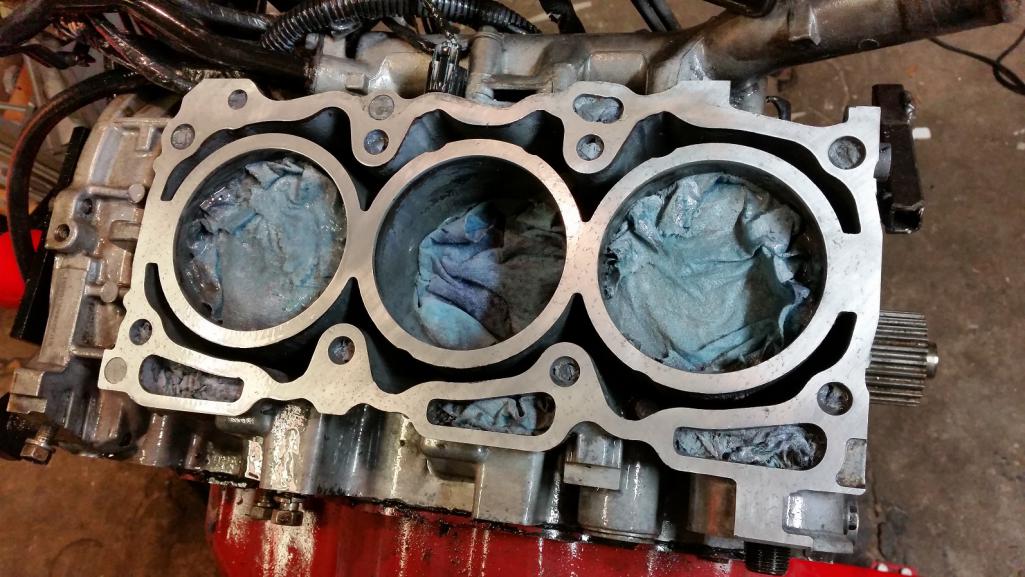 |
| ThePaintedMan |
 Feb 3 2016, 09:37 PM Feb 3 2016, 09:37 PM
Post
#380
|
|
Advanced Member     Group: Members Posts: 3,887 Joined: 6-September 11 From: St. Petersburg, FL Member No.: 13,527 Region Association: South East States 
|
Thanks Rich. I have done another assessment with a straight edge on the finished surface and the deck is within a tolerance that I cannot determine a noticeable gap at this point. My plan is once the heads are back from the reputable shop up the road, to apply Prussian blue to the deck surface and then use very, very small movement of the head on it to determine if there is anymore work that needs to be done.
The other thing I'm slightly worried about is the amount of material that I removed. I believe it to be fairly inconsequential, and I will rely on the machine shop to tell me how much was removed from the heads. At that point, I'll order the appropriate gasket thickness to try to retain the stock compression and therefore, timing. My understanding is that as deck height is decreased, timing is retarded, in some cases by several degrees. Oh, and the SVX is finally gone. A guy in town wanted it to "restore". (IMG:style_emoticons/default/screwy.gif) I tried to explain that the majority of the harness, interior, etc was gone, but it wanted it anyway. For $200, I can't complain. Bye-bye SVX! Attached thumbnail(s) 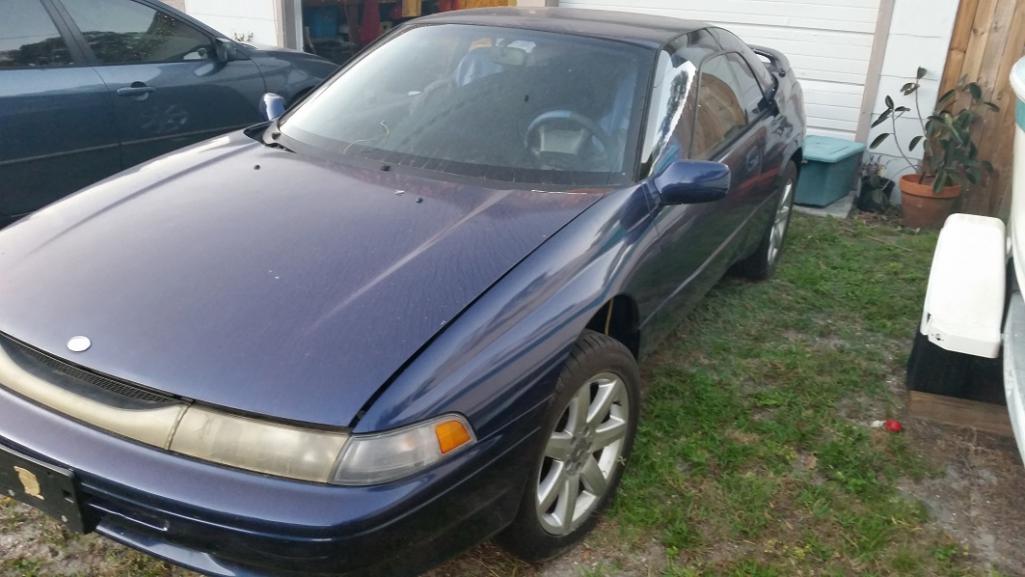
|
  |
1 User(s) are reading this topic (1 Guests and 0 Anonymous Users)
0 Members:

|
Lo-Fi Version | Time is now: 29th November 2025 - 12:24 AM |
Invision Power Board
v9.1.4 © 2025 IPS, Inc.


