|
|
|
Porsche, and the Porsche crest are registered trademarks of Dr. Ing. h.c. F. Porsche AG.
This site is not affiliated with Porsche in any way. Its only purpose is to provide an online forum for car enthusiasts. All other trademarks are property of their respective owners. |
|
|

  |

| seanery |
 Aug 25 2004, 10:15 AM Aug 25 2004, 10:15 AM
Post
#1
|
|
waiting to rebuild whitey!  Group: Retired Admin Posts: 15,852 Joined: 7-January 03 From: Indy Member No.: 100 Region Association: None |
I've read the past threads but can't find the answer I'm looking for.
I'm trying to remove my fogs to put on the Pilot Lites from Camp914. How do I remove this bracket? I've tried my 8mm allen ball head and the straight end, neither fits. Is there a trick to this? Attached image(s) 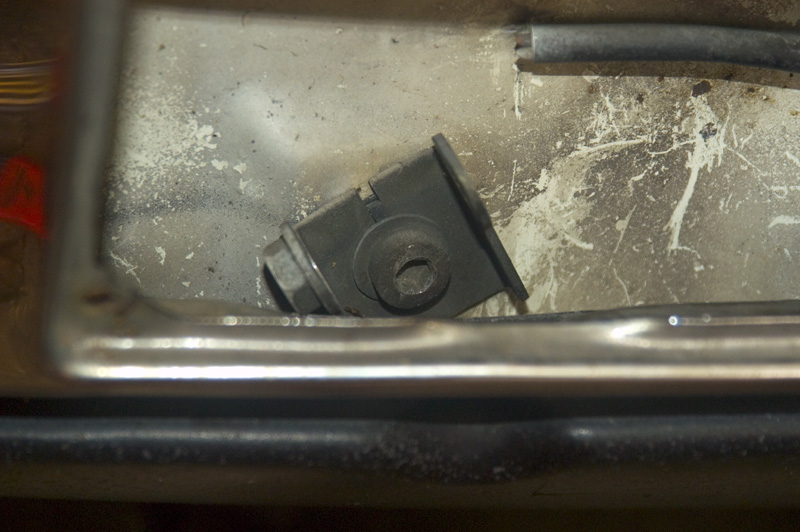
|
   |

 
|
| Joseph Mills |
Aug 25 2004, 10:35 AM
Post
#2
|
|
on a Sonoma diet now... Group: Members Posts: 1,482 Joined: 29-December 02 From: Oklahoma City, OK Member No.: 39 |
From your photo it looks like that hex is somewhat "rounded". Could just be the photo though.
(IMG:style_emoticons/default/confused24.gif) |
|
|
|
| tdgray |
Aug 25 2004, 10:55 AM
Post
#3
|
|
Thank God Nemo is not here to see this Group: Members Posts: 9,705 Joined: 5-August 03 From: Akron, OH Member No.: 984 Region Association: None |
Nope I am having the same problem. I just thought maybe I was missing a wrench in my set (damn kids..er me not putting tools away).
What gives, is this a special size? (IMG:style_emoticons/default/confused24.gif) |
|
|
|
| morph |
Aug 25 2004, 11:07 AM
Post
#4
|
|
quality parts builder Group: Members Posts: 1,828 Joined: 25-November 03 From: oregon coast Member No.: 1,389 Region Association: Pacific Northwest |
yep its a special size
its one of those wierd mid sizes its a .5 size so its in between two of the sizes in a standard metric sets you can buy. (IMG:style_emoticons/default/mad.gif) i still havent found the correct tool for it yet |
|
|
|
| Joe Bob |
Aug 25 2004, 11:15 AM
Post
#5
|
|
Retired admin, banned a few times Group: Members Posts: 17,427 Joined: 24-December 02 From: Boulder CO Member No.: 5 Region Association: None |
I've had to drill them out....
|
|
|
|
| double-a |
Aug 25 2004, 11:19 AM
Post
#6
|
|
Senior Member Group: Members Posts: 987 Joined: 15-September 03 From: vancouver, wa, usa Member No.: 1,162 Region Association: Pacific Northwest |
i just did this two days ago. take my advice: remove the valance first! it's a pain, but you can get to that bolt much, much easier that way.
for getting that bolt off, i used a 9/32nd" bit on my drill, fits perfectly. ~a |
|
|
|
| RON S. |
Aug 25 2004, 11:32 AM
Post
#7
|
|
9140430841, FINALLY RUNNING Group: Members Posts: 1,212 Joined: 22-May 03 From: WALTERBORO,S.C. Member No.: 724 Region Association: South East States |
Yea,
It is a bastard size. I swore at it for half an hour before I took and old Allen wrench and ground it down with a disc grinder to make it fit. Dumb a**'d engineering. Ron |
|
|
|
| seanery |
Aug 25 2004, 01:23 PM
Post
#8
|
|
waiting to rebuild whitey! Group: Retired Admin Posts: 15,852 Joined: 7-January 03 From: Indy Member No.: 100 Region Association: None |
OK, I got it off.
This is the procedure I recommend: 1. Remove VALENCE! 6 screws, well worth the effort-you can get to the bolt from the bottom very easily 2. Get a Torx T-45. It fits the hole perfectly! -see picture 3. Replace existing bolts with M10 20mm 1.5 pitch bolts-mine are grade 12.2 (overkill) and I painted them so they won't rust-they use the common 8mm allen to tighten 4. Reuse the wavey washer from the original 5. Throw the old bolts into your misc bolts drawer 6. If you're a member of your local CSB chapter you can probably return the T-45 Attached image(s) 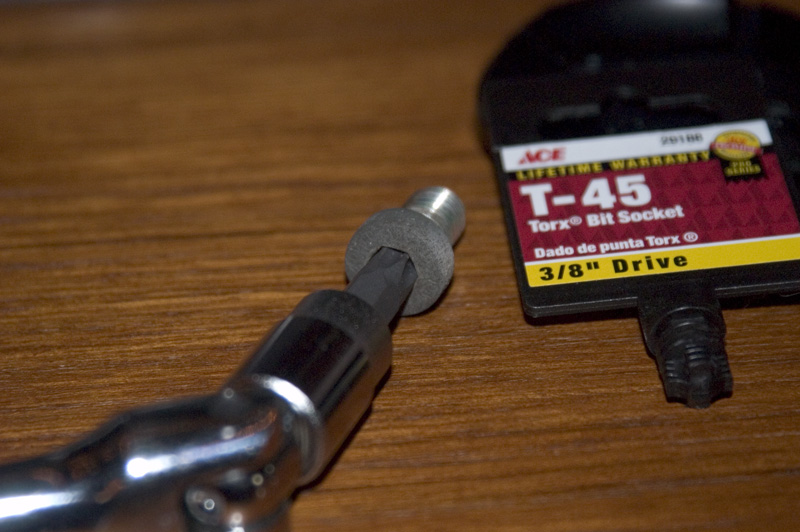
|
|
|
|
| morph |
Aug 25 2004, 02:41 PM
Post
#9
|
|
quality parts builder Group: Members Posts: 1,828 Joined: 25-November 03 From: oregon coast Member No.: 1,389 Region Association: Pacific Northwest |
(IMG:style_emoticons/default/idea.gif) good idea t 45 torx
|
|
|
|
| Dman |
Aug 25 2004, 02:46 PM
Post
#10
|
|
Member Group: Members Posts: 163 Joined: 18-February 03 From: Sacramento CA Member No.: 311 |
I would keep it. I think everyone needs a "dado de punta TORX"! (IMG:style_emoticons/default/wacko.gif)
|
|
|
|
|
1 User(s) are reading this topic (1 Guests and 0 Anonymous Users)
0 Members:

|
Lo-Fi Version | Time is now: 21st May 2024 - 07:05 PM |
Invision Power Board
v9.1.4 © 2024 IPS, Inc.