|
|
|
Porsche, and the Porsche crest are registered trademarks of Dr. Ing. h.c. F. Porsche AG.
This site is not affiliated with Porsche in any way. Its only purpose is to provide an online forum for car enthusiasts. All other trademarks are property of their respective owners. |
|
|


| '73-914kid |
 Jan 12 2012, 01:34 AM Jan 12 2012, 01:34 AM
Post
#1
|
|
Senior Member  Group: Members Posts: 1,473 Joined: 1-November 08 From: Vista, CA Member No.: 9,714 Region Association: Southern California |
Okay Everyone, here we are. The Tangerine Racing dual carb cable/pulley setup. I finally saved up enough of my spare change and recyclables to step up to the plate in exchange for my worn out Hex-Bar setup. This will be a pictorial guide to help aid in the Assembly of the linkage.
Some background: I've been running CB Performances Hex Bar setup for 2 years now, as a daily driver setup. I modified it to correct the arm geometry in an attempt to synchronize the arms at every throttle arrangements, and for those 2 years, It worked extremely well. As of late though, I've noticed that I was having to re-synch the carbs at 200 mile intervals. Yup, the hex bar was wearing. This was how it looked with the hex bar still in place: (IMG:http://www.914world.com/bbs2/uploads_offsite/i260.photobucket.com-9714-1326353690.1.jpg) As you can see, my heim joints were also wearing, and I had to have springs on the down link itself in an effort to keep the rod ends pre-loaded. (IMG:http://www.914world.com/bbs2/uploads_offsite/i260.photobucket.com-9714-1326353690.2.jpg) Rather than take the time to upgrade all the heim joints, bar, and linkage, to a quality that I would desire, I figured I'd go with something more accurate. Along comes the CFR kit. First thing's first, remove the old hex bar, and set it aside. I don't think I'll ever go back to it, but I figure I'll save it anyways. (IMG:http://www.914world.com/bbs2/uploads_offsite/i260.photobucket.com-9714-1326353690.3.jpg) And here's how everything comes from CFR. packaged up nicely, and with good instructions. The cable and sheathes aren't pictured, but you get the gist of what everything looks like. The installation of the pulleys requires some work however, and is not quite "bolt on" but completely doable. The first thing you have to do is line up the holes in the pulley for the barrel clamp. I accomplished this by using blue sharpie at a 45 degree angle. Easily drawn with a protractor. The picture shows the correct orientation in relation to the carb body. (IMG:http://www.914world.com/bbs2/uploads_offsite/i260.photobucket.com-9714-1326353691.4.jpg) After you have it oriented correctly, you must center punch the throttle stop arm, and then drill a hole in it. A roll pin hold the pulleys on to the throttle arm. It does so quite successfully I must say. To bolt the pulley on to the throttle shaft, you must use blue loctite, as the counterbore in the pulley is not wide enough to accommodate the original locking tab. This is repeated similarly for the driver side (slave side) carb. One thing that was recently pointed out was to not overtighten this nut, as it can strip the threads on the throttle shaft, and then you're SOL at that point (Thanks Mark) (IMG:http://www.914world.com/bbs2/uploads_offsite/i260.photobucket.com-9714-1326353691.5.jpg) After you have the pulley tight on the carb shaft, you can set down the carb onto the intake and assemble the cable mounts. I don't have any good pictures of the installation procedure for those, however it's incredibly straightforward, and explained in great detail in Chris' instructions. One thing to be aware of, is the position of the cable mounts, in comparison to the groove machined in the pulley. The mounts can be assembled in multiple arrangements to fit just about any pulley offset. Again, I used blue loctite for many of these parts, as I really hate the idea of having throttle linkage coming apart on the freeway. From here, it's time to string the cables from carb to carb, and really check out your work. This is a picture from my preliminary test/fitment: (IMG:http://www.914world.com/bbs2/uploads_offsite/i260.photobucket.com-9714-1326353691.6.jpg) Notice how much cleaner the engine compartment looks without that bulky HexBar mount? After everything is installed, you can start it up and begin the synchronization process, which I don't think I'll cover in this article. I'm tired, and I have class early tommorow morning. One observation I've had with this cable setup though, is that it is heavily based upon cable tension. In a perfect world, the cable would be tensioned enough so that when the passenger carb begins to rotate, it rotates simultaneously with the slave carb. However, when the cable is tensioned to that degree, it pulls the slave carb off idle. This was overcome by a stiffer spring, but that left me with an undesirably stiff throttle pedal. Then I looked towards the length of the sheathe. In the last picture, there is an obvious S bend in the sheathe, which despite being teflon lined, creates significant resistance and friction. My solution, shorten it. By doing so, I now have a setup with a nice throttle pedal feel, wonderful idle, and wonderful synchronization. Each application is different, so it may or may not have to be trimmed, or tuned differently than mine. So, my final conclusion on the linkage is this: It really is a wonderful kit. So far it is the only cable linkage setup that is developed specifically for 914's, and really does live up to the hype that I at least had heard about it. It's wonderful to drive around with carbs synched at every RPM, and without the fear that over 200 miles the synchronization is going to change drastically. I'm not advertising for Chris, and I wasn't put up to, but I figured I'd share my installation experience, as this really is an excellent alternative to the hex-bar linkage that so many people seem to have issues synchronizing. One final note, before you go about throwing this kit on dirty carbs, go ahead and buy yourself a can of carb cleaner, and clean the shafts, and the throttle return springs that webers have on their shafts. This will ensure that you have a good clean slate to start out with when getting return spring tensions set. Thanks for reading, and I hope that some might find this helpful -Ethan |
   |

 
|
  |
Replies(1 - 19)
| Cairo94507 |
Jan 12 2012, 08:04 AM
Post
#2
|
|
Michael Group: Members Posts: 9,760 Joined: 1-November 08 From: Auburn, CA Member No.: 9,712 Region Association: Northern California |
Nice work and write up. Definitely an improvement over the Hex Bar setup.
|
 |
|
| Van |
Jan 12 2012, 08:42 AM
Post
#3
|
|
Member Group: Members Posts: 199 Joined: 15-January 08 From: Hyde Park, NY Member No.: 8,571 |
Looks like Chris did an excellent job with that product! Kudos!
|
|
|
|
| 76-914 |
Jan 12 2012, 09:11 AM
Post
#4
|
|
Repeat Offender & Resident Subaru Antagonist Group: Members Posts: 13,502 Joined: 23-January 09 From: Temecula, CA Member No.: 9,964 Region Association: Southern California |
Good job. More impressive is your diction. (IMG:style_emoticons/default/thumb3d.gif)
|
|
|
|
| aharder |
Jan 12 2012, 09:33 AM
Post
#5
|
|
Advanced Member Group: Members Posts: 4,391 Joined: 6-September 11 From: Dallas Texas Member No.: 13,524 Region Association: Southwest Region |
Thanks for the information. I'm planning on dual Webers
and I have been interested in this set up. Now I know I'll be saving my spare change also...... (IMG:style_emoticons/default/biggrin.gif) |
|
|
|
| PeeGreen 914 |
Jan 12 2012, 11:04 AM
Post
#6
|
|
Just when you think you're done...wait, there is more..lol Group: Members Posts: 10,219 Joined: 21-September 06 From: Seattle, WA... actually Everett Member No.: 6,884 Region Association: Pacific Northwest |
Nice work Ethan (IMG:style_emoticons/default/beerchug.gif)
|
|
|
|
| Mark Henry |
Jan 13 2012, 12:11 AM
Post
#7
|
|
that's what I do! Group: Members Posts: 20,065 Joined: 27-December 02 From: Port Hope, Ontario Member No.: 26 Region Association: Canada |
One point I'd like to emphasize is do not over tighten the nut on the throttle shaft as it can strip. Just snug it up and let the locktite do the work.
Good write up Ethan, but you might want to add this caveat to your first post. (IMG:style_emoticons/default/sunglasses.gif) |
|
|
|
| '73-914kid |
Jan 13 2012, 12:56 AM
Post
#8
|
|
Senior Member Group: Members Posts: 1,473 Joined: 1-November 08 From: Vista, CA Member No.: 9,714 Region Association: Southern California |
QUOTE(Mark Henry @ Jan 12 2012, 10:11 PM)  One point I'd like to emphasize is do not over tighten the nut on the throttle shaft as it can strip. Just snug it up and let the locktite do the work. Good write up Ethan, but you might want to add this caveat to your first post. (IMG:style_emoticons/default/sunglasses.gif) Thanks for the tip, I went ahead and added it to the write up -Ethan |
|
|
|
| ottox914 |
Jan 13 2012, 08:03 AM
Post
#9
|
|
The glory that once was. Group: Members Posts: 1,302 Joined: 15-December 03 From: Mahtomedi, MN Member No.: 1,438 Region Association: Upper MidWest |
Could we get some close ups of how the cable mounting blocks attach to the carb/manifold area? Wondering if this might work on the turbo 914...
|
|
|
|
| '73-914kid |
Jan 13 2012, 08:27 AM
Post
#10
|
|
Senior Member Group: Members Posts: 1,473 Joined: 1-November 08 From: Vista, CA Member No.: 9,714 Region Association: Southern California |
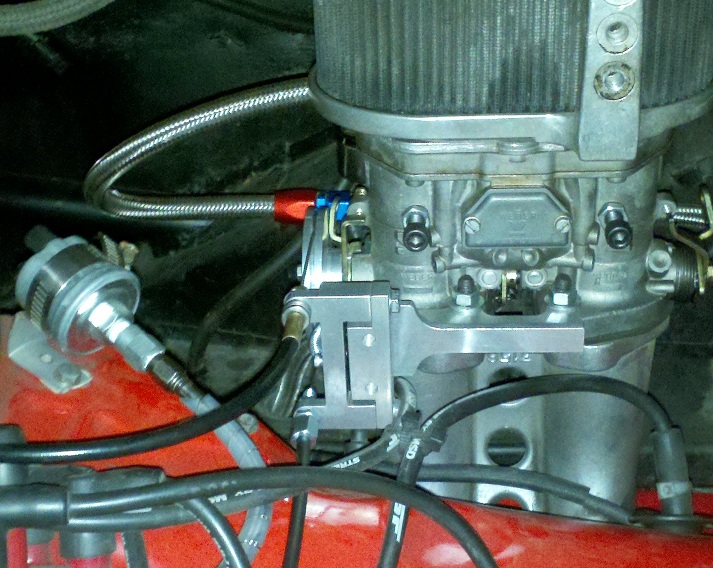 This is about the best picture I can get, as I'm at school right now, and only have the camera on my phone. Hopefully it shows what you're looking for |
|
|
|
| ChrisFoley |
Jan 13 2012, 11:37 AM
Post
#11
|
|
I am Tangerine Racing Group: Members Posts: 7,925 Joined: 29-January 03 From: Bolton, CT Member No.: 209 Region Association: None |
QUOTE(ottox914 @ Jan 13 2012, 09:03 AM) Could we get some close ups of how the cable mounting blocks attach to the carb/manifold area? Wondering if this might work on the turbo 914... Dave, I have an altered bracket design on the drawing board for some special applications. If the standard design doesn't work for you, the alternate might. Ethan, I'm glad you figured out that shortening the cable sheath was appropriate for your installation. We've done it here too, a couple times, but hadn't gotten around to adding it to the instructions - until now. (IMG:style_emoticons/default/smile.gif) |
|
|
|
| '73-914kid |
Jan 13 2012, 05:41 PM
Post
#12
|
|
Senior Member Group: Members Posts: 1,473 Joined: 1-November 08 From: Vista, CA Member No.: 9,714 Region Association: Southern California |
Well, as proof of concept, i proceeded to drive up to San Luis Obispo. 230 miles from school. Linkage stayed in sync and the carbs in tune the whole way. Even got 31 mpg average.
|
|
|
|
| Tom |
Jan 13 2012, 07:48 PM
Post
#13
|
|
Advanced Member Group: Members Posts: 2,139 Joined: 21-August 05 From: Port Orchard, WA 98367 Member No.: 4,626 Region Association: None |
That is a nice installation job and the kit does seem well thought out, but your install pics and info should help many if and when they decide to upgrade their own. Nice job!!
Tom |
|
|
|
| mrbubblehead |
Jan 14 2012, 12:04 AM
Post
#14
|
|
Twodollardoug Group: Members Posts: 1,155 Joined: 17-December 10 From: calimesa ca. Member No.: 12,492 Region Association: Southern California |
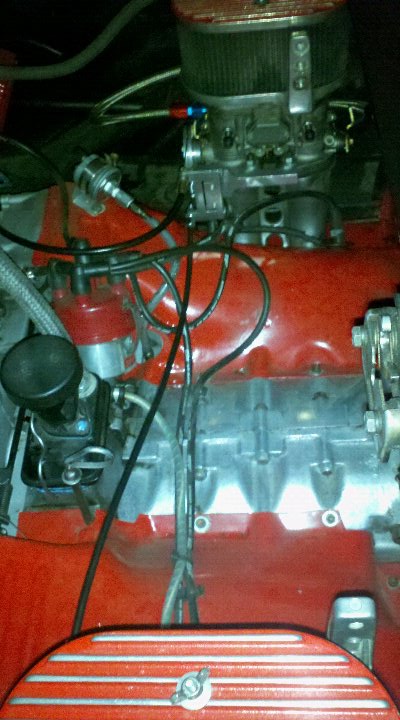
ethan, could you snap a photo of your crossover cable now. i want to see how much you cut off. i have the same set up as you. but i dont remember having the master carb open before the slave. im sure mine are opening at the same time. im gonna go check them right now.
|
|
|
|
| '73-914kid |
Jan 14 2012, 12:30 PM
Post
#15
|
|
Senior Member Group: Members Posts: 1,473 Joined: 1-November 08 From: Vista, CA Member No.: 9,714 Region Association: Southern California |
Si Senor.. and sorry about the poor quality..
 |
|
|
|
| Gint |
Jan 14 2012, 02:31 PM
Post
#16
|
|
Mike Ginter Group: Admin Posts: 16,075 Joined: 26-December 02 From: Denver CO. Member No.: 20 Region Association: Rocky Mountains |
QUOTE My solution, shorten it. So, did you have to shorten the cable also? Just the sheath? Did it have a metal end on it and if so were you able to put it back on? I didn't know Chris made those. A carb cable linkage kit that isn't vapor ware. How much are they? |
|
|
|
| FourBlades |
Jan 14 2012, 02:43 PM
Post
#17
|
|
From Wreck to Rockin Group: Members Posts: 2,054 Joined: 3-December 07 From: Brevard, FL Member No.: 8,414 Region Association: South East States |
I bought and installed this as soon as they were shipping.
It has worked great for months with no tweaking needed ever. How much slack do you leave after shortening the cable sheath? John |
|
|
|
| '73-914kid |
Jan 14 2012, 02:45 PM
Post
#18
|
|
Senior Member Group: Members Posts: 1,473 Joined: 1-November 08 From: Vista, CA Member No.: 9,714 Region Association: Southern California |
I just had to shorten the sheathe. The cable has a swedged end that connects to the master pulley, and the a barrel nut holds the cable on the slave side. It goes for $270 IIRC
|
|
|
|
| 7275914911 |
Jan 14 2012, 02:46 PM
Post
#19
|
|
Hummmm!!! Group: Members Posts: 756 Joined: 7-May 08 From: Mid-South Member No.: 9,028 Region Association: South East States |
I love mine and I switched from Bellcrank and not Droplink. Installed last May.
I had never realized my carbs had more than just off and on. I can really feather the throttle and feel it now. Well not at this moment because of drop valve seat on #3..Damn Hot_Shoe (LOL) I highly recommend this product. Another nut that you should NOT BE OVER TIGHTENED is the Throttle Cable End. It sucks to be ready to Turn the Key and you find yourself running a new Throttle cable instead. Thanks Chris for the quality stuff you make for these addictive little cars!! And Ed too... |
|
|
|
| '73-914kid |
Jan 14 2012, 02:47 PM
Post
#20
|
|
Senior Member Group: Members Posts: 1,473 Joined: 1-November 08 From: Vista, CA Member No.: 9,714 Region Association: Southern California |
I don't really know how to describe how much slack was left in it.. My best description was that it just seemed "right" not too tight, but not too long that it would cause resistance within the sheathe
|
|
|
|
|
1 User(s) are reading this topic (1 Guests and 0 Anonymous Users)
0 Members:

|
Lo-Fi Version | Time is now: 18th May 2024 - 06:49 AM |
Invision Power Board
v9.1.4 © 2024 IPS, Inc.