|
|
|
Porsche, and the Porsche crest are registered trademarks of Dr. Ing. h.c. F. Porsche AG.
This site is not affiliated with Porsche in any way. Its only purpose is to provide an online forum for car enthusiasts. All other trademarks are property of their respective owners. |
|
|


| bcheney |
 Jan 12 2012, 10:47 PM Jan 12 2012, 10:47 PM
Post
#1
|
|
Senior Member  Group: Members Posts: 1,341 Joined: 16-November 03 From: Orlando, FL Member No.: 1,348 Region Association: South East States |
Is there a special set of oil line wrenches that can be used with the set of lines in this picture? Is there a special wrench that allows you to take the line at the bottom of pic off the oil tank while the tank is installed in the fender well of the car? Or do you just need to install or remove the line from the tank by taking the tank out?
Attached thumbnail(s) 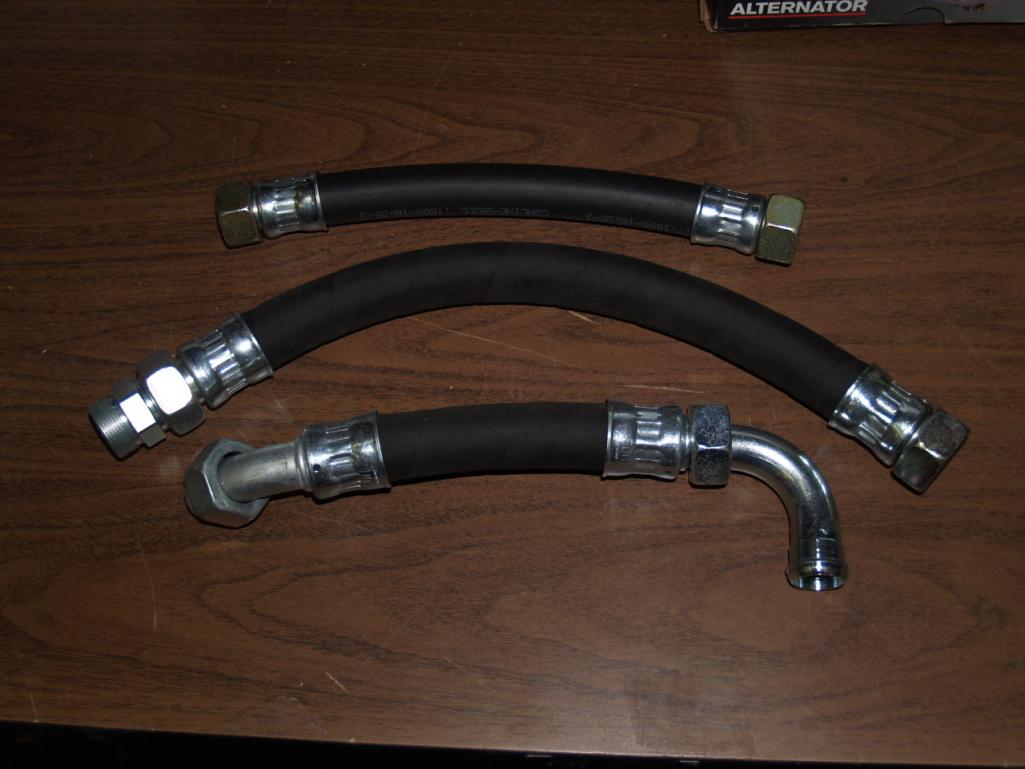
|
   |

 
|
  |
Replies(1 - 14)
| jim912928 |
Jan 12 2012, 11:37 PM
Post
#2
|
|
Senior Member Group: Members Posts: 1,485 Joined: 8-January 04 From: Granger, IN Member No.: 1,536 Region Association: Upper MidWest |
I got this set from Harbor Freight and used them on my six conversion (I used all metric oil lines). They are thin and had all of the large sizes needed for the oil lines and the oil connector on the engine block. The one line that is part of the "two parter" connection from the tank to the cooler needs to have the oil tank side installed before the tank goes in.
http://www.harborfreight.com/hand-tools/wr...-set-93668.html Jim |
|
|
|
| GeorgeRud |
Jan 13 2012, 04:06 PM
Post
#3
|
|
Advanced Member Group: Members Posts: 3,725 Joined: 27-July 05 From: Chicagoland Member No.: 4,482 Region Association: Upper MidWest |
32 and 36mm wrenches are what you need. The HF set actually looks to be what I paid for the two ones I bought years ago!
|
|
|
|
| 6freak |
Jan 13 2012, 04:24 PM
Post
#4
|
|
MR.C Group: Members Posts: 4,740 Joined: 19-March 08 From: Tacoma WA Member No.: 8,829 Region Association: Pacific Northwest |
36MM crows foot and long ext will work on the bottom line ....loosen it , clock it and drop out the tank.......NOT EASY EVEN FOR THE ONE THAT HAVE DONE IT AND KNOW (IMG:style_emoticons/default/smile.gif)
MikeC |
|
|
|
| mepstein |
Jan 13 2012, 04:42 PM
Post
#5
|
|
914-6 GT in waiting Group: Members Posts: 19,272 Joined: 19-September 09 From: Landenberg, PA/Wilmington, DE Member No.: 10,825 Region Association: MidAtlantic Region |
QUOTE(GeorgeRud @ Jan 13 2012, 05:06 PM)  32 and 36mm wrenches are what you need. The HF set actually looks to be what I paid for the two ones I bought years ago! 32 & 36 are common sizes spanners available at bike shops. |
 |
|
| PeeGreen 914 |
Jan 13 2012, 04:46 PM
Post
#6
|
|
Just when you think you're done...wait, there is more..lol Group: Members Posts: 10,219 Joined: 21-September 06 From: Seattle, WA... actually Everett Member No.: 6,884 Region Association: Pacific Northwest |
|
|
|
|
| bcheney |
Jan 14 2012, 09:59 AM
Post
#7
|
|
Senior Member Group: Members Posts: 1,341 Joined: 16-November 03 From: Orlando, FL Member No.: 1,348 Region Association: South East States |
QUOTE(6freak @ Jan 13 2012, 03:24 PM) 36MM crows foot and long ext will work on the bottom line ....loosen it , clock it and drop out the tank.......NOT EASY EVEN FOR THE ONE THAT HAVE DONE IT AND KNOW (IMG:style_emoticons/default/smile.gif) MikeC I'm thinking it may easier to remove the tank then to loosen the fitting....if the tank is EMPTY? Would be interested to hear what folks have to say that have done this. Thanks Mike for the crowfoot suggestion. Where can you pick up a 36mm crowfoot? |
|
|
|
| Krieger |
Jan 14 2012, 11:08 AM
Post
#8
|
|
Advanced Member Group: Members Posts: 4,711 Joined: 24-May 04 From: Santa Rosa CA Member No.: 2,104 Region Association: None |
I will be attempting this today with no specialty tools. Currently have an empty tank installed in car with the bottom line in fender well finger tight and marked for position. I have all the factory seals. I plan on trying to remove the tank with line on, or separating and removing. Then when both are out attaching line in marked position. I heard that when installing the tank you rotate it counter clock-wise in the fenderwell. I will try and report back.
|
|
|
|
| bcheney |
Jan 14 2012, 11:27 AM
Post
#9
|
|
Senior Member Group: Members Posts: 1,341 Joined: 16-November 03 From: Orlando, FL Member No.: 1,348 Region Association: South East States |
QUOTE(Krieger @ Jan 14 2012, 10:08 AM) I will be attempting this today with no specialty tools. Currently have an empty tank installed in car with the bottom line in fender well finger tight and marked for position. I have all the factory seals. I plan on trying to remove the tank with line on, or separating and removing. Then when both are out attaching line in marked position. I heard that when installing the tank you rotate it counter clock-wise in the fenderwell. I will try and report back. Wow...I guess everything happens for a reason! Thanks for chiming in and I look forward to the report. It's tight in there...good luck. |
|
|
|
| Krieger |
Jan 14 2012, 02:56 PM
Post
#10
|
|
Advanced Member Group: Members Posts: 4,711 Joined: 24-May 04 From: Santa Rosa CA Member No.: 2,104 Region Association: None |
Okay, that was easy. Been in and out 3 times in an less than an hour adjusting position of hose. I don't have the factory foam seals on and my car has flares. Put the hose in the fenderwell, then rotate the entire assembly counter clock-wise, a little up and down and some light pushing, but no big deal. My car is not an original 6 so I'm fussing with hose location. The hose passes under the trailing arm mounting plate and can cover the 1 of the 3 bolts.
|
|
|
|
| Krieger |
Jan 14 2012, 02:59 PM
Post
#11
|
|
Advanced Member Group: Members Posts: 4,711 Joined: 24-May 04 From: Santa Rosa CA Member No.: 2,104 Region Association: None |
Here is a picture someone posted the other day. The hoses do have a good amount of flex when assembled.
Attached image(s) 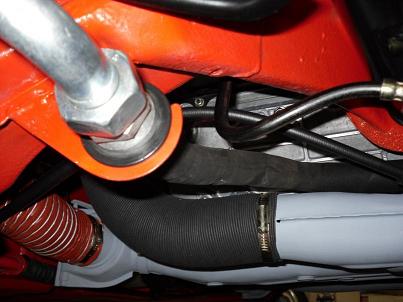
|
|
|
|
| Krieger |
Jan 14 2012, 03:15 PM
Post
#12
|
|
Advanced Member Group: Members Posts: 4,711 Joined: 24-May 04 From: Santa Rosa CA Member No.: 2,104 Region Association: None |
In and out again, readjust hose to be parallel to the tank.
|
|
|
|
| Krieger |
Jan 14 2012, 03:41 PM
Post
#13
|
|
Advanced Member Group: Members Posts: 4,711 Joined: 24-May 04 From: Santa Rosa CA Member No.: 2,104 Region Association: None |
okay not quite parallel to the seam of the tank maybe 15* in toward center of the car is it!
|
|
|
|
| 6freak |
Jan 15 2012, 11:17 PM
Post
#14
|
|
MR.C Group: Members Posts: 4,740 Joined: 19-March 08 From: Tacoma WA Member No.: 8,829 Region Association: Pacific Northwest |
QUOTE(bcheney @ Jan 14 2012, 07:59 AM) QUOTE(6freak @ Jan 13 2012, 03:24 PM) 36MM crows foot and long ext will work on the bottom line ....loosen it , clock it and drop out the tank.......NOT EASY EVEN FOR THE ONE THAT HAVE DONE IT AND KNOW (IMG:style_emoticons/default/smile.gif) MikeC I'm thinking it may easier to remove the tank then to loosen the fitting....if the tank is EMPTY? Would be interested to hear what folks have to say that have done this. Thanks Mike for the crowfoot suggestion. Where can you pick up a 36mm crowfoot? Hi .... that bottom hose must be loose ...and remove rocker panel screws (under side only) and prop outward with something ..gives just a bit more room......Snap on tools ...double check the size 36mm?? 32mm?? been awile ....hold on ..2 minutes later .........1 7/16 i know but it works |
|
|
|
| 6freak |
Jan 18 2012, 09:32 AM
Post
#15
|
|
MR.C Group: Members Posts: 4,740 Joined: 19-March 08 From: Tacoma WA Member No.: 8,829 Region Association: Pacific Northwest |
quote name='bcheney' date='Jan 12 2012, 08:47 PM' post='1603888']
Is there a special set of oil line wrenches that can be used with the set of lines in this picture? Is there a special wrench that allows you to take the line at the bottom of pic off the oil tank while the tank is installed in the fender well of the car? Or do you just need to install or remove the line from the tank by taking the tank out? [/quote]  I remember why it took this crow foot ..the other openend wrench style did not come in MM that big so i had to go SAE . good luck |
|
|
|
|
1 User(s) are reading this topic (1 Guests and 0 Anonymous Users)
0 Members:

|
Lo-Fi Version | Time is now: 18th May 2024 - 05:14 AM |
Invision Power Board
v9.1.4 © 2024 IPS, Inc.