|
|
|
Porsche, and the Porsche crest are registered trademarks of Dr. Ing. h.c. F. Porsche AG.
This site is not affiliated with Porsche in any way. Its only purpose is to provide an online forum for car enthusiasts. All other trademarks are property of their respective owners. |
|
|


| DNHunt |
 Sep 3 2004, 09:22 PM Sep 3 2004, 09:22 PM
Post
#1
|
|
914 Wizard? No way. I got too much to learn.  Group: Members Posts: 4,099 Joined: 21-April 03 From: Gig Harbor, WA Member No.: 598 |
I decided to rig up a degree wheel to use in setting up the valve train. It's just a paper 360 degree disk stuck on my trigger wheel with a pointer off 1 of the studs for the cooling shroud. It should be interesting to see where valves open and close.
Dave Attached image(s) 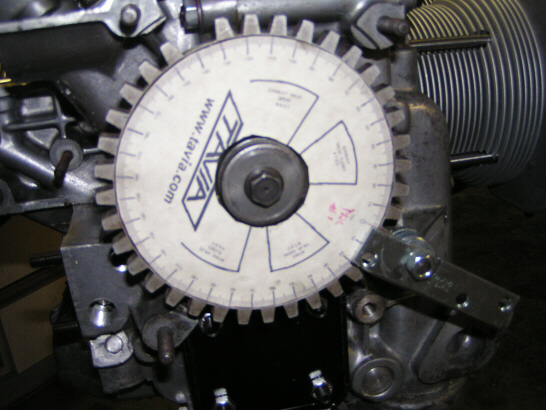
|
   |

 
|
Posts in this topic
 DNHunt Decided to rig up a degree wheel Sep 3 2004, 09:22 PM
 DNHunt I think it will make it a little easier to replica... Sep 3 2004, 09:26 PM d7n7master SOB!!! I want your engine stand!... Sep 3 2004, 10:09 PM Mueller look'n good Dave :worship:
nice degree whe... Sep 4 2004, 01:22 AM Tom Perso Have fun with that!!!
Do you have the... Sep 4 2004, 05:35 AM DNHunt Tom
Mine are some single springs. I have some spr... Sep 4 2004, 06:59 AM Tom Perso You are all set!!!
Good luck... Wh... Sep 4 2004, 07:44 AM DNHunt Chromoly Sep 4 2004, 08:32 AM DNHunt Here's a picture of the trial springs on the v... Sep 4 2004, 08:34 AM DNHunt I made a little stand for the dial indicator that ... Sep 4 2004, 08:37 AM DNHunt I've got a rectangular frame that clamps the i... Sep 4 2004, 08:40 AM DNHunt Well, we managed to get 1 cylinder done. Dad had a... Sep 4 2004, 09:32 PM DNHunt The idea is to get the adjuster parallel to the va... Sep 4 2004, 09:39 PM DNHunt A lot of trial and error. Here as good a shot as I... Sep 4 2004, 09:46 PM swood Dave, how's the vtg going? What adjusters are... Sep 6 2004, 01:07 PM Jake Raby Dave, looking good! I like your tool for the g... Sep 6 2004, 03:27 PM DNHunt The adjusters are swivel feet. The one in the pict... Sep 6 2004, 03:28 PM Jake Raby Looks great Dave... Thats what its suppose to look... Sep 6 2004, 03:30 PM
DNHunt I think it will make it a little easier to replica... Sep 3 2004, 09:26 PM d7n7master SOB!!! I want your engine stand!... Sep 3 2004, 10:09 PM Mueller look'n good Dave :worship:
nice degree whe... Sep 4 2004, 01:22 AM Tom Perso Have fun with that!!!
Do you have the... Sep 4 2004, 05:35 AM DNHunt Tom
Mine are some single springs. I have some spr... Sep 4 2004, 06:59 AM Tom Perso You are all set!!!
Good luck... Wh... Sep 4 2004, 07:44 AM DNHunt Chromoly Sep 4 2004, 08:32 AM DNHunt Here's a picture of the trial springs on the v... Sep 4 2004, 08:34 AM DNHunt I made a little stand for the dial indicator that ... Sep 4 2004, 08:37 AM DNHunt I've got a rectangular frame that clamps the i... Sep 4 2004, 08:40 AM DNHunt Well, we managed to get 1 cylinder done. Dad had a... Sep 4 2004, 09:32 PM DNHunt The idea is to get the adjuster parallel to the va... Sep 4 2004, 09:39 PM DNHunt A lot of trial and error. Here as good a shot as I... Sep 4 2004, 09:46 PM swood Dave, how's the vtg going? What adjusters are... Sep 6 2004, 01:07 PM Jake Raby Dave, looking good! I like your tool for the g... Sep 6 2004, 03:27 PM DNHunt The adjusters are swivel feet. The one in the pict... Sep 6 2004, 03:28 PM Jake Raby Looks great Dave... Thats what its suppose to look... Sep 6 2004, 03:30 PM DNHunt Here's Gerry torqueing down the rockers to che... Sep 6 2004, 03:32 PM
  |
1 User(s) are reading this topic (1 Guests and 0 Anonymous Users)
0 Members:

|
Lo-Fi Version | Time is now: 15th June 2026 - 06:37 PM |
Invision Power Board
v9.1.4 © 2026 IPS, Inc.