|
|
|
Porsche, and the Porsche crest are registered trademarks of Dr. Ing. h.c. F. Porsche AG.
This site is not affiliated with Porsche in any way. Its only purpose is to provide an online forum for car enthusiasts. All other trademarks are property of their respective owners. |
|
|

  |

| SLITS |
 Sep 7 2004, 10:50 AM Sep 7 2004, 10:50 AM
Post
#21
|
|
"This Utah shit is HARSH!"  Group: Benefactors Posts: 13,602 Joined: 22-February 04 From: SoCal Mountains ... Member No.: 1,696 Region Association: None |
All of it will bolt right up no problems, but you must use the exhaust hanger from the 1.7.
The bolts shouldn't touch and will cause a transfer of heat to the filter - get the correct filter for it. |
   |

 
|
| brant |
Sep 7 2004, 10:51 AM
Post
#22
|
|
914 Wizard Group: Members Posts: 11,618 Joined: 30-December 02 From: Colorado Member No.: 47 Region Association: Rocky Mountains |
It would be easy to upgrade later, after the motor was in the car and running...
The 1.7 exhause also gives up 5hp or so to the early 2.0 stuff..... It sounds like the 1.7 is better than the late 2.0 (I honestly don't know).... but down the road you may want to upgrade the the early 2.0 and get those 5free hp) brant |
|
|
|
| RustyWa |
Sep 7 2004, 01:38 PM
Post
#23
|
|
Working Member Group: Members Posts: 610 Joined: 2-January 03 From: Kent, WA Member No.: 72 |
QUOTE(brant @ Sep 7 2004, 08:26 AM) The 75/76 style is pretty restrictive.. I meant by back dating that yes, you can bolt up the complete early style system.... You can find SSI's or even stock 2.0 stuff will work well. I think you will need the all the bits... - a pair of Heat exchangers - I think the early style muffler (or bursch or any aftermarket for an early style 2.0) - an early style 2.0 muffler bracket (or you can make your own) - the muffler gaskets for the early style system. brant Don't forget the two tin pieces that attach to the motor case and the heat exchangers. The two pieces that you can see when you look under your car and up at your engine. |
|
|
|
| Rhodes71/914 |
Sep 7 2004, 01:57 PM
Post
#24
|
|
Glacier Group: Members Posts: 1,374 Joined: 8-August 04 From: End of the Road, Alaska Member No.: 2,482 |
QUOTE(RustyWa @ Sep 7 2004, 11:38 AM) Don't forget the two tin pieces that attach to the motor case and the heat exchangers. The two pieces that you can see when you look under your car and up at your engine. Funny you should mention the tin, while dismantling there was only one peice of tin underneath on the drivers side going from the engine to the heat exchanges. Should there be one on the passenger side as well? |
|
|
|
| RustyWa |
Sep 7 2004, 02:04 PM
Post
#25
|
|
Working Member Group: Members Posts: 610 Joined: 2-January 03 From: Kent, WA Member No.: 72 |
Yes there should be one on each side. The later style ones ('75-'76) do not work if you are planning on back-dating your exhaust system. Also, the tail-shifter tin for the drivers side is different than the side-shifters tin.
|
|
|
|
| Rhodes71/914 |
Sep 8 2004, 12:41 AM
Post
#26
|
|
Glacier Group: Members Posts: 1,374 Joined: 8-August 04 From: End of the Road, Alaska Member No.: 2,482 |
Starting to look a little better. (IMG:style_emoticons/default/smile.gif)
Attached image(s) 
|
|
|
|
| Rhodes71/914 |
Sep 8 2004, 12:50 AM
Post
#27
|
|
Glacier Group: Members Posts: 1,374 Joined: 8-August 04 From: End of the Road, Alaska Member No.: 2,482 |
What can I do about those cylinders?
Little bit of surface rust. I don't think that I am going to break the engine down is there anything that I can spray on them like it sits now? Thanks for checking out my post! Time for one of these (IMG:style_emoticons/default/beer.gif) |
|
|
|
| SpecialK |
Sep 8 2004, 10:16 AM
Post
#28
|
|
aircraft surgeon Group: Benefactors Posts: 3,211 Joined: 15-March 04 From: Pacific, MO Member No.: 1,797 |
I'll probably get "smacked down" by the other members for this (IMG:style_emoticons/default/slap.gif) , but as bad as the rust looks aesthetically, it probably helps the cooling some. Seems to me that the rust would increase the surface area, and generate a small amout of turbulance in the airflow across the cylinders. I'd hit them a little with a wire brush to knock the big stuff off, and leave it at that. You could try Naval Jelly on them, but I'm not sure what adverse effects, if any, it'll have on the aluminum heads and block. Then there's Oxisolv and the like which is probably a little less harsh:
http://www.eastwoodco.com/jump.jsp?itemTyp...GORY&itemID=380 "While you've got it this far apart", you might as well pull the oil cooler, give it a thorough cleaning, and replace the seals. Much easier to replace them now, than to find out after you've got the engine installed that they've developed a leak. (IMG:style_emoticons/default/headbang.gif) |
|
|
|
| Rhodes71/914 |
Sep 8 2004, 10:24 AM
Post
#29
|
|
Glacier Group: Members Posts: 1,374 Joined: 8-August 04 From: End of the Road, Alaska Member No.: 2,482 |
QUOTE(Special_K @ Sep 8 2004, 08:16 AM) "While you've got it this far apart", you might as well pull the oil cooler, give it a thorough cleaning, and replace the seals. Much easier to replace them now, than to find out after you've got the engine installed that they've developed a leak. (IMG:style_emoticons/default/headbang.gif) Thanks for the advice Kevin. I was just thinking about that last night. Debating whether I was going to pull the oil cooler or not. You just pushed me in the rigth direction. |
|
|
|
| SpecialK |
Sep 8 2004, 11:20 AM
Post
#30
|
|
aircraft surgeon Group: Benefactors Posts: 3,211 Joined: 15-March 04 From: Pacific, MO Member No.: 1,797 |
Sean, I hate to drag you down into my little "while you've got it this far apart" hell (IMG:style_emoticons/default/happy11.gif) , but here's another "simple" suggestion, replace the push rod tube seals. Extremely easy to do while the engine is sitting all exposed like yours is right now. Pop the valve covers, remove the two rocker shaft retainer nuts (do it one side at a time so there's no issues on how everything goes in there), pull out the push rods noting from which valve they came from, give the tubes a twist and pull them out through the head. The Vitron push rod tube seals are said to be the best, and are cheap insurance against getting oil all over your nice clean HE's again. There was an excellent thread here recently about what, if any, sealants/adhesives to use, and where to use them. If I can find it, I'll repost a copy of it here, or you could email Jake Raby at 'aircooled.net'. Back to the valves. After you've reinstalled your tubes with the new seals, reinsert the push rods back into their original position/location and reinstall the rocker assy. loosely. Give each rod a wiggle to ensure that they've seated back into the center of the lifter/tappet, retorque the retainer nuts to spec. (10 ft. lbs according to Haynes) and re-adjust the valve clearances. Repeat for the other side, and install fresh valve cover gaskets. It sounds like a lot, but it shouldn't take more than 30-45 mins.
If that sounds like too much (IMG:style_emoticons/default/huh.gif) , at the VERY least adjust your valves now, you'll be glad you did! |
|
|
|
| Root_Werks |
Sep 8 2004, 12:01 PM
Post
#31
|
|
Village Idiot Group: Members Posts: 8,315 Joined: 25-May 04 From: About 5NM from Canada Member No.: 2,105 Region Association: Pacific Northwest |
Did someone already mention the main seal? Might as well replace that to right? (IMG:style_emoticons/default/biggrin.gif) It never ends! Come on man, just tear the whole thing appart! (IMG:style_emoticons/default/laugh.gif) If you are anything like most of us, you will have your engine done by the time your children have children. (IMG:style_emoticons/default/laugh.gif)
|
|
|
|
| SpecialK |
Sep 8 2004, 12:30 PM
Post
#32
|
|
aircraft surgeon Group: Benefactors Posts: 3,211 Joined: 15-March 04 From: Pacific, MO Member No.: 1,797 |
QUOTE(Root_Werks @ Sep 8 2004, 10:01 AM) Did someone already mention the main seal? Might as well replace that to right? (IMG:style_emoticons/default/biggrin.gif) It never ends! Come on man, just tear the whole thing appart! (IMG:style_emoticons/default/laugh.gif) If you are anything like most of us, you will have your engine done by the time your children have children. (IMG:style_emoticons/default/laugh.gif) Crap! (IMG:style_emoticons/default/huh.gif) How could I forget the main seal! Which means you'll have to remove the flywheel and clutch assy. to replace it. Might as well resurface the flywheel and check/replace any/all worn clutch components, replace the input shaft seal on the tranny. And "while you've got it this far apart"... (IMG:style_emoticons/default/happy11.gif) (IMG:style_emoticons/default/happy11.gif) (IMG:style_emoticons/default/happy11.gif) |
|
|
|
| seanery |
Sep 8 2004, 12:36 PM
Post
#33
|
|
waiting to rebuild whitey! Group: Retired Admin Posts: 15,852 Joined: 7-January 03 From: Indy Member No.: 100 Region Association: None |
you know, you coulf get some nikkies and 103s!
|
|
|
|
| Root_Werks |
Sep 8 2004, 02:04 PM
Post
#34
|
|
Village Idiot Group: Members Posts: 8,315 Joined: 25-May 04 From: About 5NM from Canada Member No.: 2,105 Region Association: Pacific Northwest |
Muuuuuhahhaaa! (IMG:style_emoticons/default/happy11.gif) Just pick up the wrench Sean, a few small turns and you will be in disassembly Hell! (IMG:style_emoticons/default/sad.gif)
Oh yeah, while your in there, don't forget to strengthen the case, buy a new crank/rods etc. Hey, might as well since you've gone this far right? (IMG:style_emoticons/default/laugh.gif) |
|
|
|
| Rhodes71/914 |
Sep 8 2004, 02:50 PM
Post
#35
|
|
Glacier Group: Members Posts: 1,374 Joined: 8-August 04 From: End of the Road, Alaska Member No.: 2,482 |
You guys ar killin' me (IMG:style_emoticons/default/ohmy.gif) LOL. Seriously thank you far all the input/advice. I think that I will definitely do the push-rod tube seals. I have been going back and forth on the clutch assy/flywheel/main bearing, Since I have it out and sitting there on the garage floor I might as well. I mean how stupid would I feel if I got it in the car and the clutch went out, or the main seal started to leak.
Of course there is plenty that I could do... time is not an issue but $ is. Anybody in Oregon need a home loan? One good loan fee and I could go crazy on this thing. (IMG:style_emoticons/default/clap56.gif) Keep the suggestions coming. |
|
|
|
| SpecialK |
Sep 8 2004, 03:57 PM
Post
#36
|
|
aircraft surgeon Group: Benefactors Posts: 3,211 Joined: 15-March 04 From: Pacific, MO Member No.: 1,797 |
QUOTE(Rhodes71/914 @ Sep 8 2004, 12:50 PM) Since I have it out and sitting there on the garage floor I might as well... The initial stages of "Dirk Wright's Disease" (IMG:style_emoticons/default/ohmy.gif) Welcome to the club Sean - (IMG:style_emoticons/default/assimilate.gif) Seriously, anything you can fix/replace, within budget of course, at this stage of disassembly will save you a lot of time and aggrevation down the road. Here's a link to the post I mentioned earlier. 'Silver2.0' (4th reply down) gives his "detail" recipe for a leak free engine. He recommends "Nada" on the tube seals. http://www.914world.com/bbs2/index.php?act...5774&hl=sealant but, while you've got the engine tin and manifolds off, now is a good time to prime and paint them (IMG:style_emoticons/default/lol2.gif) P.S. - Your console is finally boxed and ready to send, but like a dumb-ass, I didn't take any pics of where all of the brackets reattach. I'll email you some high quality (IMG:style_emoticons/default/rolleyes.gif) pics of the correct bracket locations with my "Blurrmaster 5000 Digital Camera" as I install my recovered one. |
|
|
|
| Rhodes71/914 |
Sep 9 2004, 12:43 AM
Post
#37
|
|
Glacier Group: Members Posts: 1,374 Joined: 8-August 04 From: End of the Road, Alaska Member No.: 2,482 |
Not much work tonight, shopping night at the farmers market, gotta get those fresh fruits and veggies, as well as some fresh fish. (IMG:style_emoticons/default/chowtime.gif)
I'm getting OT here I did clean up the tin, mostly in pretty good shape but I think that I will paint it "while it's off" I'll spare you the pics this time. Still trying to decide if I am going to pull the clutch/flywheel. I am going to talk to the previous owner and try to find out exactly what was done "10,000 miles ago" |
|
|
|
| Rhodes71/914 |
Sep 15 2004, 12:11 AM
Post
#38
|
|
Glacier Group: Members Posts: 1,374 Joined: 8-August 04 From: End of the Road, Alaska Member No.: 2,482 |
Haven't been able to work on the 914 for a while but in honor of today I tried to get something done. Just a little painting and clean-up of the fan housing. It's not powder coating but it does look better than it was. As soon as I get some parts in the mail I can do a little work to the engine.
Until then cheers! (IMG:style_emoticons/default/beer.gif) Attached image(s) 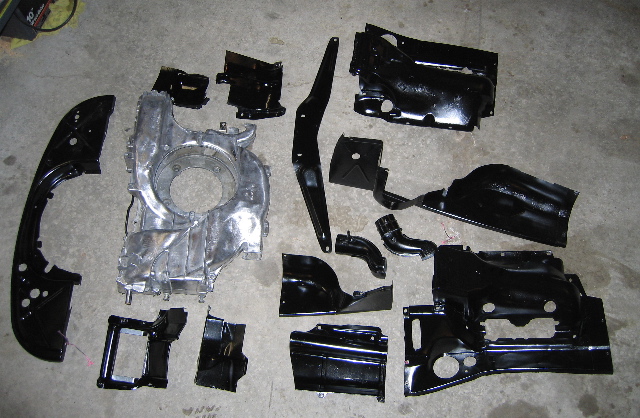
|
|
|
|
| machina |
Sep 15 2004, 06:25 AM
Post
#39
|
|
Advanced Member Group: Benefactors Posts: 2,030 Joined: 21-June 03 From: Miami Beach, FL Member No.: 848 |
sean, looks sweet,
how did you polish the blower housing? dr |
|
|
|
| maf914 |
Sep 15 2004, 06:39 AM
Post
#40
|
|
Not a Guru! Group: Members Posts: 3,049 Joined: 30-April 03 From: Central Florida Member No.: 632 Region Association: None |
Sean,
The polished fan shroud looks nice, but you probably need to clear coat it to keep the finish. On the Shop Talk Type 4 Forum one of the guys (Griznant with the pretty T4 912) polished his and said it oxidized quickly and that it neeed clear coat or paint. Good luck with your new engine! |
|
|
|
|
1 User(s) are reading this topic (1 Guests and 0 Anonymous Users)
0 Members:

|
Lo-Fi Version | Time is now: 3rd May 2024 - 06:10 PM |
Invision Power Board
v9.1.4 © 2024 IPS, Inc.