|
|

|
Porsche, and the Porsche crest are registered trademarks of Dr. Ing. h.c. F. Porsche AG.
This site is not affiliated with Porsche in any way. Its only purpose is to provide an online forum for car enthusiasts. All other trademarks are property of their respective owners. |
|
|
  |
| BritCarJim |
 Feb 14 2012, 04:39 PM Feb 14 2012, 04:39 PM
Post
#1
|
|
Member   Group: Members Posts: 98 Joined: 22-January 12 From: Sevierville, TN Member No.: 14,043 Region Association: South East States |
my "new" teener project is still at the mechanics shop where it was when i got it but i should be able to tgake it home in the next few days. i had the shop pull the calipers and the pedal assembly which i have rebuilt and they are supposed to put back in tomorrow (i went by and rust-encapsulated the floor under the pedals...and took them new brake hoses and a new brake master). Anyway, when i was by there this morning i took a bunch of pictures of the underside of the car while it was on the lift so i can start to get sorted on what i've got and what i can do about it. having said all of that....
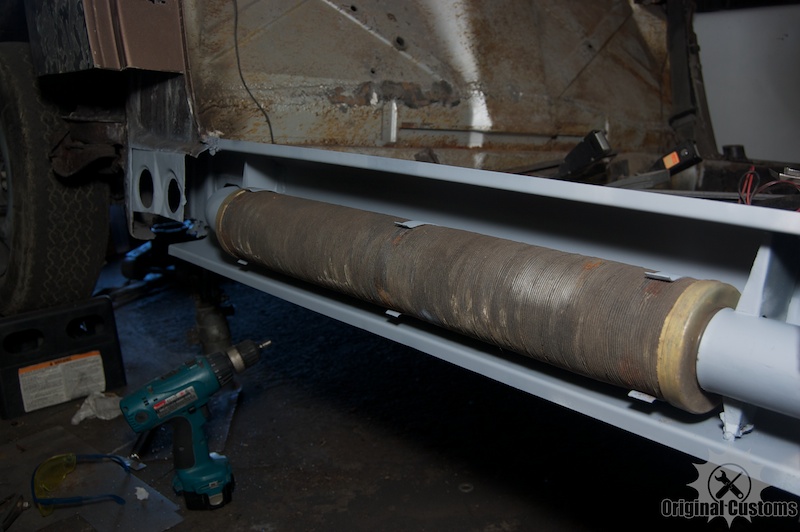
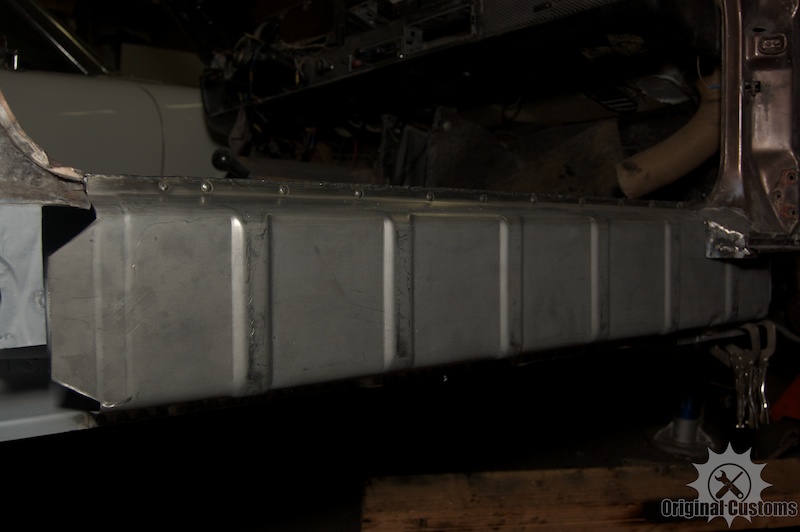
...i've looked at some build threads with stuff about repair of the longs but haven't got it in my head yet as to exactly how that part of the structure is put together. anybody have a good diagram or some good photos to show how all that is put together? |
| McMark |
 Feb 14 2012, 04:49 PM Feb 14 2012, 04:49 PM
Post
#2
|
|
914 Freak!                Group: Retired Admin Posts: 20,179 Joined: 13-March 03 From: Grand Rapids, MI Member No.: 419 Region Association: None |
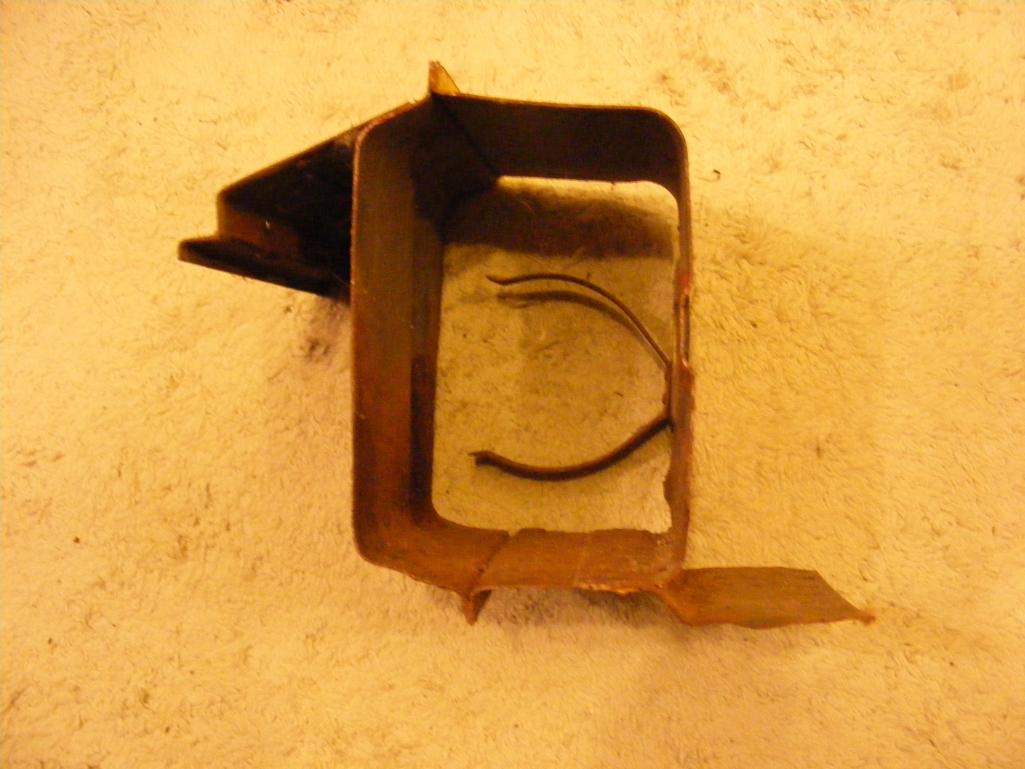
The majority of the length of the longs is just to 'C' shapes welded together, almost like this: []
The lip where the seal installs is the upper weld junction, and the lip underneath is the lower weld junction. Not a complex piece. Try downloading the PET file from Porsche and looking at the exploded diagrams. It might be helpful. Attached image(s)  
|
| ejm |
 Feb 14 2012, 08:08 PM Feb 14 2012, 08:08 PM
Post
#3
|
|
I can see the light at the end of the tunnel     Group: Members Posts: 2,691 Joined: 3-February 03 From: Massachusetts Member No.: 224 Region Association: None |
|
| nathansnathan |
 Feb 15 2012, 10:19 AM Feb 15 2012, 10:19 AM
Post
#4
|
|
Senior Member    Group: Members Posts: 1,052 Joined: 31-May 10 From: Laguna Beach, CA Member No.: 11,782 Region Association: None |
It's a bit more complicated than that, as it is 2 layers for a lot of it.
There are some pretty good shots and discussion of the long construction on my build thread that is linked to in my signature. -Page 6 I get into the inner side and there are pics of the outer on page 1 and 3. There's no piece available for the inside inner forward of the firewall or the inside outer rear of the firewall, all on the passenger side. Because of this, a lot of 914's get put together wrong, just 1 layer on each side by the passenger rear firewall. (IMG:http://www.914world.com/bbs2/uploads/post-1623-1229478544.jpg) I think a lot of body guys, even, don't know about this, as I've been told by everyone that the replacement pieces are available for everything, but I've got confirmation from the panel maker that it's not so. The outer also, the replacement pieces I got didn't have the inner layer, despite that it shows it in the photo and talks about it being spot welded on the site. (IMG:http://www.914world.com/bbs2/uploads/post-7712-1193017589.jpg) (IMG:http://www.914world.com/bbs2/uploads/post-7712-1193017603.jpg) restoration design piece for outer passenger long Here's my piece I got from them without it, the piece below the one labelled 330. (IMG:http://www.914world.com/bbs2/uploads_offsite/www.914club.com-11782-1292380344.8.jpg) |
| jimkelly |
 Feb 15 2012, 10:54 AM Feb 15 2012, 10:54 AM
Post
#5
|
|
Delaware USA     Group: Members Posts: 4,969 Joined: 5-August 04 From: Delaware, USA Member No.: 2,460 Region Association: MidAtlantic Region |
luckily these cars never rust (IMG:style_emoticons/default/barf.gif) well except for this one (IMG:style_emoticons/default/welder.gif)
http://www.914world.com/bbs2/index.php?showtopic=16748 ** oh yeah - you should be stting down for this !!! |
| BritCarJim |
 Feb 15 2012, 01:22 PM Feb 15 2012, 01:22 PM
Post
#6
|
|
Member   Group: Members Posts: 98 Joined: 22-January 12 From: Sevierville, TN Member No.: 14,043 Region Association: South East States |
hmmm. so where is the best place to get panels? oh, and what about the chassis reinforcement bits i've seen threads on, where can you get that?
|
| FourBlades |
 Feb 15 2012, 01:26 PM Feb 15 2012, 01:26 PM
Post
#7
|
|
From Wreck to Rockin     Group: Members Posts: 2,054 Joined: 3-December 07 From: Brevard, FL Member No.: 8,414 Region Association: South East States 
|
Restoration Design for replacement panels. I've used nearly every one of their pieces and they fit very nice and are well made. Tangerine Racing sells a reinforcing kit for bracing the doors while working on your car. I have one and really like it. John |
| dlee6204 |
 Feb 15 2012, 01:27 PM Feb 15 2012, 01:27 PM
Post
#8
|
|
Howdy     Group: Members Posts: 2,162 Joined: 30-April 06 From: Burnsville, NC Member No.: 5,956 |
(IMG:style_emoticons/default/agree.gif) You can't go wrong with Restoration Design
http://www.restoration-design.com/ |
| McMark |
 Feb 15 2012, 03:14 PM Feb 15 2012, 03:14 PM
Post
#9
|
|
914 Freak!                Group: Retired Admin Posts: 20,179 Joined: 13-March 03 From: Grand Rapids, MI Member No.: 419 Region Association: None |
My pics above are all Restoration-Design pieces.
|
| daniel951 |
 Mar 20 2012, 06:43 PM Mar 20 2012, 06:43 PM
Post
#10
|
|
Newbie  Group: Members Posts: 13 Joined: 21-January 12 From: evansville indiana Member No.: 14,036 Region Association: None |
i recently ordered and received an outer engine compartment long like you showed in your picture. i got it from RD in Canada. it is 2 layers thick and is very strong. the inner long that we get from AA or RD is thicker than the stock. and in fact is one layer thick.
|
| draganc |
 Mar 20 2012, 07:43 PM Mar 20 2012, 07:43 PM
Post
#11
|
|
Senior Member    Group: Members Posts: 725 Joined: 2-November 09 From: central new jersey Member No.: 11,000 Region Association: North East States |
The majority of the length of the longs is just to 'C' shapes welded together, almost like this: [] The lip where the seal installs is the upper weld junction, and the lip underneath is the lower weld junction. Not a complex piece. Try downloading the PET file from Porsche and looking at the exploded diagrams. It might be helpful. Mark, great looking "spot" welds on the long. I guess as a pro you would use a spot welder more often then us hobby mechanics. Any particular reason why you used a MIG and and not a spot welder? I have some small work and thinking of buying a $160 240AC HF spot welder. Thanks, Dragan |
  |
1 User(s) are reading this topic (1 Guests and 0 Anonymous Users)
0 Members:

|
Lo-Fi Version | Time is now: 11th May 2024 - 02:34 AM |
Invision Power Board
v9.1.4 © 2024 IPS, Inc.


