|
|
|
Porsche, and the Porsche crest are registered trademarks of Dr. Ing. h.c. F. Porsche AG.
This site is not affiliated with Porsche in any way. Its only purpose is to provide an online forum for car enthusiasts. All other trademarks are property of their respective owners. |
|
|

  |

| jPs |
 Sep 9 2004, 11:17 AM Sep 9 2004, 11:17 AM
Post
#1
|
|
Newbie  Group: Members Posts: 46 Joined: 17-August 04 From: Austin, Texas Member No.: 2,554 |
I know most of y'all take A/C out of your 914's but I'm hoping to add it and am wondering if anyone can give a little advice.
I just aquired an old underdash unit manufactured by Heatransfer out of San Antonio, TX. I've read that VPC and DPT made underdash unit and so this might be a little unique...I dunno. At any rate the underdash unit appears to have everything needed such as expansion valve, standard pcar looking blower motor, etc. From the unit runs a red line (12v hot), green (ground), and red (compressor relay). Bench test shows that everything appears to work correctly and I also have picked up the original York compressor and a relay of some sort with the unit but I've no clue how it's to be wired or what. Below is a picture of the connectors and the only info on the relay is 150-10 12V. Forgive my ignorance here but first does anybody know what the relay pinning is or is it even really necessary to run a relay. From what I can figure I should be able to connect (red) compress relay line direct to the compressor and evaporator fan and I'm guessing the underdash unit would trigger the compressor and evaporator fan to kick in as needed....am I off base here or do I need a go-between relay some where in this picture? I have access to R12 and evac machine on the cheap and so I may upgrade the compressor down the road based on performance but for right now I'd like to get it all hooked up and see how it runs to begin with.....any advice would be GREATLY appreciated. I am willing to buy a new relay but admittedly I'm clueless on what I would need. Attached image(s) 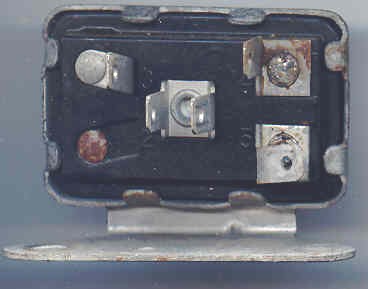
|
   |

 
|
| MarkV |
Sep 9 2004, 11:27 AM
Post
#2
|
|
Fear the Jack Stands Group: Members Posts: 1,493 Joined: 15-January 03 From: Sunny Tucson, AZ Member No.: 154 Region Association: None |
|
|
|
|
| PorscheTom |
Sep 9 2004, 11:32 AM
Post
#3
|
|
Will work for an Avatar. Group: Members Posts: 140 Joined: 12-May 04 From: Shingletown, CA Member No.: 2,057 |
I'm no expert, but when I installed A/C in my '69 bug I restored, the only relay used was to power up the compresser clutch. I guess it draws some serious power when it is first energized. So, I'd guess that your relay is for the compresser clutch.
Pinout on the relay...sorry. Guessing would be, one pin would be direct 12 volt into the relay from a direct battery connection, one pin would be attached to your temp control to cycle the compressor on / off, other pin would be 12 volt out to the compressor, also a ground somewhere. (IMG:style_emoticons/default/idea.gif) YMMV. Good luck |
|
|
|
| jPs |
Sep 9 2004, 11:47 AM
Post
#4
|
|
Newbie Group: Members Posts: 46 Joined: 17-August 04 From: Austin, Texas Member No.: 2,554 |
Thanks for the info this cleared up the questions. Plan on running two relays from the underdash unit, one to the compressor clutch and the other to the evap fan.
So does anybody know where to get a throttle solnoid for a carb setup? |
|
|
|
| 3d914 |
Sep 9 2004, 01:15 PM
Post
#5
|
|
Senior Member Group: Members Posts: 1,275 Joined: 24-September 03 From: Benson, AZ Member No.: 1,191 Region Association: Southwest Region |
jPs,
Here's a link to a previous posting. It includes an A/C wiring diagram I put together that may be of some help. A/C Link Best of luck, |
|
|
|
| jPs |
Sep 9 2004, 04:26 PM
Post
#6
|
|
Newbie Group: Members Posts: 46 Joined: 17-August 04 From: Austin, Texas Member No.: 2,554 |
3D914,
Thank you VERY much...going to get replace hoses this weekend then I'm gonna give it a try. Bump on the throttle solnoid if somebody has a source. |
|
|
|
| Kerrys914 |
Sep 9 2004, 04:45 PM
Post
#7
|
|
Dear, the parts I just sold paid for that part ;) Group: Members Posts: 1,568 Joined: 26-December 02 From: Williamsburg, VA Member No.: 16 |
I have the DPD system in mine with a few tweeks and have R134a in it.
DO a search here and on the bird board..but here are some of the MUST do's for a conversion to 134a but most aplly to R-12 too: - Replace the drier - Get new hoses - Get a new fan, electric ones are cheap and will help with the vent temps - Replace the TXV (expansion valve) for the evap. These run about $30 - Flush the system and add NEW oil. - Pull a deep vacuum for about an hour and charge by weight - Get a binary switch for the high pressure cut off I was going to put a WOT switch in but decided against it. Every time you let off the gas the compressor would kick-in feel very funny with the on-off-on-off-on-off. I installed a nice switch to kill the A/C if I was in need of some extra horses. It only takes a second to flip the switch and it will keep the A/C off untill you pass that dam miata (IMG:style_emoticons/default/smile.gif) (IMG:style_emoticons/default/smile.gif) (IMG:style_emoticons/default/driving.gif) Best of luck |
|
|
|
| Aaron Cox |
Sep 9 2004, 04:49 PM
Post
#8
|
|
Professional Lawn Dart Group: Retired Admin Posts: 24,542 Joined: 1-February 03 From: Corona, CA Member No.: 219 Region Association: Southern California |
a little off topic but..
i saw a street/strip bug that had a AC style electronic clutch pulley on his alternator. flip the switch and let a few horses free (IMG:style_emoticons/default/wink.gif) back to VPC, DPD,914, AC, etc. (IMG:style_emoticons/default/rolleyes.gif) |
|
|
|
| SpecialK |
Sep 9 2004, 05:45 PM
Post
#9
|
|
aircraft surgeon Group: Benefactors Posts: 3,211 Joined: 15-March 04 From: Pacific, MO Member No.: 1,797 |
In the relay pic, typically the two terminals to the right of the pic would be the "coil" side of the relay (control), and the other two (double spade and the one up to the left) would be the switched terminals (load). Easy check - but 12V to the coil terminals and you should hear a click as the contacts make and break. A VOM set to ohms can be attached to the switched terminals (as you apply 12V to the coil terminals) to ensure that the contacts are actually good.
|
|
|
|
| MarkV |
Sep 9 2004, 06:35 PM
Post
#10
|
|
Fear the Jack Stands Group: Members Posts: 1,493 Joined: 15-January 03 From: Sunny Tucson, AZ Member No.: 154 Region Association: None |
QUOTE(jPs @ Sep 9 2004, 02:26 PM) Bump on the throttle solnoid if somebody has a source. I don't think there was ever a provision for throttle solenoid. You could try to adapt something like the photo below. It would be easier to adapt to FI than carbs. http://cgi.ebay.com/ebaymotors/ws/eBayISAP...TRK%3AMEWA%3AIT Attached image(s) 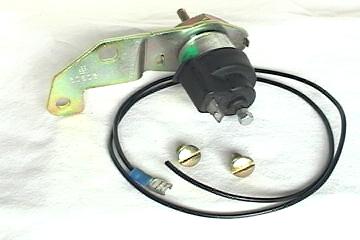
|
|
|
|
| jPs |
Sep 9 2004, 07:14 PM
Post
#11
|
|
Newbie Group: Members Posts: 46 Joined: 17-August 04 From: Austin, Texas Member No.: 2,554 |
Looks like I've a finalized plan now, just need to go talk with the keeper of the checkbook and order a few extra parts I hadn't thought about such as the expansion valve & binary switch.
Any recommendations of good places to order parts is appreciated....most places I've called around here want more than online shopping + shipping charges. I will checkout pelican and tweeks however. thanks again all (IMG:style_emoticons/default/pray.gif) |
|
|
|
| Hi_Fi_Guy |
Sep 9 2004, 07:33 PM
Post
#12
|
|
Tuetonic terror Group: Members Posts: 375 Joined: 12-August 03 From: Sunny Phoenix, AZ Member No.: 1,019 |
For those of us longing to get their A/C units updated and re-installed someday please share your project and install with us.
Also, I know these people have some modern compressors and other A/C components that have been used on some 914s here in Arizona and also in Texas so they should have, The Good Stuff™. http://www.ackits.com/ |
|
|
|
| jr91472 |
Sep 9 2004, 07:49 PM
Post
#13
|
|
"I'm pacing myself sergeant..." Group: Members Posts: 1,205 Joined: 2-August 04 From: McKinney, TX Member No.: 2,437 |
Great thread jP, send us some pics. Would love to see how it looks when installed (never seen one personally).
PS: Great to hear from another Texican!! (IMG:style_emoticons/default/wavey.gif) |
|
|
|
| Kerrys914 |
Sep 10 2004, 05:58 AM
Post
#14
|
|
Dear, the parts I just sold paid for that part ;) Group: Members Posts: 1,568 Joined: 26-December 02 From: Williamsburg, VA Member No.: 16 |
ACKITS.com is a great place to get parts. I'll get the guys e-mail I used and he can get anything you want at great prices.
The binary switch is best to get as part of your NEW drier. If you bought a drier without one no worries they sell a switch that can be installed in-line. The TXV can be bought from the above (that is where I bought mine) for about $30. How are you going to get new hoses and/or fittings? Some place charge a crazy abount to crimp A/C hoses. You will need to have 2 or 3 fittings crimped onto th enew hose AFTER you feed the hose through the car. Just tape up the end and feed the hose through the dealer installed holes or drill your own. Don't forget to locate and drill the hole for evap drain pan hose. It's a pain to get the drill to fit under the evap after it is installed (IMG:style_emoticons/default/smile.gif) (IMG:style_emoticons/default/smile.gif) Cheers (IMG:style_emoticons/default/beerchug.gif) |
|
|
|
| jPs |
Sep 10 2004, 06:23 AM
Post
#15
|
|
Newbie Group: Members Posts: 46 Joined: 17-August 04 From: Austin, Texas Member No.: 2,554 |
Sharing the project seems like a good idea and so here goes. Here's a pic of some of the main componets. Underdash unit, compressor which eventually I'm gonna replace as it weighs about as much as a boat anchor, condensor, and the old dryer.
Forgive the camera but it's an old cheapy. Attached image(s) 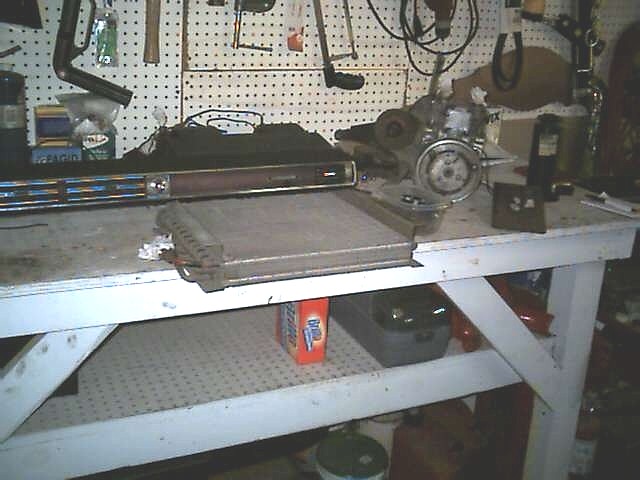
|
|
|
|
| jPs |
Sep 10 2004, 06:26 AM
Post
#16
|
|
Newbie Group: Members Posts: 46 Joined: 17-August 04 From: Austin, Texas Member No.: 2,554 |
Here's the original condensor mounting unit + fan and cover. After speaking with my finance manager last night she reminded me things are a little tight so I'm going to use some parts and upgrade later...like this fan. I let it run all night last night and it appears in good shape, except that as it's old I'm sure it draws a heavier current than newer models and displaces less air, but it's gonna have to work for now.
Attached image(s) 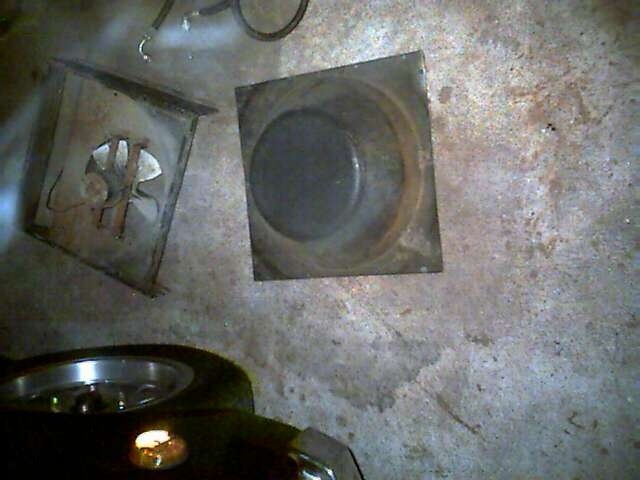
|
|
|
|
| jPs |
Sep 10 2004, 06:33 AM
Post
#17
|
|
Newbie Group: Members Posts: 46 Joined: 17-August 04 From: Austin, Texas Member No.: 2,554 |
My teener previously had air and the PO had left the condensor and lines in tact but everything else was missing. Here's the trunk area and you can see the cutout area done by the original install. There's some surface rust so I'll be cleaning and painting all this up. I'm also not real satisfied with the air circulation as you can see the cutout areas are kinda silly....I've a few ideas and will be rearranging the layout.
You'll also note the hardline coming up from the bottom and all lines will be replaced. On the top left of the picture you'll note the cutouts for the lines. One was used for the windshield wiper pressure hose to the spare tire and since I'm going to replace that with a electric pump driven system I'll probably make use of that for a/c line routing. Attached image(s) 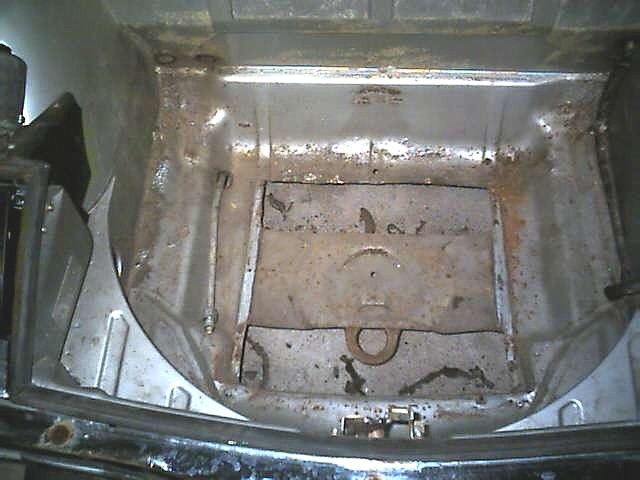
|
|
|
|
| 3d914 |
Sep 10 2004, 07:26 AM
Post
#18
|
|
Senior Member Group: Members Posts: 1,275 Joined: 24-September 03 From: Benson, AZ Member No.: 1,191 Region Association: Southwest Region |
jPs,
Before you cut up the hole(s) in the trunk any more, consider this. Typically when done by the dealers adding the air, a large rectangle was cut out of the floor. This was especially true with VPC system, as its condensor had a bigger footprint. When I replaced my system, I went with the DPD condenser you have shown - as it has greater air flow than the VPC condenser. My trunk already had the larger rectangle cut out for the VPC unit, so I had to retrofit some pieces to seal it all up. What I'm getting at is that if I had to cut one from scratch, I would do it much like what you have there, and here's why. If you look at the underside of the condenser housing, you will notice that the front part (about 1/3) of it is for intake air that is drawn up through the condenser fins. It then passes out the back (about 1/3) to vent. Rather than one big square hole inthe trunk, all one needs are two rectangular hole as you have there - one for the intake & one for the exhaust. The other ring they left sticking out was the tow hook, but you could remove that if you want - as it doesn't look like there is quite enough material there to do the job. Also, you may want to get some scrap thin sheet steel (1/16 in) to make a small air scoop for the front intake vent. I'll try to get some pictures of mine. It just helps get more air directed into the intake from under the car. Just my $0.02 |
|
|
|
| maf914 |
Sep 10 2004, 07:32 AM
Post
#19
|
|
Not a Guru! Group: Members Posts: 3,049 Joined: 30-April 03 From: Central Florida Member No.: 632 Region Association: None |
jPs,
The picture of the trunk reminds me that there is usually a forward facing scoop that extends below the trunk floor in the front slot. This was a piece of sheet metal bent at at about a 45 degree attached to the sides and rear edge of the front opening. It apparently helped scoop air into the opening, up and through the fprward portion of the condenser coil. For the rear opening there was also a sheet metal flap or deflector that was supposed to help the exhaust air discharge. It attached to the front edge of the rear opening and extended down below the floor, also at a 45 degree angle. How well these aero devices worked under the floor is anybody's guess. (IMG:style_emoticons/default/laugh.gif) |
|
|
|
| Kerrys914 |
Sep 10 2004, 07:52 AM
Post
#20
|
|
Dear, the parts I just sold paid for that part ;) Group: Members Posts: 1,568 Joined: 26-December 02 From: Williamsburg, VA Member No.: 16 |
Do you have the pulley that mounts behing the cooling fan?
If you are going to reuse the old hoses I would just connect up what you have for parts. I wouldn't buy anything new and connect it into the old system. Chances are high it will need to be opend back up next spring (IMG:style_emoticons/default/sad.gif) You will also probably loose your charge of R-12 over the winter since the old system was designed with bleed typoe hose. Once you get the $$ ready to do the system right and replace everything listed earlier with new. The cost of my A/C systems was about $150 for the original A/C system and about another $200 for the retro fit to R134a and new parts. Labor was all done by me (IMG:style_emoticons/default/smile.gif) that saved some big $$$$ A/C shops get a premium rate for labor. Cheers |
|
|
|
|
1 User(s) are reading this topic (1 Guests and 0 Anonymous Users)
0 Members:

|
Lo-Fi Version | Time is now: 31st July 2025 - 12:10 AM |
Invision Power Board
v9.1.4 © 2025 IPS, Inc.