|
|
|
Porsche, and the Porsche crest are registered trademarks of Dr. Ing. h.c. F. Porsche AG.
This site is not affiliated with Porsche in any way. Its only purpose is to provide an online forum for car enthusiasts. All other trademarks are property of their respective owners. |
|
|

  |

| OllieG |
 Mar 28 2012, 02:30 PM Mar 28 2012, 02:30 PM
Post
#1
|
|
OllieG  Group: Members Posts: 212 Joined: 6-July 11 From: UK Member No.: 13,282 Region Association: England |
Hi all, I haven't posted much on 914World so 'greetings from the UK'!
I'm converting a '74 to a 6cyl. Right now I'm replacing the rear trunk floor with an RD floor replacement and was hoping some of you guys could give some advice on how best to install it.. The previous owner did a heinous job in trying to repair the original floor with a flat sheet. I've cut and ground that out now. I still have some of the original floor edges to remove but am nearly ready to install the replacement floor. I'm wondering what's the best way to deal with the area across and over the transmission mounts?..this will be where the original floor will be cut and the new floor will be welded in. There is an additional reinforcing piece right above the transmission mounts which I feel will need to be removed as there are clear signs of rust beneath it, which needs sorting - see pic. (IMG:http://www.914world.com/bbs2/uploads_offsite/i1235.photobucket.com-13282-1332966650.1.jpg) (IMG:http://www.914world.com/bbs2/uploads_offsite/i1235.photobucket.com-13282-1332966650.2.jpg) Obviously once this piece is removed the strength of the 'beam' will be compromised. The RD panel has section pressed into it at this point to add stiffness(see pic)..but is it enough alone? (IMG:http://www.914world.com/bbs2/uploads_offsite/i1235.photobucket.com-13282-1332966650.3.jpg) Has anyone else done this job?..and should I be worried about the strength of the floor above the transmission mounts with just the single layer of the RD floor? Hope this makes sense!! Thanks for any tips... Ollie. |
   |

 
|
| SirAndy |
Mar 28 2012, 02:39 PM
Post
#2
|
|
Resident German Group: Admin Posts: 42,483 Joined: 21-January 03 From: Oakland, Kalifornia Member No.: 179 Region Association: Northern California |
I've done that repair but on mine the double part was not rusted.
In your case, i would drill out the spotwelds on the doubled up piece, clean out the rust, weld in the RD part and then add a custom strip to double up that area again. There's quite a bit of "twisting" going on at those transmission mounts, especially if your /6 has a bit of torque. (IMG:style_emoticons/default/smash.gif) |
 |
|
| OllieG |
Mar 29 2012, 02:04 PM
Post
#3
|
|
OllieG Group: Members Posts: 212 Joined: 6-July 11 From: UK Member No.: 13,282 Region Association: England |
Thanks Andy...will do that. I drilled out the reinforcing panel and found lots of rust beneath.The floorpan itself, like the RD replacement, has the same sectioned strip beneath the reinforcing piece... I'll custom make a new piece as I'll likely opt for an SC 3.0L, so plenty of torque!.
Cheers, Ollie. (IMG:http://www.914world.com/bbs2/uploads_offsite/i1235.photobucket.com-13282-1333051491.1.jpg) |
|
|
|
| 914werke |
Mar 29 2012, 02:22 PM
Post
#4
|
|
"I got blisters on me fingers" Group: Members Posts: 11,678 Joined: 22-March 03 From: USofA Member No.: 453 Region Association: Pacific Northwest |
Isnt that plate available from RD also?
|
|
|
|
| gothspeed |
Mar 29 2012, 02:23 PM
Post
#5
|
|
Senior Member Group: Members Posts: 1,539 Joined: 3-February 09 From: SoCal Member No.: 10,019 Region Association: None |
Good information on this thread (IMG:style_emoticons/default/smile.gif)
|
|
|
|
| OllieG |
Mar 29 2012, 03:02 PM
Post
#6
|
|
OllieG Group: Members Posts: 212 Joined: 6-July 11 From: UK Member No.: 13,282 Region Association: England |
QUOTE(rdauenhauer @ Mar 29 2012, 09:22 PM)  Isnt that plate available from RD also? I don't think so..wish it was as I think it's going to be difficult to recreate with 'home garage' tools. Any tips on bending radii into sheet accurately welcome! |
|
|
|
| jmill |
Mar 29 2012, 06:22 PM
Post
#7
|
|
Green Hornet Group: Members Posts: 2,449 Joined: 9-May 08 From: Racine, Wisconsin Member No.: 9,038 Region Association: Upper MidWest |
QUOTE(OllieG @ Mar 29 2012, 04:02 PM) Any tips on bending radii into sheet accurately welcome! Wood and a bench work great. clamp the sheet metal between your bench and a piece of wood with the metal sticking out. Bend the piece up or down and slowly hammer form the piece to get a nice bend. You can sand a radius into the wood to get the bend radius you want. Attached image(s) 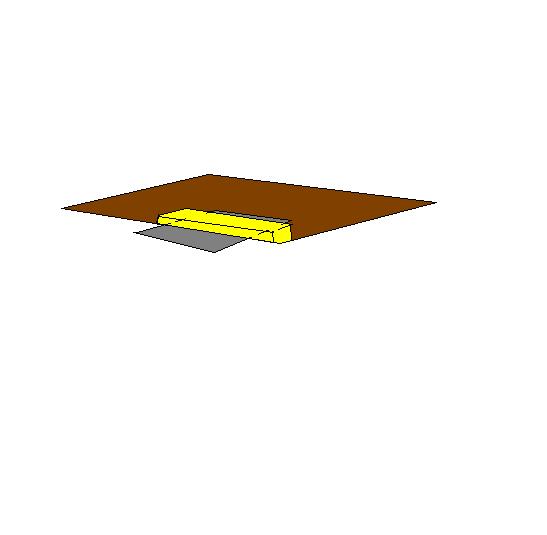
|
|
|
|
| jmill |
Mar 29 2012, 06:26 PM
Post
#8
|
|
Green Hornet Group: Members Posts: 2,449 Joined: 9-May 08 From: Racine, Wisconsin Member No.: 9,038 Region Association: Upper MidWest |
To form the joggle clamp the piece like so and hammer lip down. Match thickness of wood to height of joggle.
Attached image(s) 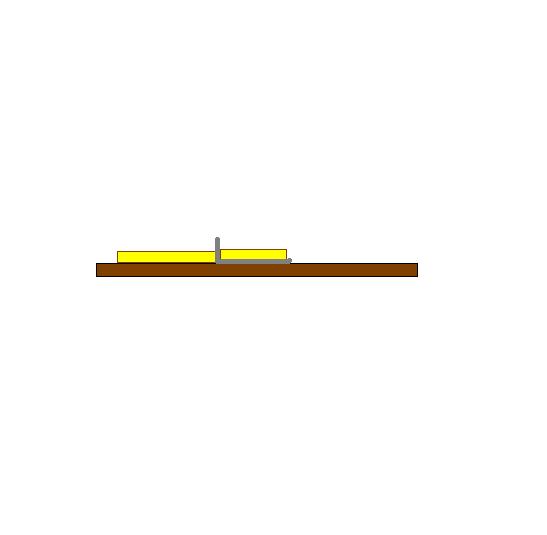
|
|
|
|
| OllieG |
Mar 30 2012, 04:04 AM
Post
#9
|
|
OllieG Group: Members Posts: 212 Joined: 6-July 11 From: UK Member No.: 13,282 Region Association: England |
QUOTE(jmill @ Mar 30 2012, 01:26 AM) To form the joggle clamp the piece like so and hammer lip down. Match thickness of wood to height of joggle. Got it...thanks John, great tips. Saves me buying a sheet bender and modifying that! Will post pics of the results. Ollie. |
|
|
|
| IronHillRestorations |
Mar 30 2012, 06:51 AM
Post
#10
|
|
I. I. R. C. Group: Members Posts: 6,945 Joined: 18-March 03 From: West TN Member No.: 439 Region Association: None |
What I do is take a Sharpie and ruler and make a straight line through the center of the flange and the spot welds, along that flange. Then using a cut off tool, I cut through the top layer of metal only, so you end up with a small lip to set the repair pan on, and you can make a less noticeable repair.
|
|
|
|
| OllieG |
Mar 30 2012, 02:43 PM
Post
#11
|
|
OllieG Group: Members Posts: 212 Joined: 6-July 11 From: UK Member No.: 13,282 Region Association: England |
I've cut out all of the original floor now (horrible job, especially in the tight corners beneath the lights) - drilled out spot welds and ground away the metal I couldn't reach with the drill.
I've also, very carefully and slowly(!) cut and fitted the floor - a 'mm' at a time it seemed, but the floor fits beautifully now (if I do say so myself) so it 'should' weld in neatly. (IMG:http://www.914world.com/bbs2/uploads_offsite/i1235.photobucket.com-13282-1333140208.1.jpg) (IMG:http://www.914world.com/bbs2/uploads_offsite/i1235.photobucket.com-13282-1333140208.2.jpg) I cleaned out the bottom section of the 'tranny' support beam and epoxied the inside of it before it's all sealed-up when the floor pan is welded in. There's virtually no rust proofing in this cavity from the factory..I cleaned off the dirt and grease and there was a fair amount of bare untreated metal. I guess it was all the dirt that had been 'rustproofing' it all these years. It's better rustproofed now with the epoxy than when it left the factory! (IMG:http://www.914world.com/bbs2/uploads_offsite/i1235.photobucket.com-13282-1333140208.3.jpg) (IMG:http://www.914world.com/bbs2/uploads_offsite/i1235.photobucket.com-13282-1333140208.4.jpg) Hope this is of interest, but I haven't found any threads of this job so thought it might be useful! Anyway, aiming to get it all done next week..will post pics of the finished job. Ollie. |
|
|
|
|
1 User(s) are reading this topic (1 Guests and 0 Anonymous Users)
0 Members:

|
Lo-Fi Version | Time is now: 6th June 2026 - 02:06 AM |
Invision Power Board
v9.1.4 © 2026 IPS, Inc.