|
|
|
Porsche, and the Porsche crest are registered trademarks of Dr. Ing. h.c. F. Porsche AG.
This site is not affiliated with Porsche in any way. Its only purpose is to provide an online forum for car enthusiasts. All other trademarks are property of their respective owners. |
|
|

  |

| microsa |
 Oct 9 2004, 10:20 PM Oct 9 2004, 10:20 PM
Post
#1
|
|
Member  Group: Members Posts: 94 Joined: 20-February 03 From: San Antonio, Tx Member No.: 329 |
I am in the process of getting everything together for the 5 lug conversion
on YellowDog and have some questions about the "M" calipers. It seems that the front end parts that I got for the conversion are from a 74-89 911. As far as I can tell the ball joint is the same for the 73 914 (YellowDog) as it is for the 74-89 911 so the struts should bolt right up. (Please corrected me if I am wrong, please!) I have identified all the seals and bearings for the 911 struts and need to re-build the "M" calipers that I have from the 911. I got them apart and all went well till I tried to get the pistons out. They are really stuck. I have no idea how long these brakes were off the road or where they have been stored. The calipers had brake fluid (of sorts) in them, but air would not move them and I soaked them with PB Blaster and have been able to get them to turn by tapping on the pistons but that's it. Any ideas on how to get them out? Next question is what kind of shape are the caliper bores likely to be in? (IMG:http://66.140.241.85/forum/photo_album/microsa/Move%20Over1.jpg) |
   |

 
|
| microsa |
Oct 10 2004, 05:37 PM
Post
#2
|
|
Member Group: Members Posts: 94 Joined: 20-February 03 From: San Antonio, Tx Member No.: 329 |
Anyone?
|
|
|
|
| TimT |
Oct 10 2004, 05:44 PM
Post
#3
|
|
retired Group: Members Posts: 4,033 Joined: 18-February 03 From: Wantagh, NY Member No.: 313 |
You need to exercise the piston,
User a c-clamp or vise-grip and push the piston back into the bore, then use air pressure or hydraulic pressure to push the piston out. I made an adapter ... I welded a metric brake connector to a air-hose quick disconnect. Watch your fingers if you use something like this as this will shoot the piston out like a bullet |
|
|
|
| Eric_Shea |
Oct 10 2004, 07:24 PM
Post
#4
|
|
PMB Performance Group: Admin Posts: 19,275 Joined: 3-September 03 From: Salt Lake City, UT Member No.: 1,110 Region Association: Rocky Mountains |
Here's the only way I've been able to do it:
Harbor Freight Grease Gun. Remove the fitting head with a 14mm wrench. The threads are the same as the input on the M-Caliper. Screw it on and pump the caliper full of grease. You'll need clamps to limit the travel once you've got one side moving. If they are as bad as you say, air will not work (as you now know) it will compress. You need a fluid in there that will not compress. Make no mistake... this is a messy job. Once you're done, clean them out with compressed air, paper towels and then finish it off with a can of brake cleaner in all the passages. The bore's may be a bit rough. I've used #80 glass bead to clean them up in the past. Don't blast them too much. The rubber seal is the main issue for sealing. So to do this you'll need: Air Grease Gun Glass Bead Blaster You may elect to dismantle them afterward. Once mine are cleaned up I usually take them to a platers and have them zinc coated. My guys charge me about $20-30.00 depending on the mood they're in. |
|
|
|
| Slowpoke |
Oct 10 2004, 07:30 PM
Post
#5
|
|
Member Group: Members Posts: 116 Joined: 1-June 03 From: Tucson, AZ Member No.: 768 |
Could be a complete of the wall response, I'm not famaliar with that caliper. But, I've used an internal pipe wrench to losen up a piston on other calipers. I've even used those cheap plier type things that most people use to spread battery cable clamps open.
|
|
|
|
| microsa |
Oct 10 2004, 07:30 PM
Post
#6
|
|
Member Group: Members Posts: 94 Joined: 20-February 03 From: San Antonio, Tx Member No.: 329 |
Thanks Eric, that's what I needed!
(IMG:style_emoticons/default/clap56.gif) |
|
|
|
| Eric_Shea |
Oct 10 2004, 07:37 PM
Post
#7
|
|
PMB Performance Group: Admin Posts: 19,275 Joined: 3-September 03 From: Salt Lake City, UT Member No.: 1,110 Region Association: Rocky Mountains |
|
|
|
|
| thomasotten |
Oct 10 2004, 09:07 PM
Post
#8
|
|
Senior Member Group: Members Posts: 1,545 Joined: 16-November 03 From: San Antonio, Texas Member No.: 1,349 |
I had to hook mine up to the car and stomp really hard on the brakes to get the pistons out.
|
 |
|
| microsa |
Oct 11 2004, 01:08 PM
Post
#9
|
|
Member Group: Members Posts: 94 Joined: 20-February 03 From: San Antonio, Tx Member No.: 329 |
Well, the grease gun trick did the job! The pistons and the bores look fine
the rust and corrosion was all above the o-ring and little buffing with Scotch Brite pad cleaned the whole thing up. Thanks guys. Now another question. The surface of the pistons that contacts the brake pad has raised ring area that does not make a complete ring. It looks to me like this would cause the piston to not push on the pad uniformly. Why are they make that way? Pic attached. (IMG:http://66.140.241.85/forum/photo_album/microsa/P1010005.JPG) |
|
|
|
| Eric_Shea |
Oct 11 2004, 07:52 PM
Post
#10
|
|
PMB Performance Group: Admin Posts: 19,275 Joined: 3-September 03 From: Salt Lake City, UT Member No.: 1,110 Region Association: Rocky Mountains |
Those are supposed to face the direction of the spinning rotor at 20 deg. Hard to describe but I'll bet someone has a scan of the manual or something. Basically: position your caliper on the bench as it would be mounted. Imagine the rotor spinning through it. The opening faces the oncoming rotor spin and should be positioned 20 deg off the right edge of the pad area in the rotor... damn this is confusing to me and I'm trying to explain it.
Do you have any Porsche "type" manual? Clymer? Haynes? They all should have a picture of the process... Sorry, it's a tough one to explain. E. |
|
|
|
| microsa |
Oct 11 2004, 08:02 PM
Post
#11
|
|
Member Group: Members Posts: 94 Joined: 20-February 03 From: San Antonio, Tx Member No.: 329 |
Yeah, I found it in my Haynes. I just never read that before, never had to o/h calipers on one of these cars. Strange, but I'm sure they did the research or it wouldn't be there. I think I have it figured out. In looking at the old pads, they were not in the correct position before, but they will be when I go back together with them.
Thanks All. Oh yeah, who's got the best deal on a re-drilled to five lug rear hub with all the necessary pieces in one package? I know I've asked before, but don't think I got any firm answers. |
|
|
|
| Eric_Shea |
Oct 14 2004, 05:25 PM
Post
#12
|
|
PMB Performance Group: Admin Posts: 19,275 Joined: 3-September 03 From: Salt Lake City, UT Member No.: 1,110 Region Association: Rocky Mountains |
QUOTE Oh yeah, who's got the best deal on a re-drilled to five lug rear hub with all the necessary pieces in one package? I know I've asked before, but don't think I got any firm answers. Me. (IMG:style_emoticons/default/biggrin.gif) Actually, it depends on what you want. People recommend the GPR kit. When you price out the items separately their redrilled hubs come in at $129.00 If you go this route (hubs only) you will need bearings at least. You'll also need new rotors and, of course, new wheels (IMG:style_emoticons/default/wink.gif) I have one set of "hubs only" for $125.00. I sell completed control arms (bead blasted, repainted, new bearings, 5-lug hubs pressed in) for: $349.00 - Without new bushings. $399.00 - With new bushings. I have one set of each currently. With my conversions you'll also need to get 914-6 rotors. I developed the package because a rear conversion was a little difficult for the average wrench. Pressing out hubs, pressing out bearings, pressing in new bearings, pulling in new hubs, pressing out bushings... it can all be a bitch. The GPR kit leaves you with all (or most of) those tasks. (not bad mouthing them... just explaining why I built my package the way I did. Their prices are fair to be sure.) With mine you'll need an 11mm for the brake line, a 19mm for the calipers, 22mm for the shock bolt, a 22mm and a 17mm for all the control arm bolts (ohhhhhhhh and don't forget the 30mm for the hub castle nut!) Meaning: Bolt On. As Aaron, Mark, John and others can attest to, they come back in like new condition. I require your cores back. Happy hunting... |
|
|
|
| Eric_Shea |
Oct 14 2004, 05:29 PM
Post
#13
|
|
PMB Performance Group: Admin Posts: 19,275 Joined: 3-September 03 From: Salt Lake City, UT Member No.: 1,110 Region Association: Rocky Mountains |
Pic...
Attached image(s) 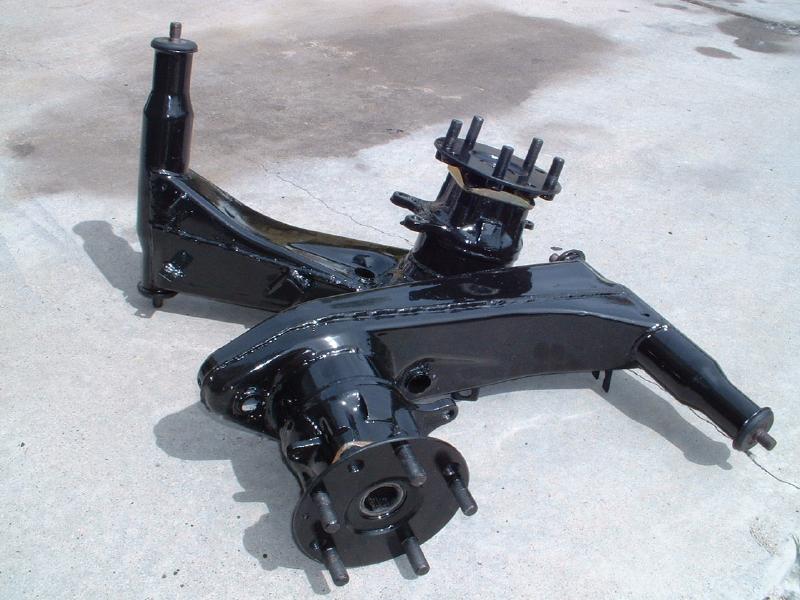
|
|
|
|
|
1 User(s) are reading this topic (1 Guests and 0 Anonymous Users)
0 Members:

|
Lo-Fi Version | Time is now: 17th May 2024 - 05:38 PM |
Invision Power Board
v9.1.4 © 2024 IPS, Inc.