|
|
|
Porsche, and the Porsche crest are registered trademarks of Dr. Ing. h.c. F. Porsche AG.
This site is not affiliated with Porsche in any way. Its only purpose is to provide an online forum for car enthusiasts. All other trademarks are property of their respective owners. |
|
|

  |

| Mr.242 |
 Jul 2 2012, 09:01 PM Jul 2 2012, 09:01 PM
Post
#21
|
|
May your glass be smaller so it's always FULL!  Group: Members Posts: 1,079 Joined: 10-June 08 From: Seattle Member No.: 9,160 Region Association: Pacific Northwest |
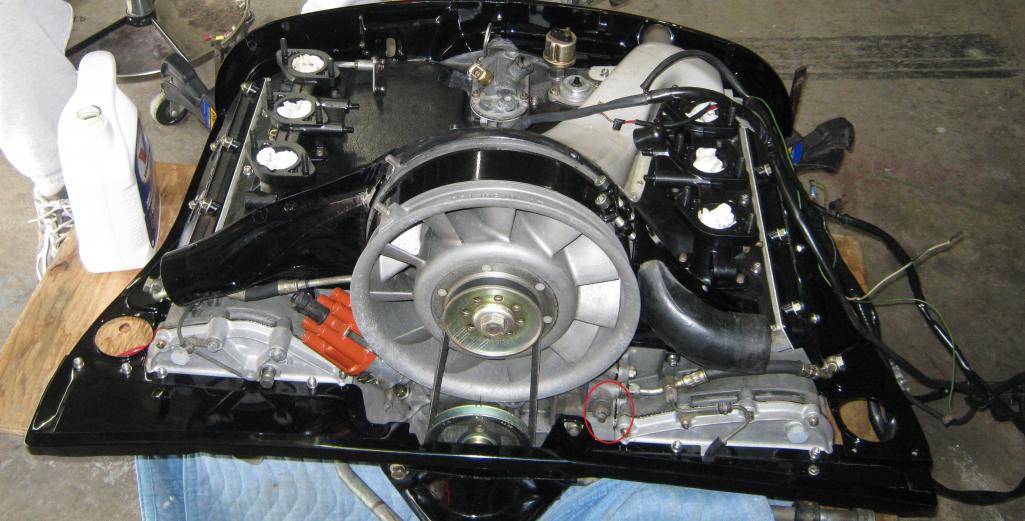
Oil temp sensor is here...left side of fan as it sits in the car. Find the RED circle. There is a green wire that connect to this. (IMG:style_emoticons/default/biggrin.gif)
 |
   |

 
|
| smj |
Jul 2 2012, 09:36 PM
Post
#22
|
|
"Dude, Steve from Berkeley." Group: Members Posts: 591 Joined: 28-August 05 From: Berkeley, CA Member No.: 4,691 Region Association: Northern California |
QUOTE(Mr.242 @ Jul 2 2012, 07:01 PM)  Oil temp sensor is here...left side of fan as it sits in the car. Find the RED circle. There is a green wire that connect to this. (IMG:style_emoticons/default/biggrin.gif) Cool, thanks. Then in the photo below this should be the oil pressure switch? Does this also act as a sensor for the oil pressure gauge in a 911, even though it's called a switch even in the 911 diagrams? (And shouldn't there be a thermostat next to it instead of a cover?) 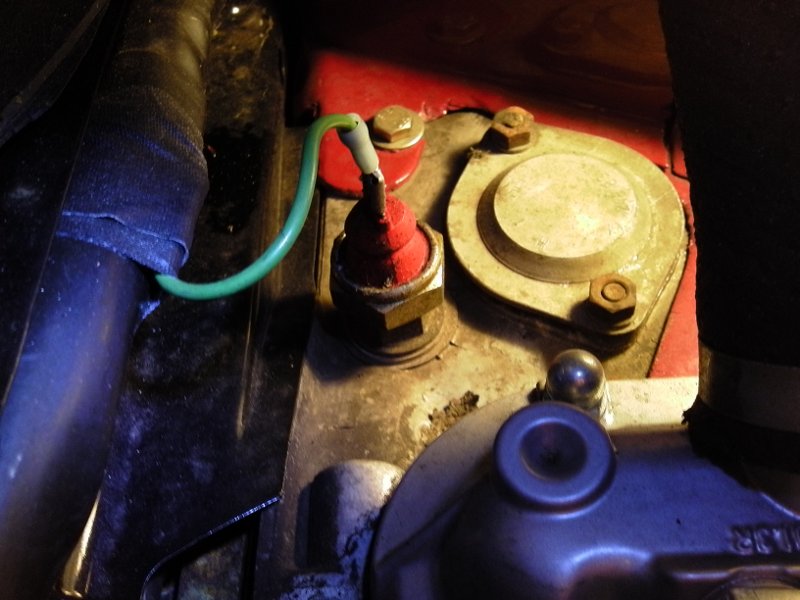 |
|
|
|
| smj |
Jul 2 2012, 10:41 PM
Post
#23
|
|
"Dude, Steve from Berkeley." Group: Members Posts: 591 Joined: 28-August 05 From: Berkeley, CA Member No.: 4,691 Region Association: Northern California |
And this should be my oil temp sensor. I felt around and made sure the green wire is connected to something (couldn't get an eye on it), but... shouldn't there be something connected to the spade liug sticking out of the top of this thing?
 So hopefully this means I'll find signals when I try to swap an oil combo gauge for the existing combo gauge. (Yes, I realize I may need to change the senders. Right now I'll settle for confirming a signal.) |
|
|
|
| sixnotfour |
Jul 2 2012, 11:44 PM
Post
#24
|
|
914 Wizard Group: Members Posts: 10,430 Joined: 12-September 04 From: Life Elevated..planet UT. Member No.: 2,744 Region Association: Rocky Mountains |
red sender = idiot light
the round one in your pic is later location pressure sender red circle 242 should also be on your motor for temp. ( although being a late engine its probably the wrong one for the six temp gauge. if it brass correct, chrome its later |
 |
|
| smj |
Jul 3 2012, 01:58 AM
Post
#25
|
|
"Dude, Steve from Berkeley." Group: Members Posts: 591 Joined: 28-August 05 From: Berkeley, CA Member No.: 4,691 Region Association: Northern California |
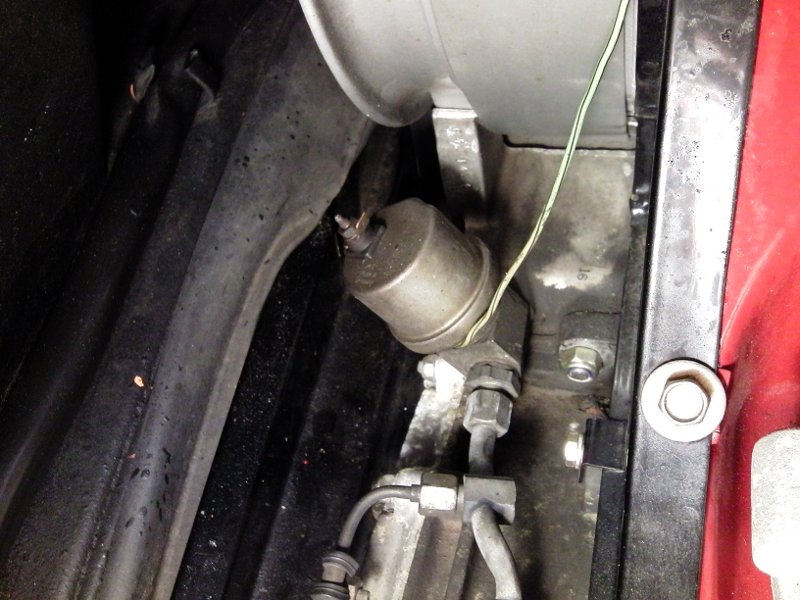
(IMG:style_emoticons/default/idea.gif) Okay, I grabbed a mirror and just had another look. If you note how that green w/ black stripe wire runs, it was actually making a stupidly tight/taut turn around that sensor over to - ta da! - what should be a temperature sensor in the proper location. Still couldn't get a photo, but the mirror let me see there was another spade lug that the wire ran to in what seems like the location Mr.242 pointed out earlier.
So I have the oil pressure switch (aka idiot light) in the position it should be and wired. I've got an oil temp sensor in the correct position and wired. And that can/sensor that the green line w/ black stripe was running around? Looks like an SC oil pressure sender, p/n 911.606.111.01! (IMG:style_emoticons/default/smilie_pokal.gif) Thank you sixnotfour for the clue that prompted me to go looking again. Edit: Say, to test this notion should I be able to connect the oil pressure gauge to the chassis/ground and the lug on the oil pressure sender, then start her up? That oil temp sender might not work with the correct 914-6 gauge, but I didn't get that with the car anyway - somebody put in a gauge with just an idiot light in the upper position, and the original didn't come with the car. However I have a pristine later oil combo gauge (p/n 911.641.103.05) that I bet will work fine with these temp/pressure senders. Though I'll have to find a wire in the harness to use for the pressure sensor, or run a new one... (IMG:style_emoticons/default/huh.gif) Sorry I didn't get the mirror out earlier, or realize there was a p/n on that can down by the fan. (IMG:style_emoticons/default/slap.gif) |
|
|
|
| smj |
Jul 7 2012, 01:31 AM
Post
#26
|
|
"Dude, Steve from Berkeley." Group: Members Posts: 591 Joined: 28-August 05 From: Berkeley, CA Member No.: 4,691 Region Association: Northern California |
Picked up an electric impact wrench, 30mm socket, bucket o' "parts cleaner," a few other bits - I think I've got everything to tackle the CVs this weekend. This is on top of another delivery from Pelican on Thursday...
That means I'll be trying to use the Sears super duper bolt/screw extractor thingies to get that bolt that sheared off just below flush-level with the outer CV joint. Here's hoping that goes smoothly... (IMG:style_emoticons/default/unsure.gif) |
|
|
|
| smj |
Jul 11 2012, 11:35 PM
Post
#27
|
|
"Dude, Steve from Berkeley." Group: Members Posts: 591 Joined: 28-August 05 From: Berkeley, CA Member No.: 4,691 Region Association: Northern California |
This past weekend I did manage to remove the passenger side halfshaft, extract the sheared bolt, inspect and repack both CVs (they're badly worn, but I didn't want to leave the car on stands while I decide what to replace them with), and reinstall the whole thing. Of course I reassembled the CV incorrectly the first time, but who's counting? (IMG:style_emoticons/default/unsure.gif) (Stupid CV joint tricks thread)
Tonight I confirmed that the bolts that came with the 944 seatbelts will thread into the shoulder mounting point (easiest to check) - I think another thread mentioned there's a US law mandating standard attachment specs. (See Cap'n Krusty here) And that there appears to be the same clearance for the spools/retractors in the backpad in the 1970 -6 as there is in the 1974 -4. However I want to peel back the firewall padding in the engine bay of the -4 to see what the retractor mount is threading into, and figure that into whatever bracket/reinforcement is needed in the -6 before I proceed. Tried to get a signal from the oil pressure sender (incorrectly identified in Post #23) to read on the oil pressure gauge in my 911 oil combo can (can p/n 911.641.103.05), but the needle just sat at 0. I hooked the lugs marked "G" and "Earth ground" from the gauge to the ground point by the engine bay relay board, and the remaining '+' lug to the lug on the sender, but no joy. Not sure that should work, so more reading to be done... Edit 16-Aug-2012: Clarify where I saw the clearance for the seatbelt retractor. |
|
|
|
| mikey63 |
Jul 12 2012, 01:43 PM
Post
#28
|
|
Member Group: Members Posts: 121 Joined: 30-March 10 From: Windsor,Ca Member No.: 11,529 Region Association: Northern California |
I just installed a 911 combo gauge in my car and the hook up is earth=ground, g=sending unit, +=power. this should get it to work!
Mike |
|
|
|
| smj |
Jul 12 2012, 09:27 PM
Post
#29
|
|
"Dude, Steve from Berkeley." Group: Members Posts: 591 Joined: 28-August 05 From: Berkeley, CA Member No.: 4,691 Region Association: Northern California |
QUOTE(mikey63 @ Jul 12 2012, 11:43 AM) I just installed a 911 combo gauge in my car and the hook up is earth=ground, g=sending unit, +=power. this should get it to work! Now why didn't I think of that? I needed a boost today, and getting a needle on either gauge to move would do it - thanks!! In other news, I ordered a pair of 911 flag mirrors. Gotta have those bases (and reinforcing plates) to fit the 914 door but I'd like to use the upper portions from my 944S, just to keep something from that car with me. But this way I can use whichever motors and switchgear will work out the best. (I know the mirrors from each model are wired differently, but I should be able to swap all the innards around if I wanted to use 911 switches rather than 944 switches, for example.) Thanks again Mike! (IMG:style_emoticons/default/wavey.gif) Edit: Got the Six out, grabbed +12V from the taillight circuit, ground from a convenient chassis bolt, and ran a line from the relevant sender lugs to "G" and voilà - plausible readings on each gauge in turn. Was even able to observe increased druck when running at a faster idle. (IMG:style_emoticons/default/w00t.gif) Time to follow up on my last reminder about the triple gauge kit - I've got EL wire waiting to be used... PS - So glad I'm capturing all the stupid things I'm doing in these threads... (IMG:style_emoticons/default/rolleyes.gif) |
|
|
|
| Mr.242 |
Jul 13 2012, 07:33 AM
Post
#30
|
|
May your glass be smaller so it's always FULL! Group: Members Posts: 1,079 Joined: 10-June 08 From: Seattle Member No.: 9,160 Region Association: Pacific Northwest |
Nice work...keep plugging away (no phun intended).
It is great to check off things on the car that need to be done. Try to balance your insanity. And have you noticed the bank account drops directly in proportion to the amount of boxes delivered to your door? |
|
|
|
| smj |
Jul 17 2012, 11:56 PM
Post
#31
|
|
"Dude, Steve from Berkeley." Group: Members Posts: 591 Joined: 28-August 05 From: Berkeley, CA Member No.: 4,691 Region Association: Northern California |
Thanks. Ordered the coarse spline, 6 bolt, 100mm transmission output flanges (923.332.209.02) and the '74-77 911 6 bolt, 100mm stub axles (923.332.232.01). Altogether $375+ - ouch, and less than halfway there. Should've been patient and posted WTB on Pelican, but... So that's this month's teener money spent on the halfshaft front.
I'm inclined to go with the Sway-A-Way #2420, which will require the 87+ 951 CVs (951.332.901.00) for everthing to have 28 splines. If I'm lucky I'll find good used CVs and could bring this in just over $1k in parts with the needed wheel bearings. Not sure if I mentioned that the tach stopped working. And I just paid for the triple gauge kit drilled for the silver button, so I shouldn't just throw in the nearest 911SC tach w/o the button... Good news: I do have the correct tach (914.641.301.10). And while I couldn't remove the whole cluster, I did manage to pop out the combo gauge. Lots of suspicious splicing, but I did find a loose green w/ black stripe lead that's probably for the oil temp sender. I've got pics from the CV adventure I'll post up here when I'm bored - or maybe in more of a how to (or how not to) thread... All right, enough procrastinating - back to work... |
|
|
|
|
1 User(s) are reading this topic (1 Guests and 0 Anonymous Users)
0 Members:

|
Lo-Fi Version | Time is now: 14th May 2024 - 09:18 AM |
Invision Power Board
v9.1.4 © 2024 IPS, Inc.