|
|
|
Porsche, and the Porsche crest are registered trademarks of Dr. Ing. h.c. F. Porsche AG.
This site is not affiliated with Porsche in any way. Its only purpose is to provide an online forum for car enthusiasts. All other trademarks are property of their respective owners. |
|
|

  |

| Dr Evil |
 Jun 12 2012, 05:54 PM Jun 12 2012, 05:54 PM
Post
#1
|
|
Send me your transmission!  Group: Members Posts: 23,044 Joined: 21-November 03 From: Loveland, OH 45140 Member No.: 1,372 Region Association: MidAtlantic Region |
From my 31 pages of notes that I have been emailing a lot of copies of lately because I cant seem to post them here in PDF format.
Adjusting your shifter Concept: Before you can easily adjust your shifter you need to conceptualize what is happening. I can only do so well with words and diagrams, but once you get the concept you will be surprised how easy it is to adjust the shifter perfectly in a very short amount of time. For this explanation, reference figures 2, 3, and 4 below. Figure 2 is the conceptual depiction of how the shifter should be when aligned correctly. The black outline is where you would like the shift pattern to be, and is where the stick-shift actually can travel. The red lines represent where the shift pattern actually is. Stay with me, and make sure you get this concept. Now a common issue is that people end up with only some gears, but not all. Refer to figure 3. You will notice that the red lines are to the right and up from the desired location of the shifter. In this setup you would only be able to select 1st and 3rd gears, but 1st would be near where 3rd should be and 3rd would be near where 5th should be. About now I hope you are having that “ah ha!” moment. Adjustment: 1. Select a gear. In using figure 3 it would be wisest to select 3rd. You can determine that it is 3rd that you are selecting because there will be no gears past the middle (1st) and 3rd is the next over on the bottom. Also, you would have no upper gears. 2. Loosen the pinch bolt under the stick shift 3. Stabilize the shift rod in the tunnel so it doesn’t move, this way you are only moving the stick-shift and not the rod, thus not changing the fact that the gear box is in third. 4. Move the shifter to where 3rd should be. Second and 3rd are the only gears to use as they lie on the plane of the spring plate and you can use the shifters spring plate to guide you to where 2 and 3 should be. 5. Tighten pinch bolt and see if you can get all gears. The short answer is, put transmission into known 2nd or 3rd gear, then move the stick to where that gear is supposed to be. Now use this concept on Figure 4. In figure 4 you would only have gears 1, 3, and 5 as R, 2, 4 would be out of reach of your current adjustment. To fix this scenario you would follow the same steps as stated above. I hope this clarifies this simple procedure. It is a bit more difficult to explain in prose. Fig 2 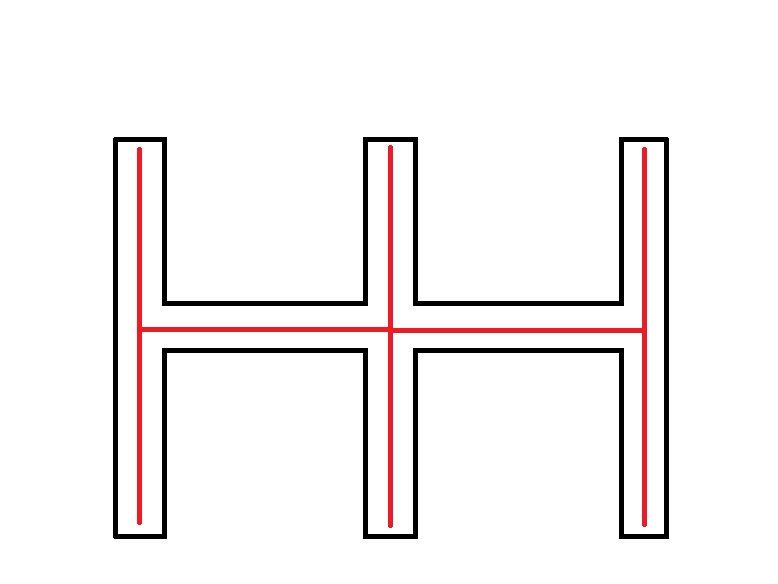 Fig 3 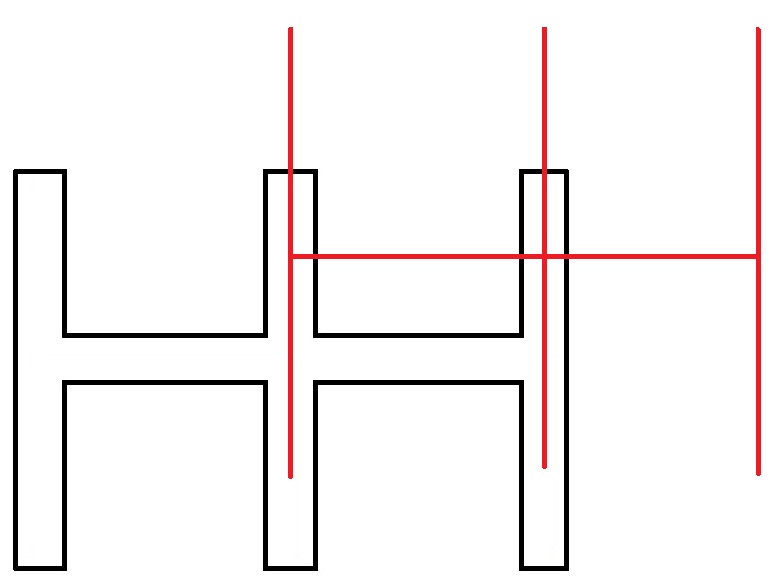 Fig 4 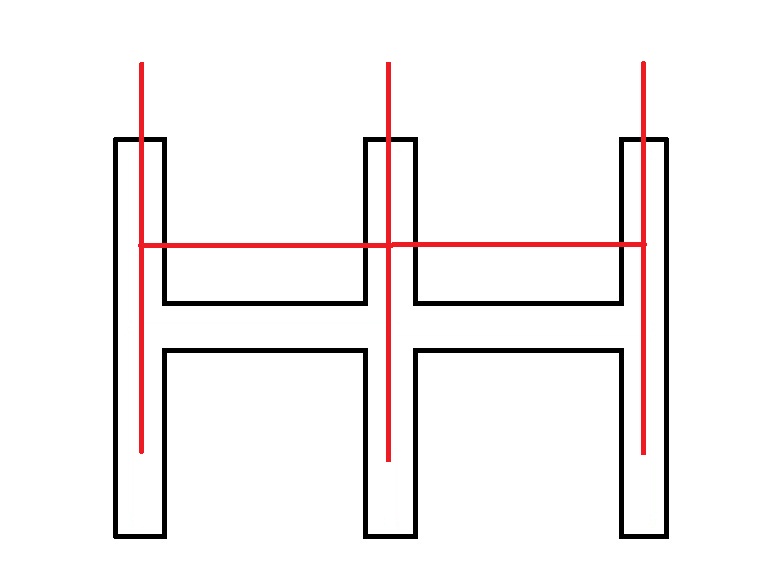 |
   |

 
|
| Dave_Darling |
Jun 12 2012, 06:04 PM
Post
#2
|
|
914 Idiot Group: Members Posts: 15,355 Joined: 9-January 03 From: Silicon Valley / Kailua-Kona Member No.: 121 Region Association: Northern California |
Psst--this isn't clutch adjustment, this is gear shift lever adjustment. Specifically for side-shift transmissions, right?
--DD |
|
|
|
| Dr Evil |
Jun 12 2012, 06:13 PM
Post
#3
|
|
Send me your transmission! Group: Members Posts: 23,044 Joined: 21-November 03 From: Loveland, OH 45140 Member No.: 1,372 Region Association: MidAtlantic Region |
Damn, I need to change the title :doh:
|
|
|
|
| Dr Evil |
Jun 12 2012, 06:14 PM
Post
#4
|
|
Send me your transmission! Group: Members Posts: 23,044 Joined: 21-November 03 From: Loveland, OH 45140 Member No.: 1,372 Region Association: MidAtlantic Region |
BTW, the concepts apply to side and tail, the only thing different is the location of some of the adjustment points.
|
|
|
|
| rjames |
Jun 12 2012, 10:40 PM
Post
#5
|
|
I'm made of metal Group: Members Posts: 4,466 Joined: 24-July 05 From: Shoreline, WA Member No.: 4,467 Region Association: Pacific Northwest |
If shifting is pretty good most of the time, is it worth trying to see if I can dial it in more? Or would that ensure that I'll be under the car for hours just trying to get things back to where they started?
Shorter version of the question: How much fine tuning can be done when adjusting? |
|
|
|
| Dr Evil |
Jun 13 2012, 09:52 AM
Post
#6
|
|
Send me your transmission! Group: Members Posts: 23,044 Joined: 21-November 03 From: Loveland, OH 45140 Member No.: 1,372 Region Association: MidAtlantic Region |
If your shifting is basically as in Fig 2, you are there. New bushings, or taking up slack in bushings helps a lot. Other than that, a rebuild makes a huge difference (IMG:style_emoticons/default/smile.gif)
|
|
|
|
| Scott S |
Jun 13 2012, 10:23 AM
Post
#7
|
|
Small Member Group: Members Posts: 1,698 Joined: 30-April 03 From: Colorado Member No.: 633 |
I worked on this for quite a while last week. I got SO close! I was able to feel everything cleanly - except the pull back/down for 3rd. I made the mistake of pulling to hard and actually popped the shift rod off of the 90 degree connection that is on the shift rod (my car is a tail shifter). I was really bummed, as I now have to undo everything, get it put together and start the process over.
I do think I know what happened however - and it is 100% my fault. I did not fully tighten the stud that attaches to the firewall. I put it in half way when I first started the process and never went back and tightened it up - see below. 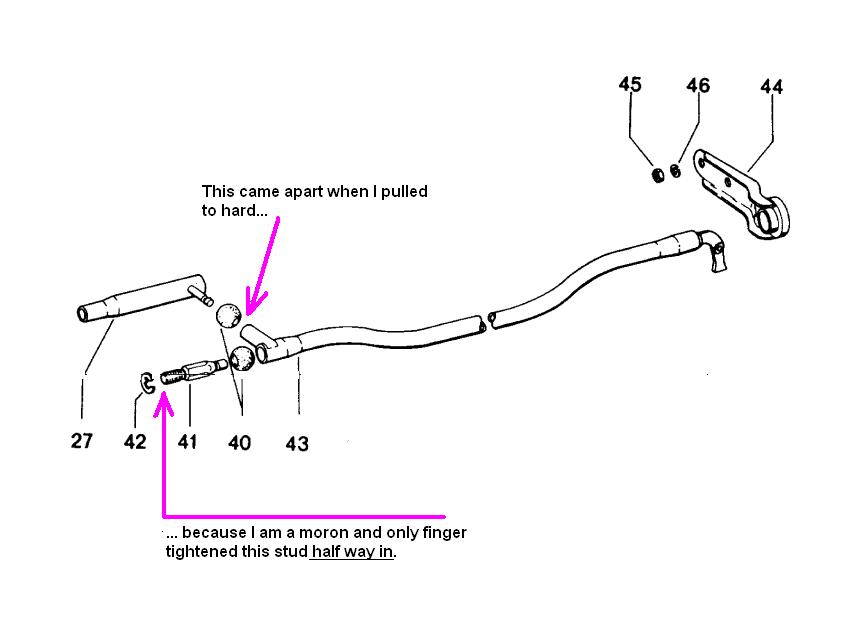 I am pretty confident that having this stud 1/4" to 5/8" too long (due to not being threaded in all the way) caused the ball bushing to bottom out in the rod before I was able to get 3rd gear . Starting all over aging tomorrow night. (IMG:style_emoticons/default/headbang.gif) |
|
|
|
| 02loftsmoor |
Jun 13 2012, 11:16 AM
Post
#8
|
|
Senior Member Group: Members Posts: 577 Joined: 26-June 11 From: Ft. Worth TX Member No.: 13,243 Region Association: Southwest Region |
Tip; if you go to the print tab you will have more information on the instructions, it under the options tab.. Wes
|
|
|
|
| Dr Evil |
Jun 13 2012, 11:23 AM
Post
#9
|
|
Send me your transmission! Group: Members Posts: 23,044 Joined: 21-November 03 From: Loveland, OH 45140 Member No.: 1,372 Region Association: MidAtlantic Region |
QUOTE(02loftsmoor @ Jun 13 2012, 01:16 PM)  Tip; if you go to the print tab you will have more information on the instructions, it under the options tab.. Wes (IMG:style_emoticons/default/confused24.gif) I dont know what you are referring to |
|
|
|
| Dr Evil |
Jun 13 2012, 11:25 AM
Post
#10
|
|
Send me your transmission! Group: Members Posts: 23,044 Joined: 21-November 03 From: Loveland, OH 45140 Member No.: 1,372 Region Association: MidAtlantic Region |
QUOTE(Scott S @ Jun 13 2012, 12:23 PM) I worked on this for quite a while last week. I got SO close! I was able to feel everything cleanly - except the pull back/down for 3rd. I made the mistake of pulling to hard and actually popped the shift rod off of the 90 degree connection that is on the shift rod (my car is a tail shifter). I was really bummed, as I now have to undo everything, get it put together and start the process over. I do think I know what happened however - and it is 100% my fault. I did not fully tighten the stud that attaches to the firewall. I put it in half way when I first started the process and never went back and tightened it up - see below. I am pretty confident that having this stud 1/4" to 5/8" too long (due to not being threaded in all the way) caused the ball bushing to bottom out in the rod before I was able to get 3rd gear . Starting all over aging tomorrow night. (IMG:style_emoticons/default/headbang.gif) You got it. Same concept, different places to adjust. Reassembly of that part is not hard. You will be done in no time. Put the stud and ball into the external rod, place the other ball from the internal rod into its spot and place the stud in its hole and tighten. |
|
|
|
| Cory |
Jun 7 2014, 02:38 PM
Post
#11
|
|
Newbie Group: Members Posts: 4 Joined: 19-May 14 From: Grand Forks Member No.: 17,373 Region Association: None |
Any one can help? tried to adjust the linkage and now all i have is reverse, and 1st ... 74' 914
|
|
|
|
| Mblizzard |
Jun 7 2014, 06:28 PM
Post
#12
|
|
Advanced Member Group: Members Posts: 3,033 Joined: 28-January 13 From: Knoxville Tn Member No.: 15,438 Region Association: South East States |
QUOTE(Cory @ Jun 7 2014, 12:38 PM) Any one can help? tried to adjust the linkage and now all i have is reverse, and 1st ... 74' 914 Others may have better info but this happened to me once and I had let the shit rod rotate in the tunnel and had to start all over. So either by hand shifting at the trans or readjusting at the shifter get it to third and follow the Drs instructions and make sure to use vise grips on the rod. |
|
|
|
| vw505 |
Jun 7 2014, 09:22 PM
Post
#13
|
|
Member Group: Members Posts: 228 Joined: 17-April 03 From: San Antonio, TX , Navy retired Member No.: 579 Region Association: None |
My shifter is out and I don't know what gear I'm in. What is my first step?
|
|
|
|
| McMark |
Jun 8 2014, 09:08 AM
Post
#14
|
|
914 Freak! Group: Retired Admin Posts: 20,180 Joined: 13-March 03 From: Grand Rapids, MI Member No.: 419 Region Association: None |
I would pull away the cover over the shifter at the transmission if it's a side shifter. Move it to the middle (vertically) and push towards the front of the car. That's third.
|
|
|
|
| bulitt |
Jun 8 2014, 11:19 AM
Post
#15
|
|
Achtzylinder Group: Members Posts: 4,189 Joined: 2-October 11 Member No.: 13,632 Region Association: South East States |
|
|
|
|
| PThompson509 |
Jun 8 2014, 11:25 AM
Post
#16
|
|
Member Group: Members Posts: 132 Joined: 9-August 05 From: Santa Cruz, CA Member No.: 4,564 Region Association: Northern California |
I just got through doing this, and ended up recreating what the Evil Doctor had already posted. *sigh* I REALLY need to work on my search-fu. (IMG:style_emoticons/default/confused24.gif)
I also really needed to have some vice-grips on the end of the shift rod. (IMG:style_emoticons/default/headbang.gif) Oh well, only 1/2 inch of skin taken off - not too bad. (IMG:style_emoticons/default/beer.gif) |
|
|
|
| stugray |
Jun 8 2014, 11:35 AM
Post
#17
|
|
Advanced Member Group: Members Posts: 3,825 Joined: 17-September 09 From: Longmont, CO Member No.: 10,819 Region Association: None |
Another trick I learned after doing this about a hundered times:
Put a dab of white paint (I use good ole white out) on the joint where you make adjustments. Then put a pen mark on the white paint to register the position of the shaft (both in/out & twist) before you start making adjustments. One of the hardest parts is: as you are messing with it, guaranteed you will go "Wait did that just move? Which way did it move?" With the starting marks you can tell which way you are going. By using the white out, you can just knock it all off with a wire brush and start again with new marks. |
|
|
|
| HalfMoon |
Jun 8 2014, 08:38 PM
Post
#18
|
|
Senior Member Group: Members Posts: 828 Joined: 13-November 12 From: Shenandoah Junction, WV Member No.: 15,144 Region Association: MidAtlantic Region |
QUOTE(stugray @ Jun 8 2014, 01:35 PM) Another trick I learned after doing this about a hundered times: Put a dab of white paint (I use good ole white out) on the joint where you make adjustments. Then put a pen mark on the white paint to register the position of the shaft (both in/out & twist) before you start making adjustments. One of the hardest parts is: as you are messing with it, guaranteed you will go "Wait did that just move? Which way did it move?" With the starting marks you can tell which way you are going. By using the white out, you can just knock it all off with a wire brush and start again with new marks. YES! This simple little piece of advice helped enormously the other day when I was making adjustments to regain my high gears. |
|
|
|
| Cory |
Jun 21 2014, 08:33 PM
Post
#19
|
|
Newbie Group: Members Posts: 4 Joined: 19-May 14 From: Grand Forks Member No.: 17,373 Region Association: None |
QUOTE(Cory @ Jun 7 2014, 03:38 PM) Any one can help? tried to adjust the linkage and now all i have is reverse, and 1st ... 74' 914 Thanks for the replys. Replaced all the shifter bushings, turns out there wasnt a firewall bushing in at all! two other bushing were just rattling around inside the rubber boot at the firewall... talk about sloppy shifting. Once all the new bushings were in, adjusted with the bungee cord method mention in a previous post ( racer chris) and bam! tight shift pattern and all the gears! |
|
|
|
| tessmar |
Mar 24 2015, 04:05 PM
Post
#20
|
|
Newbie Group: Members Posts: 4 Joined: 10-September 13 From: Jackson, California Member No.: 16,370 Region Association: Central California |
In my case it was a single setscrew which had backed out and was causing problems. Dr. Evil's diagrams helped me visualize and nail down the precise symptoms, and I thought I was in for pulling up the brand new, glued in carpet over the center channel in the cockpit.
My 1970 1.7 was converted to a sideshifter as part of its restoration by swapping my tailshifter for a box from a 914-6 which was getting a close ratio upgrade. I ws thinking I needed to know how the shift lever mechansim actually entered the box in order to further understand what was wrong and which way things needed to move to correct the problem. I expected to see the mechanism entering from one side or another but when I looked it is more of a "bottom shifter" than a side mechanism. I immediately noticed that the piece which transitions the motion from the long shift rod to the box itself is retained by a setscrew which clearly had backed out...I could turn it by hand! This setscrew has a long taper (at least 1/8") to seat into an indent on the long shaft. Cleaning it and using Loctite and seating it fully solved the problem of missed gears. So if you are having these sorts of problems, check that all connections in the linkage are tightened correctly before assuming you have bad bushings or an adjustment issue. When I was researching shifting problems I did not see any mention of this in any posts I ran across. The diagrams of the linkage in places like Pelican appear to be lifted from the Haynes manual, and do not show the orientation of the pieces or where they actually connect to the transmission. I could not figure out how everything went together except to examine the car and try to look for the various components pictured in these aids. |
|
|
|
|
1 User(s) are reading this topic (1 Guests and 0 Anonymous Users)
0 Members:

|
Lo-Fi Version | Time is now: 13th July 2026 - 07:39 PM |
Invision Power Board
v9.1.4 © 2026 IPS, Inc.