|
|
|
Porsche, and the Porsche crest are registered trademarks of Dr. Ing. h.c. F. Porsche AG.
This site is not affiliated with Porsche in any way. Its only purpose is to provide an online forum for car enthusiasts. All other trademarks are property of their respective owners. |
|
|

  |

| lotus_65 |
 Jul 1 2012, 06:57 AM Jul 1 2012, 06:57 AM
Post
#1
|
|
Senior Member  Group: Members Posts: 1,609 Joined: 21-March 05 From: minneapolis, mn Member No.: 3,795 Region Association: Northstar Region |
I took Valy's advice from my first thread and tore into these calipers.
I now completely agree that rebuilding the calipers is vital, and I'm going to do a complete job of it... but: i have used every tool i have, and made one. i STILL can't get this clip out: PMB pic here's mine: 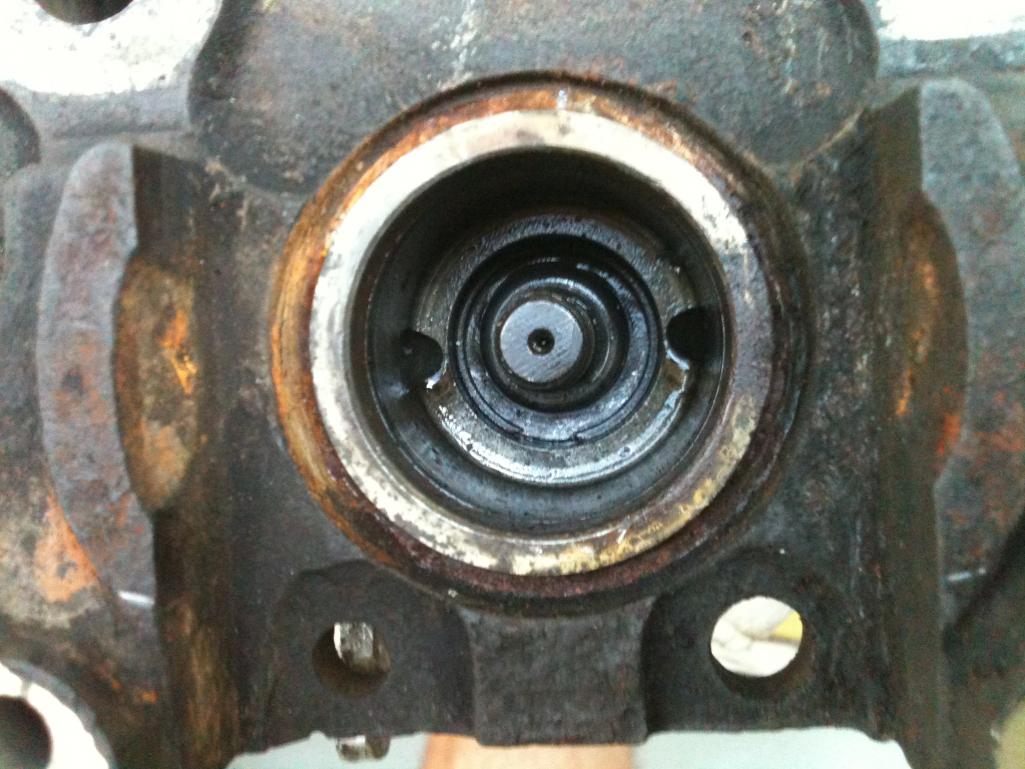 unlike the images i've seen on pmb and others, i don't have the pilot holes, just the edge is showing. anyone have a method to remove this puppy? |
   |

 
|
| Nicky |
Jul 1 2012, 07:41 AM
Post
#2
|
|
Newbie Group: Members Posts: 24 Joined: 21-March 11 From: Pennsylvania Member No.: 12,845 Region Association: North East States |
I used really pointy picks to work it out. Mine were the same, no holes, and it was a pain. Stabbed into it a little and moved it while working another pick behind it. I think the ends are cut at an angle to get behind them as well. Hold out one end behind the cut, and slide a pick around the ring behind it to push it out of the slot.
|
|
|
|
| lotus_65 |
Jul 1 2012, 07:48 AM
Post
#3
|
|
Senior Member Group: Members Posts: 1,609 Joined: 21-March 05 From: minneapolis, mn Member No.: 3,795 Region Association: Northstar Region |
yep, that sounds like it. i'll keep digging, and maybe make a new sturdier tool! thanks
QUOTE(Nicky @ Jul 1 2012, 08:41 AM)  I used really pointy picks to work it out. Mine were the same, no holes, and it was a pain. Stabbed into it a little and moved it while working another pick behind it. I think the ends are cut at an angle to get behind them as well. Hold out one end behind the cut, and slide a pick around the ring behind it to push it out of the slot. |
|
|
|
| Nicky |
Jul 1 2012, 07:51 AM
Post
#4
|
|
Newbie Group: Members Posts: 24 Joined: 21-March 11 From: Pennsylvania Member No.: 12,845 Region Association: North East States |
Yeah, once you get one end out a little you will want to pry a little to keep tension on it to lift out. If your picks are flexing too much it will be tough. I may have used a tiny flat head screwdriver too. I remember wishing I had a third hand. You'll feel like a locksmith once you're done.
|
|
|
|
| JStroud |
Jul 1 2012, 07:56 AM
Post
#5
|
|
Senior Member Group: Members Posts: 1,463 Joined: 15-January 11 From: Galt, California Member No.: 12,594 Region Association: Northern California |
It's a pain to get out......but wait till you try to put it back in. (IMG:style_emoticons/default/poke.gif)
That's fun too. Jeff |
|
|
|
| lotus_65 |
Jul 1 2012, 08:13 AM
Post
#6
|
|
Senior Member Group: Members Posts: 1,609 Joined: 21-March 05 From: minneapolis, mn Member No.: 3,795 Region Association: Northstar Region |
(IMG:style_emoticons/default/biggrin.gif)
i got that idea from the pmb how-to section! oh well... nothing ventured... QUOTE(jsconst @ Jul 1 2012, 08:56 AM) It's a pain to get out......but wait till you try to put it back in. (IMG:style_emoticons/default/poke.gif) That's fun too. Jeff |
|
|
|
| Valy |
Jul 1 2012, 10:35 AM
Post
#7
|
|
Senior Member Group: Members Posts: 1,677 Joined: 6-April 10 From: Sunnyvale, CA Member No.: 11,573 Region Association: Northern California |
Find a flat screwdriver that fits in the gap between the clips ends. Fit it there and twist it to compress one end in.
Assembly is a PITA. There is a spring blow that hat you're trying to get out so you need one hand to compress the spring, one to keep the c clip in place and one to compress the c clip (IMG:style_emoticons/default/wink.gif) I couldn't find a clip with ears like Eric is using since all I found had too big ears. If you find the right clip, it should be much eastern to refit with only 2 hands. |
|
|
|
| stugray |
Jul 1 2012, 11:06 AM
Post
#8
|
|
Advanced Member Group: Members Posts: 3,825 Joined: 17-September 09 From: Longmont, CO Member No.: 10,819 Region Association: None |
I spent a good part of a day by myself and could not get them out either - not enough hands.
Once my friend helped me I had it out on the first try in 30 seconds. Use two dental picks, one straight and one bent at the end. Get the clip started out with the bent one and have the helper stick the straight one in the gap behind the clip. Then you can get another bite using the angled one. If you ever think you might have to do it again, Eric has the circlips that come out with circlip pliers. Stu |
|
|
|
| JStroud |
Jul 1 2012, 11:41 AM
Post
#9
|
|
Senior Member Group: Members Posts: 1,463 Joined: 15-January 11 From: Galt, California Member No.: 12,594 Region Association: Northern California |
I had a hard time getting mine back together using a socket to compress the spring and hat to get the clip back in. I had to replace two damaged caliper pistons, so I ended up taking the threaded part out of a bad piston, and threaded it on to hold the hat and spring down while I put the clip in. Less in your way to get the clip on, then just unthread once the clips back in. Worked awesome.
Jeff |
|
|
|
| Eric_Shea |
Jul 1 2012, 10:07 PM
Post
#10
|
|
PMB Performance Group: Admin Posts: 19,304 Joined: 3-September 03 From: Salt Lake City, UT Member No.: 1,110 Region Association: Rocky Mountains |
Alright, alright... it's been fun watching. (IMG:style_emoticons/default/av-943.gif)
Those came on 75 and 76 cars. Two tools needed: 1. Dental pick with an angled end 2. Very small screw driver First - Have the very small screwdriver in place and ready for action. That place is just behind the clip head and against the bore wall. Second - Use the angled pick under that 45 degree angle in the clip head. It helps here to have a very sharp pick. Pull "inward" (toward the center of the caliper) on the clip head and then stick the small screwdriver behind the clip as it comes out of the journal. This will be very close to the clip head to get it to work. Third - Shimy or slide the screwdriver down the clip a bit to get more of it out of the journal. Keep firm downward pressure on it so the clip doesn't snap back. Fourth - Again, keep FIRM pressure on the screwdriver so the clip cannot go back into the journal. Use the angled pick to get under the head of the clip. At this point I Bend and twist the crap out of it so there's no chance of ever using them again. I have plenty or good ones and I hate those things. Have fun! (IMG:style_emoticons/default/wavey.gif) I'll sell you some regular clips for $134.50 each! (IMG:style_emoticons/default/biggrin.gif) |
|
|
|
| Eric_Shea |
Jul 1 2012, 10:13 PM
Post
#11
|
|
PMB Performance Group: Admin Posts: 19,304 Joined: 3-September 03 From: Salt Lake City, UT Member No.: 1,110 Region Association: Rocky Mountains |
Here's some fancy colors for you:
Red = Where you position your screwdriver. Green = Put the point of the clip in here. Blue = Pry in that direction. Yellow = Shimmy the screwdriver down at least that far and then go to town on the clip. 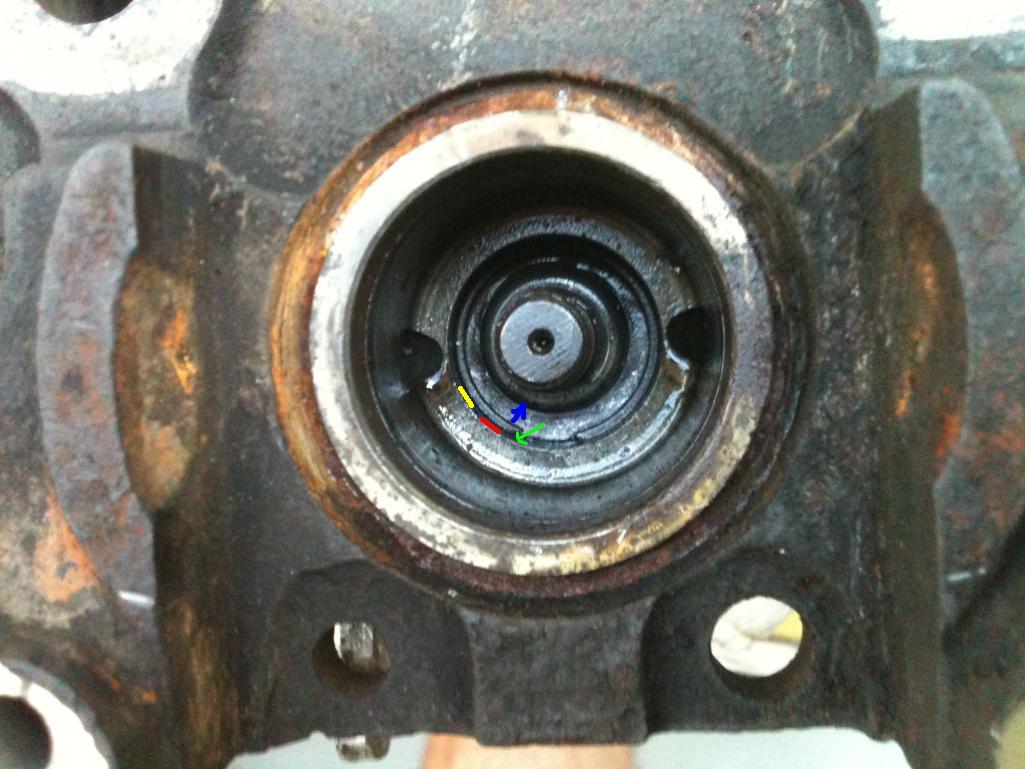 |
|
|
|
|
1 User(s) are reading this topic (1 Guests and 0 Anonymous Users)
0 Members:

|
Lo-Fi Version | Time is now: 10th March 2026 - 08:05 AM |
Invision Power Board
v9.1.4 © 2026 IPS, Inc.