|
|
|
Porsche, and the Porsche crest are registered trademarks of Dr. Ing. h.c. F. Porsche AG.
This site is not affiliated with Porsche in any way. Its only purpose is to provide an online forum for car enthusiasts. All other trademarks are property of their respective owners. |
|
|

  |

| brant |
 Nov 1 2004, 07:08 PM Nov 1 2004, 07:08 PM
Post
#1
|
|
914 Wizard  Group: Members Posts: 12,188 Joined: 30-December 02 From: Colorado Member No.: 47 Region Association: Rocky Mountains |
Where to start....
We'll, I know there has been a lot of talk about this car but no pictures previously... thanks to all the helpful advice I finally got my first camera, and thanks to some tech support from members of this group I think I finally figured out how to use it also... First off in this thread, I wanted to recognize someone... I want to recognize my father. the "project" below is largely the results of his efforts and hard work... Its been a ton of hard work and it wouldn't be possible without him... He doesn't hear it enough from me, but I really appreciate him and what he has done for me. Now for the pics... the first one is a PPI picture from the seller when I bought it around 3 years ago. We got it running and drove it for 3 months before starting the demolition almost 2 years ago: (drum roll please for my first ever pic) Attached image(s) 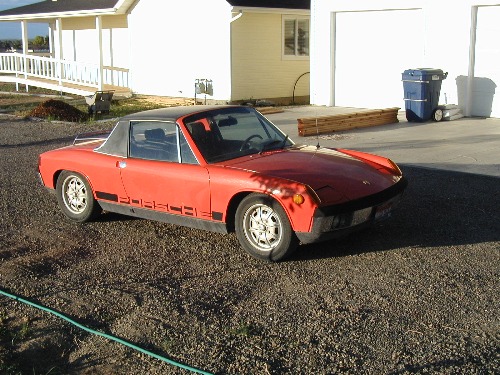
|
   |

 
|
| brant |
Nov 1 2004, 07:19 PM
Post
#2
|
|
914 Wizard Group: Members Posts: 12,188 Joined: 30-December 02 From: Colorado Member No.: 47 Region Association: Rocky Mountains |
These are just some PPI pictures of the rear trunk... The chassis is a 1972/4
It was really rust free... we decided to go with the -4 since I would of changed nearly every single thing on a -6 anyways... our local vintage rules allow 1972 or older only... so we took the best 1972 or earlier car that we could afford... here are some photos from the seller that I want to document for posterity: Attached image(s) 
|
|
|
|
| brant |
Nov 1 2004, 07:19 PM
Post
#3
|
|
914 Wizard Group: Members Posts: 12,188 Joined: 30-December 02 From: Colorado Member No.: 47 Region Association: Rocky Mountains |
Uno mas...
Attached image(s) 
|
|
|
|
| Trekkor |
Nov 1 2004, 07:22 PM
Post
#4
|
|
I do things... Group: Members Posts: 7,809 Joined: 2-December 03 From: Napa, Ca Member No.: 1,413 Region Association: Northern California |
Good for you (IMG:style_emoticons/default/smilie_pokal.gif)
Post often with pics. You don't want to get the TTIWWP's bomb dropped on you! KT |
|
|
|
| Jeroen |
Nov 1 2004, 07:23 PM
Post
#5
|
|
914 Guru Group: Members Posts: 7,887 Joined: 24-December 02 From: The Netherlands Member No.: 3 Region Association: Europe |
keep em coming!
|
|
|
|
| brant |
Nov 1 2004, 09:24 PM
Post
#6
|
|
914 Wizard Group: Members Posts: 12,188 Joined: 30-December 02 From: Colorado Member No.: 47 Region Association: Rocky Mountains |
Wow...
just another example of the great help from admins here.. let me try this again. this is a full view picture. we spent about 18 months doing the welding, chassis prep, body work, metal fender flares, and priming. we broke down and had someone else shoot the paint we had bought in order to save time. the body is not perfect as its a race car class rules require all metal... no fiberglass so the fenders were done by cutting, prying, and welding in pieces of metal.... body could of been smoother, but didn't want to add much filler... I wish I had a scanner so I could add some of the 18months worth of 35mm "in progress" pictures that I took... anyways here she is: Attached image(s) 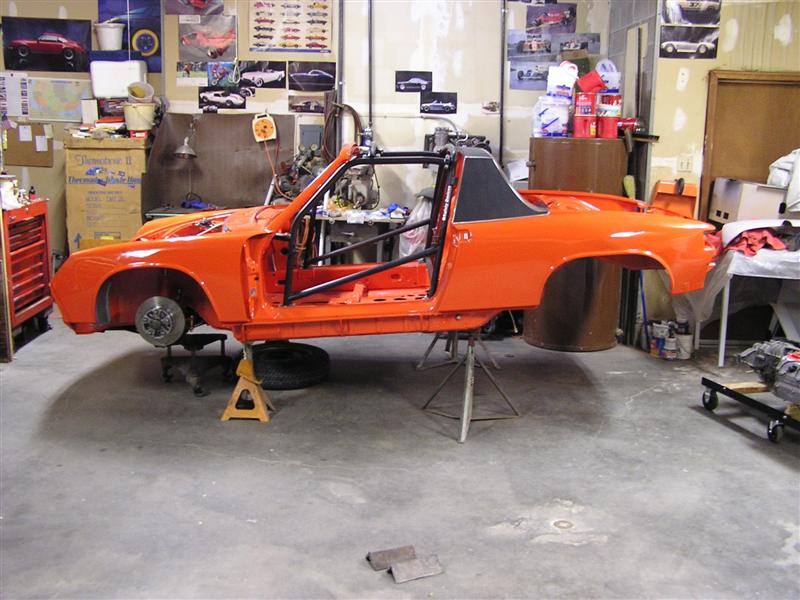
|
|
|
|
| brant |
Nov 1 2004, 09:29 PM
Post
#7
|
|
914 Wizard Group: Members Posts: 12,188 Joined: 30-December 02 From: Colorado Member No.: 47 Region Association: Rocky Mountains |
We (my dad and I) always have run our old -4 race car as a 2 driver car for drivers ed and club racing....
we always fought over heating even with our oil cooler through the hood/deep sump/accusump... so this go around we decided to make sure that there would be no cooling issues... and we went with a pair of the fluidyne coolers. for the vintage group we were not allowed a hood exit. and since I strongly believe in not having a restrictive cooler exit, we chose not to compromise the exit to fit the fuel cell... thus we wanted to try something different, and decided to go throught the head light area and into the fender well..... here is a view of it: Attached image(s) 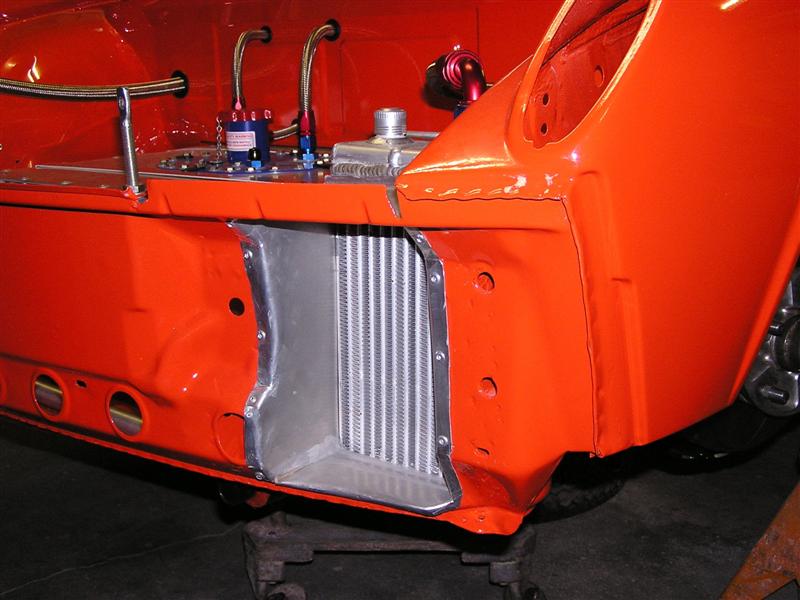
|
|
|
|
| brant |
Nov 1 2004, 09:32 PM
Post
#8
|
|
914 Wizard Group: Members Posts: 12,188 Joined: 30-December 02 From: Colorado Member No.: 47 Region Association: Rocky Mountains |
the coolers are the twin pass fluidynes...
the fuel cell is a custom job... we bought a bladder and our race shop got a guy to custom fab an aluminum shell for it... The front bulk head is cut open so the shell slips back into it.. I've still got to add an oil line to connect the two front coolers I've got to tell you guys... I can't say enough about my race shop. Its AJRS. the guy (allen johnson) is seriously a genious. next: Attached image(s) 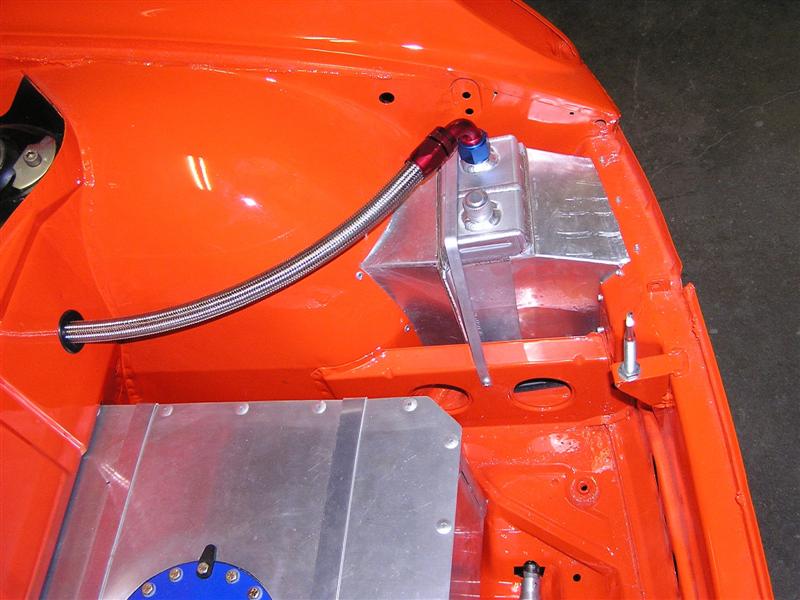
|
|
|
|
| brant |
Nov 1 2004, 09:35 PM
Post
#9
|
|
914 Wizard Group: Members Posts: 12,188 Joined: 30-December 02 From: Colorado Member No.: 47 Region Association: Rocky Mountains |
Here is a shot of the air exit.
also in this shot is some of the front suspension... AJRS did a bit of custom fabricating on the koni's. they are split and sectioned with a bit removed. creates a body drop inside the koni's are shortened Carrera shocks (front and rear) they are customed valved for my weight and suspension. don't know how they work, but can't wait to try. oh.. mueller bearings in there too but not visisble. we're going to use the drop kit for the spindles. (changing the spindles on the strut was not legal, and neither were the cross drilled rotors) Attached image(s) 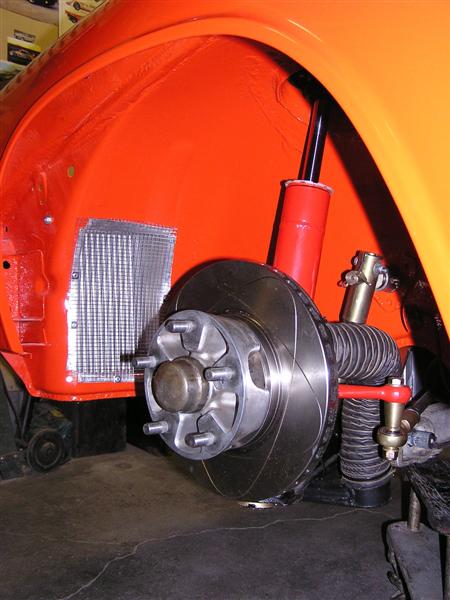
|
|
|
|
| brant |
Nov 1 2004, 09:37 PM
Post
#10
|
|
914 Wizard Group: Members Posts: 12,188 Joined: 30-December 02 From: Colorado Member No.: 47 Region Association: Rocky Mountains |
Here is the cooler on the other side...
also a close up of the front hood mount. Inside each of the fenders I glued in a piece of neopreme material... I learned this on my old race car. you can get it at certain upholstry shops. it stops all of the rock stars from sticky tires... Attached image(s) 
|
|
|
|
| Stutgart46 |
Nov 1 2004, 09:41 PM
Post
#11
|
|
Stutgart46 Group: Members Posts: 396 Joined: 20-November 03 From: Houston, TX Member No.: 1,365 |
Looks great. Keep the pics coming.
|
|
|
|
| brant |
Nov 1 2004, 09:42 PM
Post
#12
|
|
914 Wizard Group: Members Posts: 12,188 Joined: 30-December 02 From: Colorado Member No.: 47 Region Association: Rocky Mountains |
Race class rules allow no weld in bracing... only bolt in.
we wanted to do something to strengthen the front points. Found this amazing bar. It was in a metal scrap yard. not sure if its even aluminum or what. It is so hard! perhaps anodized for hardness? anyways when we went looking for ends to thread into it, we had to go to a specialized bolt place... the old guy behind the counter had to make some calls because he couldn't determine the thread either... turns out its RAF (british-aircraft) thread. not used anywhere else. I could of ordered a bolt from england for $40 bucks or something... So instead we had a machine shop make us some ends. here is a shot of it installed through the front trunk floor, just infront of the cell. Oh... on the cell. We were told not to go too small due to it being a -6 and a 2 driver car, so its a 15 gallong jobbie: Attached image(s) 
|
|
|
|
| brant |
Nov 1 2004, 09:49 PM
Post
#13
|
|
914 Wizard Group: Members Posts: 12,188 Joined: 30-December 02 From: Colorado Member No.: 47 Region Association: Rocky Mountains |
fuel system...
I learned from AJ that its tough to get the last 2-3 gallons from a cell. we didn't want to needless carry the extra weight, so we used his fuel injection pump set up. It supposedly will get the cell dry to the last cup. He runs it in the F.I. race cars because they are super sensitive to pressure variation. one pump (holley) pulls fuel from the cell to an accumulator. (Fuel first goes through a filter) The accumulator is really an oil accumulator that he mods and welds some fittings to. There is an overflow line for when the accumulator is full. A second pump (facet) pulls from the accumulator and feeds the carbs. We ran the standard brake line through the tunnel and then picked up with shielded stainless on the back side... you can also see how the cell sticks through the bulkhead and nearly against the sway bar there is a mess of twisted stuff in this shot but here goes: Attached image(s) 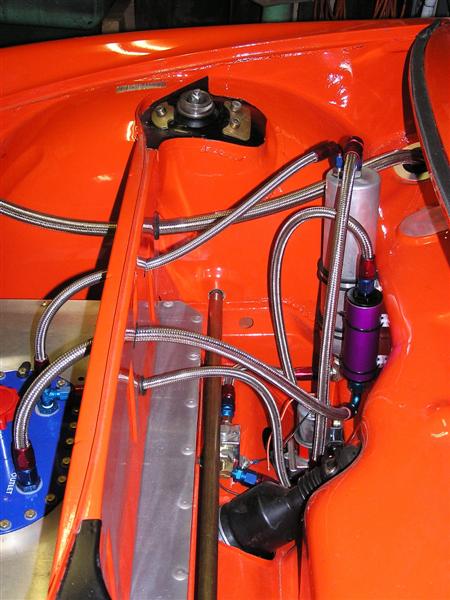
|
|
|
|
| brant |
Nov 1 2004, 09:51 PM
Post
#14
|
|
914 Wizard Group: Members Posts: 12,188 Joined: 30-December 02 From: Colorado Member No.: 47 Region Association: Rocky Mountains |
Since all of these are front trunk pictures... here are the rest of the front things...
This is the other side of the front cowl area. we drilled everything we could for lightness. dad ran the oil lines very cleanly... we closed up the holes with aluminum glued in place using professional panel adhesive. here is one: Attached image(s) 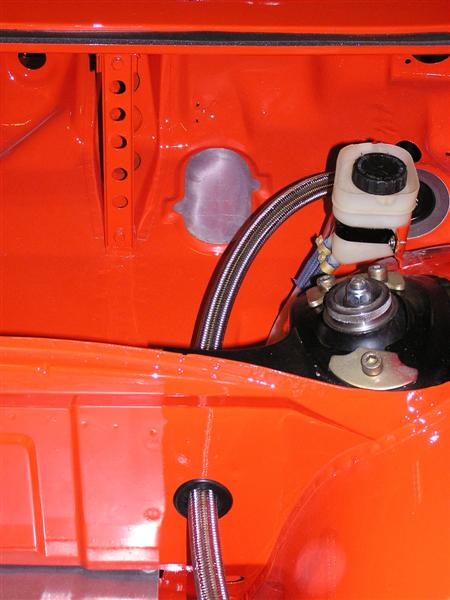
|
|
|
|
| brant |
Nov 1 2004, 09:54 PM
Post
#15
|
|
914 Wizard Group: Members Posts: 12,188 Joined: 30-December 02 From: Colorado Member No.: 47 Region Association: Rocky Mountains |
Another front item...
boy... posting pictures is fun! These are the replacement front headlight covers that dad made. They are aluminum of course.. Rules said "metal" so I'm assuming aluminum is ok. Also, here are the front turn signal replacements... rules require no plastic or glass lenses... JOHN KELLEY made these up and I can't thank him enough. Beeeutiful: Attached image(s) 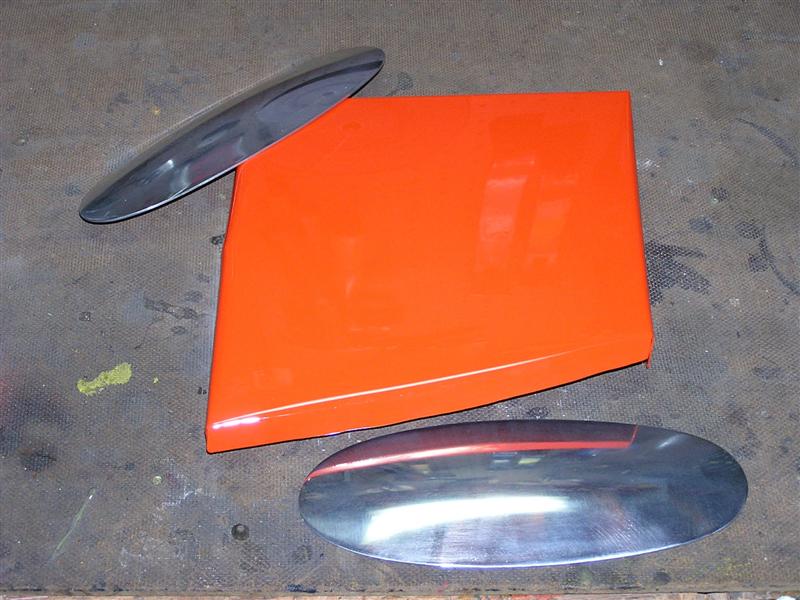
|
|
|
|
| brant |
Nov 1 2004, 09:58 PM
Post
#16
|
|
914 Wizard Group: Members Posts: 12,188 Joined: 30-December 02 From: Colorado Member No.: 47 Region Association: Rocky Mountains |
More body. I'm pretty proud of the fenders.
I did a set by hand on my first race car and they were smoother.. but on this set I went for clearance up deep in the top since I intend to really lower it. No pictures yet, but we're running custom length carrera shocks (with the custom valving) on the rear too. Hope to get really low. When we started building this 2 years ago our vintage group would only allow 60series tires. Now they've changed that rule, so we hope to use the 225/50's... Oh.. I almost forgot. There was a thread last month about mounting engine lids. Our lid (camera wouldn't hold any more pictures) has a forward pointing rod that slips into the hole at the top of the firewall. here is the rear flare, its more obvious in real life than this picture: Attached image(s) 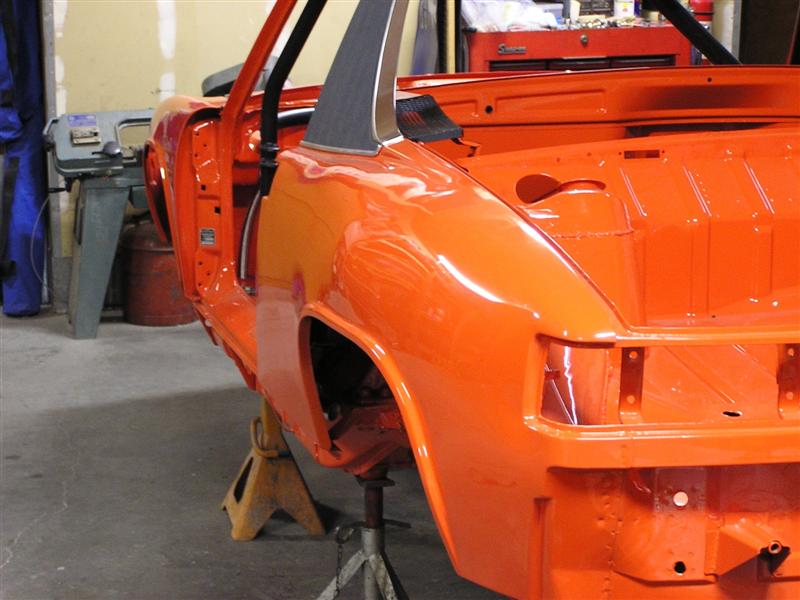
|
|
|
|
| brant |
Nov 1 2004, 10:01 PM
Post
#17
|
|
914 Wizard Group: Members Posts: 12,188 Joined: 30-December 02 From: Colorado Member No.: 47 Region Association: Rocky Mountains |
Another shot of the same fender....
also visible is the cool little aluminum trim piece that dad made up to hold down the forward edge of the sail panel vinyl: Attached image(s) 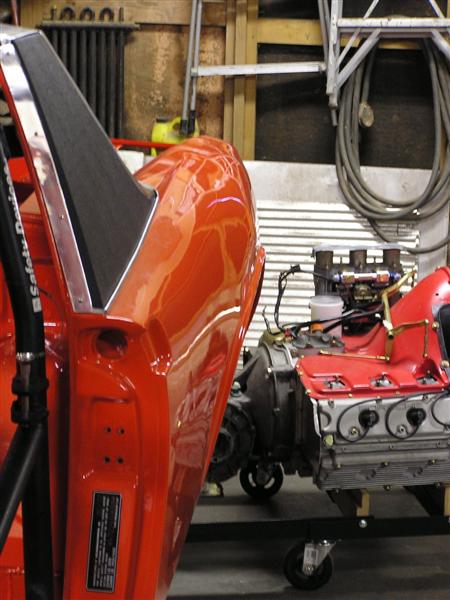
|
|
|
|
| brant |
Nov 1 2004, 10:05 PM
Post
#18
|
|
914 Wizard Group: Members Posts: 12,188 Joined: 30-December 02 From: Colorado Member No.: 47 Region Association: Rocky Mountains |
A little bit of motor pic snuck in that one.
Here is another. Motor was built by Henry Schmidt of SuperTec Its a 2.0/6 "S" motor on an aluminum 66 case. Motor was a back up of Phil Van Buskirks, so he built his vintage 67S-911 on his original serial number'd block and built his back up on a 2nd block... when phil sold his car, he had this back up motor which has yet to ever have oil put into it. I bought it from him and Henry shipped it straight to me. Very stock with only oiling mods, rod mods, and an oil pump upgrade. I was very impressed with his work. All hardware was even done correctly, all replated and powdercoated the fan even: Attached image(s) 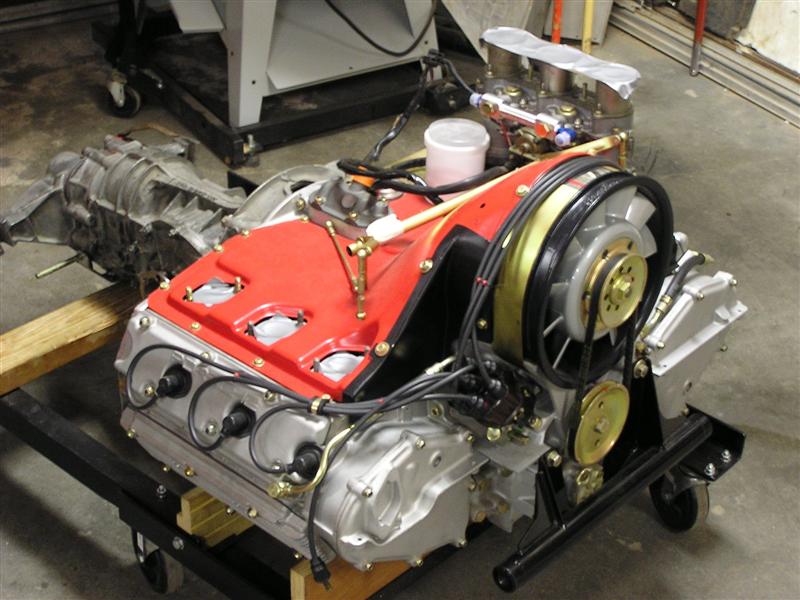
|
|
|
|
| brant |
Nov 1 2004, 10:10 PM
Post
#19
|
|
914 Wizard Group: Members Posts: 12,188 Joined: 30-December 02 From: Colorado Member No.: 47 Region Association: Rocky Mountains |
You can't see it in this shot, but here is a fuzzy one with the tranny installed.
AJ lightened the flywheel and its got 3 seperate 6inch long windows around the edge where he lightened it. (he calls it stage 3) Were also running the aluminum presure plate out of our old -4 car. The box is my old race box from the -4 car. Its a locked diff with A/F/K-L/S/X gearing. Not optimum for this car, but just freshened and good enough to start with. We hope to build up a new box for the 2006 season, but couldn't afford it right now. Oh.. one more thing. Dad made a very cool -6 motor dolly on rollers. It as low as he could get it and still slip a jack underneath. Makes install much better: Attached image(s) 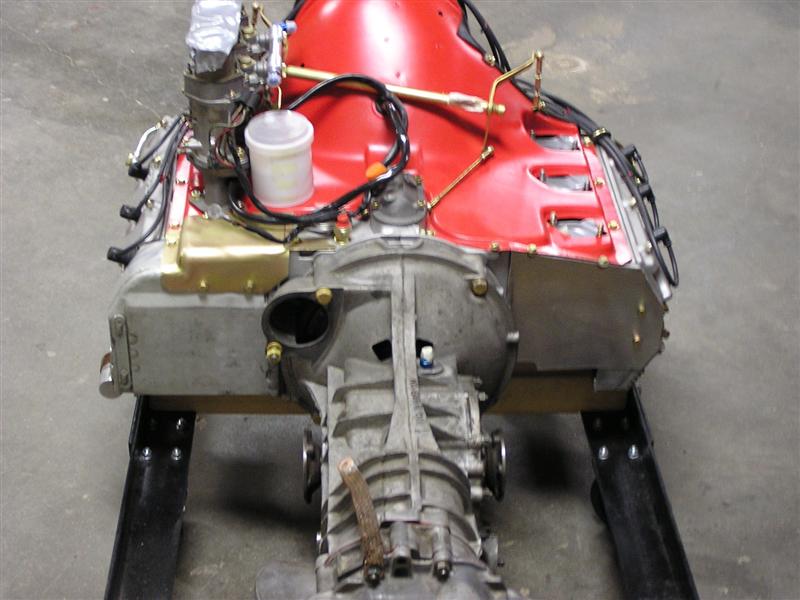
|
|
|
|
| brant |
Nov 1 2004, 10:14 PM
Post
#20
|
|
914 Wizard Group: Members Posts: 12,188 Joined: 30-December 02 From: Colorado Member No.: 47 Region Association: Rocky Mountains |
Its way past my dinner time so only another one or two for tonight...
Here is the seam welding on the rear towers outside: Attached image(s) 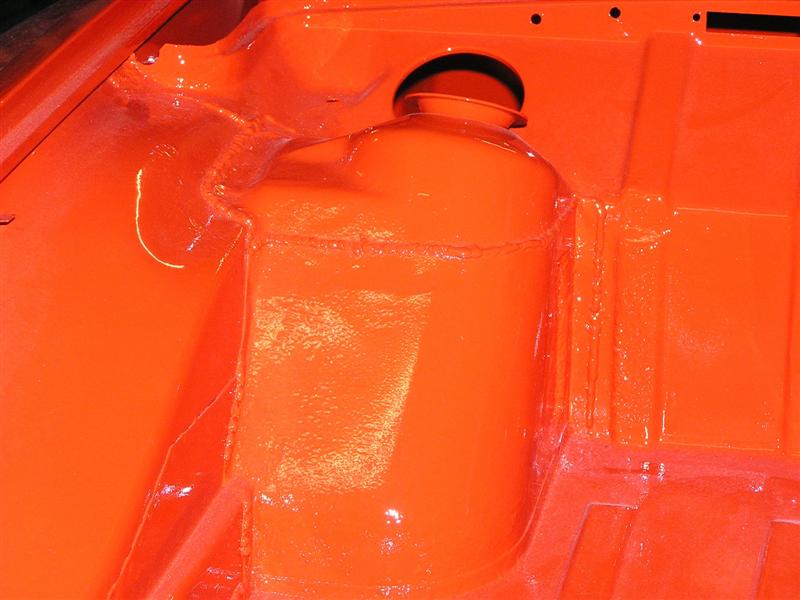
|
|
|
|
|
1 User(s) are reading this topic (1 Guests and 0 Anonymous Users)
0 Members:

|
Lo-Fi Version | Time is now: 13th May 2026 - 11:09 PM |
Invision Power Board
v9.1.4 © 2026 IPS, Inc.