|
|
|
Porsche, and the Porsche crest are registered trademarks of Dr. Ing. h.c. F. Porsche AG.
This site is not affiliated with Porsche in any way. Its only purpose is to provide an online forum for car enthusiasts. All other trademarks are property of their respective owners. |
|
|

  |

| Jeffs9146 |
 Mar 27 2013, 04:29 PM Mar 27 2013, 04:29 PM
Post
#381
|
|
Ski Bum  Group: Members Posts: 4,062 Joined: 10-January 03 From: Discovery Bay, Ca Member No.: 128 |
Personaly I would take the pedal cluster out, clean it, put in a brass bushing set, clean the floor and then button it up!
If the bushings haven't been done yet they will need to be at some point so why not now! |
   |

 
|
| Chris H. |
Mar 27 2013, 05:12 PM
Post
#382
|
|
Senior Member Group: Members Posts: 4,030 Joined: 2-January 03 From: Chicago 'burbs Member No.: 73 Region Association: Upper MidWest |
(IMG:style_emoticons/default/agree.gif) Doing the bronze bushings is one of those "little things" that makes a huge difference. Much smoother operation.
|
|
|
|
| 914Eric |
Mar 27 2013, 05:27 PM
Post
#383
|
|
Member Group: Members Posts: 316 Joined: 7-November 12 From: Northern Idaho Member No.: 15,125 Region Association: Pacific Northwest |
QUOTE(Chris H. @ Mar 27 2013, 04:12 PM)  (IMG:style_emoticons/default/agree.gif) Doing the bronze bushings is one of those "little things" that makes a huge difference. Much smoother operation. Dammit you guys...Deeper and deeper and deeper I go. lol I'm going crazy to start putting it back together and drive the thing. Spring is almost here. I know Chris Shea does a complete rebuild, but everything seems to work really nice? But if they wear out and I'm already there...why not right? Is it a fairly easy job of just popping in a couple of bushings or ??? Are the bushings available from the usual suspects; AA, Pelican? |
|
|
|
| turk22 |
Mar 27 2013, 06:15 PM
Post
#384
|
|
Treetop Flyer Group: Members Posts: 735 Joined: 27-July 12 From: Cincinnati OH Member No.: 14,725 Region Association: Upper MidWest |
Its the "while your in there" syndrome.
I'm able to drive mine, and that's why I'm reluctant to tear it all apart, cause while I'm in there, it may take a year before it get put back together. |
|
|
|
| 914Eric |
Mar 27 2013, 08:46 PM
Post
#385
|
|
Member Group: Members Posts: 316 Joined: 7-November 12 From: Northern Idaho Member No.: 15,125 Region Association: Pacific Northwest |
Been wanting to find my engine number for a while. Looked a few times and could never find it. Finally scrubbed away some gunk, and found it. Engine number GA 000934 That along with my 001147 chassis number and the vinyl on the window posts definitely shows an early 1973. |
|
|
|
| Chris H. |
Mar 27 2013, 09:17 PM
Post
#386
|
|
Senior Member Group: Members Posts: 4,030 Joined: 2-January 03 From: Chicago 'burbs Member No.: 73 Region Association: Upper MidWest |
There is a great DIY article on Pelican on rebuilding the pedal cluster. It's not very hard technically but the roll pin can be a PITA to remove and/or reinstall (never reuse the roll pin, always replace it with a new one).
Check it here: PP Article Eric Shea re-does them very nicely if you don't want to mess with it. Better than new. |
|
|
|
| 914Eric |
Mar 28 2013, 05:40 PM
Post
#387
|
|
Member Group: Members Posts: 316 Joined: 7-November 12 From: Northern Idaho Member No.: 15,125 Region Association: Pacific Northwest |
Chris H...Thank you for the pedal cluster article. Haven't read it yet, but I will.
So I ordered the "Super Pak" from RacerChris at Tangerine and have 5 SS fuel lines, fuel hose, injector elbows, fuel rail hose, etc... all coming in the next few days. In preparation I'm checking out my injectors and noticed some odd things. While they are all green: 2 have press fit conectors. 2 had hose clamp connectors. 3 have black tips 1 has a green tip. The ends on 3 open, and one appears stuck shut although I didn't force it. I'm sending them all to WitchHunter to get them checked out, but I just wondered if anybody had any thoughts or insights as to why I have such a hodge-podge?  |
|
|
|
| rnellums |
Mar 29 2013, 07:30 AM
Post
#388
|
|
Professional Enthusiast Group: Members Posts: 1,646 Joined: 26-November 09 From: Littleton, CO Member No.: 11,072 Region Association: Rocky Mountains |
The hoses were originally on all of them, but if you cut them off carefully you end up with what is on the right. It should work equally well either way. I ordered and installed 4 new from Otto's in CA when I did my engine refresh last year so I would have some spares (but mine were leaking a bit already). ~90$ ea. I think.
|
|
|
|
| 914Eric |
Mar 29 2013, 11:03 AM
Post
#389
|
|
Member Group: Members Posts: 316 Joined: 7-November 12 From: Northern Idaho Member No.: 15,125 Region Association: Pacific Northwest |
QUOTE(rnellums @ Mar 29 2013, 06:30 AM) The hoses were originally on all of them, but if you cut them off carefully you end up with what is on the right. It should work equally well either way. I ordered and installed 4 new from Otto's in CA when I did my engine refresh last year so I would have some spares (but mine were leaking a bit already). ~90$ ea. I think. Auto Atlanta's website lists new OEM porsche injectors for $321. Ouch. They also list new Bosch for $255. I wonder if those are the same without the "Porsche" box? They also have rebuilt listed for $75. Pelican doesn't have anything at all. You say you got new from Otto's for $90...New What? OEM, Bosch, or ?? |
|
|
|
| rnellums |
Mar 29 2013, 12:02 PM
Post
#390
|
|
Professional Enthusiast Group: Members Posts: 1,646 Joined: 26-November 09 From: Littleton, CO Member No.: 11,072 Region Association: Rocky Mountains |
New OEM Bosch, although I'm not sure how many are left.
http://www.914world.com/bbs2/index.php?sho...40025&st=90 post 97 are photos |
|
|
|
| 914Eric |
Mar 29 2013, 08:15 PM
Post
#391
|
|
Member Group: Members Posts: 316 Joined: 7-November 12 From: Northern Idaho Member No.: 15,125 Region Association: Pacific Northwest |
QUOTE(rnellums @ Mar 29 2013, 11:02 AM) New OEM Bosch, although I'm not sure how many are left. http://www.914world.com/bbs2/index.php?sho...40025&st=90 post 97 are photos Ross, Thanks for the link to the injector pics. While I was in there I got to really look over your car. Hadn't seen your thread before. VERY nice. I really like the unusual color. Seems like if you got those Bosch injectors for $90...I'll need to give Otto's a call. Far cheaper than AA. |
|
|
|
| rnellums |
Mar 31 2013, 07:11 PM
Post
#392
|
|
Professional Enthusiast Group: Members Posts: 1,646 Joined: 26-November 09 From: Littleton, CO Member No.: 11,072 Region Association: Rocky Mountains |
|
|
|
|
| Dave_Darling |
Mar 31 2013, 07:33 PM
Post
#393
|
|
914 Idiot Group: Members Posts: 14,986 Joined: 9-January 03 From: Silicon Valley / Kailua-Kona Member No.: 121 Region Association: Northern California |
Are they still going? Otto passed away not long ago...
--DD |
|
|
|
| 914Eric |
Apr 1 2013, 12:51 PM
Post
#394
|
|
Member Group: Members Posts: 316 Joined: 7-November 12 From: Northern Idaho Member No.: 15,125 Region Association: Pacific Northwest |
Was looking back to try and find a particular post and realized that since the thread has gotten so big that I needed an index. It is now in the page header to help find particular topics. |
|
|
|
| 914Eric |
Apr 7 2013, 03:46 PM
Post
#395
|
|
Member Group: Members Posts: 316 Joined: 7-November 12 From: Northern Idaho Member No.: 15,125 Region Association: Pacific Northwest |
Trying to pull the front blower housing off the engine and got all the cheeshead and hex bolts out but it still won't come off. It's loose all the way around the perimeter, but seems to be held by the large pulley or an "odd" fastener underneath the small pulley. The fastener is like a round carriage bolt with two flat sides.
Factory manual says to remove the 3 bolts on the large pulley, but when I try...It just spins the engine. How do you keep the engine from spinning to remove the pulley bolts? How to remove the round headed bolt with the two flat sides? See arrow. It's always easy once you learn the technique. (IMG:style_emoticons/default/headbang.gif) Thanks Guys. 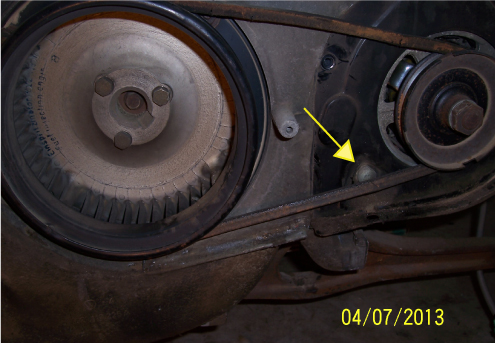 |
|
|
|
| rnellums |
Apr 7 2013, 06:58 PM
Post
#396
|
|
Professional Enthusiast Group: Members Posts: 1,646 Joined: 26-November 09 From: Littleton, CO Member No.: 11,072 Region Association: Rocky Mountains |
The round headed bolt has a square shoulder like a carriage bolt that fits into the alternator bracket, so all you need to do it loosen the nut on the other side. For the fan hub I usually use a flywheel lock that bolts to the case and has teeth that lock the flywheel, I picked mine up at a VW shop a while ago. Between the two case halves there are also two alignment pins. those usually are what holds it together after removing all the screws for me. a bit of rocking usually does a trick. A screwdriver might work too, but it will easily mar the metal.
|
|
|
|
| bigkensteele |
Apr 7 2013, 07:17 PM
Post
#397
|
|
Major Member Group: Members Posts: 2,197 Joined: 30-August 04 From: Cincinnati, OH Member No.: 2,660 Region Association: South East States |
Hey Eric, glad to see you working on it again.
The bolt by the arrow is the pivot point for your alternator. On the back side of the alternator, there is a nut that must be removed to pull that bolt out. You do not need to separate the two halves of the fan housing, unless you feel the need to clean where no one will ever see. You will need to pull the fan off to get to the four bolts holding the fan housing to the engine case. If you use any type of water-based cleaner on the fan housing, dry it immediately. It will pit it permanently if left to soak (ask me how I know). You can't safely remove the fan without a flywheel lock, or some other means of holding the rotating assembly in a fixed position. Whatever you do, don't try wedging something between the fan blades. They will snap off. I strongly recommend the flywheel lock. Pelican has them. Are you replacing the front main seal? If so, you will also need to pull the fan hub from the end of the crank. This requires a special tool that you can easily make if you have a welder. Basically a flat steel "C" shape. I can mail you the one I made if you don't weld. |
|
|
|
| McMark |
Apr 8 2013, 10:10 AM
Post
#398
|
|
914 Freak! Group: Retired Admin Posts: 20,179 Joined: 13-March 03 From: Grand Rapids, MI Member No.: 419 Region Association: None |
Grab yourself an impact gun (air or electric) for fasteners just like the fan bolts. Makes life so much easier.
|
|
|
|
| 914Eric |
Apr 8 2013, 11:20 AM
Post
#399
|
|
Member Group: Members Posts: 316 Joined: 7-November 12 From: Northern Idaho Member No.: 15,125 Region Association: Pacific Northwest |
Mark...or anyone,
Will an impact gun get the fan bolts out without a flywheel lock? Hi Ken... |
|
|
|
| Dave_Darling |
Apr 8 2013, 03:23 PM
Post
#400
|
|
914 Idiot Group: Members Posts: 14,986 Joined: 9-January 03 From: Silicon Valley / Kailua-Kona Member No.: 121 Region Association: Northern California |
Yes, that's one of the things impact guns are for. Loosening things that you can't hold still.
BTW, I have been lucky enough not to break any fan blades by putting a long screwdriver through the timing hole and the fan. I try to keep the screwdriver at the back of the blade where it attaches to the rest of the fan; the blades are a little bit stronger that way. (Still some risk of breaking them, though.) --DD |
|
|
|
|
1 User(s) are reading this topic (1 Guests and 0 Anonymous Users)
0 Members:

|
Lo-Fi Version | Time is now: 19th May 2024 - 03:12 PM |
Invision Power Board
v9.1.4 © 2024 IPS, Inc.