|
|
|
Porsche, and the Porsche crest are registered trademarks of Dr. Ing. h.c. F. Porsche AG.
This site is not affiliated with Porsche in any way. Its only purpose is to provide an online forum for car enthusiasts. All other trademarks are property of their respective owners. |
|
|

  |

| 914Eric |
 Apr 9 2013, 01:41 PM Apr 9 2013, 01:41 PM
Post
#401
|
|
Member  Group: Members Posts: 316 Joined: 7-November 12 From: Northern Idaho Member No.: 15,125 Region Association: Pacific Northwest |
So I got out my trusty hammer impact driver that I use on my motorcycles to get old philips heads out of the case once their frozen in and stripping. Worked great and I now have the fan housing and fan off.
Everything looks good EXCEPT, one of the fan blades is broken off and gone. So what do I do? Ignore it...One missing blade isn't a big deal? Find a replacement that has all the blades? Find somebody who knows what they are doing and weld in a new blade?  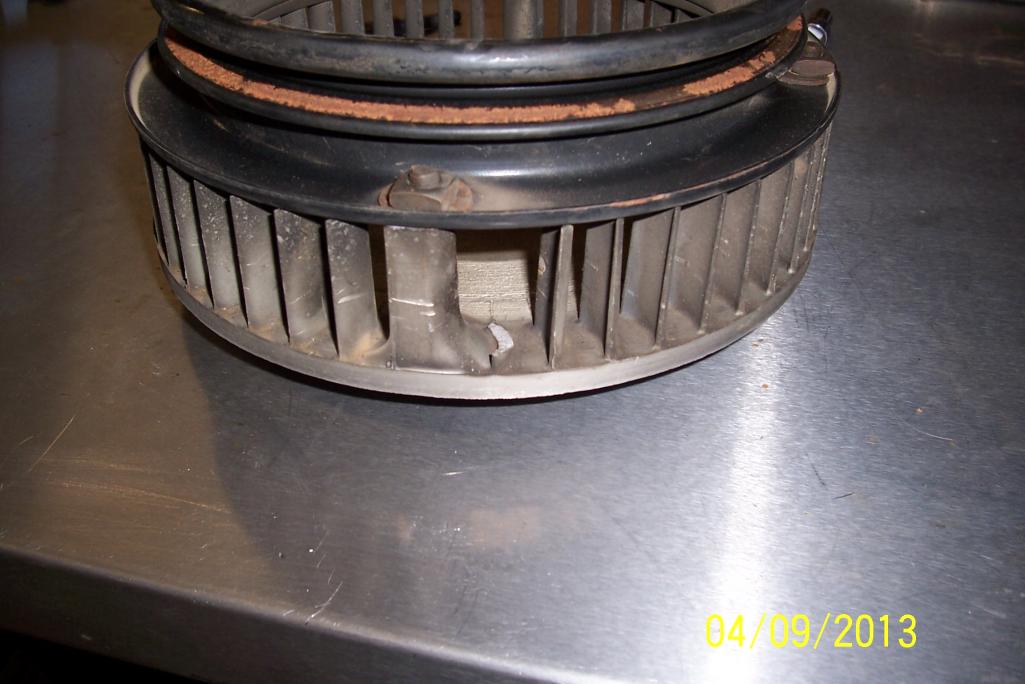 |
   |

 
|
| Dave_Darling |
Apr 9 2013, 06:20 PM
Post
#402
|
|
914 Idiot Group: Members Posts: 14,982 Joined: 9-January 03 From: Silicon Valley / Kailua-Kona Member No.: 121 Region Association: Northern California |
You have a few choices.
1- Break off a blade 180 degrees from that one and run it. 2- Get an unbroken fan. 3- Break off a dozen more blades, then sell it on e-bay as a "special racing fan". I suggest option #2. Should be some in the classifieds here or on Pelican. I bet the Cap'n has a few, and I know Rich at HPH has dozens. --DD |
|
|
|
| 914Eric |
Apr 9 2013, 06:42 PM
Post
#403
|
|
Member Group: Members Posts: 316 Joined: 7-November 12 From: Northern Idaho Member No.: 15,125 Region Association: Pacific Northwest |
QUOTE(Dave_Darling @ Apr 9 2013, 05:20 PM)  You have a few choices. 1- Break off a blade 180 degrees from that one and run it. 2- Get an unbroken fan. 3- Break off a dozen more blades, then sell it on e-bay as a "special racing fan". I suggest option #2. Should be some in the classifieds here or on Pelican. I bet the Cap'n has a few, and I know Rich at HPH has dozens. --DD Thanks Dave. I like option 3. (IMG:style_emoticons/default/lol-2.gif) Pretty sure I wouldn't be the first to attempt such a thing. |
|
|
|
| 914Eric |
Apr 10 2013, 09:48 AM
Post
#404
|
|
Member Group: Members Posts: 316 Joined: 7-November 12 From: Northern Idaho Member No.: 15,125 Region Association: Pacific Northwest |
QUOTE(Dave_Darling @ Apr 9 2013, 05:20 PM) I bet the Cap'n has a few, and I know Rich at HPH has dozens. --DD For the uninformed...What is HPH? |
|
|
|
| dlkawashima |
Apr 10 2013, 10:18 AM
Post
#405
|
|
914 Guru Group: Members Posts: 9,749 Joined: 1-October 10 From: San Jose Member No.: 12,234 Region Association: Northern California |
High Performance House in Redwood City. Rich Bontempi is the owner.
|
|
|
|
| 914Eric |
Apr 10 2013, 01:17 PM
Post
#406
|
|
Member Group: Members Posts: 316 Joined: 7-November 12 From: Northern Idaho Member No.: 15,125 Region Association: Pacific Northwest |
QUOTE(dlkawashima @ Apr 10 2013, 09:18 AM) High Performance House in Redwood City. Rich Bontempi is the owner. Thanks Dave. Here is something I thought you might enjoy. More original factory engine markings/stamps. Little hard to read, but they are 022 010C 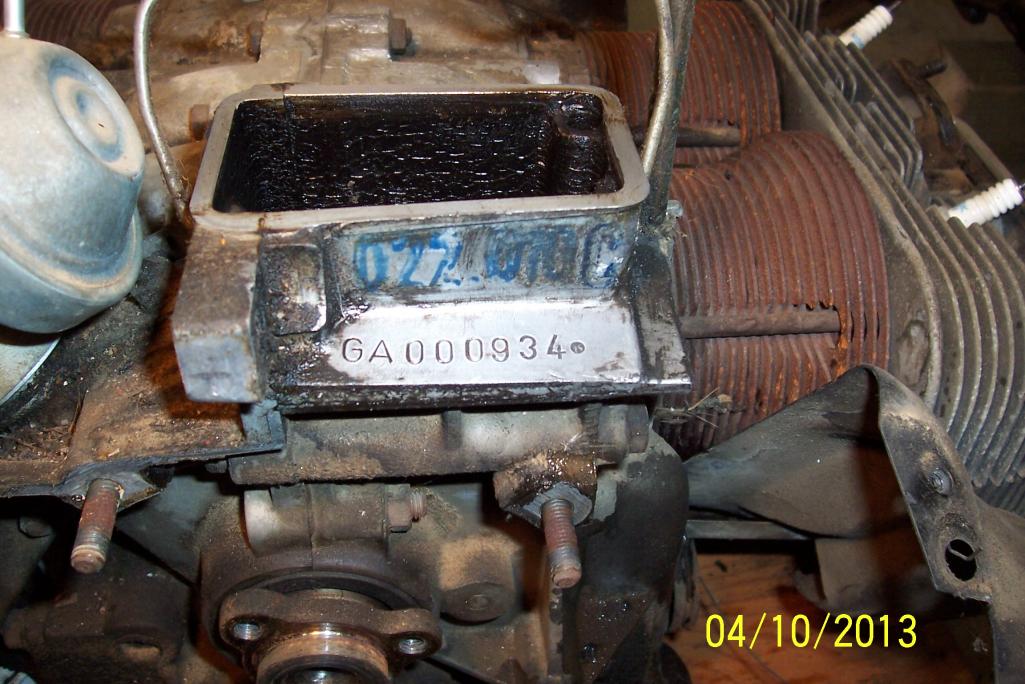 |
|
|
|
| bigkensteele |
Apr 10 2013, 07:43 PM
Post
#407
|
|
Major Member Group: Members Posts: 2,197 Joined: 30-August 04 From: Cincinnati, OH Member No.: 2,660 Region Association: South East States |
Hey Eric, this is the super-top-secret highly precise special fan removal tool that I mentioned earlier.
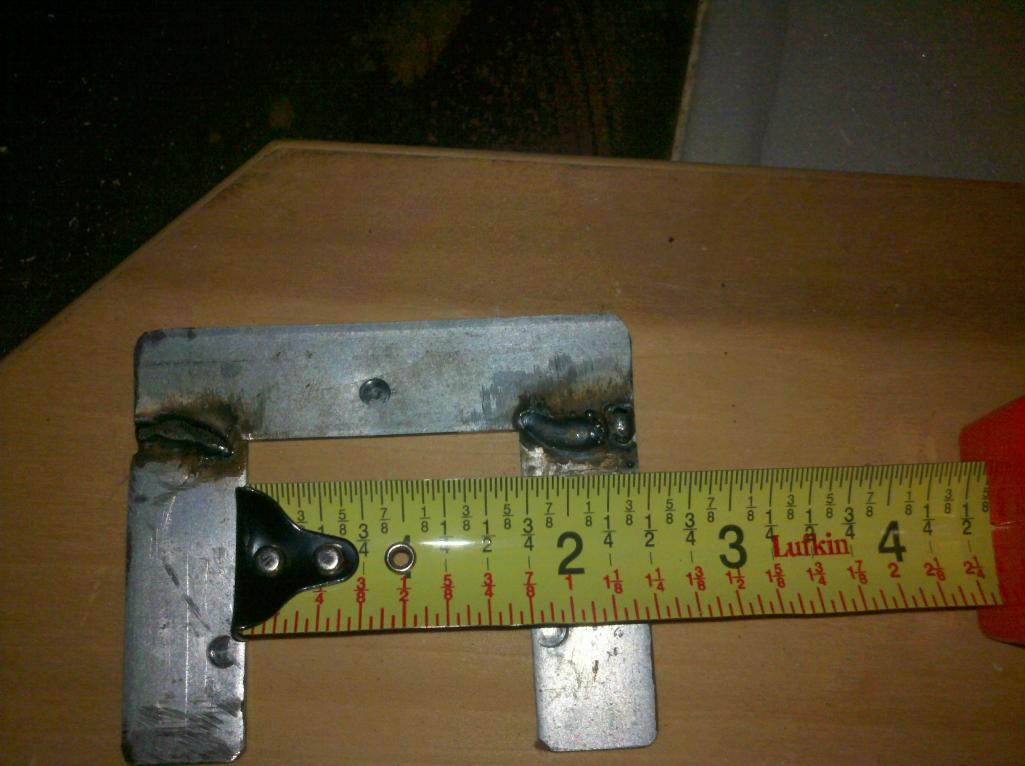 In your picture just above, you can see where it goes - between the fan hub and the case. You LOOSEN the big bolt in the middle and put the 3 smaller bolts back in. You then tighten the 3 bolts evenly until the hub pops loose. The reason you only loosen the center bolt is that there is a woodruff key that indexes the hub to the crank, and you don't want to loose it in the event that the hub pops off completely. You can see in the picture that there are three circular marks where I used it. I will try to get it in the mail tomorrow. No need to send it back. It took me longer to dig my welder out of the corner of the garage than it did to make the piece. (IMG:style_emoticons/default/welder.gif) |
|
|
|
| bigkensteele |
Apr 10 2013, 08:12 PM
Post
#408
|
|
Major Member Group: Members Posts: 2,197 Joined: 30-August 04 From: Cincinnati, OH Member No.: 2,660 Region Association: South East States |
By the way, it is said that the fan and pulley assembly are balanced from the factory and should not be separated unless you absolutely must. I don't know if this is true or not, and given that you have a blade missing, the balance is off anyway.
However, if you do separate the pulley from the fan for paint, cleaning or whatever, make sure you mark the position because, if I recall correctly, one of the timing marks is on the pulley and one is on the fan casting. So, the pulley should be put back on in the same position that it came off. I might be wrong on that, but I think that is what I recall. |
|
|
|
| 914Eric |
Apr 12 2013, 01:17 PM
Post
#409
|
|
Member Group: Members Posts: 316 Joined: 7-November 12 From: Northern Idaho Member No.: 15,125 Region Association: Pacific Northwest |
So I'm making progress, Cooling fan and housing is off; Oil cooler is off; and I've got the housing cleaned up and ready to put back on except one thing.
One of the little flaps just falls off. One stay on and it looks like there is some tiny piece of something that is holding it on. It's so tiny it's hard to tell if it is just a dab of glue, or a tiny grommet or what it is? I checked the parts fiche and only the flap and post are listed with nothing holding the post on. So...What keeps the little flap from falling out of the fan housing? 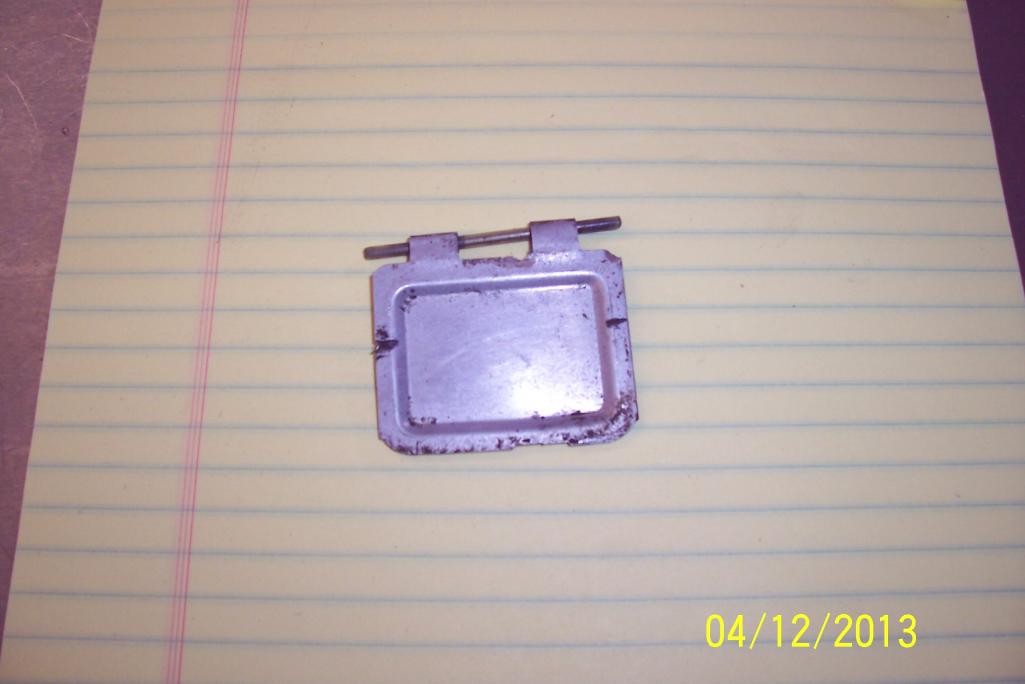 |
|
|
|
| rnellums |
Apr 12 2013, 01:30 PM
Post
#410
|
|
Professional Enthusiast Group: Members Posts: 1,646 Joined: 26-November 09 From: Littleton, CO Member No.: 11,072 Region Association: Rocky Mountains |
The rod is supposed to run through small holes in the fan shroud. I think its primary function is to keep junk from accumulating in the shroud when the engine is off, since any airflow when the engine is on will open the flap.
|
|
|
|
| 914Eric |
Apr 12 2013, 01:58 PM
Post
#411
|
|
Member Group: Members Posts: 316 Joined: 7-November 12 From: Northern Idaho Member No.: 15,125 Region Association: Pacific Northwest |
QUOTE(rnellums @ Apr 12 2013, 12:30 PM) The rod is supposed to run through small holes in the fan shroud. I think its primary function is to keep junk from accumulating in the shroud when the engine is off, since any airflow when the engine is on will open the flap. Yes...I understand that part. What holds the rod IN the holes in the fan shroud? It is not a press fit that is snug...It just falls right out. |
|
|
|
| rnellums |
Apr 12 2013, 02:28 PM
Post
#412
|
|
Professional Enthusiast Group: Members Posts: 1,646 Joined: 26-November 09 From: Littleton, CO Member No.: 11,072 Region Association: Rocky Mountains |
You mean side to side? I believe the hot air guides that clamp to the shroud prevent it from sliding out side to side.
|
|
|
|
| 914Eric |
Apr 12 2013, 04:10 PM
Post
#413
|
|
Member Group: Members Posts: 316 Joined: 7-November 12 From: Northern Idaho Member No.: 15,125 Region Association: Pacific Northwest |
QUOTE(rnellums @ Apr 12 2013, 01:28 PM) You mean side to side? I believe the hot air guides that clamp to the shroud prevent it from sliding out side to side. Yea...I guess if you squeeze the hinge part of the flaps real tight onto the pin, it should keep the pin from vibrating out. This must be VW engineering...as opposed to the Porsche side. Kinda cheesy IMO. |
|
|
|
| rnellums |
Apr 12 2013, 09:11 PM
Post
#414
|
|
Professional Enthusiast Group: Members Posts: 1,646 Joined: 26-November 09 From: Littleton, CO Member No.: 11,072 Region Association: Rocky Mountains |
This clamps to the shroud on both sides of where the pin rests and should hold it in. I think the flap itself should be loose on the pin.
Attached thumbnail(s) 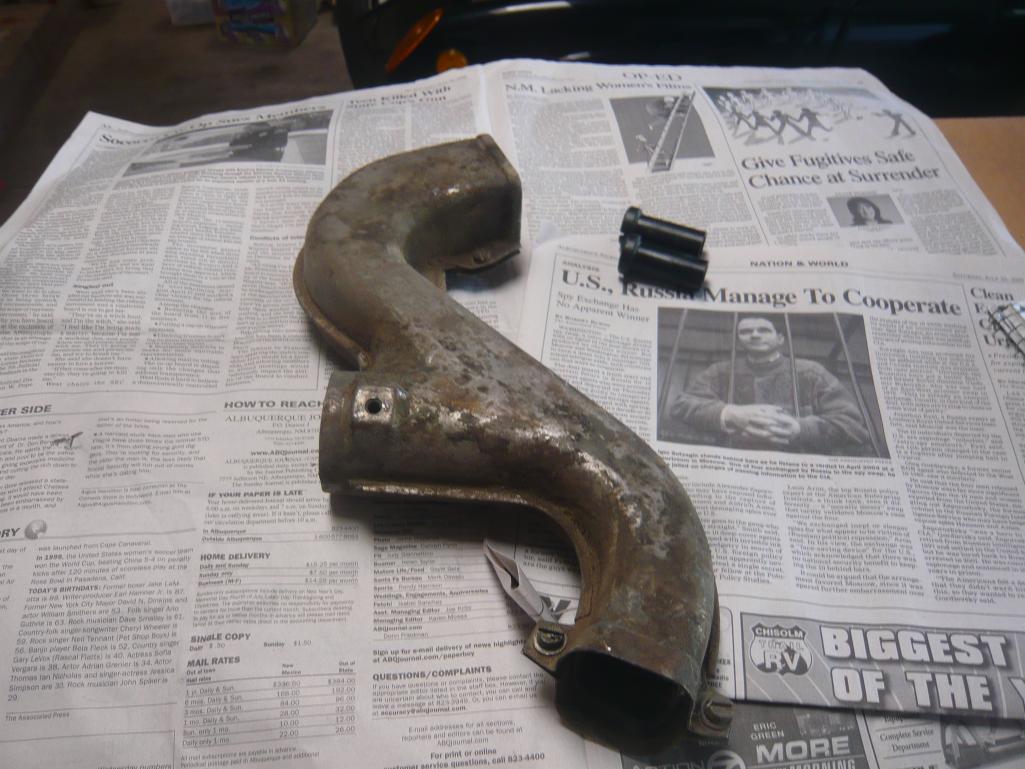
|
|
|
|
| 914Eric |
Apr 13 2013, 09:34 AM
Post
#415
|
|
Member Group: Members Posts: 316 Joined: 7-November 12 From: Northern Idaho Member No.: 15,125 Region Association: Pacific Northwest |
Great point Rob...I forgot the heat exchanger goes on there and will keep the pins from moving. (IMG:style_emoticons/default/wacko.gif) |
|
|
|
| 914Eric |
Apr 13 2013, 02:52 PM
Post
#416
|
|
Member Group: Members Posts: 316 Joined: 7-November 12 From: Northern Idaho Member No.: 15,125 Region Association: Pacific Northwest |
Got my injectors back from WitchHunter. They were quick and easy, and I would recommend them. Problem is, they say my injectors don't match and recommend replacement.
While all the injectors tested OK on resistance, leak, and spray pattern, seems I have some variance issues. Injectors 1 and 4 are consistant; #2 is high, and #3 is low. I have a 15% variance at static, and 11% variance at 2500 rpm. Anybody know what an OEM original should test at for static and 2500 rpm? What % variance is acceptable? Would appreciate any insights some of you with experience in this area could offer. 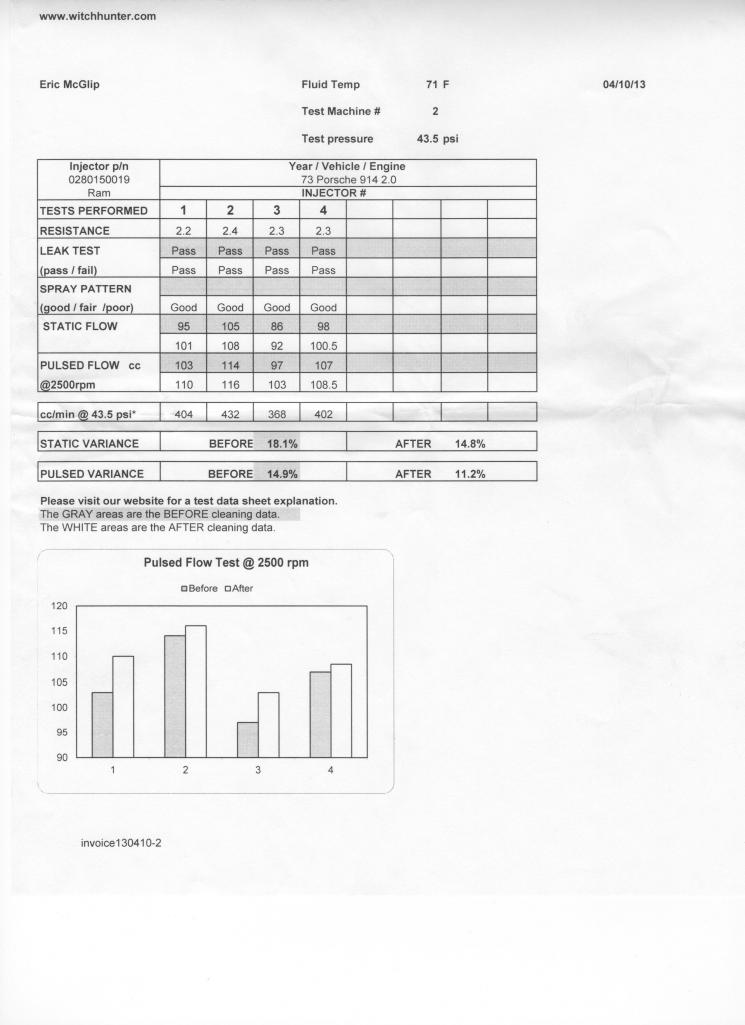 |
|
|
|
| 914Eric |
Apr 14 2013, 06:29 PM
Post
#417
|
|
Member Group: Members Posts: 316 Joined: 7-November 12 From: Northern Idaho Member No.: 15,125 Region Association: Pacific Northwest |
Still looking for help on what I need to do with my injectors now that I have test results back. See previous post.
|
|
|
|
| turk22 |
Apr 14 2013, 08:27 PM
Post
#418
|
|
Treetop Flyer Group: Members Posts: 735 Joined: 27-July 12 From: Cincinnati OH Member No.: 14,725 Region Association: Upper MidWest |
QUOTE(914Eric @ Apr 13 2013, 04:52 PM) Got my injectors back from WitchHunter. They were quick and easy, and I would recommend them. Problem is, they say my injectors don't match and recommend replacement. While all the injectors tested OK on resistance, leak, and spray pattern, seems I have some variance issues. Injectors 1 and 4 are consistant; #2 is high, and #3 is low. I have a 15% variance at static, and 11% variance at 2500 rpm. Anybody know what an OEM original should test at for static and 2500 rpm? What % variance is acceptable? Would appreciate any insights some of you with experience in this area could offer. Eric, when you say your injectors don't match, are they physically different injectors, (like two from a 73, and two from at 75 or something)? Or by don't match you mean do you mean just the fact they have a flow variance? Thought I recalled that you thought the injectors looked different when you pulled them. |
|
|
|
| 914Eric |
Apr 14 2013, 10:21 PM
Post
#419
|
|
Member Group: Members Posts: 316 Joined: 7-November 12 From: Northern Idaho Member No.: 15,125 Region Association: Pacific Northwest |
QUOTE(turk22 @ Apr 14 2013, 07:27 PM) QUOTE(914Eric @ Apr 13 2013, 04:52 PM) Got my injectors back from WitchHunter. They were quick and easy, and I would recommend them. Problem is, they say my injectors don't match and recommend replacement. While all the injectors tested OK on resistance, leak, and spray pattern, seems I have some variance issues. Injectors 1 and 4 are consistant; #2 is high, and #3 is low. I have a 15% variance at static, and 11% variance at 2500 rpm. Anybody know what an OEM original should test at for static and 2500 rpm? What % variance is acceptable? Would appreciate any insights some of you with experience in this area could offer. Eric, when you say your injectors don't match, are they physically different injectors, (like two from a 73, and two from at 75 or something)? Or by don't match you mean do you mean just the fact they have a flow variance? Thought I recalled that you thought the injectors looked different when you pulled them. When I say "Match" I mean the flow rates. Not sure what amount of variance is acceptable. And now that you mention it, Witchunter pointed out the 3 of my injectors are labeled "Ram". 1 has a Porsche/Bosch part number. So they seem to be 2 different manufacturers...but I'm not sure that is really my problem. The variance is what I'm most concerned about. I think. (IMG:style_emoticons/default/confused24.gif) |
|
|
|
| 914Eric |
Apr 25 2013, 06:27 PM
Post
#420
|
|
Member Group: Members Posts: 316 Joined: 7-November 12 From: Northern Idaho Member No.: 15,125 Region Association: Pacific Northwest |
Front main seal and o-ring came in today, so I went out to install the new main seal.
I pulled the impeller hub with that hi-tech tool sent to me by Ken Steele. Impeller hub came off nicely and everything appears in good order. I'm thinking the old main seal just pops out...but no...Seems like it is welded in there. What's the proper way to get the old front main seal out? As always...thanks in advance. Eric |
|
|
|
|
1 User(s) are reading this topic (1 Guests and 0 Anonymous Users)
0 Members:

|
Lo-Fi Version | Time is now: 8th May 2024 - 04:18 AM |
Invision Power Board
v9.1.4 © 2024 IPS, Inc.