|
|
|
Porsche, and the Porsche crest are registered trademarks of Dr. Ing. h.c. F. Porsche AG.
This site is not affiliated with Porsche in any way. Its only purpose is to provide an online forum for car enthusiasts. All other trademarks are property of their respective owners. |
|
|


| Chris H. |
 Dec 27 2012, 11:02 AM Dec 27 2012, 11:02 AM
Post
#301
|
|
Senior Member  Group: Members Posts: 4,071 Joined: 2-January 03 From: Chicago 'burbs Member No.: 73 Region Association: Upper MidWest |
Finally starting the thread. First, I never would have done this if it weren't for several of you helping me out, especially Ian at:
Cold Water Conversions Ian tolerated dozens of questions from me as I decided which way to go. Thanks again! Here is the candidate (or victim, depending on what side of the fence you are on):  A 1975 1.8L with California Emissions...I've had it for almost 11 years. During that time I have logged about 2800 miles on it. I decided to swap it out for a modern drive train so my daughter could drive it so I started looking for a 2.2L Subie and a 2WD auto trans. This setup CAN be made to work with a custom hanger, but it's not a very exciting trans. Think early '90's Camry or Corolla acceleration. I'm sure it could be re-geared but an Audi trans would probably be a much better option. Then I found and SVX for cheap and changed directions entirely. Looks like my kid will be learning to drive a 5 speed Subie! So far I have: 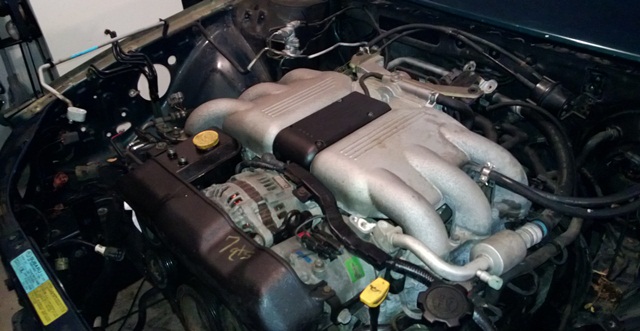 Strong running SVX engine 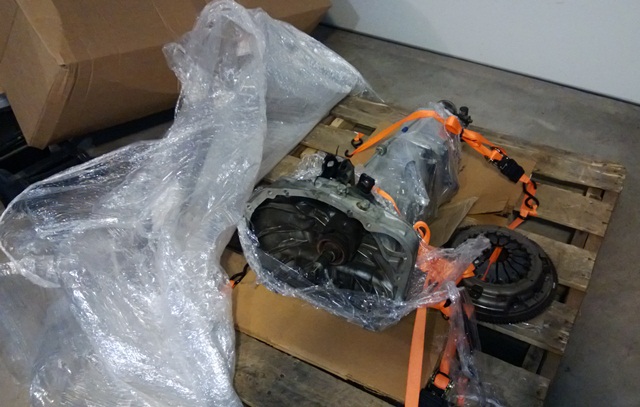 2006 WRX trans purchased from NASIOC  If you don't feel like chasing this stuff down Ian will source it for you. Next up I'll post the highlights of the SVX strip-down and note some of the pitfalls, valuable parts, and stuff to be careful not to break! Any feedback, comments, questions, concerns are welcome. I want to do it right. |
   |

 
|
Posts in this topic
Chris H. My 3.3L Subie Conversion Thread Dec 27 2012, 11:02 AM DBCooper Cool. I have a turbo, but really like that N/A h... Dec 27 2012, 03:19 PM jimkelly keep the pics coming : )
i see you are going with... Dec 27 2012, 03:55 PM Chris H. Thanks guys. DBCooper I think I have seen yours i... Dec 28 2012, 06:24 PM a914622 If our going to use the stock ecu (i recomend) the... Dec 28 2012, 10:37 PM
DBCooper Cool. I have a turbo, but really like that N/A h... Dec 27 2012, 03:19 PM jimkelly keep the pics coming : )
i see you are going with... Dec 27 2012, 03:55 PM Chris H. Thanks guys. DBCooper I think I have seen yours i... Dec 28 2012, 06:24 PM a914622 If our going to use the stock ecu (i recomend) the... Dec 28 2012, 10:37 PM
 Chris H.
If our going to use the stock ecu (i recommend) t... Dec 28 2012, 11:18 PM Dr Evil :popcorn:
Dont let Scotty B see this :) Dec 28 2012, 10:51 PM brant thank you for documenting this Dec 29 2012, 08:34 AM kg6dxn Enjoy the striping! DO YOURSELF A FAVOR AND LA... Dec 29 2012, 09:52 AM Chris H. Thanks guys. Got the harness out...
Empty basket... Dec 29 2012, 03:34 PM 904svo Heres my WRX harness before and after. Label all t... Dec 29 2012, 05:25 PM speed metal army Holy Moley!
Waaayy too much of the scary stuff... Dec 30 2012, 12:00 AM 76-914 Subscribed. Looks like your a couple month's a... Dec 30 2012, 09:19 AM Chris H.
Subscribed. Looks like your a couple month's ... Dec 30 2012, 08:48 PM nsyr Three quaters of that wire will be eliminated. Dec 30 2012, 10:54 AM ruby914 It's nice to see all the Suby conversions in w... Dec 31 2012, 10:42 AM DBCooper I was lazy, bought a plug and play engine harness ... Dec 31 2012, 10:55 AM a914622 All the wires get trimed down to look like this
... Dec 31 2012, 11:05 AM BIGKAT_83
All the wires get trimed down to look like this
... Dec 31 2012, 08:05 PM 3d914 Great 3.3 conversion thread. Keep it coming and go... Dec 31 2012, 03:41 PM Chris H. Happy New Year everyone!
Just a bit more pr... Jan 1 2013, 04:38 PM Chris H. Finally wrestled the engine and trans out...
Firs... Jan 2 2013, 06:55 PM euro911 :popcorn: Jan 8 2013, 02:47 AM Chris H. Parts are en route! Lots of parts! Some ... Jan 8 2013, 07:34 AM charliew Nice thread, I have great respect for guys that ta... Jan 8 2013, 08:26 PM cwpeden Had an offer to co-buy an SVX today. An aquaintanc... Jan 8 2013, 10:46 PM Chris H. Thanks Charlie. Been coming here 10 years so it... Jan 8 2013, 11:11 PM a914622 Subaru parts . com is the best pricing you will fi... Jan 8 2013, 11:47 PM Chris H. Thanks jcl! Wow that is very helpful. Jan 9 2013, 07:16 AM BIGKAT_83 Chris here is a picture of my fuel tank with the i... Jan 9 2013, 04:29 PM Tilly74
Chris here is a picture of my fuel tank with the ... Jan 10 2013, 10:23 AM Chris H.
[quote name='BIGKAT_83' post='1799385' date='Jan ... Jan 10 2013, 03:16 PM Chris H. Very nice Bob! Thanks! I finally got the... Jan 9 2013, 09:08 PM Chris H. Just some minor updates...the exciting stuff will ... Jan 23 2013, 06:44 AM Chris H. So the angle of the intake has gotten my attention... Jan 23 2013, 06:44 AM Chris H. Here's a better shot of the angle...
And t... Jan 23 2013, 06:54 AM 76-914 Chris, what is the issue with the TB and Alt? I di... Jan 23 2013, 08:11 AM Chris H. Sorry what I was saying is that it appears that I ... Jan 23 2013, 10:27 AM scotty b If you flip it, will you still have enough room to... Jan 23 2013, 04:51 PM wingnut86 94' had an EGR valve in the location under the... Jan 23 2013, 09:12 PM Chris H. Sorry guys I was out for a couple of days...
wing... Jan 25 2013, 10:10 AM BIGKAT_83 Its the Idle Air Control valve.... You need this i... Jan 25 2013, 11:36 AM Chris H. Well there you go...that thing is not going anywhe... Jan 25 2013, 12:31 PM 76-914 Just stay 3 month's ahead of me so I don't... Jan 25 2013, 01:59 PM scotty b Sorry for the highjack, but it is somewhat related... Jan 26 2013, 09:45 AM DBCooper That's what BIGKAT did (with just the GT openi... Jan 26 2013, 10:25 AM Chris H. BIGKAT and I were talking radiators last week. Si... Jan 26 2013, 02:32 PM scotty b The wheel well cutting is definitely an area to be... Jan 26 2013, 03:51 PM DBCooper Give it a go. I think that area works because it... Jan 26 2013, 04:42 PM Dr Evil I would like to make a two radiator system like th... Jan 26 2013, 05:03 PM kg6dxn
I would like to make a two radiator system like t... Jan 26 2013, 05:30 PM a914622 Yes the intake can be flipped around, but the inje... Jan 27 2013, 12:28 AM Chris H. Thanks for the insight jcl... the alternator setup... Jan 27 2013, 11:06 AM strawman
... been looking at stock Subie gauge clusters...... Jan 27 2013, 01:58 PM 904svo
[quote name='Chris H.' post='1810259' date='Jan 2... Jan 27 2013, 04:33 PM strawman The trouble with using the Subaru Speedo is that i... Jan 27 2013, 06:49 PM 76-914 Hey Chris, what's that cluster from the SVX lo... Jan 27 2013, 12:11 PM Chris H. SVX's are all automatics...the cluster is a li... Jan 27 2013, 12:43 PM Chris H. Thanks guys.... Geoff if I end up using the stock... Jan 27 2013, 05:35 PM DBCooper There's an aftermarket VDO electrical speedome... Jan 27 2013, 10:49 PM Chris H. Is it this one?
Certainly a good option. Fit... Jan 28 2013, 08:00 AM DBCooper Yup, that's it. Found a photo:
http://www.91... Jan 28 2013, 09:13 AM 904svo It's answer like these that take the scare out... Jan 28 2013, 11:07 AM Chris H. Wow, it's been a long time since update! ... Mar 21 2013, 08:52 PM Chris H. Never done a timing belt before so I wasted a lot ... Mar 21 2013, 09:00 PM Chris H. Don’t have any pics of this, but I did try flipp... Mar 21 2013, 09:24 PM Chris H. Also bought a very inexpensive 2006 Impreza gauge ... Mar 21 2013, 09:43 PM Chris H. Next step is the engine wiring. I hear that's... Mar 21 2013, 09:50 PM a914622 Sweet. I just started on a second harness cut down... Mar 21 2013, 10:10 PM Chris H. Thanks jcl. Yes most of those seals are on the en... Mar 22 2013, 07:03 AM a914622 Yep. I plan on making long tube headers. A lot of ... Mar 22 2013, 08:35 AM Chris H. Nice. Picked these up from Bob (BIGKAT) along wit... Mar 22 2013, 09:04 AM 76-914
Nice. Picked these up from Bob (BIGKAT) along wi... Mar 28 2013, 09:09 PM a914622 sweet. And it looks like they dont have the ... Mar 23 2013, 07:33 AM Chris H.
sweet. And it looks like they dont have the ... Mar 24 2013, 02:56 PM Chris H. Time to start reinstalling the accessories onto th... Mar 28 2013, 08:58 PM Chris H. I heard the knock sensors were one of the keys to ... Mar 28 2013, 09:04 PM Chris H. He special ordered them from somewhere...I THINK O... Mar 28 2013, 09:31 PM Chris H. Tackled the engine wiring harnesses....
Because t... Apr 2 2013, 09:25 AM wingnut86 Subd:-) May 4 2013, 08:49 PM Chris H. Well things have slowed down a LOT but they are ab... Jun 4 2013, 05:44 PM kg6dxn
Hydraulic clutch bits...still need to decide whe... Jun 8 2013, 03:54 PM Chris H. Couple of notes....
1. Be very careful to choose... Jun 4 2013, 05:59 PM Chris H. Here's what the oil separator plate looks like... Jun 4 2013, 06:12 PM euro911 What supports the front of the engine, Chris?
Loo... Jun 4 2013, 11:40 PM nsyr nothing. the engine mounts are towards the back of... Jun 5 2013, 06:32 AM Chris H.
nothing. the engine mounts are towards the back o... Jun 5 2013, 07:50 AM jimkelly but in your pic there is no trans on the motor. I... Jun 5 2013, 01:14 PM Chris H. Hey Jim,
Believe it or not the engine is being h... Jun 5 2013, 03:57 PM nsyr I would be careful with those mounts. They are flu... Jun 5 2013, 05:33 PM Chris H.
I would be careful with those mounts. They are fl... Jun 5 2013, 05:56 PM Chris H. Look what came today....flywheel bolts...
These... Jun 8 2013, 09:28 AM Chris H. It's one of those weeks where you get a surpri... Jun 8 2013, 12:31 PM 76-914 That's a good tip Mike. Wow Chris, your moving... Jun 8 2013, 06:23 PM Chris H. Thanks Mike. Definitely looking to copy a good id... Jun 8 2013, 07:38 PM 76-914 I'm building my own because he is out of commi... Jul 23 2013, 07:42 AM Chris H. Kent, I'm just about to pull the engine! ... Jul 23 2013, 01:55 PM 76-914 Very nice! Keep the pic's coming and the b... Jul 23 2013, 03:14 PM euro911 I got tired of living that 'vicious' cycle... Jul 23 2013, 05:04 PM Chris H. Got the old engine out! I'm feeling a lit... Aug 1 2013, 06:23 PM
Chris H.
If our going to use the stock ecu (i recommend) t... Dec 28 2012, 11:18 PM Dr Evil :popcorn:
Dont let Scotty B see this :) Dec 28 2012, 10:51 PM brant thank you for documenting this Dec 29 2012, 08:34 AM kg6dxn Enjoy the striping! DO YOURSELF A FAVOR AND LA... Dec 29 2012, 09:52 AM Chris H. Thanks guys. Got the harness out...
Empty basket... Dec 29 2012, 03:34 PM 904svo Heres my WRX harness before and after. Label all t... Dec 29 2012, 05:25 PM speed metal army Holy Moley!
Waaayy too much of the scary stuff... Dec 30 2012, 12:00 AM 76-914 Subscribed. Looks like your a couple month's a... Dec 30 2012, 09:19 AM Chris H.
Subscribed. Looks like your a couple month's ... Dec 30 2012, 08:48 PM nsyr Three quaters of that wire will be eliminated. Dec 30 2012, 10:54 AM ruby914 It's nice to see all the Suby conversions in w... Dec 31 2012, 10:42 AM DBCooper I was lazy, bought a plug and play engine harness ... Dec 31 2012, 10:55 AM a914622 All the wires get trimed down to look like this
... Dec 31 2012, 11:05 AM BIGKAT_83
All the wires get trimed down to look like this
... Dec 31 2012, 08:05 PM 3d914 Great 3.3 conversion thread. Keep it coming and go... Dec 31 2012, 03:41 PM Chris H. Happy New Year everyone!
Just a bit more pr... Jan 1 2013, 04:38 PM Chris H. Finally wrestled the engine and trans out...
Firs... Jan 2 2013, 06:55 PM euro911 :popcorn: Jan 8 2013, 02:47 AM Chris H. Parts are en route! Lots of parts! Some ... Jan 8 2013, 07:34 AM charliew Nice thread, I have great respect for guys that ta... Jan 8 2013, 08:26 PM cwpeden Had an offer to co-buy an SVX today. An aquaintanc... Jan 8 2013, 10:46 PM Chris H. Thanks Charlie. Been coming here 10 years so it... Jan 8 2013, 11:11 PM a914622 Subaru parts . com is the best pricing you will fi... Jan 8 2013, 11:47 PM Chris H. Thanks jcl! Wow that is very helpful. Jan 9 2013, 07:16 AM BIGKAT_83 Chris here is a picture of my fuel tank with the i... Jan 9 2013, 04:29 PM Tilly74
Chris here is a picture of my fuel tank with the ... Jan 10 2013, 10:23 AM Chris H.
[quote name='BIGKAT_83' post='1799385' date='Jan ... Jan 10 2013, 03:16 PM Chris H. Very nice Bob! Thanks! I finally got the... Jan 9 2013, 09:08 PM Chris H. Just some minor updates...the exciting stuff will ... Jan 23 2013, 06:44 AM Chris H. So the angle of the intake has gotten my attention... Jan 23 2013, 06:44 AM Chris H. Here's a better shot of the angle...
And t... Jan 23 2013, 06:54 AM 76-914 Chris, what is the issue with the TB and Alt? I di... Jan 23 2013, 08:11 AM Chris H. Sorry what I was saying is that it appears that I ... Jan 23 2013, 10:27 AM scotty b If you flip it, will you still have enough room to... Jan 23 2013, 04:51 PM wingnut86 94' had an EGR valve in the location under the... Jan 23 2013, 09:12 PM Chris H. Sorry guys I was out for a couple of days...
wing... Jan 25 2013, 10:10 AM BIGKAT_83 Its the Idle Air Control valve.... You need this i... Jan 25 2013, 11:36 AM Chris H. Well there you go...that thing is not going anywhe... Jan 25 2013, 12:31 PM 76-914 Just stay 3 month's ahead of me so I don't... Jan 25 2013, 01:59 PM scotty b Sorry for the highjack, but it is somewhat related... Jan 26 2013, 09:45 AM DBCooper That's what BIGKAT did (with just the GT openi... Jan 26 2013, 10:25 AM Chris H. BIGKAT and I were talking radiators last week. Si... Jan 26 2013, 02:32 PM scotty b The wheel well cutting is definitely an area to be... Jan 26 2013, 03:51 PM DBCooper Give it a go. I think that area works because it... Jan 26 2013, 04:42 PM Dr Evil I would like to make a two radiator system like th... Jan 26 2013, 05:03 PM kg6dxn
I would like to make a two radiator system like t... Jan 26 2013, 05:30 PM a914622 Yes the intake can be flipped around, but the inje... Jan 27 2013, 12:28 AM Chris H. Thanks for the insight jcl... the alternator setup... Jan 27 2013, 11:06 AM strawman
... been looking at stock Subie gauge clusters...... Jan 27 2013, 01:58 PM 904svo
[quote name='Chris H.' post='1810259' date='Jan 2... Jan 27 2013, 04:33 PM strawman The trouble with using the Subaru Speedo is that i... Jan 27 2013, 06:49 PM 76-914 Hey Chris, what's that cluster from the SVX lo... Jan 27 2013, 12:11 PM Chris H. SVX's are all automatics...the cluster is a li... Jan 27 2013, 12:43 PM Chris H. Thanks guys.... Geoff if I end up using the stock... Jan 27 2013, 05:35 PM DBCooper There's an aftermarket VDO electrical speedome... Jan 27 2013, 10:49 PM Chris H. Is it this one?
Certainly a good option. Fit... Jan 28 2013, 08:00 AM DBCooper Yup, that's it. Found a photo:
http://www.91... Jan 28 2013, 09:13 AM 904svo It's answer like these that take the scare out... Jan 28 2013, 11:07 AM Chris H. Wow, it's been a long time since update! ... Mar 21 2013, 08:52 PM Chris H. Never done a timing belt before so I wasted a lot ... Mar 21 2013, 09:00 PM Chris H. Don’t have any pics of this, but I did try flipp... Mar 21 2013, 09:24 PM Chris H. Also bought a very inexpensive 2006 Impreza gauge ... Mar 21 2013, 09:43 PM Chris H. Next step is the engine wiring. I hear that's... Mar 21 2013, 09:50 PM a914622 Sweet. I just started on a second harness cut down... Mar 21 2013, 10:10 PM Chris H. Thanks jcl. Yes most of those seals are on the en... Mar 22 2013, 07:03 AM a914622 Yep. I plan on making long tube headers. A lot of ... Mar 22 2013, 08:35 AM Chris H. Nice. Picked these up from Bob (BIGKAT) along wit... Mar 22 2013, 09:04 AM 76-914
Nice. Picked these up from Bob (BIGKAT) along wi... Mar 28 2013, 09:09 PM a914622 sweet. And it looks like they dont have the ... Mar 23 2013, 07:33 AM Chris H.
sweet. And it looks like they dont have the ... Mar 24 2013, 02:56 PM Chris H. Time to start reinstalling the accessories onto th... Mar 28 2013, 08:58 PM Chris H. I heard the knock sensors were one of the keys to ... Mar 28 2013, 09:04 PM Chris H. He special ordered them from somewhere...I THINK O... Mar 28 2013, 09:31 PM Chris H. Tackled the engine wiring harnesses....
Because t... Apr 2 2013, 09:25 AM wingnut86 Subd:-) May 4 2013, 08:49 PM Chris H. Well things have slowed down a LOT but they are ab... Jun 4 2013, 05:44 PM kg6dxn
Hydraulic clutch bits...still need to decide whe... Jun 8 2013, 03:54 PM Chris H. Couple of notes....
1. Be very careful to choose... Jun 4 2013, 05:59 PM Chris H. Here's what the oil separator plate looks like... Jun 4 2013, 06:12 PM euro911 What supports the front of the engine, Chris?
Loo... Jun 4 2013, 11:40 PM nsyr nothing. the engine mounts are towards the back of... Jun 5 2013, 06:32 AM Chris H.
nothing. the engine mounts are towards the back o... Jun 5 2013, 07:50 AM jimkelly but in your pic there is no trans on the motor. I... Jun 5 2013, 01:14 PM Chris H. Hey Jim,
Believe it or not the engine is being h... Jun 5 2013, 03:57 PM nsyr I would be careful with those mounts. They are flu... Jun 5 2013, 05:33 PM Chris H.
I would be careful with those mounts. They are fl... Jun 5 2013, 05:56 PM Chris H. Look what came today....flywheel bolts...
These... Jun 8 2013, 09:28 AM Chris H. It's one of those weeks where you get a surpri... Jun 8 2013, 12:31 PM 76-914 That's a good tip Mike. Wow Chris, your moving... Jun 8 2013, 06:23 PM Chris H. Thanks Mike. Definitely looking to copy a good id... Jun 8 2013, 07:38 PM 76-914 I'm building my own because he is out of commi... Jul 23 2013, 07:42 AM Chris H. Kent, I'm just about to pull the engine! ... Jul 23 2013, 01:55 PM 76-914 Very nice! Keep the pic's coming and the b... Jul 23 2013, 03:14 PM euro911 I got tired of living that 'vicious' cycle... Jul 23 2013, 05:04 PM Chris H. Got the old engine out! I'm feeling a lit... Aug 1 2013, 06:23 PM  |
1 User(s) are reading this topic (1 Guests and 0 Anonymous Users)
0 Members:

|
Lo-Fi Version | Time is now: 6th February 2026 - 08:09 PM |
Invision Power Board
v9.1.4 © 2026 IPS, Inc.