|
|
|
Porsche, and the Porsche crest are registered trademarks of Dr. Ing. h.c. F. Porsche AG.
This site is not affiliated with Porsche in any way. Its only purpose is to provide an online forum for car enthusiasts. All other trademarks are property of their respective owners. |
|
|

  |

| JRust |
 Aug 27 2015, 01:08 PM Aug 27 2015, 01:08 PM
Post
#601
|
|
914 Guru  Group: Members Posts: 6,317 Joined: 10-January 03 From: Albany Oregon Member No.: 129 Region Association: Pacific Northwest |
I was just considering running the lines through the long on the passenger side. Good to see that coming together Kent! I need to get mine going. Was hoping to have it done for Red Rocks. Doubtful with it off for paint now. I'll get it back less than a week before I leave. So I will probably just finish my center console & deal with the a/c over the winter (IMG:style_emoticons/default/dry.gif)
|
   |

 
|
| 76-914 |
Aug 27 2015, 05:21 PM
Post
#602
|
|
Repeat Offender & Resident Subaru Antagonist Group: Members Posts: 13,836 Joined: 23-January 09 From: Temecula, CA Member No.: 9,964 Region Association: Southern California |
QUOTE(Chris H. @ Aug 27 2015, 08:47 AM)  What does this guy think he is...a plumber or something? (IMG:style_emoticons/default/piratenanner.gif) Kent what are you going to control the setup with? The stock Subaru controls? Can't remember. Looking good (IMG:style_emoticons/default/thumb3d.gif) . The controls are mounted on the under dash unit I am using. I wanted to use Vintage Air's Gen2 Mini system but it is 1/2"nom too tall to fit beneath the cowling. If using that model I would have used their adapters to convert the OEM controls while in there. Very simple believe it or not. And I would have used that model if the car were completely apart. Then I could do some cutting and welding to make it fit. Another evaporator that caught my eye is a cheap $60 Chinese unit http://www.ebay.com/itm/Universal-Under-Dash-AC-Air-Conditioner-Add-On-Unit-12V-8-5A-3-Speed-UN-0888C-/351494122081?hash=item51d6aeaa61&vxp=mtr that has 4ea. - 2.25" openings. 2 for the OEM dash vents and 2 for the defrost. No way to isolate them so it would always blow thru all 4 but that is not a problem unless you like foggy windscreens. (IMG:style_emoticons/default/lol-2.gif) The challenge is that the unit is 12" deep which doesn't leave any wiggle room and you can't lay the unit on it's back to aim those outlets upwards. (IMG:style_emoticons/default/mad.gif) I think it is doable but I'm concerned about the units longevity as well. (IMG:style_emoticons/default/idea.gif) This is the unit I will use. Heating and cooling! (IMG:style_emoticons/default/piratenanner.gif) http://www.ebay.com/itm/130609850519?_trksid=p2055119.m1438.l2649&ssPageName=STRK%3AMEBIDX%3AIT I will need to trim a tad bit off of the console to fit. A bit more on the right side than left. But take a close look at the pic and you can see the 2 openings on top for the defrost. Those openings end up dead center beneath the defrost vents so that will be convenient. (IMG:style_emoticons/default/beerchug.gif) Look for many screw ups along the way. You remember my fiasco with the gages. (IMG:style_emoticons/default/chair.gif) QUOTE(JRust @ Aug 27 2015, 12:08 PM) I was just considering running the lines through the long on the passenger side. Good to see that coming together Kent! I need to get mine going. Was hoping to have it done for Red Rocks. Doubtful with it off for paint now. I'll get it back less than a week before I leave. So I will probably just finish my center console & deal with the a/c over the winter (IMG:style_emoticons/default/dry.gif) Jamie, you can run behind the valance on either side or in the long. And the std barrier hose would fit w/o kinking. Just make sure it is the same side as the AC connections on your evaporator. I still need to run some water lines for the heater. I may run them up the tunnel or use the drivers side valance. They won't put off any heat unless I am using the heat. Then it becomes a moot point. GM has a nice 4 port heater valve. It's vacuum actuated so you need a vacuum solenoid as well. About $50 for the both of them. |
 |
|
| 914forme |
Aug 29 2015, 11:32 AM
Post
#603
|
|
Times a wastin', get wrenchin'! Group: Members Posts: 3,896 Joined: 24-July 04 From: Dayton, Ohio Member No.: 2,388 Region Association: None |
Then I could do some cutting and welding to make it fit. Another evaporator that caught my eye is a cheap $60 Chinese unit http://www.ebay.com/itm/Universal-Under-Da...a61&vxp=mtr that has 4ea. - 2.25" openings. 2 for the OEM dash vents and 2 for the defrost. No way to isolate them so it would always blow thru all 4 but that is not a problem unless you like foggy windscreens.
I just bought that one to try, does not fit. Should require more cutting than the GenII unit would. 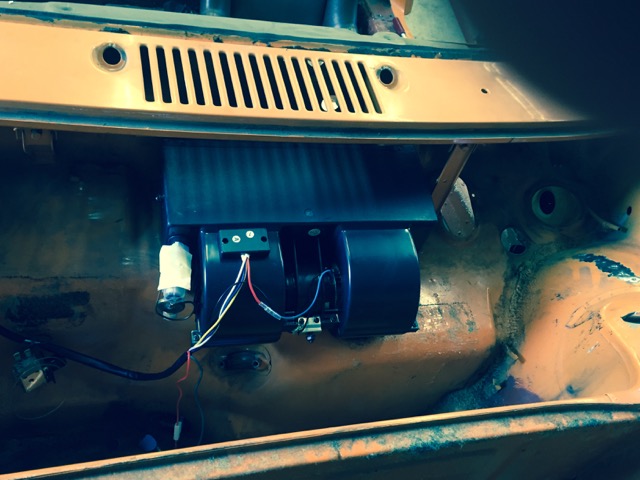 If I gave up on the idea of keeping the tock gas tank and when for a fuel cell, then I might not have all these issues. I would have other to deal with, but not this one. Under dash certainly solves the problem, but then it clutters up the 914 cabin. I have started to think, even though I don't like them a center console could give me the space I need for all the modern getting soft niceties. (IMG:style_emoticons/default/beer.gif) Don't get me wrong, I like driving with out sweet rings and a wet back. I like not getting swamp ass after a long trip, and I really like after on those cool fall mornings not having to drive a 914 in a parka on my way to an event. I would love for an under cowl unit to be made and maybe I should just get back to body work, but part of that for me is sanitary line running and getting the provision done before I put a finish coat of paint on the car. Heck it would be nice to keep it in epoxy primer as much as I change my car. (IMG:style_emoticons/default/idea.gif) Rat rod here I come. (IMG:style_emoticons/default/lol-2.gif) At least it would be one color! |
|
|
|
| 914forme |
Aug 29 2015, 11:33 AM
Post
#604
|
|
Times a wastin', get wrenchin'! Group: Members Posts: 3,896 Joined: 24-July 04 From: Dayton, Ohio Member No.: 2,388 Region Association: None |
Forgot to say thanks for the bracket, made it here safely. (IMG:style_emoticons/default/beerchug.gif)
|
|
|
|
| 914forme |
Aug 29 2015, 11:46 AM
Post
#605
|
|
Times a wastin', get wrenchin'! Group: Members Posts: 3,896 Joined: 24-July 04 From: Dayton, Ohio Member No.: 2,388 Region Association: None |
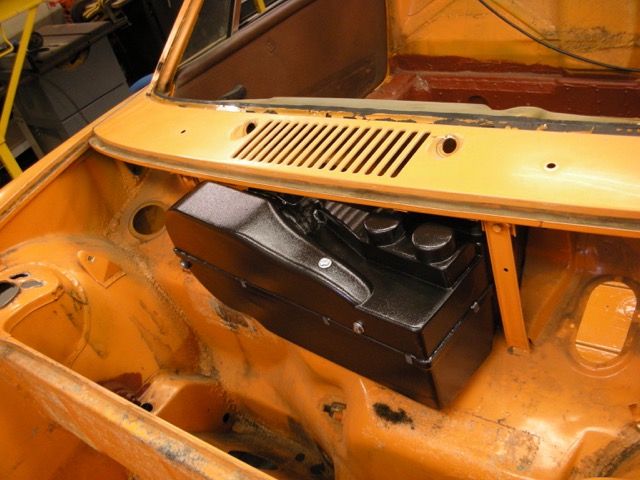
And here is the mockup GenII Micro unit in a 914, as Kent said, minor issue with fitment. In reality until I have one in my hands, I don't know how close it is, but I am thinking you could move the fan, over some and duct it back into the unit. Might get by with very little cutting at that point and still run the stock gas tank.
 |
|
|
|
| 76-914 |
Aug 29 2015, 07:42 PM
Post
#606
|
|
Repeat Offender & Resident Subaru Antagonist Group: Members Posts: 13,836 Joined: 23-January 09 From: Temecula, CA Member No.: 9,964 Region Association: Southern California |
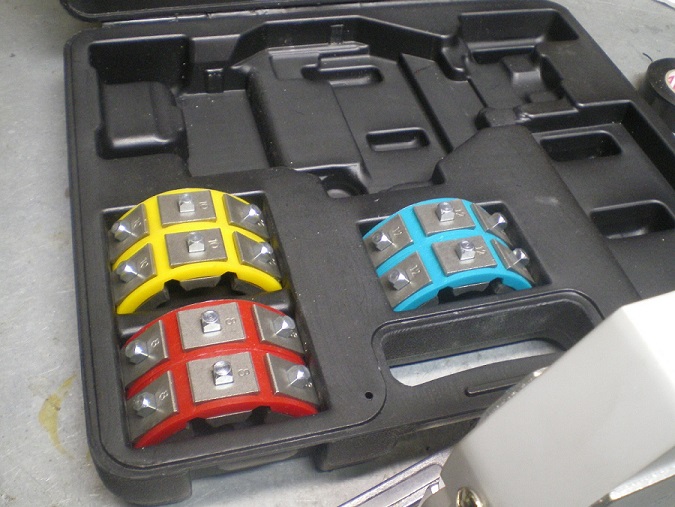
I decided to buy one of these for a couple of reasons. I knew I would make umpteen trips if I went to some company and that would get old quick. It came in a nice case with #6,8,10 & 12 dies. Reduced barrier dies are available and not included with this kit. This is their entry level model and if I did this for a living I would spring for their Hydraulic hand pump kit. That sucker can fit anywhere.
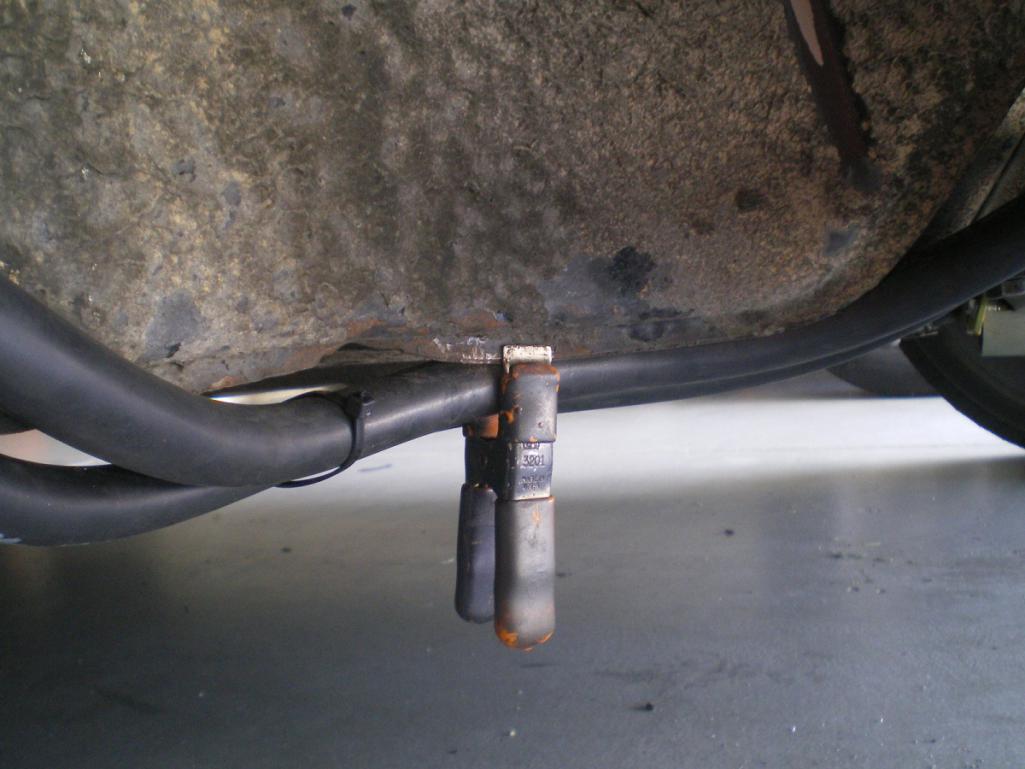
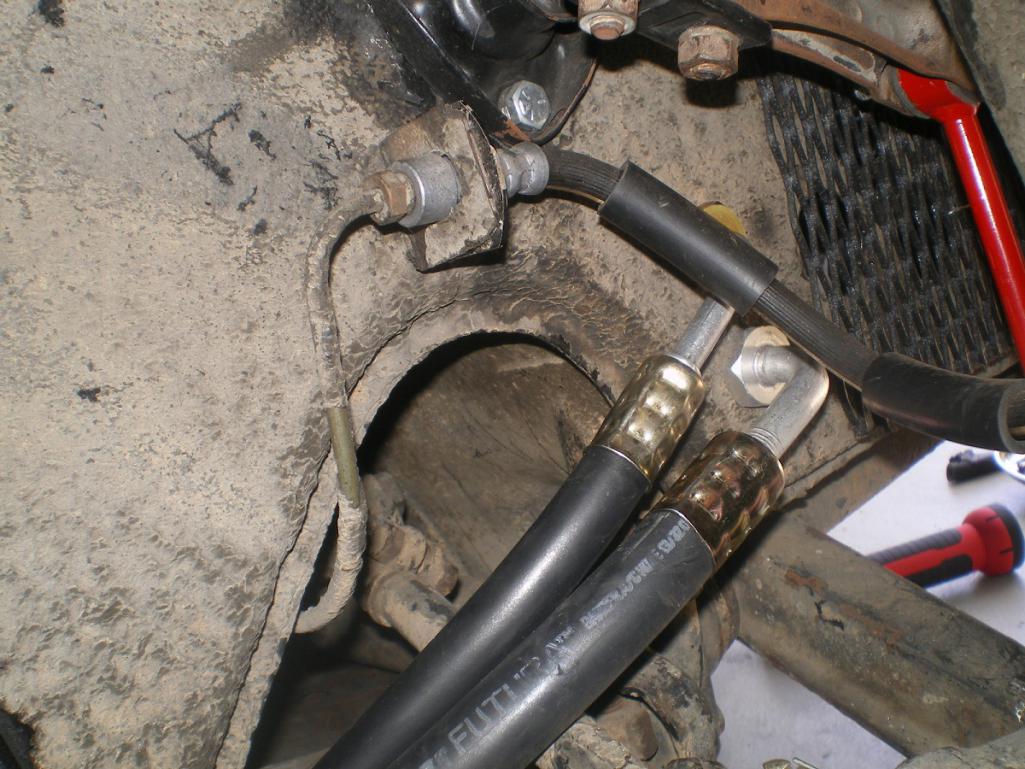
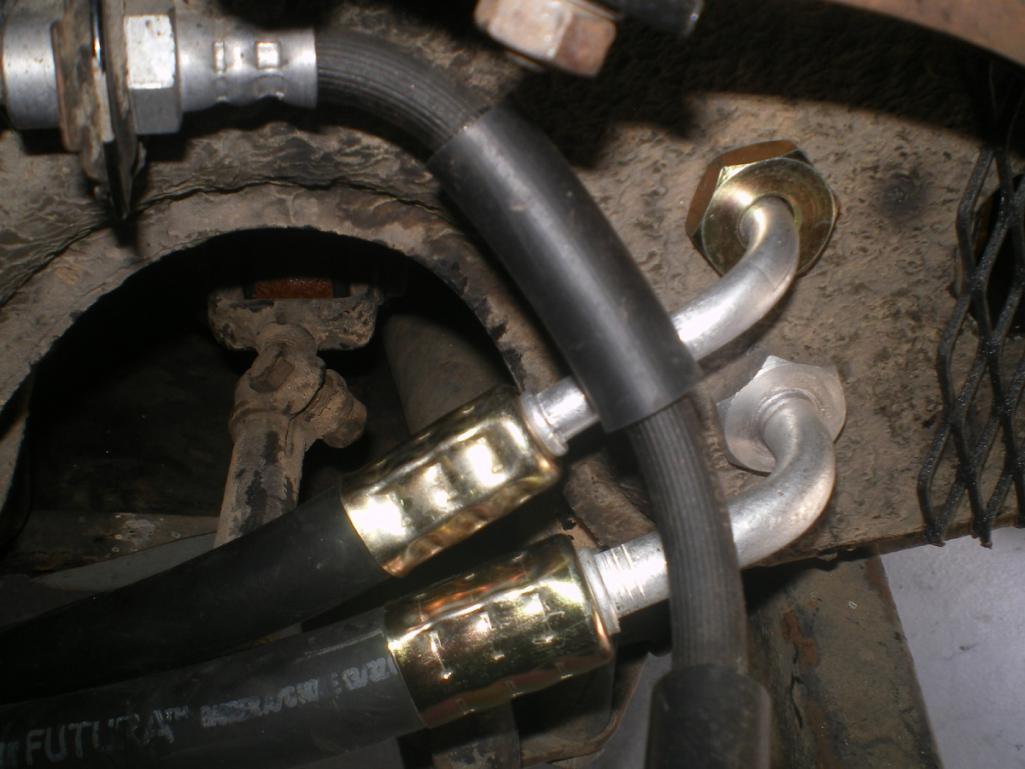
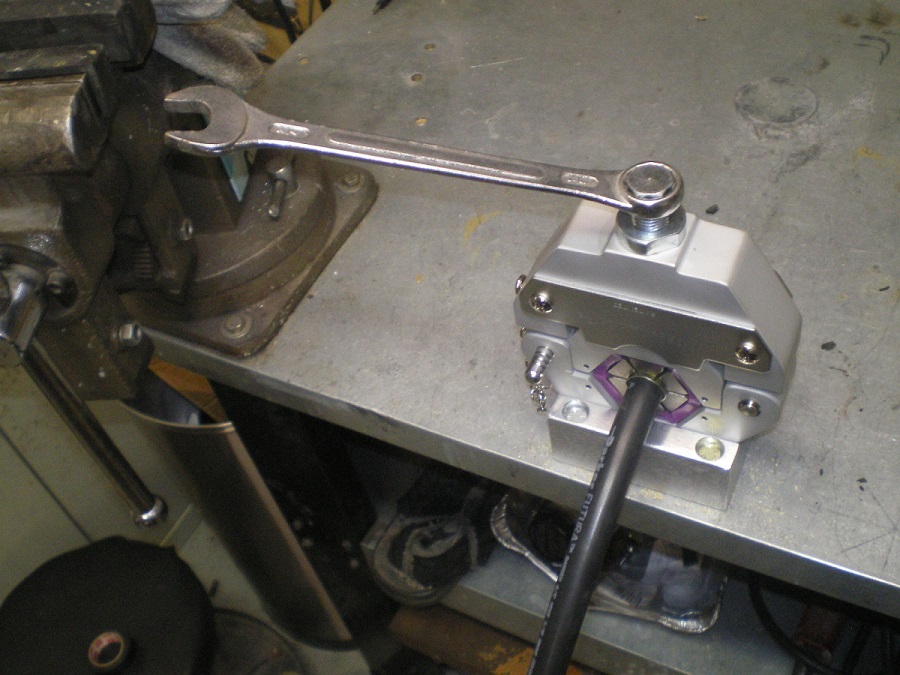 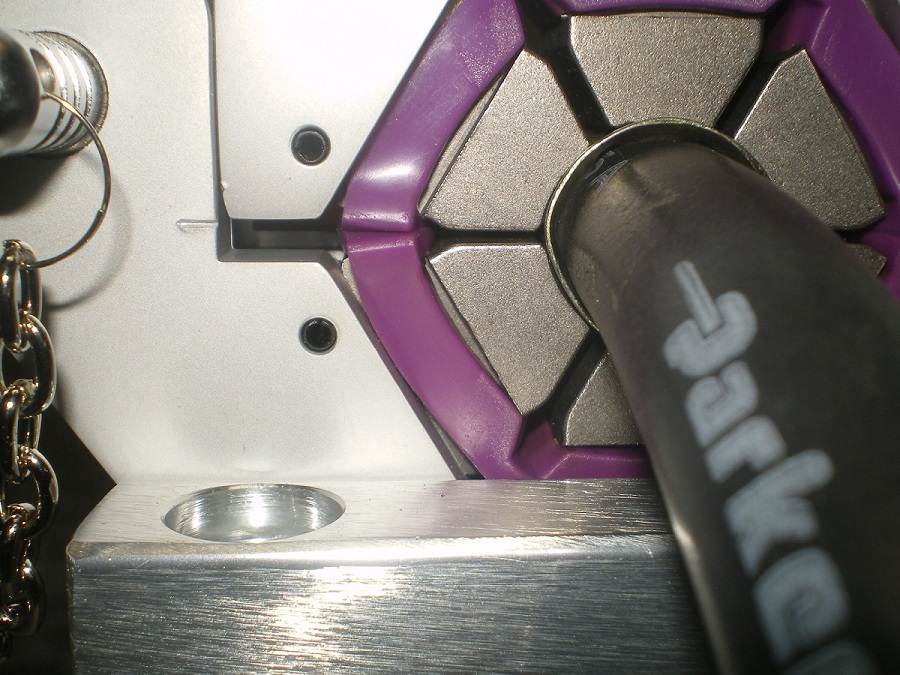  I needed to make something so I could use this as a portable device as well. So I mounted it on a piece of 2" tube to give me some leverage when tightening. 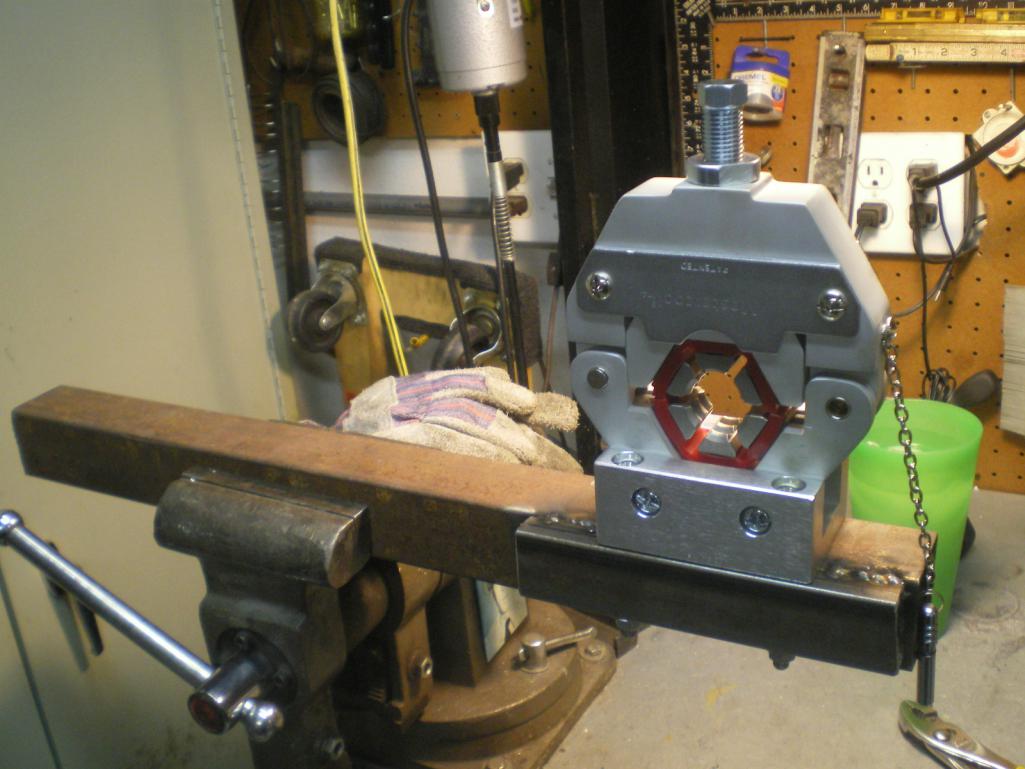 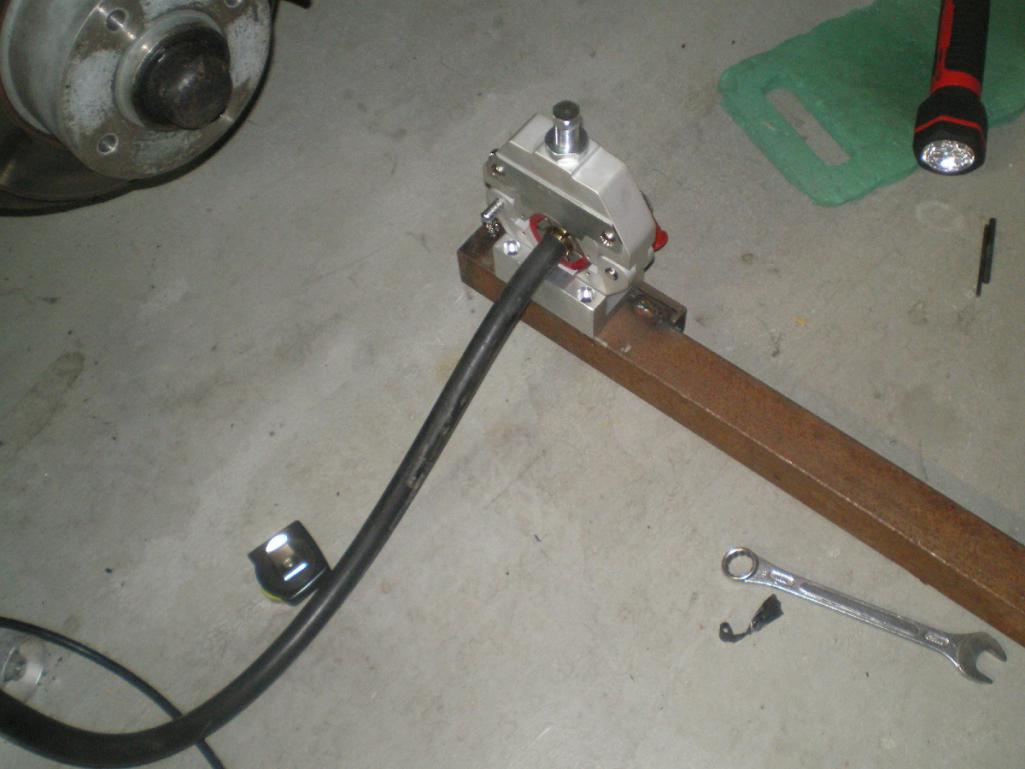 This is the best reason to purchase one of these tools. This is a trick the Pros use. By twisting the hose you can get it to conform to bends w/ very little manipulation. The other end is a bulkhead fitting and crimped 90 degrees off so that when it is twisted to penetrate the front trunk it twists the hose. This twist makes the hose follow the seam that the hose is clamped to. It would be a Bitch to take the hose to someone and hope they got it correct. And I would need huge holes to pull the hose thru if fittings were installed beforehand. 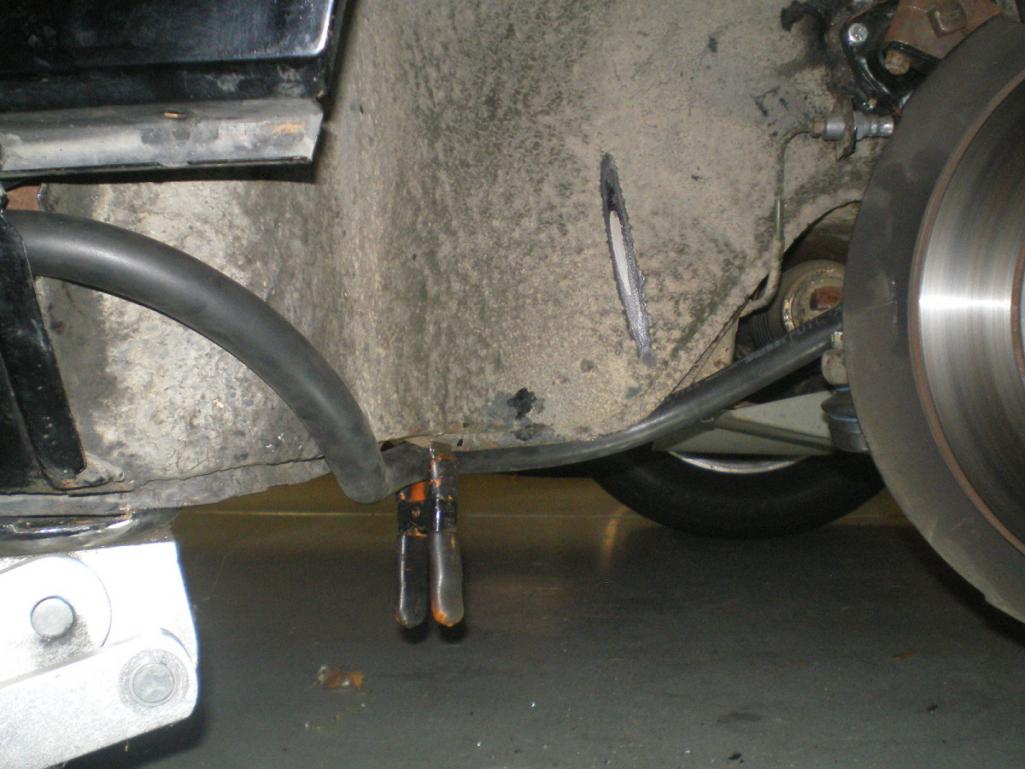 The #8 bulkhead fitting from the wheel well side. 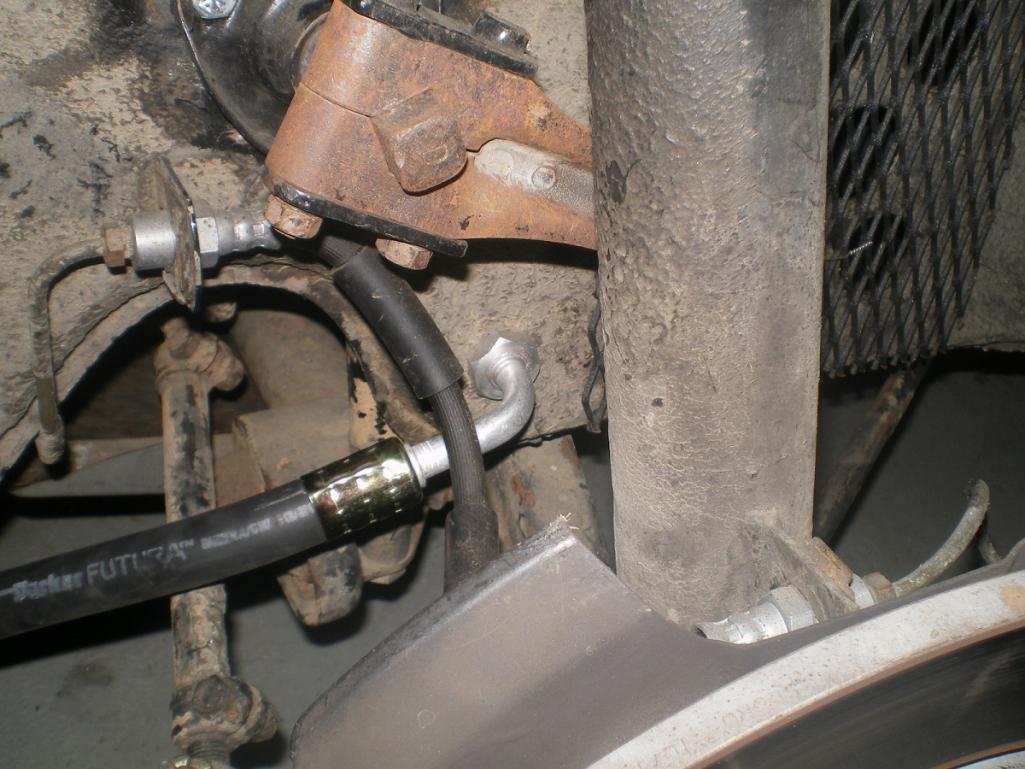 And from the trunk side. 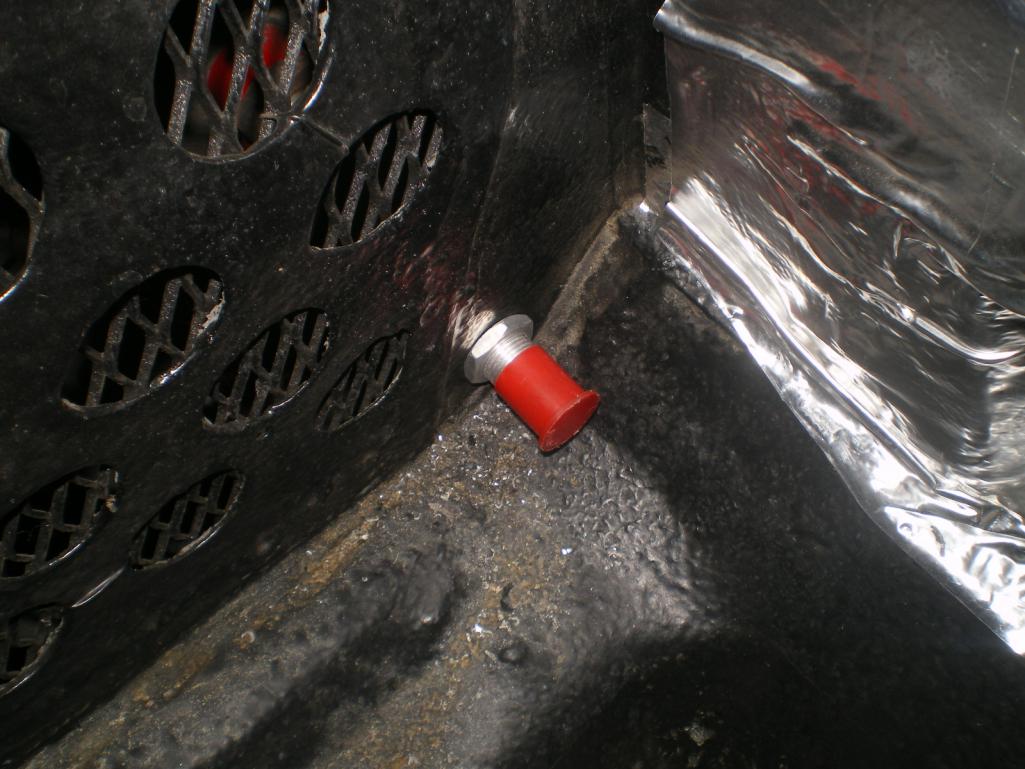 |
|
|
|
| 76-914 |
Aug 29 2015, 07:44 PM
Post
#607
|
|
Repeat Offender & Resident Subaru Antagonist Group: Members Posts: 13,836 Joined: 23-January 09 From: Temecula, CA Member No.: 9,964 Region Association: Southern California |
And a few more.
  |
|
|
|
| 914forme |
Aug 29 2015, 07:48 PM
Post
#608
|
|
Times a wastin', get wrenchin'! Group: Members Posts: 3,896 Joined: 24-July 04 From: Dayton, Ohio Member No.: 2,388 Region Association: None |
Oh wow another tool to buy, unless you want to recoup some of your investment, I, have an addiction, (IMG:style_emoticons/default/poke.gif) feed the addict!!! (IMG:style_emoticons/default/chowtime.gif)
Found it Oh they have brake line and AN flaring tools also. (IMG:style_emoticons/default/drooley.gif) |
|
|
|
| Andyrew |
Aug 30 2015, 08:08 AM
Post
#609
|
|
Spooling.... Please wait Group: Members Posts: 13,380 Joined: 20-January 03 From: Riverbank, Ca Member No.: 172 Region Association: Northern California |
Awesome! Looks fantastic!
Let me know if you want to sell it when your done! |
|
|
|
| JRust |
Aug 30 2015, 01:59 PM
Post
#610
|
|
914 Guru Group: Members Posts: 6,317 Joined: 10-January 03 From: Albany Oregon Member No.: 129 Region Association: Pacific Northwest |
I may just have to come visit to have you do the lines for mine (IMG:style_emoticons/default/evilgrin.gif)
|
|
|
|
| 76-914 |
Aug 30 2015, 05:02 PM
Post
#611
|
|
Repeat Offender & Resident Subaru Antagonist Group: Members Posts: 13,836 Joined: 23-January 09 From: Temecula, CA Member No.: 9,964 Region Association: Southern California |
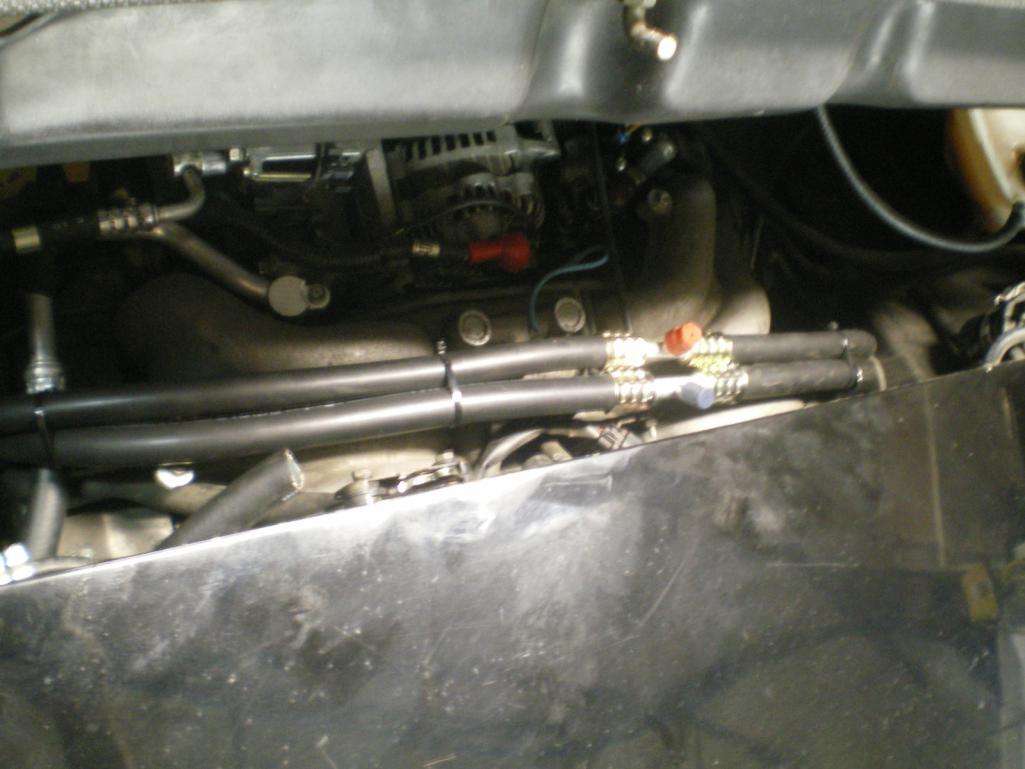
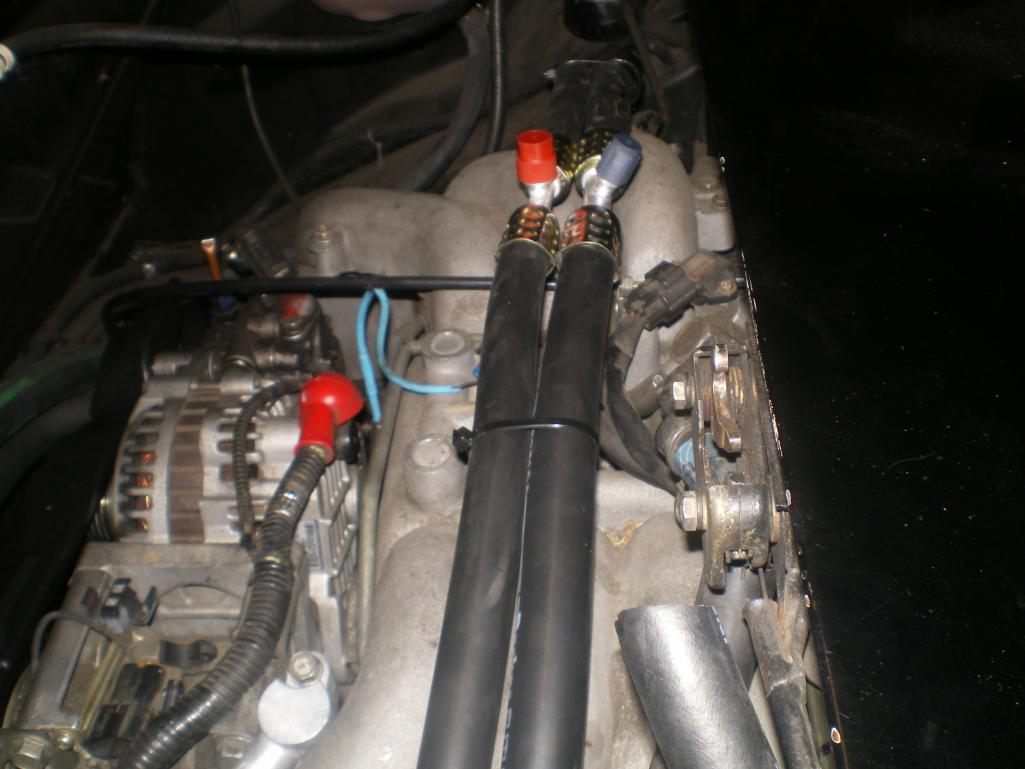
QUOTE(914forme @ Aug 29 2015, 06:48 PM) Oh wow another tool to buy, unless you want to recoup some of your investment, I, have an addiction, (IMG:style_emoticons/default/poke.gif) feed the addict!!! (IMG:style_emoticons/default/chowtime.gif) Found it Oh they have brake line and AN flaring tools also. (IMG:style_emoticons/default/drooley.gif) Tell me about it. Hi, my name is Kent and I'm a Tool Whore! (IMG:style_emoticons/default/lol-2.gif) (IMG:style_emoticons/default/av-943.gif) QUOTE(Andyrew @ Aug 30 2015, 07:08 AM) Awesome! Looks fantastic! Let me know if you want to sell it when your done! Thanks Andrew. I'm looking forward to watching your build. I'd rent it out to folks I know for $30 + shipping. QUOTE(JRust @ Aug 30 2015, 12:59 PM) I may just have to come visit to have you do the lines for mine (IMG:style_emoticons/default/evilgrin.gif) Anytime my friend. Let me know when your ready. And now; Back to work. This morning I mounted the dryer. A hose clamp helps hold the dryer as well as 2 O-rings. You can see the grommet in the upper left corner that the hose passes thru. I need to keep this area air tight where possible. 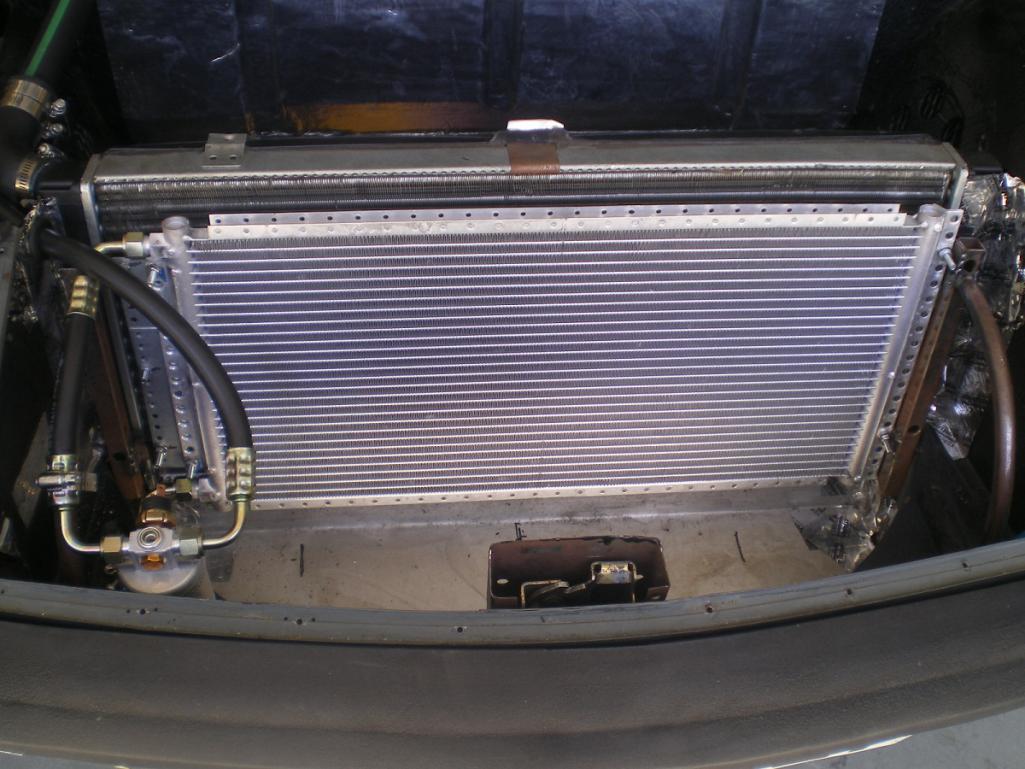 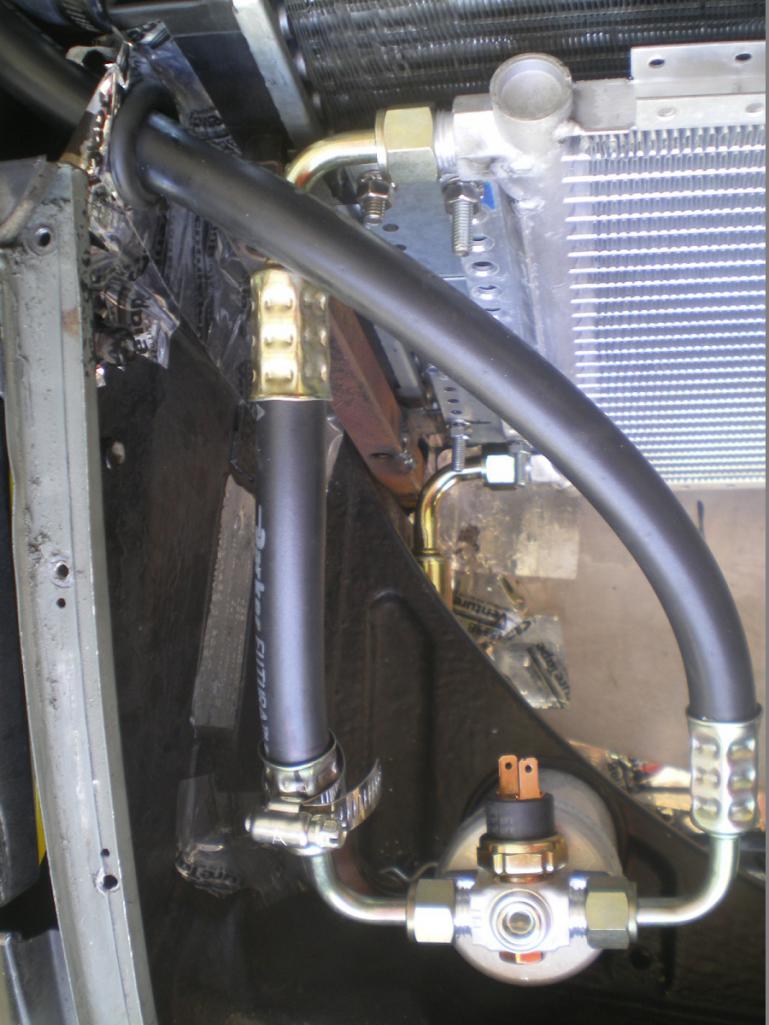 I ran out of fittings so the hose just stops at the bulkhead fitting for now. 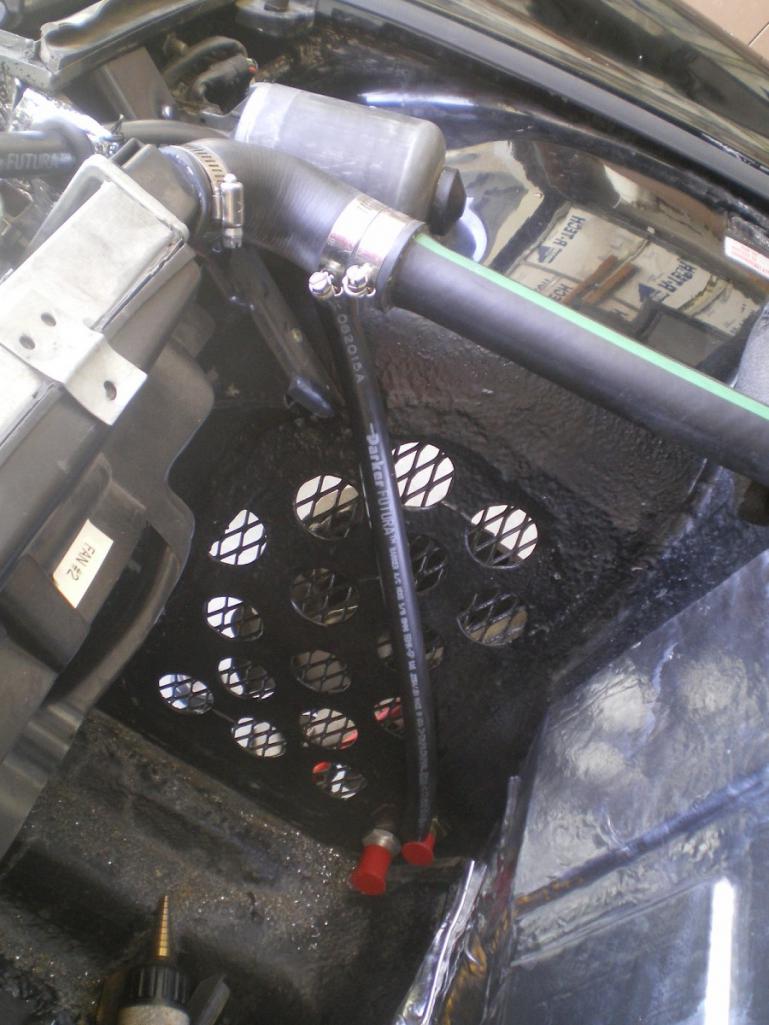 Another view after it passes thru the grommet. Getting a little crowded in this area. 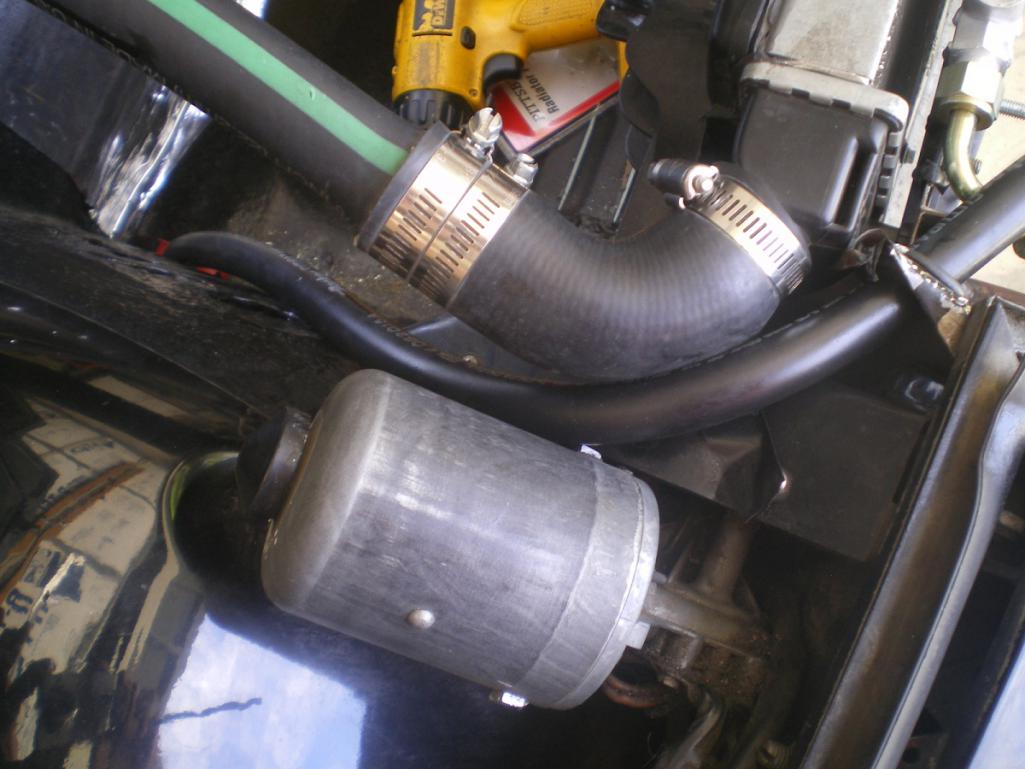 I need to find someone to weld these aluminum fittings together. Rather than use 4 fittings to go from the Subaru OEM Reduced barrier fittings on the compressor I decided to Marry 1/2 their tube to 1/2 of a beadlock fitting. It will be much tidier in the end. 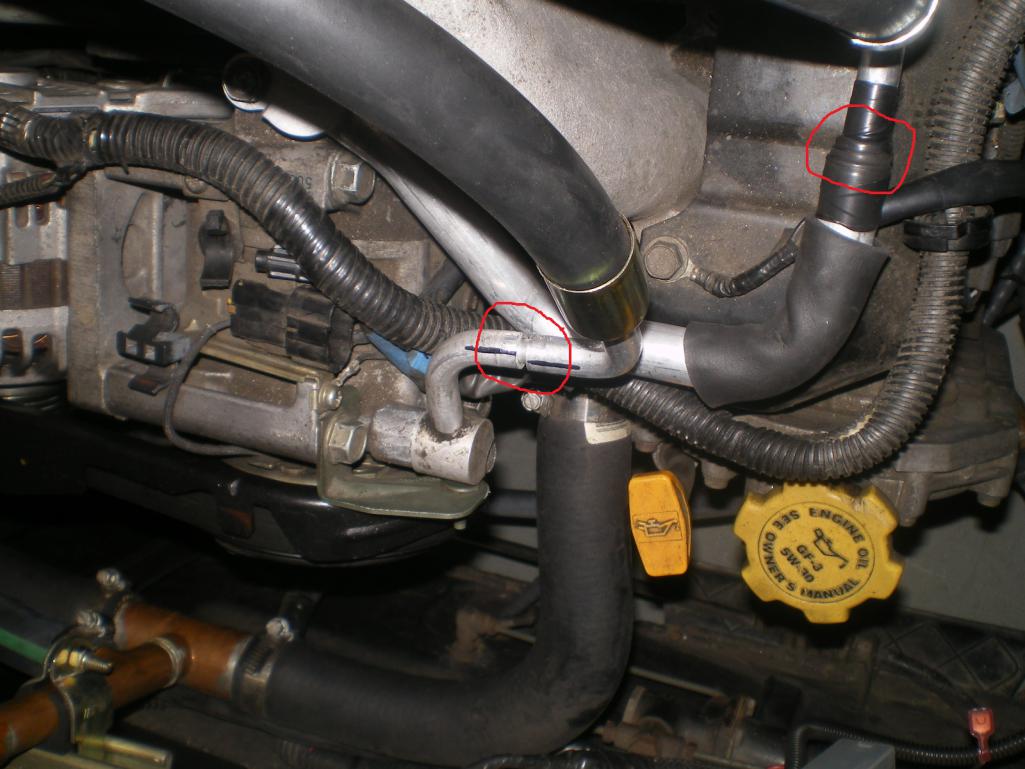 Once those are welded up I can cut these to final length and crimp these 2 fittings. 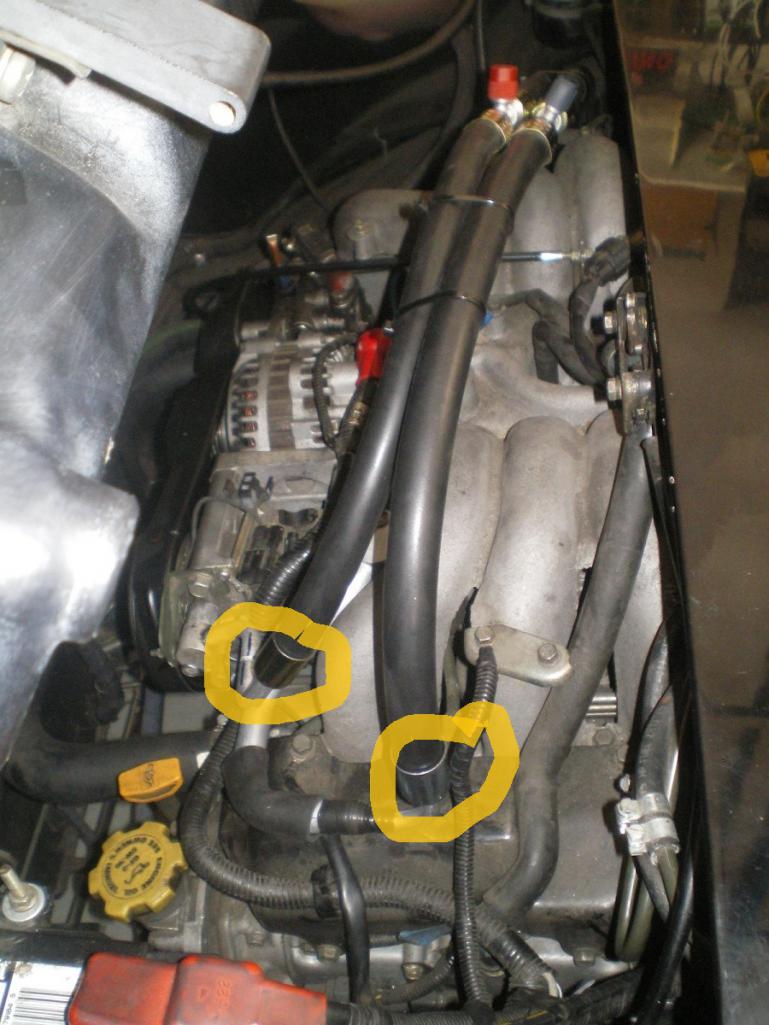 Still have the binary switch to wire in. 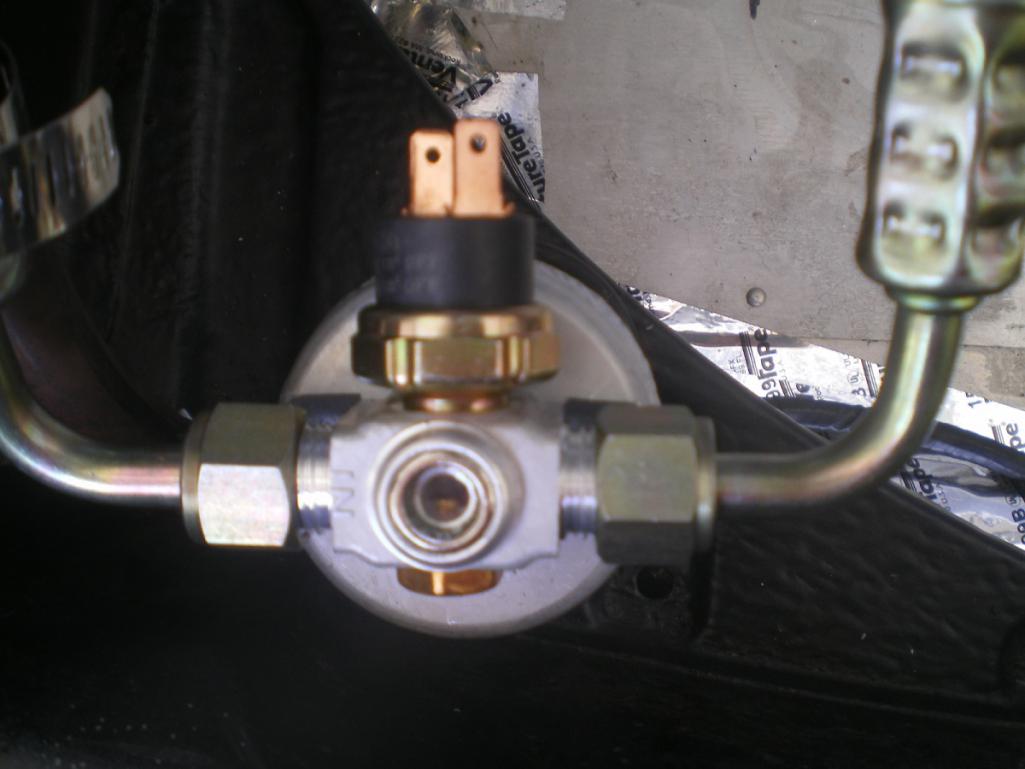 An O-Ring on both sides helps support the dryer 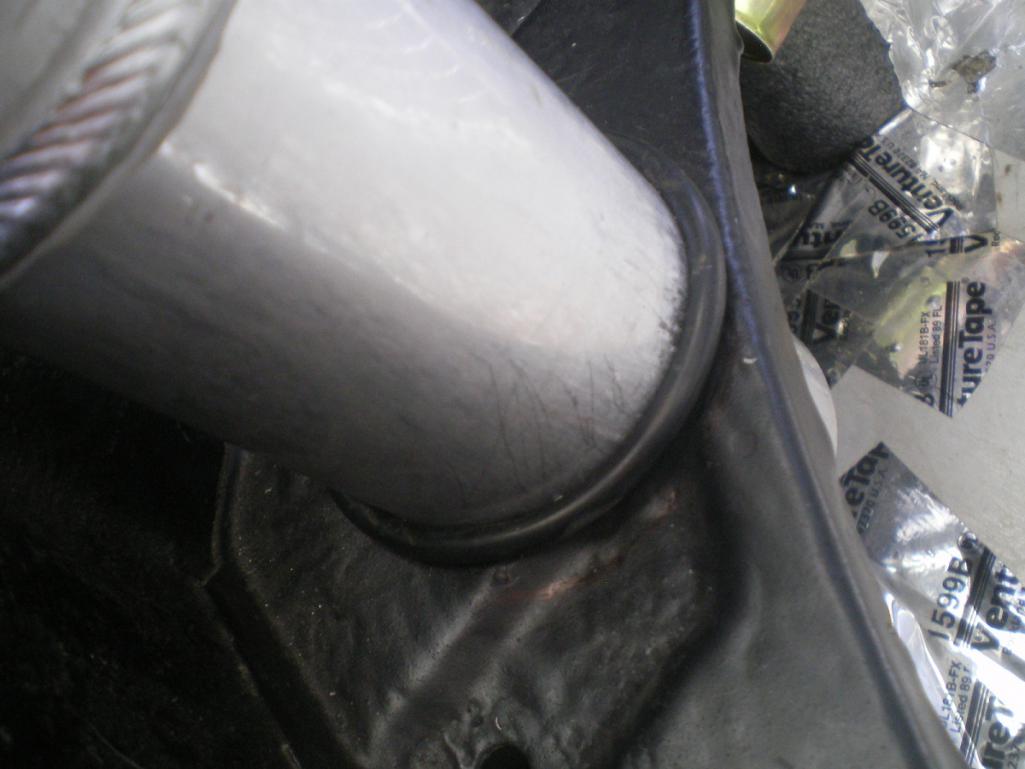 Now the hi and low lines are run together sans the Adel clamps. They should arrive next week. 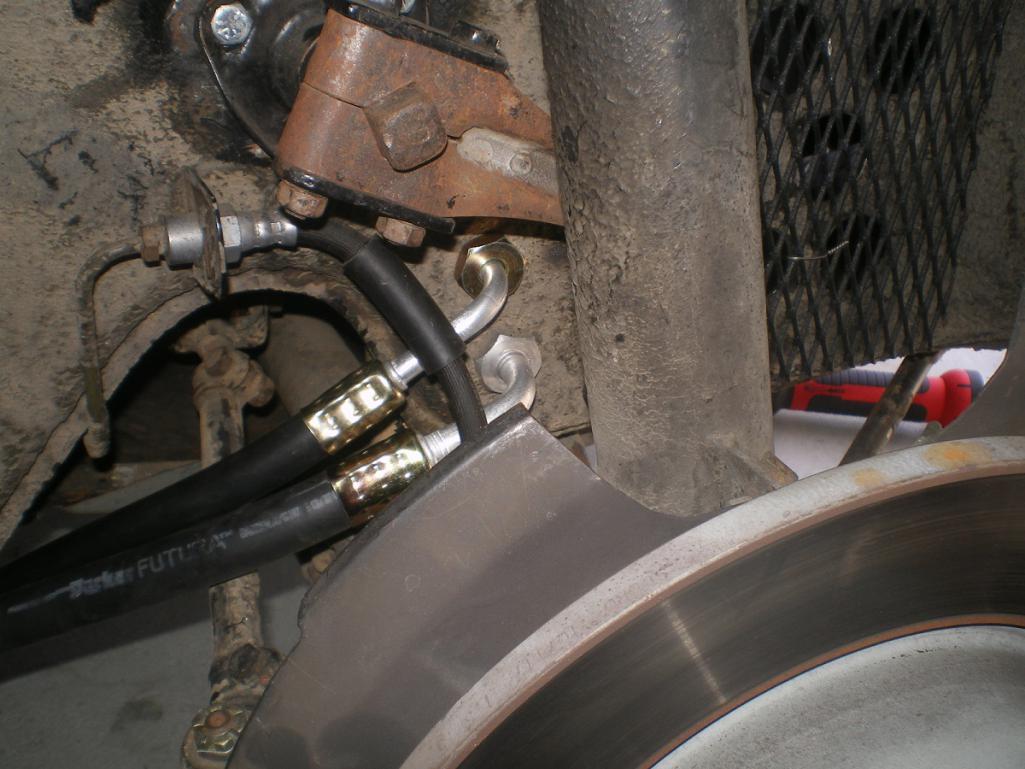 |
|
|
|
| 76-914 |
Aug 30 2015, 05:03 PM
Post
#612
|
|
Repeat Offender & Resident Subaru Antagonist Group: Members Posts: 13,836 Joined: 23-January 09 From: Temecula, CA Member No.: 9,964 Region Association: Southern California |
cont'd.
   And I need 2 more bulkhead fittings to get these 2 open hoses into the cabin and tied into the evaporator. More after I receive some more fittings. (IMG:style_emoticons/default/beerchug.gif) 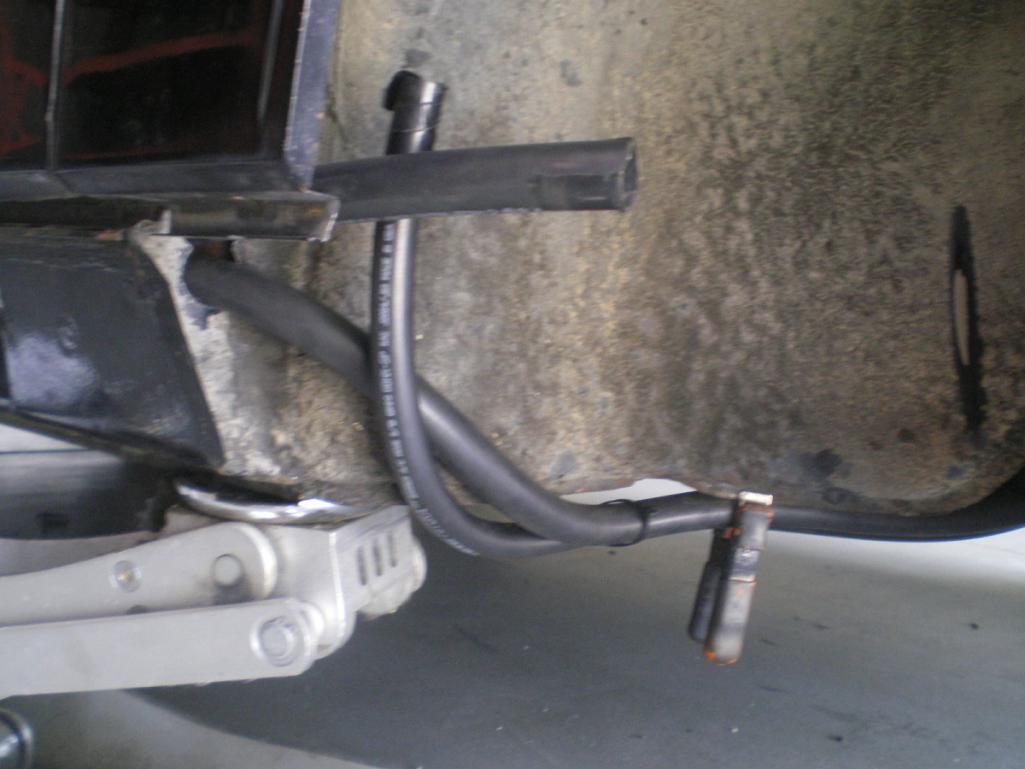 |
|
|
|
| Andyrew |
Aug 30 2015, 10:49 PM
Post
#613
|
|
Spooling.... Please wait Group: Members Posts: 13,380 Joined: 20-January 03 From: Riverbank, Ca Member No.: 172 Region Association: Northern California |
I will take you up on that!
Great looking build! I thinking going to run my lines through the heater hose tunnel. My car was a dealer AC car so I have the provisions on the pass side but I think I would rather do it this way, save from running them near the wheels. What condenser did you go with? |
|
|
|
| 76-914 |
Aug 31 2015, 08:57 AM
Post
#614
|
|
Repeat Offender & Resident Subaru Antagonist Group: Members Posts: 13,836 Joined: 23-January 09 From: Temecula, CA Member No.: 9,964 Region Association: Southern California |
QUOTE(Andyrew @ Aug 30 2015, 09:49 PM) I will take you up on that! Great looking build! I thinking going to run my lines through the heater hose tunnel. My car was a dealer AC car so I have the provisions on the pass side but I think I would rather do it this way, save from running them near the wheels. What condenser did you go with? Just holler when your ready, Andy. I think that's a great area to run your lines thru the longs. That wasn't an option for me as I used the longs for radiator lines. I may try to "sneak" the water lines for the heater up thru the tunnel, though. If I use some SS braided hose I may have enough space but crap that stuff is $$$$. Why is shiny car (IMG:style_emoticons/default/stromberg.gif) expensive? Inferior minds want to know. (IMG:style_emoticons/default/biggrin.gif) |
|
|
|
| 76-914 |
Sep 2 2015, 07:14 PM
Post
#615
|
|
Repeat Offender & Resident Subaru Antagonist Group: Members Posts: 13,836 Joined: 23-January 09 From: Temecula, CA Member No.: 9,964 Region Association: Southern California |
Forgot to answer Andrew's question. It's the OG compressor, came with the donor car, an LL Bean.
Look what was waiting on me when I got home today. (IMG:style_emoticons/default/piratenanner.gif) (IMG:style_emoticons/default/cheer.gif) Man am I impressed. Talk about "under promise, over deliver"! I can't recall the last time I received a product so complete and professionally made. BTW, Made in the San Antonio, TX. Even the ABS cover is made in in house. All relays, solenoids, hose, hangers are included. I can't detect China on it anywhere. And, if you need support, have a question or whatever you talk to one of their in house techs for free. A+ product, A+ service. Now I'm starting to get a picture of what is in store for me. Bob (BIGKAT83) tried to warn me. (IMG:style_emoticons/default/dry.gif) . 1st order is to pull the old fresh air/heater box as it will not be needed. Anybody need one? Then out come the seats, carpet and console, again. Re-configure the glove box to pick up another 2" of passenger leg room and the console to accept the evap unit, remove the dash (IIRC 4th in Mikey's line (IMG:style_emoticons/default/sunglasses.gif) ), tie defrost and panel vents into the new evaporator, run vacuum lines/reservoir and everything else I'm forgetting. If I'm finished in 3 weeks I will be happy. (IMG:style_emoticons/default/beerchug.gif) 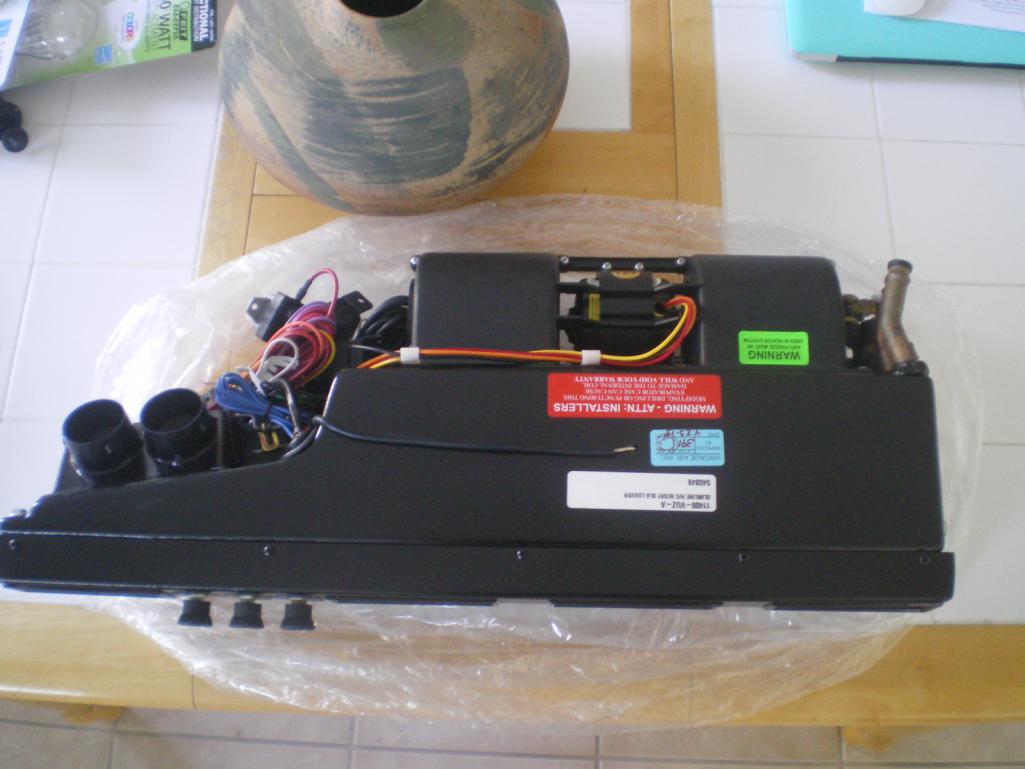 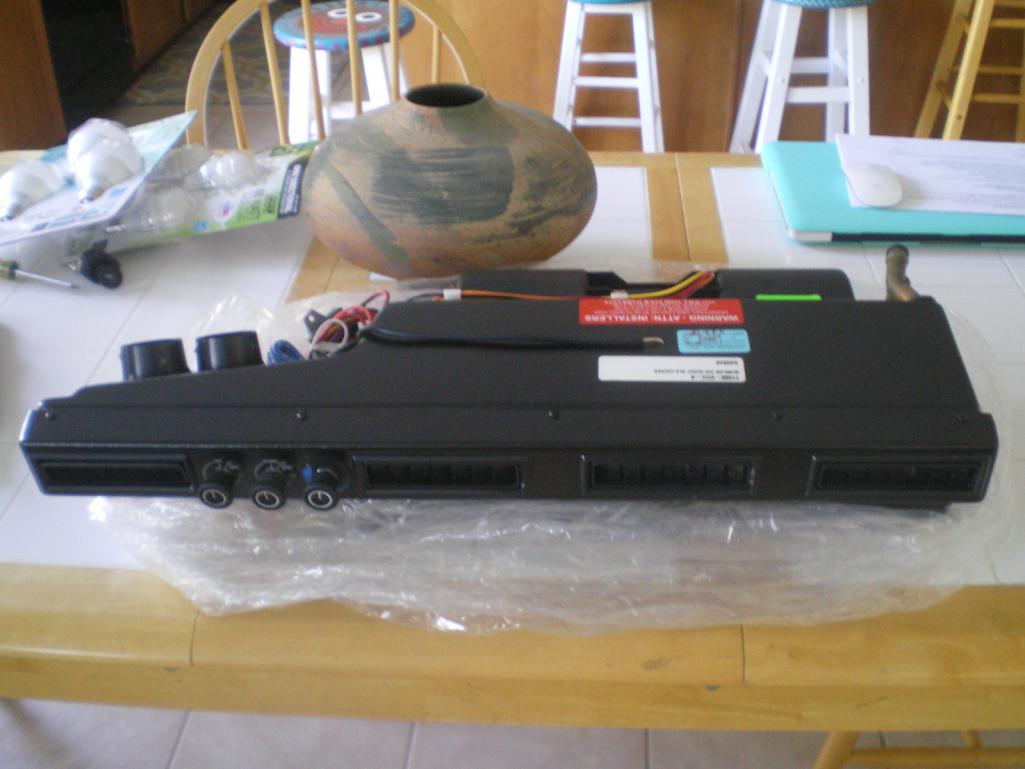  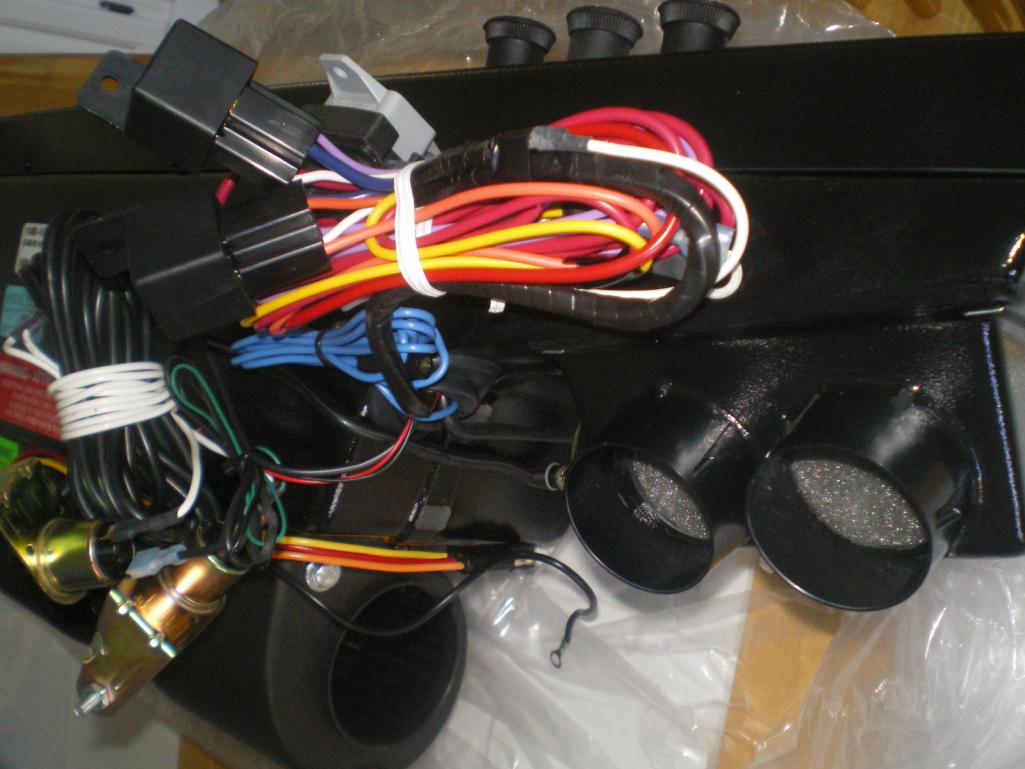 |
|
|
|
| JRust |
Sep 2 2015, 07:21 PM
Post
#616
|
|
914 Guru Group: Members Posts: 6,317 Joined: 10-January 03 From: Albany Oregon Member No.: 129 Region Association: Pacific Northwest |
QUOTE(76-914 @ Aug 31 2015, 07:57 AM) I may try to "sneak" the water lines for the heater up thru the tunnel, though. Why? Just tap into your hot line to your radiator. Add a T fitting & you have your hot water for heat up front |
|
|
|
| euro911 |
Sep 2 2015, 07:55 PM
Post
#617
|
|
Retired & living the dream. God help me if I wake up! Group: Members Posts: 8,937 Joined: 2-December 06 From: So.Cal. & No.AZ (USA) Member No.: 7,300 Region Association: Southern California |
QUOTE(76-914 @ Sep 2 2015, 06:14 PM) ... 1st order is to pull the old fresh air/heater box as it will not be needed. Anybody need one? That's a nice looking under-dash unit.Does your 'old' fresh air box include the fan unit? ... and does the fan work on all 3 speeds? Mine only works on the medium setting (IMG:style_emoticons/default/dry.gif) If so, and nobody else NEEDS it, I'll throw my hat in the ring (IMG:style_emoticons/default/confused24.gif) |
|
|
|
| 914forme |
Sep 2 2015, 08:17 PM
Post
#618
|
|
Times a wastin', get wrenchin'! Group: Members Posts: 3,896 Joined: 24-July 04 From: Dayton, Ohio Member No.: 2,388 Region Association: None |
I did not realize these require vac, I thought it used electric for the servos (IMG:style_emoticons/default/confused24.gif)
|
|
|
|
| 76-914 |
Sep 2 2015, 09:19 PM
Post
#619
|
|
Repeat Offender & Resident Subaru Antagonist Group: Members Posts: 13,836 Joined: 23-January 09 From: Temecula, CA Member No.: 9,964 Region Association: Southern California |
QUOTE(JRust @ Sep 2 2015, 06:21 PM) QUOTE(76-914 @ Aug 31 2015, 07:57 AM) I may try to "sneak" the water lines for the heater up thru the tunnel, though. Why? Just tap into your hot line to your radiator. Add a T fitting & you have your hot water for heat up front Good question, Jamie. I want to use the Subaru Heater loop as it was intended but primarily to gain extra volume and to keep hot water out of the pipes unless it's called for. In the next few weeks you'll see the GM 4 port bypass valve I'm using and it only has 1 moving part. It's vacuum actuated as well. I believe I would need 2 tees to tap into those lines; supply/return and the piping takes up valuable real estate. If I use #10 SS braided hose I will have room above the tunnel because of my armrest and console. QUOTE(euro911 @ Sep 2 2015, 06:55 PM) QUOTE(76-914 @ Sep 2 2015, 06:14 PM) ... 1st order is to pull the old fresh air/heater box as it will not be needed. Anybody need one? That's a nice looking under-dash unit.Does your 'old' fresh air box include the fan unit? ... and does the fan work on all 3 speeds? Mine only works on the medium setting (IMG:style_emoticons/default/dry.gif) If so, and nobody else NEEDS it, I'll throw my hat in the ring (IMG:style_emoticons/default/confused24.gif) TY. Probably not. If it does work on all three speeds I wouldn't know it. I can't even hear myself Fart, anymore. QUOTE(914forme @ Sep 2 2015, 07:17 PM) I did not realize these require vac, I thought it used electric for the servos (IMG:style_emoticons/default/confused24.gif) Steve, the defrost gate/door is vacuum actuated and the heater control valve they ship is vacuum actuated. As I mentioned to Jamie, I am using another heater valve but I will use the vacuum solenoid they provided. I'm thinking I need to add a vacuum reservoir in the engine bay then run a 3mm vacuum line up the tunnel. (IMG:style_emoticons/default/beerchug.gif) |
|
|
|
| mgp4591 |
Sep 3 2015, 12:20 AM
Post
#620
|
|
914 Guru Group: Members Posts: 5,851 Joined: 1-August 12 From: Salt Lake City Ut Member No.: 14,748 Region Association: Intermountain Region |
I looked at the link you provided and at the bottom it looked like they advertised it as a Vintage Air unit- same controls, same price at $345. That's the one or is it a different manufacturer? Looks pretty slick! If you keep the heater valve closed, you shouldn't have any hot water running through your system so unless I'm figuring wrong, you should be able to tap into your hot side radiator plumbing without unnecessary hot water heating up your cabin. You'd eliminate a lot of extra tubing and work if you could, but then you knew that... just trying to help because I'm looking at a similar setup and your work is an inspiration- nice to be able to pick anothers' brain via the Interweb!
|
|
|
|
|
1 User(s) are reading this topic (1 Guests and 0 Anonymous Users)
0 Members:

|
Lo-Fi Version | Time is now: 10th January 2026 - 06:00 PM |
Invision Power Board
v9.1.4 © 2026 IPS, Inc.