|
|
|
Porsche, and the Porsche crest are registered trademarks of Dr. Ing. h.c. F. Porsche AG.
This site is not affiliated with Porsche in any way. Its only purpose is to provide an online forum for car enthusiasts. All other trademarks are property of their respective owners. |
|
|

  |

| Chris H. |
 Mar 27 2016, 08:17 PM Mar 27 2016, 08:17 PM
Post
#721
|
|
Senior Member  Group: Members Posts: 4,090 Joined: 2-January 03 From: Chicago 'burbs Member No.: 73 Region Association: Upper MidWest |
(IMG:style_emoticons/default/biggrin.gif) Yeah it's easy to adjust. Mine was set at 165...and the controller is designed to turn off after the system cools down 10 degrees. So...highly unlikely the fans are strong enough to cool the system down to 155. They would stay on until the car was shut off. What are you gonna set it at? 185? 190? Just eyeball your gauge for the middle? I remember the SVX gauge stayed EXACTLY between C and H.
|
   |

 
|
| 76-914 |
Mar 28 2016, 09:27 AM
Post
#722
|
|
Repeat Offender & Resident Subaru Antagonist Group: Members Posts: 13,905 Joined: 23-January 09 From: Temecula, CA Member No.: 9,964 Region Association: Southern California |
I've only adjusted it once so far, Chris. I just turned the screw until the fans shut down since the gage was centered at that moment. I'm not going to do any serious adjusting until it warms up a bit and the AC is in full swing. I can check temps with an IR thermometer at the copper tee later and dial it in. Yesterday, I discovered that an AC line was contacting the R side tie rod when the wheel was turned completely to the right so I rerouted those lines.
|
|
|
|
| Chris H. |
Aug 7 2016, 11:22 AM
Post
#723
|
|
Senior Member Group: Members Posts: 4,090 Joined: 2-January 03 From: Chicago 'burbs Member No.: 73 Region Association: Upper MidWest |
Alright, hose update. Got my 1.25 installed and all is well so far.
Kent here are some pics and info for your install: Tips: - The 1.25 is a STRETCH to get onto the radiator inlet/outlet but hot water and dish soap and they will fit. Might have the same experience on the engine end but be patient. - The larger hose is not as bendy so keep that in mind when making turns, etc. Leave extra and then trim off a little at a time if you have a 90 degree turn. - I had to X my lines because my hot line on the engine is on the passenger side and the inlet on the rad is on the drivers side. Do that in the front trunk if you have to, not underneath. Up front: 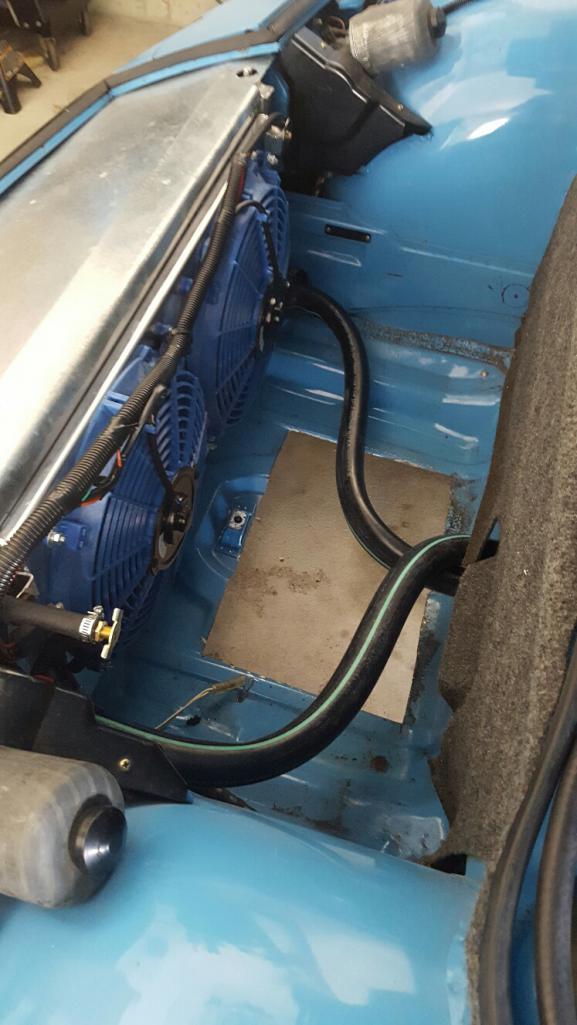 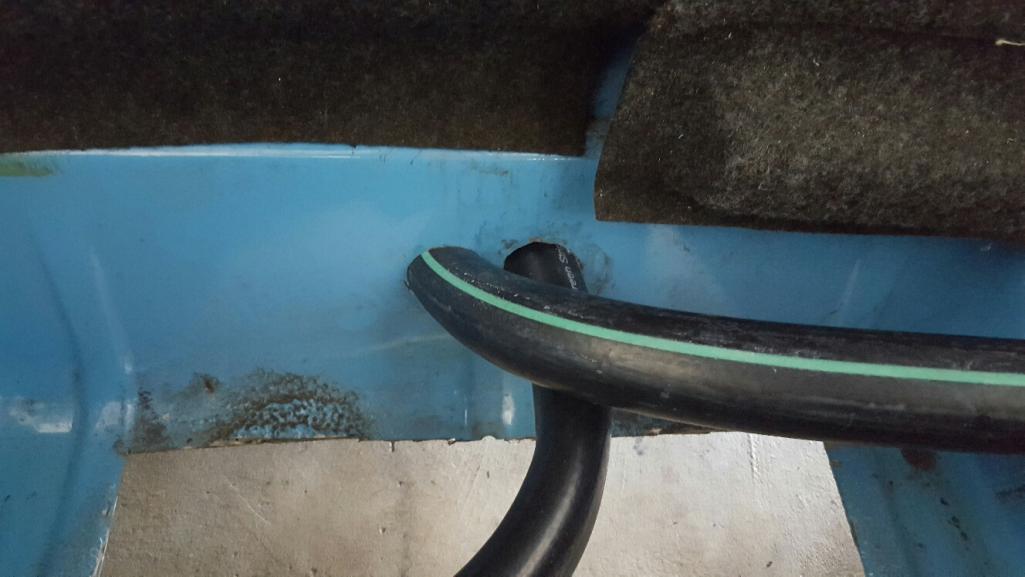 When you look underneath the car you will see that there very few places that the hoses fit through the steering rack. Basically if you locate the center of the steering rack (there is a bolt or something there), the hoses BARELY fit on either side. A lot of people just cut one hole that is oval/oblong shaped which makes sense. One will pass VERY close to the clutch setup, touching it most likely. That is the only route that allows you to easily line the hoses up in the recesses in the middle of the car. Examples for you: 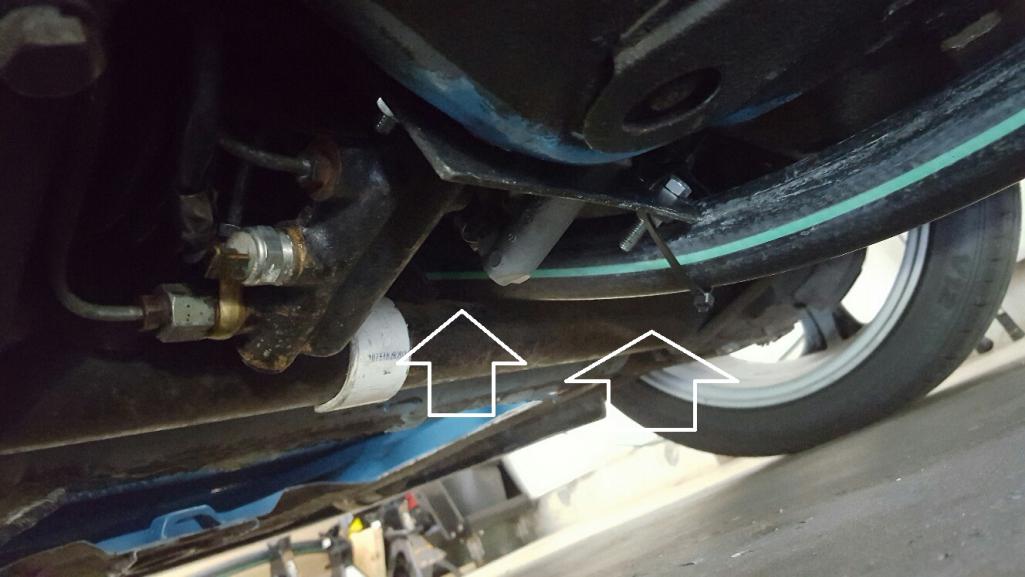 See how tight the fit is there? There was an extra hole in the clutch plate so I zip tied the hose to it. This shows both hoses from the other angle. You can see how they fit into the recesses (ALMOST exactly). 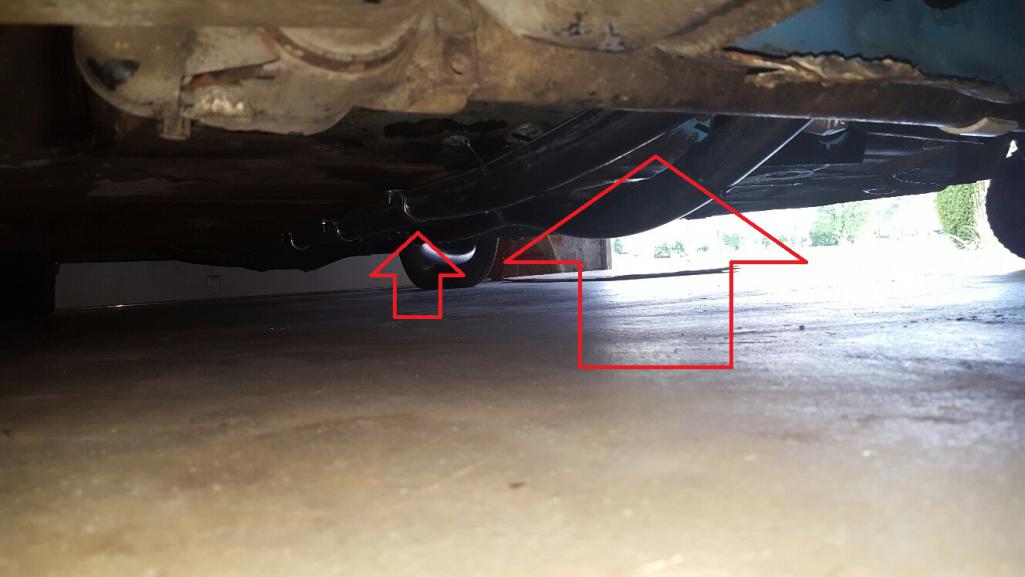 The other alternative is to come out the sides of the front trunk but the steering gear is there and there could be interference. Maybe not I just didn't like the idea myself. 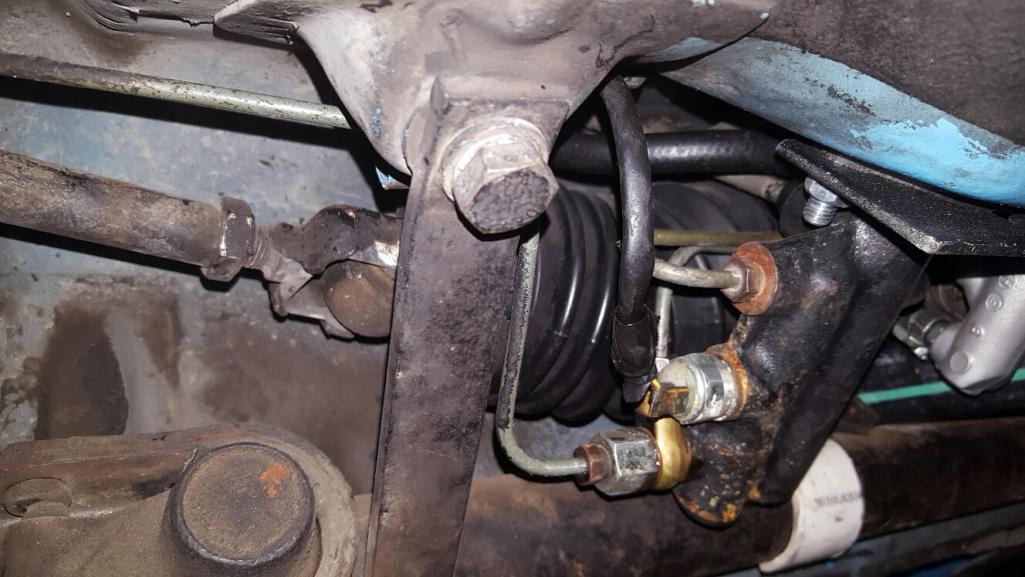 To attach the hoses underneath I used these: 1.5" Rigid Conduit Straps Even though they might seem too small, the recessed area makes it work. To attach them I used the same bolts as before for the outer bolts (floor side) since they are lower profile. You can see them in the pic. For the inner ones in the tunnel I used 10/24 size with this HF threaded rivet nut tool HF RIVETNUT For 10/24 you need slightly larger than a 1/4" drill bit. Then hog it out a bit more and the insert fits in. Even though they are aluminum they seem plenty strong. When drilling in the tunnel the closer to the middle the better. Stay away from the seam between the two and it's highly unlikely you'll hit anything. The system seems easier to fill and it has taken nearly 3 gallons so far. Temps are super cool but I haven't run it that long yet since I want to make sure it's full. How's it going with the engine install? You get ant time this weekend? PM me with questions or call me. |
|
|
|
| Chris H. |
Aug 8 2016, 07:54 PM
Post
#724
|
|
Senior Member Group: Members Posts: 4,090 Joined: 2-January 03 From: Chicago 'burbs Member No.: 73 Region Association: Upper MidWest |
(IMG:style_emoticons/default/poke.gif) (IMG:style_emoticons/default/icon_bump.gif) Update again!
I was able to start the car and let it idle for about 10 minutes. It wouldn't even get to 150 degrees with the 1.25 hoses. I know the gauge is dead on accurate since the sender is on the engine itself now. I'm running with no thermostat BTW, but more on that in my thread. You don't need to run that way. It does heat up more evenly. KENT YOU'RE GONNA LIKE THIS UPGRADE!!!! |
|
|
|
| 76-914 |
Aug 11 2016, 04:04 PM
Post
#725
|
|
Repeat Offender & Resident Subaru Antagonist Group: Members Posts: 13,905 Joined: 23-January 09 From: Temecula, CA Member No.: 9,964 Region Association: Southern California |
Not trying to be a post whore. Just needed to add this link re: the engine swap. (IMG:style_emoticons/default/beerchug.gif) http://www.914world.com/bbs2/index.php?sho...=286795&hl=
|
|
|
|
| 76-914 |
Feb 19 2017, 03:00 PM
Post
#726
|
|
Repeat Offender & Resident Subaru Antagonist Group: Members Posts: 13,905 Joined: 23-January 09 From: Temecula, CA Member No.: 9,964 Region Association: Southern California |
I wanted to keep the std spec Serpentine belt from the beginning so that I would not need to remember what size belt to buy in the future. My first attempt was to block off the in/out ports on the pump. To do this I needed to disassemble the pump in order to remove the vanes. This worked fine for 7K miles but then the bearing gave out. I believe that w/o the vanes in place too much lateral load is placed upon the bearing from the belts tension. I had another pump and installed it but knew I needed to find another solution or go thru this again. This is my solution for the 3.0. I don't know if the set up is the same for the 2.5's but maybe. Material cost = ~ $60.
Remove the PS bracket then the PS pump from the bracket. 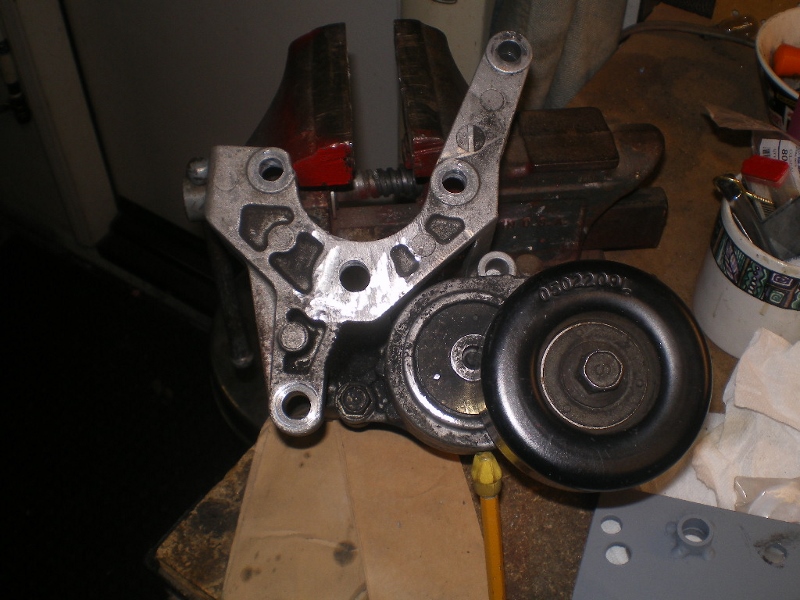 Cut 2, 1/8" pieces of steel to fit the front and rear of the bracket. Note that the front piece should be radiused to clear the wheel. Hole locations are transferred from the bracket to the plate via hole centering punches. The bolt hole for the wheel itself is simple to locate. It is lined up vertically with the bottom bolt hole and 1/2 way between the 2 top bolt holes.The piece on the right with the piece of tube tacked on is the front piece. 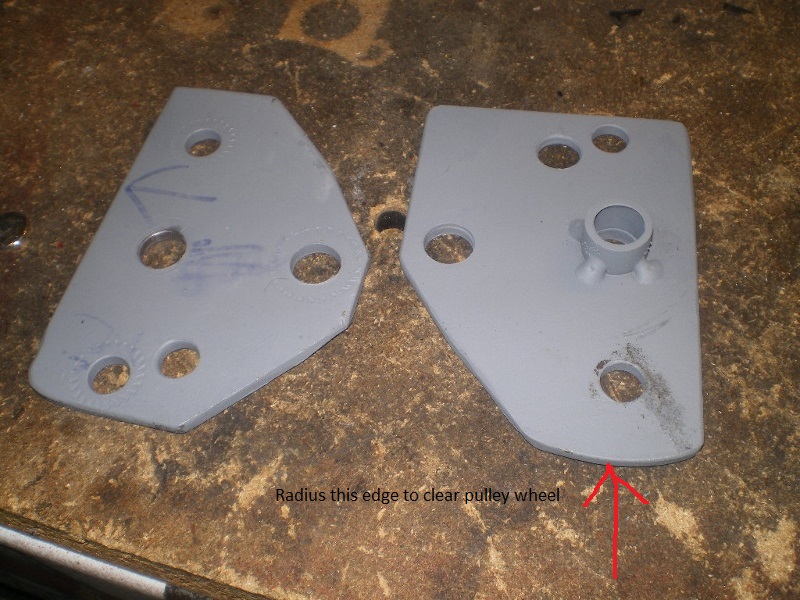 A view from the backside. 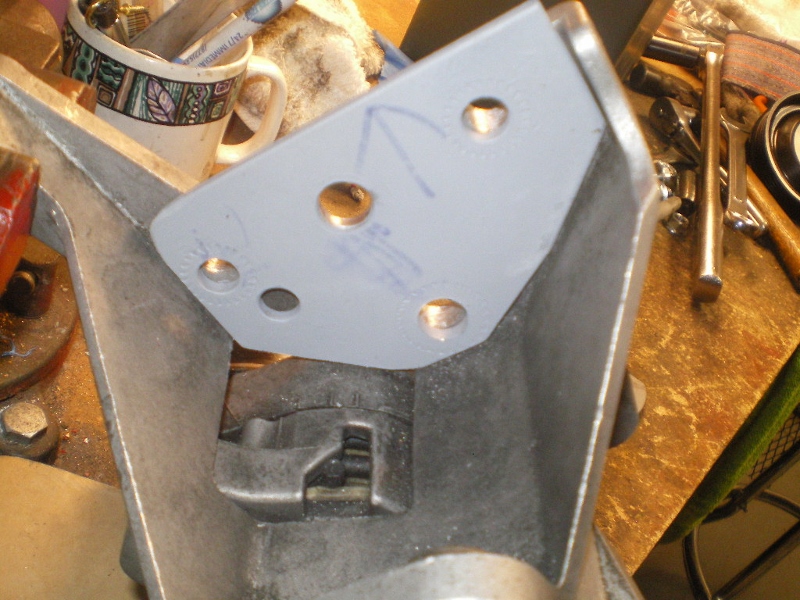 Some pics of the front and rear pieces bolted in place. ***Note*** the bottom hole has an aluminum boss on the bracket the protrudes about an 1/8" out that needs to be filed down or the front plate will not fit flush! 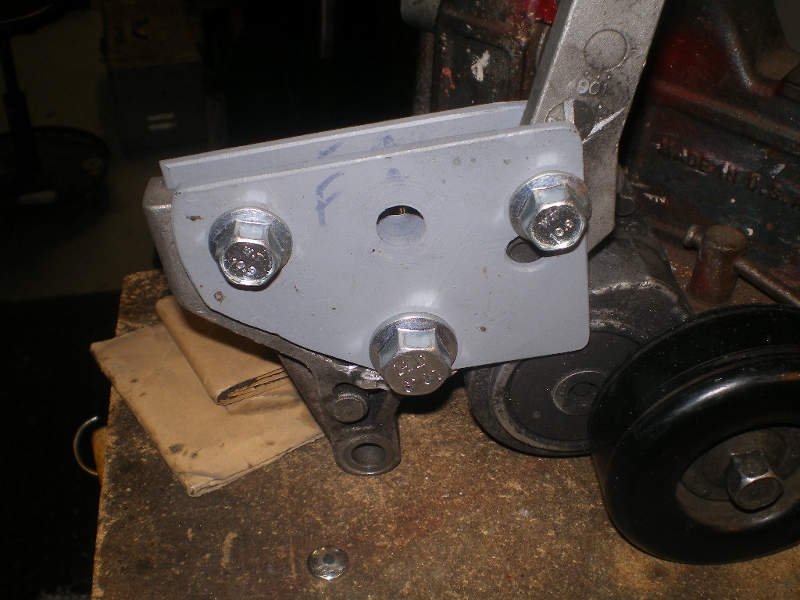 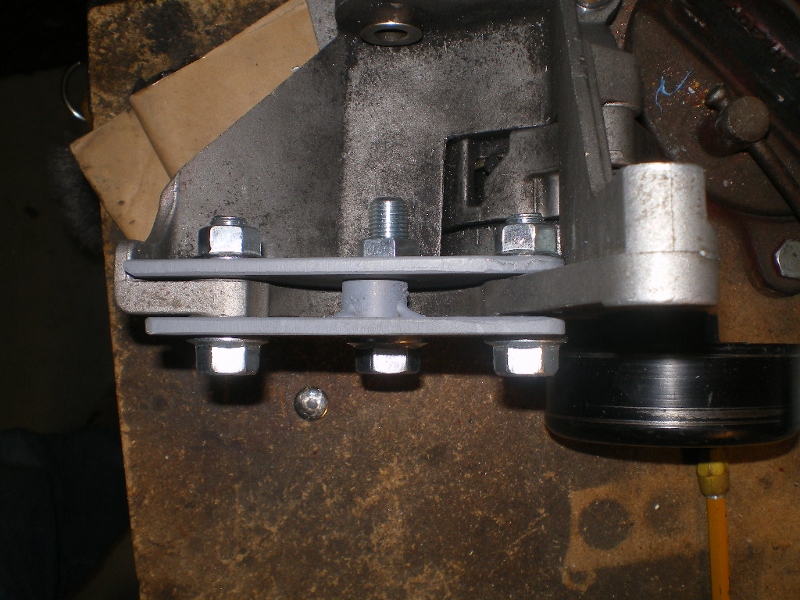 Add the necessary amount of washers to clearance the wheel from the bracket.  Finally install the wheel. 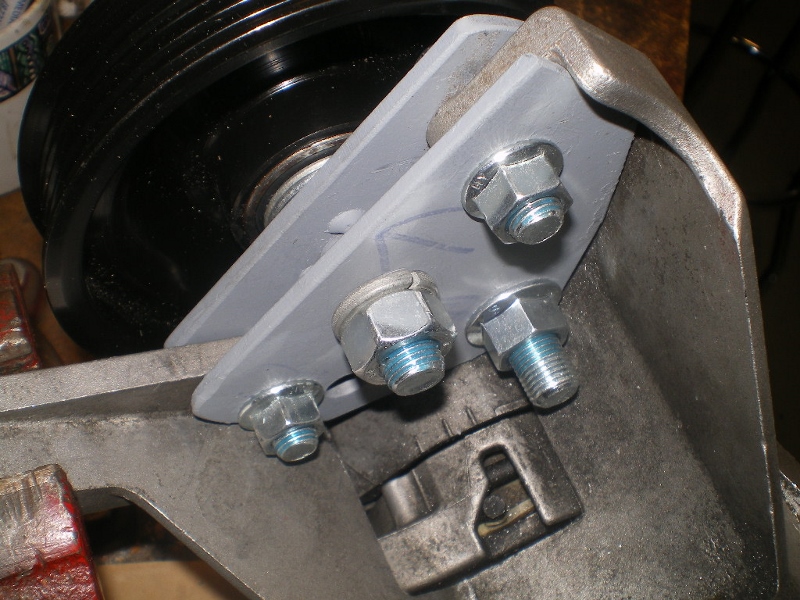 A few different pics showing the assembly in place and the clearance between the bracket and wheel. It's close but that is what is necessary to keep the wheel lined up with the belt. 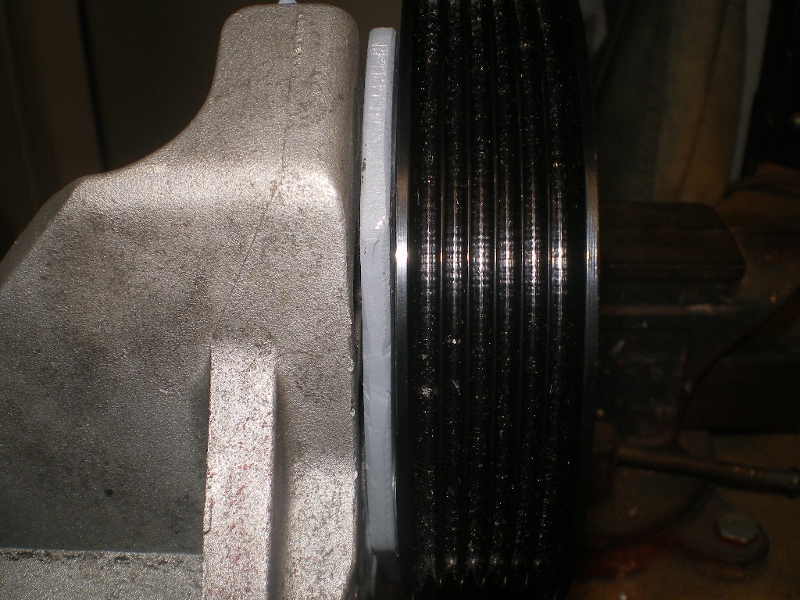 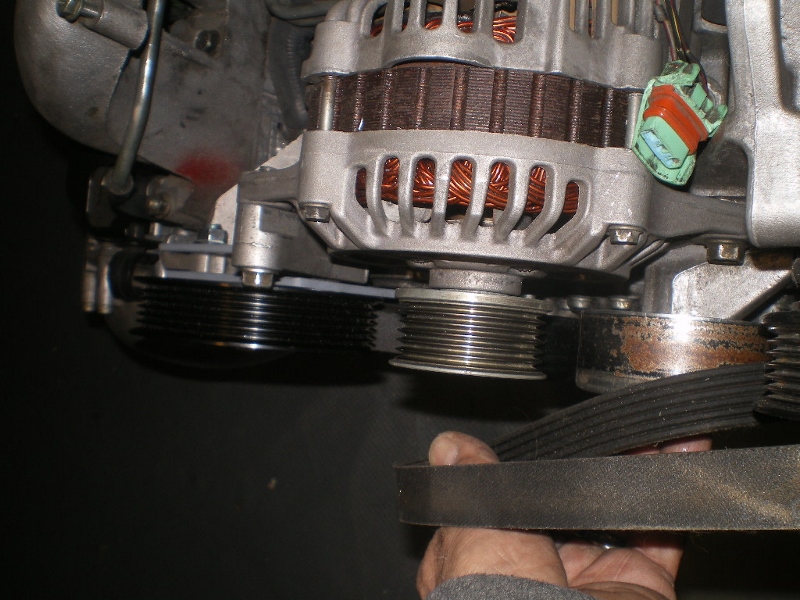 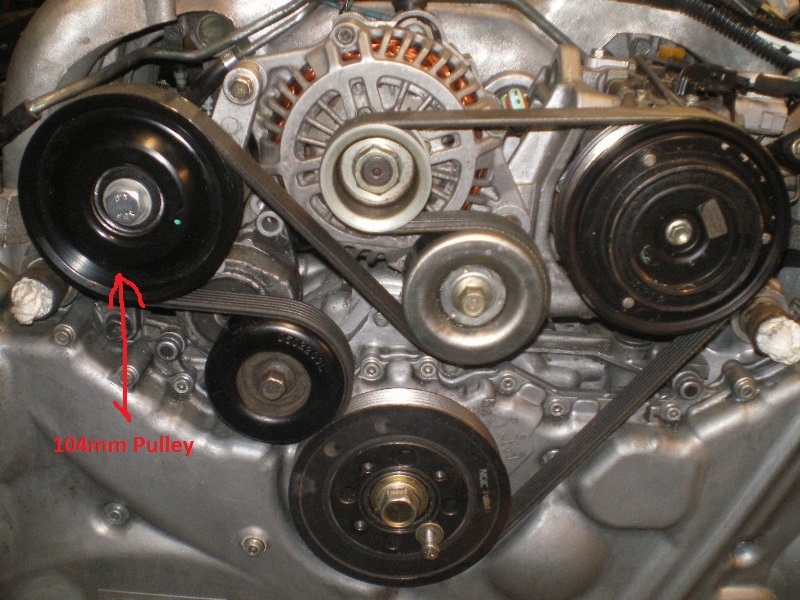 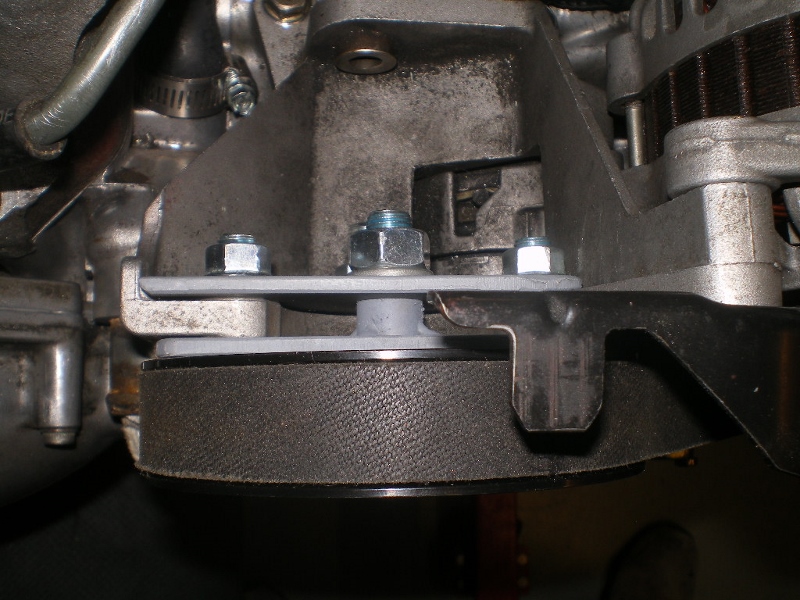 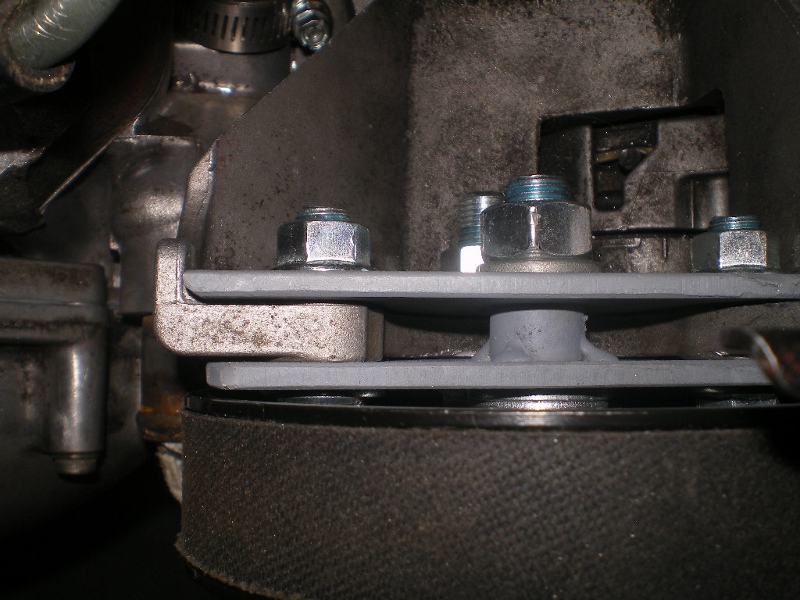 |
|
|
|
| 76-914 |
May 27 2017, 01:04 PM
Post
#727
|
|
Repeat Offender & Resident Subaru Antagonist Group: Members Posts: 13,905 Joined: 23-January 09 From: Temecula, CA Member No.: 9,964 Region Association: Southern California |
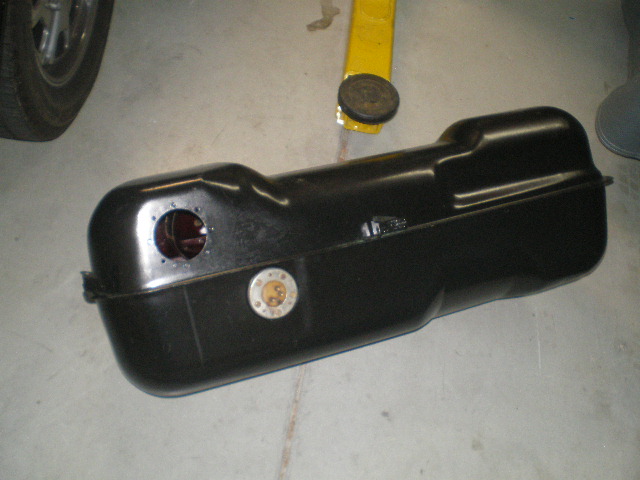
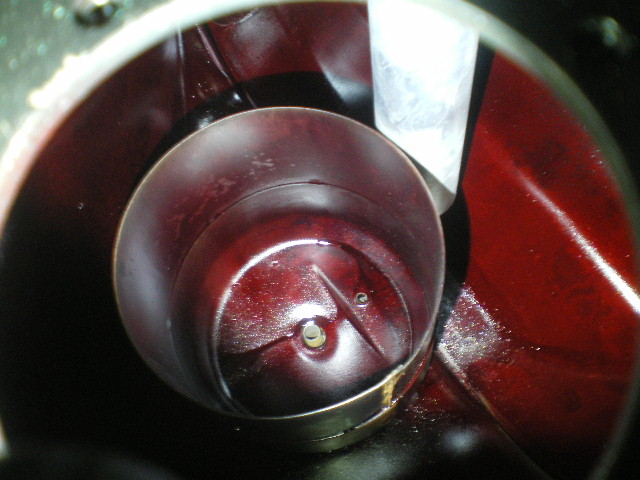
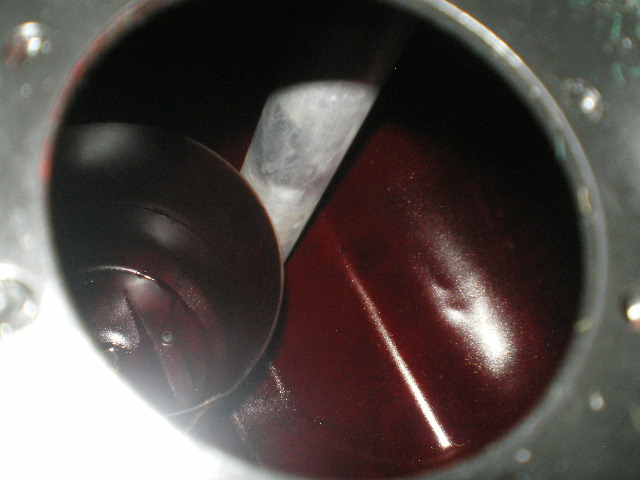
I've got about a 1,000 miles on the power steering bypass so I'm hoping it's good. I just pulled out my modified fuel tank and replaced it with an unmolested one. Thank you Chris H. You can see it cleaned up pretty good Chris. I'm now running a Walbro pump which I hope is a bit more robust than those Impreza pumps.
    Then I decided to polish the Fuchs after 2 years. I hadn't noticed the gradual degradation until I hit one with some Mother's. (IMG:style_emoticons/default/blink.gif) Yea, the nuts look like Hell. I suppose I should get those into the plater this summer.  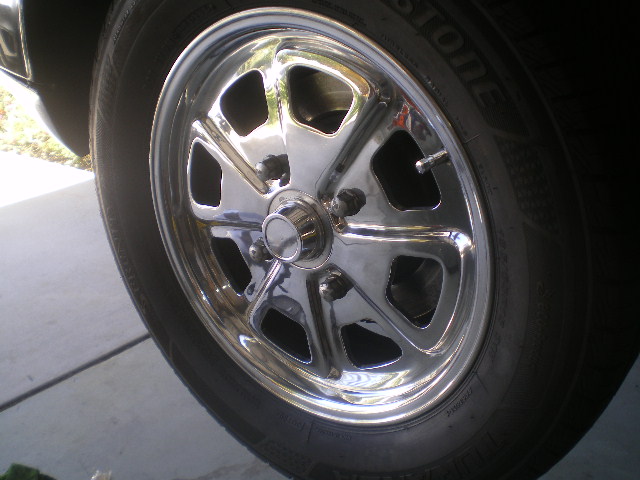 |
|
|
|
| Chris H. |
May 27 2017, 10:14 PM
Post
#728
|
|
Senior Member Group: Members Posts: 4,090 Joined: 2-January 03 From: Chicago 'burbs Member No.: 73 Region Association: Upper MidWest |
Wow that did clean up nicely. A radiator shop did that for you? Looks great. So you're up and running with the Walbro? Simple is better with that IMO.
|
|
|
|
| 914forme |
May 28 2017, 08:26 PM
Post
#729
|
|
Times a wastin', get wrenchin'! Group: Members Posts: 3,899 Joined: 24-July 04 From: Dayton, Ohio Member No.: 2,388 Region Association: None |
I have done them both ways, and I prefer a Walbro in the tank, keeps it nice and cool, and well, makes it a bit more quite. But then, It is nice hearing the fuel pump running. When I raced I had a simple dash switch for it. Also allowed you to cycle all the heat soaked fuel out of the lines for that 100HP boast you get from cool fuel. (IMG:style_emoticons/default/huh.gif)
It might really be a 0.001 HP improvement. Yes I want to know what the Rad Shop used, as I have two tanks to get cleaned up, and sealed. |
|
|
|
| 76-914 |
May 29 2017, 09:56 AM
Post
#730
|
|
Repeat Offender & Resident Subaru Antagonist Group: Members Posts: 13,905 Joined: 23-January 09 From: Temecula, CA Member No.: 9,964 Region Association: Southern California |
QUOTE(Chris H. @ May 27 2017, 09:14 PM)  Wow that did clean up nicely. A radiator shop did that for you? Looks great. So you're up and running with the Walbro? Simple is better with that IMO. This radiator shop mainly does large heat exchangers used in HVAC industry. I didn't unwrap that stinky tank to inspect but he confirmed your appraisal. He said it was in great shape with that one little spot so that's why it was treated. What impressed me was that he knew it was a 914 tank. He said the aftermarket Stereo Installers created lots of work for him in the 70's. (IMG:style_emoticons/default/av-943.gif) I know this is my imagination working overtime but I swear I have more power now! Is that possible? My pressure is up by about 2psi at cruise and 6psi when floored. (IMG:style_emoticons/default/WTF.gif) QUOTE(914forme @ May 28 2017, 07:26 PM) I have done them both ways, and I prefer a Walbro in the tank, keeps it nice and cool, and well, makes it a bit more quite. But then, It is nice hearing the fuel pump running. When I raced I had a simple dash switch for it. Also allowed you to cycle all the heat soaked fuel out of the lines for that 100HP boast you get from cool fuel. (IMG:style_emoticons/default/huh.gif) It might really be a 0.001 HP improvement. Yes I want to know what the Rad Shop used, as I have two tanks to get cleaned up, and sealed. |
|
|
|
| 914forme |
May 30 2017, 06:19 AM
Post
#731
|
|
Times a wastin', get wrenchin'! Group: Members Posts: 3,899 Joined: 24-July 04 From: Dayton, Ohio Member No.: 2,388 Region Association: None |
[quote name='76-914' date='May 29 2017, 11:56 AM' post='2490750']
[/quote] I'll ask him what they used if you'd like, Stephan. The reason I went with the external pump was to see if the old pump was heating the gas. My gas tank was getting hot as Hell so I wanted to see if the pump or the radiator was heating the gas. The 914 tank is not exposed to the cooling air rushing beneath it like a regular tank. My thought was: if the tank can't shed the heat from the pump how will it cool the pump and not continually heat the gas? I'm probably wrong as usual but I'll figure it out eventually. One thing I've learned over the years; When faced with inexperience tenacity is your best friend. (IMG:style_emoticons/default/beerchug.gif) [/quote] Some cars actually use a fuel cooler to help dissipate heat. I would not want to run the fuel line down the side of the car, but one way to dissipate the heat would be do the same thing, and just run a coil in front of your rad. Fuel heat can become an issue, as we all know from Vapor lock. I would start placing a temp probe all over the place before I went to the problem of a new pump. I have a feeling your picking up heat soak off your cooling system. Dissimilar temperature items like to merge to a constant stable temperature. Only way to know is to test. I ran a rotary fuel pump mounted to my 911 cross bar about the gravel tray for years with out issue, it was just loud. |
|
|
|
| 76-914 |
May 30 2017, 08:05 AM
Post
#732
|
|
Repeat Offender & Resident Subaru Antagonist Group: Members Posts: 13,905 Joined: 23-January 09 From: Temecula, CA Member No.: 9,964 Region Association: Southern California |
Well good to know you and others have experienced this Stephen. I'll report back after the WCR event. If it is still an issue I'll duct the radiator to the wheel wells. I've been tossing around the idea of a canvas duct! (IMG:style_emoticons/default/idea.gif) (IMG:style_emoticons/default/beerchug.gif)
|
|
|
|
| 76-914 |
Jun 11 2017, 09:21 PM
Post
#733
|
|
Repeat Offender & Resident Subaru Antagonist Group: Members Posts: 13,905 Joined: 23-January 09 From: Temecula, CA Member No.: 9,964 Region Association: Southern California |
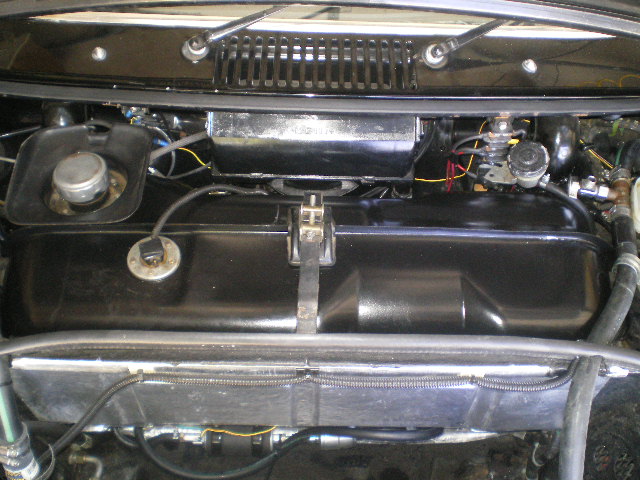
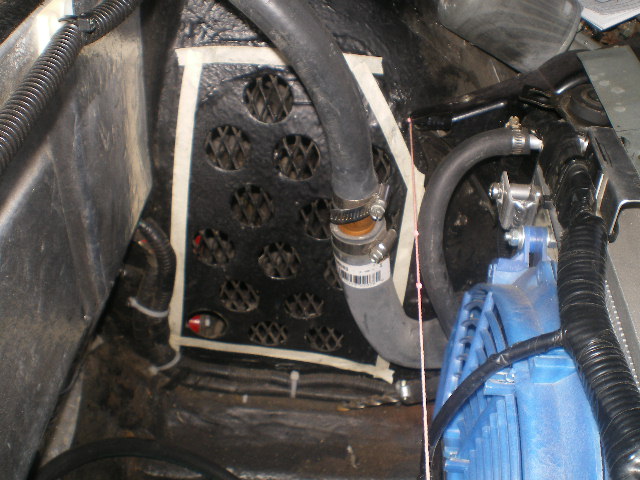
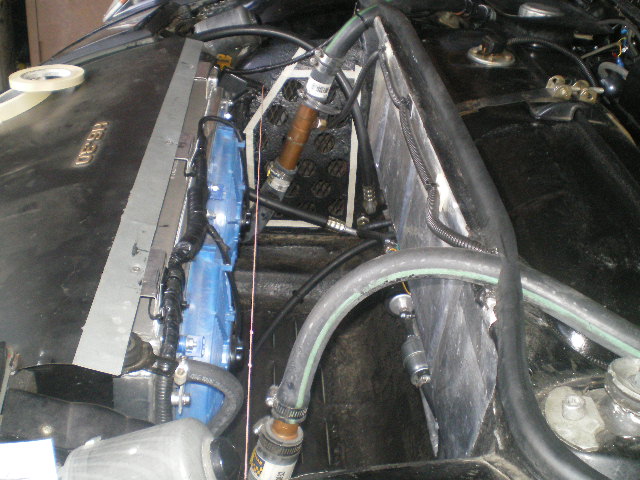
As promised, the results from the WCR trip. I was wrong again. After I eliminated every other possibility things finally make sense. First I want to say why I was adamant that the radiator exhaust wasn't the culprit. I had over 5000 miles on the car before the gas tank began to have this heat soak issue. But in thinking back, I changed radiators March 2015 which is when all this began. I never had this problem with the single core but once I went dual core........whamo! (IMG:style_emoticons/default/WTF.gif) While you wrap your head around that I'll go on to mention that I'm not the first to experience a hot gas tank. I talked with Tony aka Cracker @ WCR at length about this. That's about 5 minutes for a drunk. (IMG:style_emoticons/default/av-943.gif) Anyway he shared some of his past experiences and several of his ideas on this. Before ducting the radiator shroud I decided to take his easiest suggestion; enlarge the openings in the wheel well. Well wait just a damned second..........doesn't this tie right back in with where I left you......why this began with the radiator change out 15 month's ago. These are my thoughts and I'd like to hear yours on this. To quote Cap't Ron, "Now stay with me...." I believe the Celica racing dual core lets more air pass than the old single core Scirocco would did. This excess hot air now looks for other ways out. One of these is past the bulkhead seal, around the tank walls and out the opening below the steering column. Yes, I have the cover in place but it's certainly not air tight. Below are the pics showing the taped border area where I cut to enlarge the opening in the wheel wells. I'll drive it until I can determine if it is cured. If not then the radiator hoses get rerouted beneath the car and a plenum shall be made. More on this later. I'm coming up on 10,000 mile and believe this albeit the most recent problem, is the last of my Gremlins. (IMG:style_emoticons/default/beerchug.gif)
  |
|
|
|
| Chris H. |
Jun 12 2017, 09:50 AM
Post
#734
|
|
Senior Member Group: Members Posts: 4,090 Joined: 2-January 03 From: Chicago 'burbs Member No.: 73 Region Association: Upper MidWest |
QUOTE(76-914 @ Jun 11 2017, 10:21 PM) I'm coming up on 10,000 mile and believe this albeit the most recent problem, is the last of my Gremlins. (IMG:style_emoticons/default/beerchug.gif) Don't even SAY that out loud! (IMG:style_emoticons/default/biggrin.gif) Consider wrapping the hoses that are in the front trunk up high with something like this: Aluminized sleeving |
|
|
|
| rhodyguy |
Jun 12 2017, 09:54 AM
Post
#735
|
|
Chimp Sanctuary NW. Check it out. Group: Members Posts: 22,252 Joined: 2-March 03 From: Orion's Bell. The BELL! Member No.: 378 Region Association: Galt's Gulch |
Now you jinxed the whole deal. (IMG:style_emoticons/default/slap.gif)
|
|
|
|
| Chris914n6 |
Jun 12 2017, 03:45 PM
Post
#736
|
|
Jackstands are my life. Group: Members Posts: 3,537 Joined: 14-March 03 From: Las Vegas, NV Member No.: 431 Region Association: Southwest Region |
QUOTE(76-914 @ Jun 11 2017, 08:21 PM) That doesn't look like it's enough. Would be worth it to crunch numbers. The OUT needs to be 20% larger than the IN to account for heat expansion of the air. An insulator between the hose and the tank might help. I don't think the heat transfer would be THAT much but it's possible. |
|
|
|
| Andyrew |
Jun 12 2017, 05:02 PM
Post
#737
|
|
Spooling.... Please wait Group: Members Posts: 13,380 Joined: 20-January 03 From: Riverbank, Ca Member No.: 172 Region Association: Northern California |
QUOTE(Chris914n6 @ Jun 12 2017, 02:45 PM) QUOTE(76-914 @ Jun 11 2017, 08:21 PM) That doesn't look like it's enough. Would be worth it to crunch numbers. The OUT needs to be 20% larger than the IN to account for heat expansion of the air. An insulator between the hose and the tank might help. I don't think the heat transfer would be THAT much but it's possible. I thought it was 50% larger? I think you probably could use with a larger outlet for your radiator, but JUST ducting it will certainly increase your efficiency by a wide margin methinks. Could be a fun foam or cardboard adventure depending on how you shroud it (IMG:style_emoticons/default/smile.gif) |
|
|
|
| Chris914n6 |
Jun 12 2017, 05:45 PM
Post
#738
|
|
Jackstands are my life. Group: Members Posts: 3,537 Joined: 14-March 03 From: Las Vegas, NV Member No.: 431 Region Association: Southwest Region |
QUOTE(Andyrew @ Jun 12 2017, 04:02 PM) I thought it was 50% larger? Just 20%. A bunch of engineering went into my AC unit, some was actual heater core and radiator temps and air volume. |
|
|
|
| 76-914 |
Jun 12 2017, 09:42 PM
Post
#739
|
|
Repeat Offender & Resident Subaru Antagonist Group: Members Posts: 13,905 Joined: 23-January 09 From: Temecula, CA Member No.: 9,964 Region Association: Southern California |
QUOTE(Chris914n6 @ Jun 12 2017, 02:45 PM) QUOTE(76-914 @ Jun 11 2017, 08:21 PM) That doesn't look like it's enough. Would be worth it to crunch numbers. The OUT needs to be 20% larger than the IN to account for heat expansion of the air. An insulator between the hose and the tank might help. I don't think the heat transfer would be THAT much but it's possible. The in would be the air inlet, correct? That area is 18 x 5 or 90 sq in. The new cutout area will be 180 sq in. The coming 15 days will be hot so I'll see what happens with the larger openings. (IMG:style_emoticons/default/beerchug.gif) |
|
|
|
| mgp4591 |
Jun 12 2017, 09:45 PM
Post
#740
|
|
914 Guru Group: Members Posts: 5,958 Joined: 1-August 12 From: Salt Lake City Ut Member No.: 14,748 Region Association: Intermountain Region |
QUOTE(Chris914n6 @ Jun 12 2017, 05:45 PM) QUOTE(Andyrew @ Jun 12 2017, 04:02 PM) I thought it was 50% larger? Just 20%. A bunch of engineering went into my AC unit, some was actual heater core and radiator temps and air volume. I'd always heard that it's twice the outlet size per inlet size... (IMG:style_emoticons/default/idea.gif) |
|
|
|
|
2 User(s) are reading this topic (2 Guests and 0 Anonymous Users)
0 Members:

|
Lo-Fi Version | Time is now: 24th June 2026 - 04:07 PM |
Invision Power Board
v9.1.4 © 2026 IPS, Inc.