|
|
|
Porsche, and the Porsche crest are registered trademarks of Dr. Ing. h.c. F. Porsche AG.
This site is not affiliated with Porsche in any way. Its only purpose is to provide an online forum for car enthusiasts. All other trademarks are property of their respective owners. |
|
|


| rangrbob |
 Jan 10 2013, 06:24 PM Jan 10 2013, 06:24 PM
Post
#81
|
|
Member  Group: Members Posts: 174 Joined: 11-October 12 From: Loveland, CO Member No.: 15,027 Region Association: Rocky Mountains |
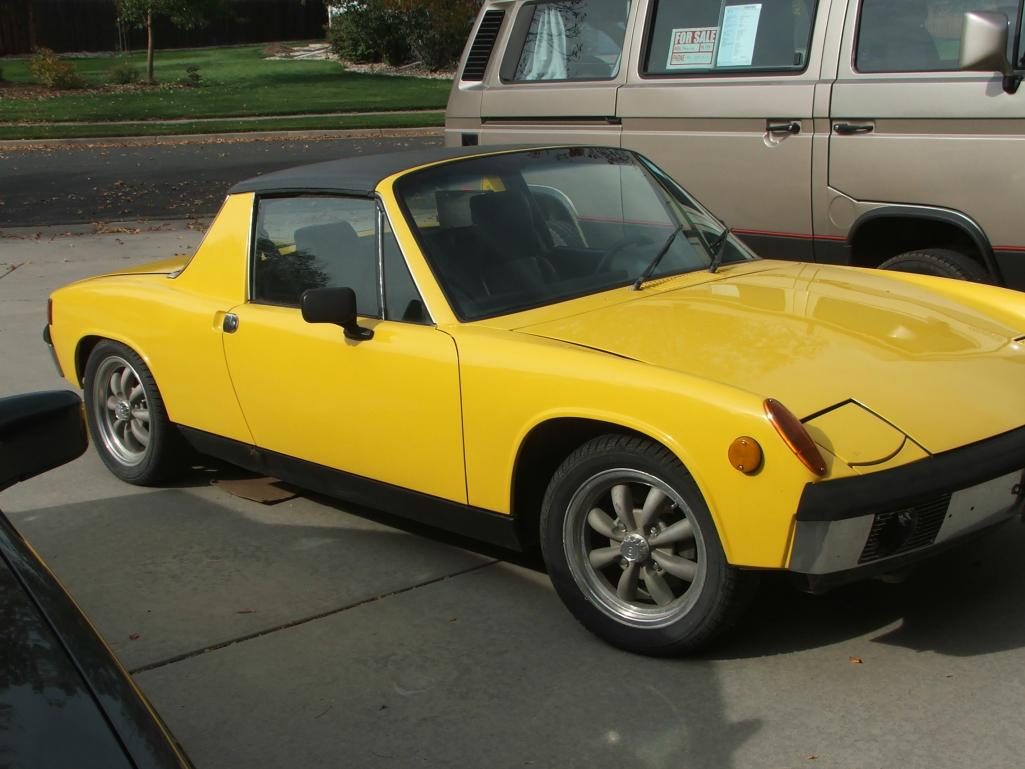 I picked up this 71 a few months ago, and have started a full restoration. It appears to have been repainted at least three times. The car was originally Metallic Gold. I'm going to try and get it to as close to how it was born, and will be shooting for a number 2+ car. It is currently at the media blaster, then off for metal work, and body/paint. (IMG:style_emoticons/default/smile.gif) 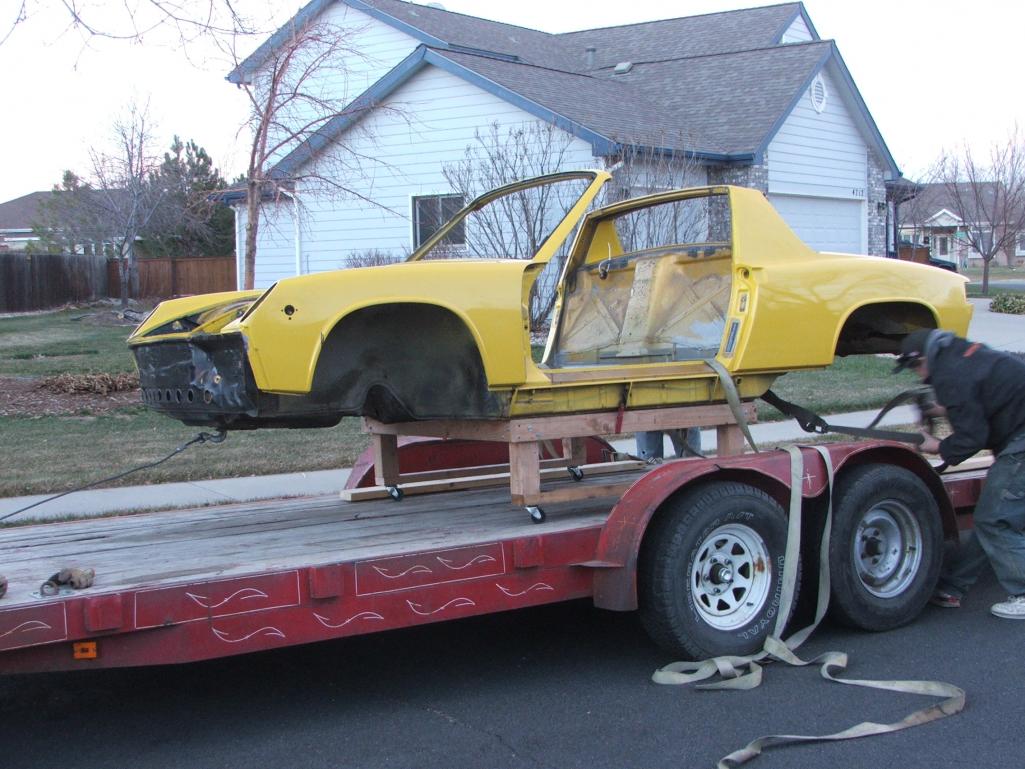 |
   |

 
|
Posts in this topic
 rangrbob MY 71 Restoration Jan 10 2013, 06:24 PM
 Gint Grats! :wttc: Progress pics are cool... You... Jan 10 2013, 07:00 PM matt5596 Looking forward to following your work.
:wttc: Jan 10 2013, 08:52 PM ruby914 Wow, I like it just the way it is. :)
:wttc:
:... Jan 10 2013, 11:02 PM
Gint Grats! :wttc: Progress pics are cool... You... Jan 10 2013, 07:00 PM matt5596 Looking forward to following your work.
:wttc: Jan 10 2013, 08:52 PM ruby914 Wow, I like it just the way it is. :)
:wttc:
:... Jan 10 2013, 11:02 PM
 rangrbob
Wow, I like it just the way it is. :)
:wttc:
... Jan 11 2013, 09:17 PM Cairo94507 Excellent! I look forward to seeing it move a... Jan 12 2013, 07:55 AM rangrbob I think the car may have had a small fire or two i... Jan 17 2013, 11:04 AM jdlmodelt
I think the car may have had a small fire or two ... Jan 17 2013, 02:33 PM FourBlades Cool original color. :Qarl:
Looking forward to ... Jan 17 2013, 03:47 PM rangrbob Starting to get some parts back. Picked up my tins... Jan 25 2013, 08:38 PM rangrbob Also got some NOS tail light lenses. Thanks Steve... Jan 25 2013, 08:42 PM rangrbob Got the body back from the media blaster today. Di... Feb 13 2013, 11:07 PM rangrbob While waiting for the body I've been working o... Feb 13 2013, 11:14 PM rangrbob Worked on door stays too.
Feb 13 2013, 11:18 PM boogie_man :wttc: That's awesome !!! another... Feb 14 2013, 12:20 PM porsche_dreamer Looks fantastic so far! Feb 17 2013, 07:55 AM rangrbob Still waiting on body. Pretty much everything els... May 29 2013, 07:05 PM rangrbob Went and checked on the body last week. I had to s... May 29 2013, 07:12 PM Kraftwerk Mine is Metallic Gold as well! Great vintage c... May 29 2013, 08:45 PM krazykonrad Looks like you are doing a really thorough job. Re... May 30 2013, 05:38 PM rangrbob
Looks like you are doing a really thorough job. R... Jan 9 2014, 06:05 PM saigon71 Your attention to detail is impressive!
Great... Jan 9 2014, 07:00 PM ThePaintedMan :agree: It's not often that someone who is new... Jan 9 2014, 09:38 PM CptTripps Bravo sir! Takes a lot of patience (that I don... Jan 10 2014, 10:05 AM boxsterfan This work is fantastic!! Did you have the... Jan 10 2014, 11:27 AM rangrbob
This work is fantastic!! Did you have th... Jan 10 2014, 01:18 PM rangrbob Well I did get the hardware back, but it was never... Feb 15 2014, 10:47 PM rangrbob It's been over a year and a half and the body ... Apr 22 2014, 09:35 PM Qarl Cool, you are in Loveland. I've visited a micr... Apr 22 2014, 10:03 PM boxsterfan Looking forward to seeing this in paint!! Apr 23 2014, 09:49 AM rangrbob Anyone have a picture of how the passenger seat br... May 12 2014, 09:33 PM Ferg Can't believe I'm just finding this thread... May 13 2014, 08:23 AM Cairo94507 Looking forward to seeing some pictures of this ca... May 13 2014, 08:27 AM rangrbob Well after close to two years at the body shop, th... Jul 25 2014, 06:56 PM Cairo94507 Well it is looking like it is ready for paint. Ca... Jul 25 2014, 07:00 PM rangrbob
Well it is looking like it is ready for paint. C... Jul 25 2014, 07:08 PM rangrbob Sent it off to the new shop last week. The guys go... Sep 12 2014, 04:33 PM rangrbob Ready for paint! :Qarl:
Sep 20 2014, 10:22 PM Sleepin Looking forward to seeing this! Sep 20 2014, 10:30 PM rangrbob It's GOLD!
At least the inside and unders... Sep 25 2014, 09:20 PM rnellums Holy cow is that going to be a sweet looking car... Sep 25 2014, 09:38 PM Cairo94507 Man that looks so nice when they get fresh paint o... Sep 26 2014, 05:47 AM Tbrown4x4 Looks great!! I also have a Metallic Gold... Sep 26 2014, 06:29 AM rangrbob Finally! :Qarl:
Oct 3 2014, 08:39 PM Cairo94507 Sweet! How exciting to get some color on the ... Oct 3 2014, 08:50 PM altitude411 looks fantastic! thanks for posting the photo... Oct 3 2014, 09:42 PM Kraftwerk Yes! Another metallic gold car saved! It i... Oct 4 2014, 08:11 AM Phoenix914 :wub:
I really like that color. Keep the pics c... Oct 4 2014, 09:06 AM KELTY360 Fantastic! There is a body line that runs from... Oct 4 2014, 09:42 AM rangrbob Here are a couple shots of the car out in the sun ... Oct 25 2014, 08:24 PM Cairo94507 Wow that looks terrific in the sun! Keep the ... Oct 26 2014, 07:49 AM rangrbob Stopped by to check on progress of the cutting and... Nov 3 2014, 10:46 PM Phoenix914 :beer1: :chow: :drooley: :worship:
Beautiful... Nov 4 2014, 06:43 AM skaufmann Okay you're inspiring me. I have a 72 914/4 me... Nov 5 2014, 02:16 PM rangrbob
Okay you're inspiring me. I have a 72 914/4 m... Nov 5 2014, 10:39 PM rangrbob Got the body back today. Now the fun starts! I... Nov 5 2014, 10:28 PM falcor75 That looks great, I got mine back from paint last ... Nov 6 2014, 05:02 AM Philip W. :headbanger: :drooley: :drooley: :drooley:
ve... Nov 6 2014, 08:18 AM Tbrown4x4 Beautiful!!
Remember: Assembly is the rev... Nov 6 2014, 09:06 AM rangrbob Started working on the wiring harness. I had to cu... Nov 21 2014, 07:55 PM Maltese Falcon
Started working on the wiring harness. I had to c... Dec 12 2014, 09:47 PM Jeff Bowlsby Random question...
Does your 1971 harness have a ... Nov 21 2014, 08:07 PM rangrbob
Random question...
Does your 1971 harness have a... Nov 21 2014, 08:48 PM rangrbob
Random question...
Does your 1971 harness have a... Dec 21 2014, 06:39 PM Jeff Bowlsby
Random question...
Does your 1971 harness have ... Dec 21 2014, 07:33 PM rick 918-S OMG! That color is outrageous! :drooley: J... Nov 21 2014, 08:43 PM rangrbob I've been doing a little more work on the wiri... Nov 28 2014, 07:06 PM wndsrfr
The #1 most sumptuous color ever....like the... Nov 30 2014, 08:14 AM altitude411 :beer2: Nov 28 2014, 07:46 PM Cairo94507 Excellent looking work. This is going to be a bea... Nov 29 2014, 08:06 AM saigon71 That is one meticulous resto you have going on the... Nov 30 2014, 08:02 AM Last930 You are a better man than I - I'd never try a ... Nov 30 2014, 08:05 AM rangrbob Today I started to put the rear suspension back on... Dec 12 2014, 07:16 PM Tbrown4x4 You're building my cars twin! I love updat... Dec 12 2014, 08:25 PM Cairo94507 Were the original markings the chassis number stam... Dec 12 2014, 10:21 PM rangrbob
Were the original markings the chassis number sta... Dec 13 2014, 07:42 PM Cairo94507 Did your trunk floor, if you can tell, get replace... Dec 14 2014, 09:08 AM rangrbob
Did your trunk floor, if you can tell, get replac... Dec 14 2014, 07:04 PM rangrbob Started dash install, and a few more things here a... Dec 20 2014, 07:47 PM turk22 I bought a NOS combo gauge from AA, that is very n... Dec 20 2014, 09:04 PM rangrbob
I bought a NOS combo gauge from AA, that is very ... Dec 20 2014, 10:34 PM Rob-O Looks fantastic! Can I make a few suggestions... Dec 21 2014, 01:09 PM rangrbob
Looks fantastic! Can I make a few suggestion... Dec 21 2014, 06:36 PM rangrbob Picked up the hardware today. I think they turned ... Dec 31 2014, 08:54 PM rangrbob Over the past couple days, I kept plugging away at... Jan 2 2015, 09:56 PM Cairo94507 Excellent work. Jan 2 2015, 10:51 PM Rob-O Nice!! Jan 2 2015, 11:04 PM Ferg :trophy: Nice work! Can't wait to see th... Jan 3 2015, 11:33 AM rangrbob I got some goodies from PMB yesterday, and I insta... Jan 7 2015, 10:10 PM puffinator
What does the "4" painted on the trai... Jan 8 2015, 07:12 AM rangrbob
What does the "4" painted on the tra... Jan 8 2015, 08:41 AM Jeff Bowlsby Single brown/white wire in that area should be the... Jan 7 2015, 11:03 PM rangrbob Today I continued on the front suspension and stee... Jan 14 2015, 07:25 PM Rob-O Looks great. Those brakes from PMB look fantastic... Jan 15 2015, 07:19 AM rangrbob Spent the day test fitting the bumpers and messing... Jan 16 2015, 09:55 PM Cairo94507 Sweet! Pretty soon... :driving: Jan 17 2015, 08:04 AM rangrbob Not much of an update. Today, I was chasing some p... Jan 28 2015, 08:23 PM bigkensteele
I'm straying from oem slightly by using some ... Jan 28 2015, 09:28 PM Erben914
I'm straying from oem slightly by using some... Jan 28 2015, 10:35 PM zambezi Polishing the ribs on the pedrinis can look good... Jan 28 2015, 09:34 PM
rangrbob
Wow, I like it just the way it is. :)
:wttc:
... Jan 11 2013, 09:17 PM Cairo94507 Excellent! I look forward to seeing it move a... Jan 12 2013, 07:55 AM rangrbob I think the car may have had a small fire or two i... Jan 17 2013, 11:04 AM jdlmodelt
I think the car may have had a small fire or two ... Jan 17 2013, 02:33 PM FourBlades Cool original color. :Qarl:
Looking forward to ... Jan 17 2013, 03:47 PM rangrbob Starting to get some parts back. Picked up my tins... Jan 25 2013, 08:38 PM rangrbob Also got some NOS tail light lenses. Thanks Steve... Jan 25 2013, 08:42 PM rangrbob Got the body back from the media blaster today. Di... Feb 13 2013, 11:07 PM rangrbob While waiting for the body I've been working o... Feb 13 2013, 11:14 PM rangrbob Worked on door stays too.
Feb 13 2013, 11:18 PM boogie_man :wttc: That's awesome !!! another... Feb 14 2013, 12:20 PM porsche_dreamer Looks fantastic so far! Feb 17 2013, 07:55 AM rangrbob Still waiting on body. Pretty much everything els... May 29 2013, 07:05 PM rangrbob Went and checked on the body last week. I had to s... May 29 2013, 07:12 PM Kraftwerk Mine is Metallic Gold as well! Great vintage c... May 29 2013, 08:45 PM krazykonrad Looks like you are doing a really thorough job. Re... May 30 2013, 05:38 PM rangrbob
Looks like you are doing a really thorough job. R... Jan 9 2014, 06:05 PM saigon71 Your attention to detail is impressive!
Great... Jan 9 2014, 07:00 PM ThePaintedMan :agree: It's not often that someone who is new... Jan 9 2014, 09:38 PM CptTripps Bravo sir! Takes a lot of patience (that I don... Jan 10 2014, 10:05 AM boxsterfan This work is fantastic!! Did you have the... Jan 10 2014, 11:27 AM rangrbob
This work is fantastic!! Did you have th... Jan 10 2014, 01:18 PM rangrbob Well I did get the hardware back, but it was never... Feb 15 2014, 10:47 PM rangrbob It's been over a year and a half and the body ... Apr 22 2014, 09:35 PM Qarl Cool, you are in Loveland. I've visited a micr... Apr 22 2014, 10:03 PM boxsterfan Looking forward to seeing this in paint!! Apr 23 2014, 09:49 AM rangrbob Anyone have a picture of how the passenger seat br... May 12 2014, 09:33 PM Ferg Can't believe I'm just finding this thread... May 13 2014, 08:23 AM Cairo94507 Looking forward to seeing some pictures of this ca... May 13 2014, 08:27 AM rangrbob Well after close to two years at the body shop, th... Jul 25 2014, 06:56 PM Cairo94507 Well it is looking like it is ready for paint. Ca... Jul 25 2014, 07:00 PM rangrbob
Well it is looking like it is ready for paint. C... Jul 25 2014, 07:08 PM rangrbob Sent it off to the new shop last week. The guys go... Sep 12 2014, 04:33 PM rangrbob Ready for paint! :Qarl:
Sep 20 2014, 10:22 PM Sleepin Looking forward to seeing this! Sep 20 2014, 10:30 PM rangrbob It's GOLD!
At least the inside and unders... Sep 25 2014, 09:20 PM rnellums Holy cow is that going to be a sweet looking car... Sep 25 2014, 09:38 PM Cairo94507 Man that looks so nice when they get fresh paint o... Sep 26 2014, 05:47 AM Tbrown4x4 Looks great!! I also have a Metallic Gold... Sep 26 2014, 06:29 AM rangrbob Finally! :Qarl:
Oct 3 2014, 08:39 PM Cairo94507 Sweet! How exciting to get some color on the ... Oct 3 2014, 08:50 PM altitude411 looks fantastic! thanks for posting the photo... Oct 3 2014, 09:42 PM Kraftwerk Yes! Another metallic gold car saved! It i... Oct 4 2014, 08:11 AM Phoenix914 :wub:
I really like that color. Keep the pics c... Oct 4 2014, 09:06 AM KELTY360 Fantastic! There is a body line that runs from... Oct 4 2014, 09:42 AM rangrbob Here are a couple shots of the car out in the sun ... Oct 25 2014, 08:24 PM Cairo94507 Wow that looks terrific in the sun! Keep the ... Oct 26 2014, 07:49 AM rangrbob Stopped by to check on progress of the cutting and... Nov 3 2014, 10:46 PM Phoenix914 :beer1: :chow: :drooley: :worship:
Beautiful... Nov 4 2014, 06:43 AM skaufmann Okay you're inspiring me. I have a 72 914/4 me... Nov 5 2014, 02:16 PM rangrbob
Okay you're inspiring me. I have a 72 914/4 m... Nov 5 2014, 10:39 PM rangrbob Got the body back today. Now the fun starts! I... Nov 5 2014, 10:28 PM falcor75 That looks great, I got mine back from paint last ... Nov 6 2014, 05:02 AM Philip W. :headbanger: :drooley: :drooley: :drooley:
ve... Nov 6 2014, 08:18 AM Tbrown4x4 Beautiful!!
Remember: Assembly is the rev... Nov 6 2014, 09:06 AM rangrbob Started working on the wiring harness. I had to cu... Nov 21 2014, 07:55 PM Maltese Falcon
Started working on the wiring harness. I had to c... Dec 12 2014, 09:47 PM Jeff Bowlsby Random question...
Does your 1971 harness have a ... Nov 21 2014, 08:07 PM rangrbob
Random question...
Does your 1971 harness have a... Nov 21 2014, 08:48 PM rangrbob
Random question...
Does your 1971 harness have a... Dec 21 2014, 06:39 PM Jeff Bowlsby
Random question...
Does your 1971 harness have ... Dec 21 2014, 07:33 PM rick 918-S OMG! That color is outrageous! :drooley: J... Nov 21 2014, 08:43 PM rangrbob I've been doing a little more work on the wiri... Nov 28 2014, 07:06 PM wndsrfr
The #1 most sumptuous color ever....like the... Nov 30 2014, 08:14 AM altitude411 :beer2: Nov 28 2014, 07:46 PM Cairo94507 Excellent looking work. This is going to be a bea... Nov 29 2014, 08:06 AM saigon71 That is one meticulous resto you have going on the... Nov 30 2014, 08:02 AM Last930 You are a better man than I - I'd never try a ... Nov 30 2014, 08:05 AM rangrbob Today I started to put the rear suspension back on... Dec 12 2014, 07:16 PM Tbrown4x4 You're building my cars twin! I love updat... Dec 12 2014, 08:25 PM Cairo94507 Were the original markings the chassis number stam... Dec 12 2014, 10:21 PM rangrbob
Were the original markings the chassis number sta... Dec 13 2014, 07:42 PM Cairo94507 Did your trunk floor, if you can tell, get replace... Dec 14 2014, 09:08 AM rangrbob
Did your trunk floor, if you can tell, get replac... Dec 14 2014, 07:04 PM rangrbob Started dash install, and a few more things here a... Dec 20 2014, 07:47 PM turk22 I bought a NOS combo gauge from AA, that is very n... Dec 20 2014, 09:04 PM rangrbob
I bought a NOS combo gauge from AA, that is very ... Dec 20 2014, 10:34 PM Rob-O Looks fantastic! Can I make a few suggestions... Dec 21 2014, 01:09 PM rangrbob
Looks fantastic! Can I make a few suggestion... Dec 21 2014, 06:36 PM rangrbob Picked up the hardware today. I think they turned ... Dec 31 2014, 08:54 PM rangrbob Over the past couple days, I kept plugging away at... Jan 2 2015, 09:56 PM Cairo94507 Excellent work. Jan 2 2015, 10:51 PM Rob-O Nice!! Jan 2 2015, 11:04 PM Ferg :trophy: Nice work! Can't wait to see th... Jan 3 2015, 11:33 AM rangrbob I got some goodies from PMB yesterday, and I insta... Jan 7 2015, 10:10 PM puffinator
What does the "4" painted on the trai... Jan 8 2015, 07:12 AM rangrbob
What does the "4" painted on the tra... Jan 8 2015, 08:41 AM Jeff Bowlsby Single brown/white wire in that area should be the... Jan 7 2015, 11:03 PM rangrbob Today I continued on the front suspension and stee... Jan 14 2015, 07:25 PM Rob-O Looks great. Those brakes from PMB look fantastic... Jan 15 2015, 07:19 AM rangrbob Spent the day test fitting the bumpers and messing... Jan 16 2015, 09:55 PM Cairo94507 Sweet! Pretty soon... :driving: Jan 17 2015, 08:04 AM rangrbob Not much of an update. Today, I was chasing some p... Jan 28 2015, 08:23 PM bigkensteele
I'm straying from oem slightly by using some ... Jan 28 2015, 09:28 PM Erben914
I'm straying from oem slightly by using some... Jan 28 2015, 10:35 PM zambezi Polishing the ribs on the pedrinis can look good... Jan 28 2015, 09:34 PM  |
1 User(s) are reading this topic (1 Guests and 0 Anonymous Users)
0 Members:

|
Lo-Fi Version | Time is now: 15th April 2026 - 09:59 PM |
Invision Power Board
v9.1.4 © 2026 IPS, Inc.