|
|
|
Porsche, and the Porsche crest are registered trademarks of Dr. Ing. h.c. F. Porsche AG.
This site is not affiliated with Porsche in any way. Its only purpose is to provide an online forum for car enthusiasts. All other trademarks are property of their respective owners. |
|
|

  |

| r_towle |
 Feb 26 2014, 07:03 PM Feb 26 2014, 07:03 PM
Post
#281
|
|
Custom Member  Group: Members Posts: 24,705 Joined: 9-January 03 From: Taxachusetts Member No.: 124 Region Association: North East States |
I am in for at least one set.
When are you going to get this done slacker??? |
   |

 
|
| Spoke |
Feb 27 2014, 11:32 AM
Post
#282
|
|
Jerry Group: Members Posts: 7,264 Joined: 29-October 04 From: Allentown, PA Member No.: 3,031 Region Association: None |
QUOTE(r_towle @ Feb 26 2014, 08:03 PM)  I am in for at least one set. When are you going to get this done slacker??? I just received some new 5mm LEDs from Cree that have a wider 1/2 power angle and run at less current. I'll build one PCB this weekend to try it out. Power dissipation and resulting temperature rise are what I've been struggling with on this project with the 5mm LEDs. The parking light setting is no problem. The brake light setting is the issue. The goal is to manage the heat when the driver stands on the brake indefinitely and not have the unit fail. Both taillight housings on my car have melted plastic above the brake bulb from the heat of the bulb when standing on the brakes like in stopped traffic. If these work out I can go to fab with the PCB and get things moving. |
|
|
|
| JmuRiz |
Feb 27 2014, 01:21 PM
Post
#283
|
|
914 Guru Group: Members Posts: 5,597 Joined: 30-December 02 From: NoVA Member No.: 50 Region Association: MidAtlantic Region |
Glad you are experimenting to see what style/configuration works best in terms of light/heat. I'm waiting to see what is the "best" configuration, but I'm sure I'll be in the market when the design is finalized.
|
|
|
|
| r_towle |
Mar 1 2014, 06:41 PM
Post
#284
|
|
Custom Member Group: Members Posts: 24,705 Joined: 9-January 03 From: Taxachusetts Member No.: 124 Region Association: North East States |
Have you considered replacing the melted area with a piece of metal as part of the solution?
|
|
|
|
| Spoke |
Mar 2 2014, 11:56 PM
Post
#285
|
|
Jerry Group: Members Posts: 7,264 Joined: 29-October 04 From: Allentown, PA Member No.: 3,031 Region Association: None |
I built another 5mm LED board with Cree C503-AAN-CY0B LEDs which have significant light output. The goal was to run the LEDs at about 1/2 the current of the original Vishay 5mm LEDs.
The lower current would allow the boards to run at much lower current/power/temp while putting out the same light. Only 51 LEDs were installed and run at about 25ma. The results were very encouraging. The light output is equal to the high power LED Cree boards which I use to compare light output. The light dispersion of these 5mm LEDs is much better than the Vishays and just about equal to the high power LED Crees. With the original 5mm LED boards with Vishay LEDs I determined that just over 7W of power would give a temperature rise of about 40C. This board dissipates just over 6W so temperature rise is around 30C. Attached image(s) 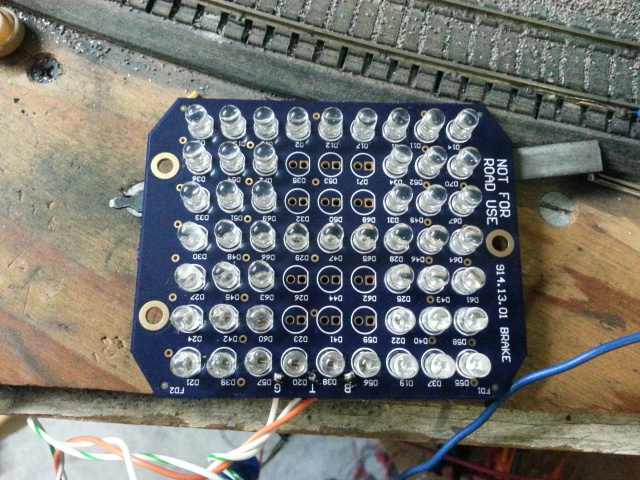
|
|
|
|
| Spoke |
Mar 3 2014, 12:11 AM
Post
#286
|
|
Jerry Group: Members Posts: 7,264 Joined: 29-October 04 From: Allentown, PA Member No.: 3,031 Region Association: None |
OK, I'm finally ready to move forward with a PCB based on the 5mm Cree LEDs. Results were good with my test board.
This board will run at even less power as I will stack 4 LEDs in series instead of 3 like the original board. This board will have 56 LEDs running at 25ma for the brake setting and about 4ma for taillight. The board will burn about 4.5W when lit for brake. I estimate a temperature rise of about 25C which is fantastic. I should be done with the layout this week and hopefully go to fab next week. The image below shows 8 LEDs facing to the left which would be populated if this board were used as a turnsignal replacement. The 8 LEDs would illuminate the side marker. Cree also manufactures an amber LED in this series. I will build a couple of these with the amber LEDs to compare the output before offering these for sale. Attached image(s) 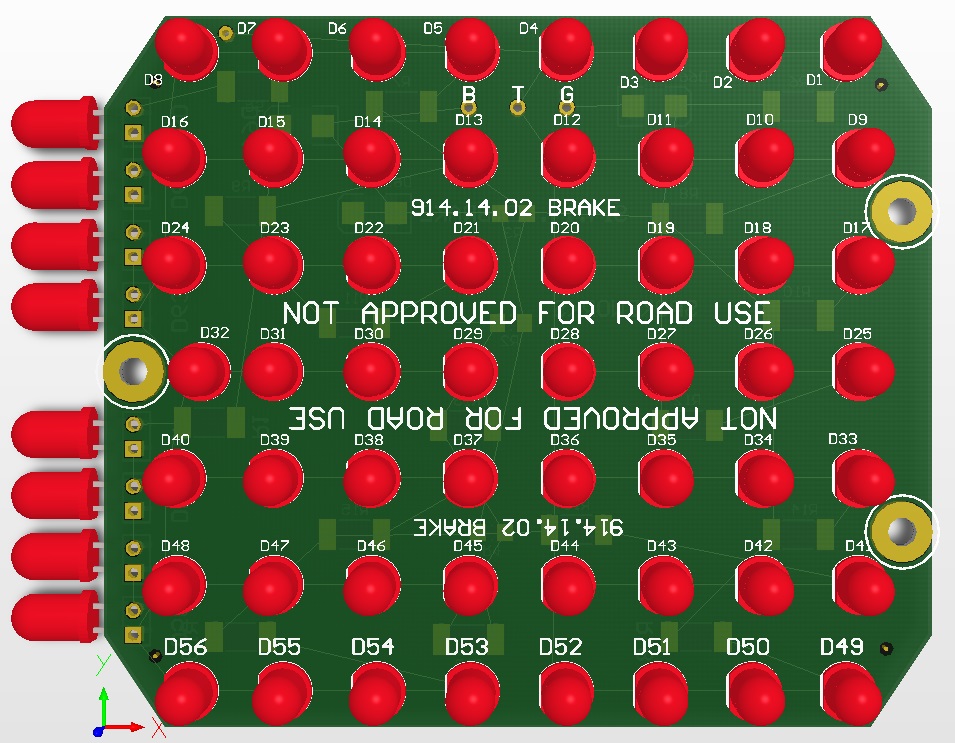
|
|
|
|
| Spoke |
Mar 3 2014, 12:15 AM
Post
#287
|
|
Jerry Group: Members Posts: 7,264 Joined: 29-October 04 From: Allentown, PA Member No.: 3,031 Region Association: None |
QUOTE(r_towle @ Mar 1 2014, 07:41 PM) Have you considered replacing the melted area with a piece of metal as part of the solution? I haven't done anything with the affected area. The cracks aren't bad but do show the signs of burning 20W in a bulb only 1-1/2 inches below the housing. I now have the high power Cree LED boards installed so there will be no more heating of the housing. |
|
|
|
| Spoke |
Mar 3 2014, 12:25 AM
Post
#288
|
|
Jerry Group: Members Posts: 7,264 Joined: 29-October 04 From: Allentown, PA Member No.: 3,031 Region Association: None |
QUOTE(McMark @ Nov 30 2013, 08:06 PM) If you want a spare set of taillight housings, just ask. Mark, I'd like to take you up on the offer of a housing. I only need one since the boards need to be interchangeable left to right. I want to investigate doing the brake and turnsignal on one board. Issues include: 1) The internal housing separators will have to be cut away. 2) A divider between turnsignals and brakes need to provided. 3) PCB fastening to the remaining parts of the housing needs to be worked out. The board will have to be at an angle such that the LEDs point directly behind the vehicle. The needed angle can be seen below. With the edge of the turnsignal PCB at the outer perimeter of the housing, the brake LEDs will be quite a bit deeper in the housing. Attached image(s) 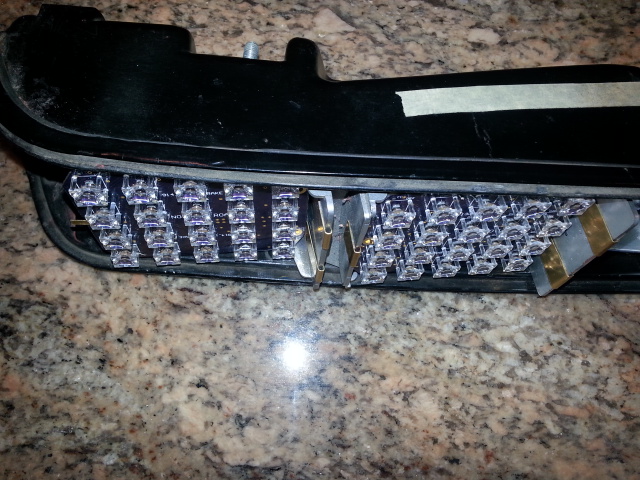
|
|
|
|
| Speedmster |
Mar 3 2014, 07:18 AM
Post
#289
|
|
Member Group: Members Posts: 62 Joined: 19-September 07 From: Louisville, Ky Member No.: 8,132 Region Association: MidAtlantic Region |
Spoke,
As I mentioned in a PM, I have received the prototype brake light boards. Dad and I disassembled his taillights yesterday and gave one a try to compare OEM with the LED board. Big difference. They look good! Dads car is 98% original 914-6 and the taillights gaskets are shot and reflectors have started flaking their reflective chrome finish off. The brass mounting clips are perfect! One observation, it was a bit challenging to get the bulb socket end in. When installing a new bulb the glass itself gives you leverage to push and turn in. Without the glass what has been your technic? These are pretty cool and when we get our buckets cleaned up and put together we will post photos. If anyone has an extra set of taillight buckets, reflectors, and lens that are still useable I would be interested. We would like to keep dads original set OEM and have a set we can dedicate to LED. |
|
|
|
| Spoke |
Mar 3 2014, 08:31 AM
Post
#290
|
|
Jerry Group: Members Posts: 7,264 Joined: 29-October 04 From: Allentown, PA Member No.: 3,031 Region Association: None |
QUOTE(Speedmster @ Mar 3 2014, 08:18 AM) Spoke, As I mentioned in a PM, I have received the prototype brake light boards. Dad and I disassembled his taillights yesterday and gave one a try to compare OEM with the LED board. Big difference. They look good! Dads car is 98% original 914-6 and the taillights gaskets are shot and reflectors have started flaking their reflective chrome finish off. The brass mounting clips are perfect! One observation, it was a bit challenging to get the bulb socket end in. When installing a new bulb the glass itself gives you leverage to push and turn in. Without the glass what has been your technic? These are pretty cool and when we get our buckets cleaned up and put together we will post photos. If anyone has an extra set of taillight buckets, reflectors, and lens that are still useable I would be interested. We would like to keep dads original set OEM and have a set we can dedicate to LED. Glad you got them lit up. I remembered that I didn't mention how to install the bulb bases in the sockets. They can be tricky. I've gotten so used to them cause I've installed and removed these a hundred times. The trick is to put your finger in the socket like in the pic. This will give enough pressure and friction to install. Attached image(s) 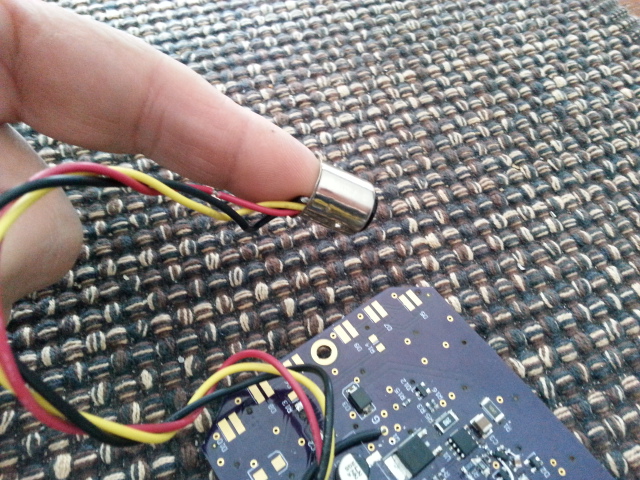
|
|
|
|
| CptTripps |
Mar 3 2014, 09:27 AM
Post
#291
|
|
:: Punch and Pie :: Group: Members Posts: 3,585 Joined: 26-December 04 From: Tuscaloosa, AL and Akron, OH Member No.: 3,342 Region Association: Upper MidWest |
Note: That's the first time that anyone has ever said "Just put your finger IN the socket to install it."
Bravo! |
|
|
|
| Spoke |
Mar 10 2014, 03:26 PM
Post
#292
|
|
Jerry Group: Members Posts: 7,264 Joined: 29-October 04 From: Allentown, PA Member No.: 3,031 Region Association: None |
Boards were ordered last week.
Will have the bare boards in 2 weeks. Should be able to start deliveries a week or 2 later. Cheers (IMG:style_emoticons/default/beerchug.gif) |
|
|
|
| orthobiz |
Mar 10 2014, 06:47 PM
Post
#293
|
|
Senior Member Group: Members Posts: 1,759 Joined: 8-January 07 From: Cadillac, Michigan Member No.: 7,438 Region Association: Upper MidWest |
Is the video with most current incarnation of the lights posted? Seems like some of your posts were showing the evolution of your design. Thanks,
Paul |
|
|
|
| Spoke |
Mar 10 2014, 07:01 PM
Post
#294
|
|
Jerry Group: Members Posts: 7,264 Joined: 29-October 04 From: Allentown, PA Member No.: 3,031 Region Association: None |
QUOTE(orthobiz @ Mar 10 2014, 08:47 PM) Is the video with most current incarnation of the lights posted? Seems like some of your posts were showing the evolution of your design. Thanks, Paul The video shows the rev 1 5mm board on the passenger side. The rev 2 5mm board will use more efficient LEDs (less current, similar intensity, wider 1/2 power angle) and will run cooler. I built one rev 1 5mm board with the efficient LEDs. That board is shown in a couple of posts ago in post 285. This one used 51 LEDs whereas the rev 2 5mm board will use 56 LEDs. The light output for the 51 LEDs was on par with the high power LED board which is my standard. I can do a video with the 51 LED board later this week. |
|
|
|
| Speedmster |
Mar 10 2014, 07:33 PM
Post
#295
|
|
Member Group: Members Posts: 62 Joined: 19-September 07 From: Louisville, Ky Member No.: 8,132 Region Association: MidAtlantic Region |
QUOTE(Spoke @ Mar 3 2014, 09:31 AM) Glad you got them lit up. I remembered that I didn't mention how to install the bulb bases in the sockets. They can be tricky. I've gotten so used to them cause I've installed and removed these a hundred times. The trick is to put your finger in the socket like in the pic. This will give enough pressure and friction to install. That is exactly what we ended up doing. While we had the taillights apart our OCD kicked in and we had some cleaning to do and ordered new seals. The OEM style bulbs (not LED) the car came with had slightly melted the bucket and reflector. Dad seems to remember back in the 80's having a brake light on the left side that stuck on one time. He thinks that is what did it. I have the rev 1 5mm (I think, correct me if I'm wrong Spoke) and they are a very big improvement in both day and night IMO. |
|
|
|
| Zimms |
Mar 11 2014, 07:17 AM
Post
#296
|
|
Senior Member Group: Members Posts: 1,415 Joined: 11-February 06 From: Michigan Member No.: 5,565 Region Association: Upper MidWest |
Spoke,
Do you have an idea of the cost? Thanks, Mark |
|
|
|
| Spoke |
Mar 11 2014, 01:29 PM
Post
#297
|
|
Jerry Group: Members Posts: 7,264 Joined: 29-October 04 From: Allentown, PA Member No.: 3,031 Region Association: None |
QUOTE(Zimms @ Mar 11 2014, 09:17 AM) Spoke, Do you have an idea of the cost? Thanks, Mark $90 + shipping. This will include: 2 PCBs with 56 LEDs each. Pigtail with 1157 base to plug directly into existing bulb socket. 6 clips to mount the boards to existing light housing. |
|
|
|
| Zimms |
Mar 11 2014, 01:34 PM
Post
#298
|
|
Senior Member Group: Members Posts: 1,415 Joined: 11-February 06 From: Michigan Member No.: 5,565 Region Association: Upper MidWest |
Thanks! Let us know where and when you want $$$
|
|
|
|
| monkeyboy |
Mar 11 2014, 02:37 PM
Post
#299
|
|
Senior Member Group: Members Posts: 808 Joined: 8-June 08 From: Los Angeles, Ca Member No.: 9,147 Region Association: None |
QUOTE(Spoke @ Mar 11 2014, 12:29 PM) QUOTE(Zimms @ Mar 11 2014, 09:17 AM) Spoke, Do you have an idea of the cost? Thanks, Mark $90 + shipping. This will include: 2 PCBs with 56 LEDs each. Pigtail with 1157 base to plug directly into existing bulb socket. 6 clips to mount the boards to existing light housing. So these are brake lights only at this time? Turn signals upcoming, or can we buy two sets of these and convert all at once? |
|
|
|
| orthobiz |
Mar 12 2014, 02:51 PM
Post
#300
|
|
Senior Member Group: Members Posts: 1,759 Joined: 8-January 07 From: Cadillac, Michigan Member No.: 7,438 Region Association: Upper MidWest |
QUOTE(Spoke @ Mar 10 2014, 09:01 PM) QUOTE(orthobiz @ Mar 10 2014, 08:47 PM) Is the video with most current incarnation of the lights posted? Seems like some of your posts were showing the evolution of your design. Thanks, Paul The video shows the rev 1 5mm board on the passenger side. The rev 2 5mm board will use more efficient LEDs (less current, similar intensity, wider 1/2 power angle) and will run cooler. I built one rev 1 5mm board with the efficient LEDs. That board is shown in a couple of posts ago in post 285. This one used 51 LEDs whereas the rev 2 5mm board will use 56 LEDs. The light output for the 51 LEDs was on par with the high power LED board which is my standard. I can do a video with the 51 LED board later this week. Thanks, much appreciated. Paul |
|
|
|
|
1 User(s) are reading this topic (1 Guests and 0 Anonymous Users)
0 Members:

|
Lo-Fi Version | Time is now: 4th November 2025 - 04:40 AM |
Invision Power Board
v9.1.4 © 2025 IPS, Inc.