|
|
|
Porsche, and the Porsche crest are registered trademarks of Dr. Ing. h.c. F. Porsche AG.
This site is not affiliated with Porsche in any way. Its only purpose is to provide an online forum for car enthusiasts. All other trademarks are property of their respective owners. |
|
|

  |

| qa1142 |
 Nov 12 2004, 11:52 AM Nov 12 2004, 11:52 AM
Post
#1
|
|
Whiplash  Group: Members Posts: 1,514 Joined: 1-June 04 From: Lake Zurich, Illinois Member No.: 2,140 |
Manual says Porsche mechanic only (IMG:style_emoticons/default/laugh.gif)
I was thinking of drilling rubber out to free them up. how do i get them apart and then back together? (IMG:style_emoticons/default/pray.gif) |
   |

 
|
| eeyore |
Nov 12 2004, 12:01 PM
Post
#2
|
|
Senior Member Group: Members Posts: 889 Joined: 8-January 04 From: meridian, id Member No.: 1,533 Region Association: None |
|
|
|
|
| ClayPerrine |
Nov 12 2004, 12:15 PM
Post
#3
|
|
Life's been good to me so far..... Group: Admin Posts: 16,437 Joined: 11-September 03 From: Hurst, TX. Member No.: 1,143 Region Association: NineFourteenerVille |
I just put the arms in a press and pushed the bushings out. They peeled right off with enough pressure, and I didn't piss off my neighbors by floating little bits of burned rubber into their pool. (IMG:style_emoticons/default/biggrin.gif)
When you reassemble and you use delrin bushings, test fit them into the brackets, and slide them over the arms. They should move freely without lubrication. IF they don't ream them until they do. Don't check them without the outside metal collars, the installation into the collars will make the hole in the center smaller. BTDT. |
 |
|
| Eric_Shea |
Nov 12 2004, 01:21 PM
Post
#4
|
|
PMB Performance Group: Admin Posts: 19,304 Joined: 3-September 03 From: Salt Lake City, UT Member No.: 1,110 Region Association: Rocky Mountains |
I've found it easier to use a torch and I've got a press sitting in the corner of the garage.
I don't like the out and out flame thrower idea either. Here's what I've found: Have a large screwdriver available and ready to use on those collars that Clay talks about. Using a torch, evenly heat the collar until you see a wisp of smoke come off the rubber bushing. Once they start to smoke they're ready to go. Put the screwdriver in the bolt holes (for the front collars) or the adjustment hole (for the rears) and begin to twist the collar. They may cool enough as to where you will have to heat them again but, by working the screwdriver and collar back and forth they will slide right off. After that it's fairly easy to cut the bushing and remove it from the arm. I put this off for a couple months and couldn't believe that I was done in five minutes (IMG:style_emoticons/default/headbang.gif) Not that tough and about a 1 or a 2 on a 10 scale. Again... don't cook the sheite out of them, just get them warm enough to smoke a bit. My $0.02 (IMG:style_emoticons/default/smash.gif) |
|
|
|
| Eric_Shea |
Nov 12 2004, 03:54 PM
Post
#5
|
|
PMB Performance Group: Admin Posts: 19,304 Joined: 3-September 03 From: Salt Lake City, UT Member No.: 1,110 Region Association: Rocky Mountains |
Found some pics...
Not as it looks, this is simply the undercoating flaming off the collar. In the background you can see the rear adjusting collars removed and the bushings cut. Attached image(s) 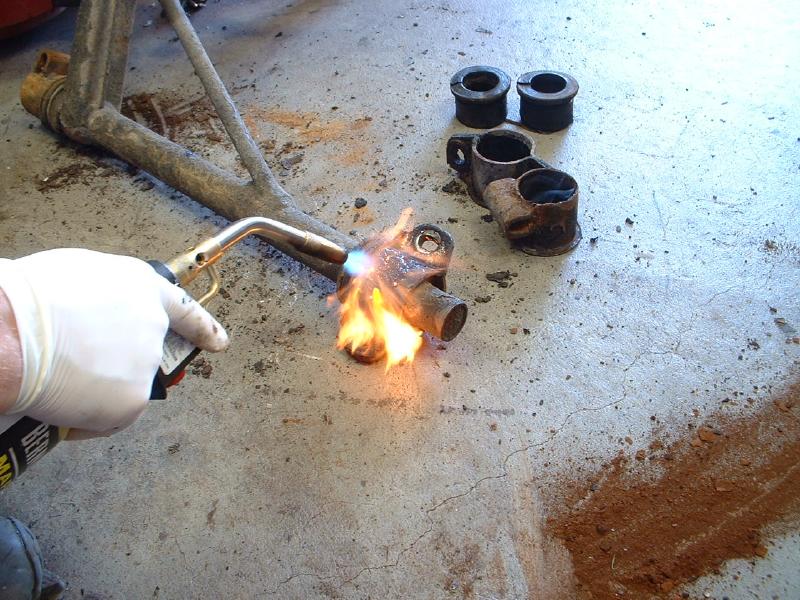
|
|
|
|
| Eric_Shea |
Nov 12 2004, 03:56 PM
Post
#6
|
|
PMB Performance Group: Admin Posts: 19,304 Joined: 3-September 03 From: Salt Lake City, UT Member No.: 1,110 Region Association: Rocky Mountains |
This is more like it. Apply even heat on both side until you see some blue smoke come out from under the collar.
Attached image(s) 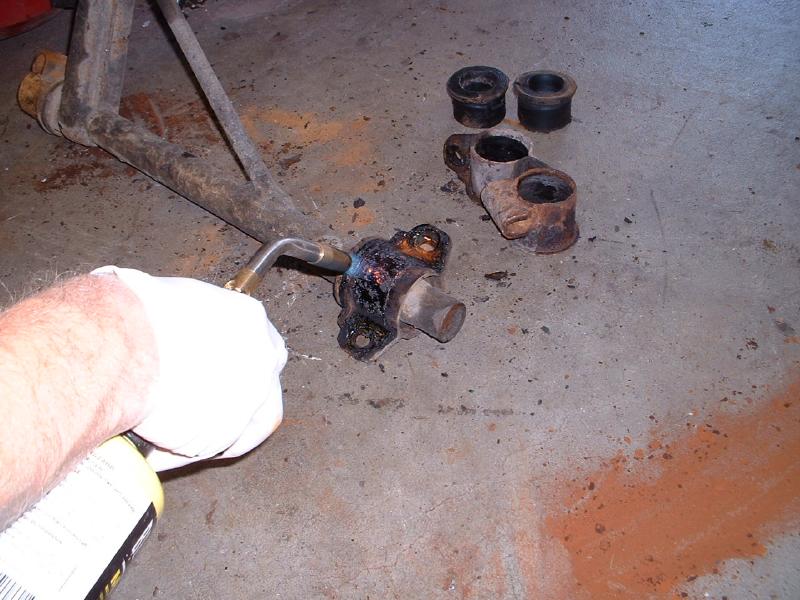
|
|
|
|
| Eric_Shea |
Nov 12 2004, 03:57 PM
Post
#7
|
|
PMB Performance Group: Admin Posts: 19,304 Joined: 3-September 03 From: Salt Lake City, UT Member No.: 1,110 Region Association: Rocky Mountains |
Insert the screwdriver and twist away...
Attached image(s) 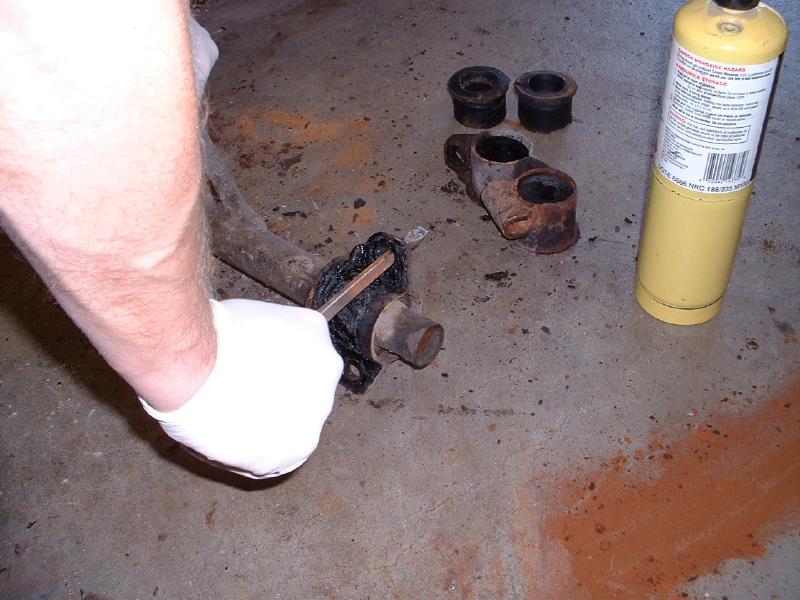
|
|
|
|
| Eric_Shea |
Nov 12 2004, 04:01 PM
Post
#8
|
|
PMB Performance Group: Admin Posts: 19,304 Joined: 3-September 03 From: Salt Lake City, UT Member No.: 1,110 Region Association: Rocky Mountains |
I usually bead blast them after that and repaint with POR-15. Powdercoating is always nice (IMG:style_emoticons/default/biggrin.gif)
Attached image(s) 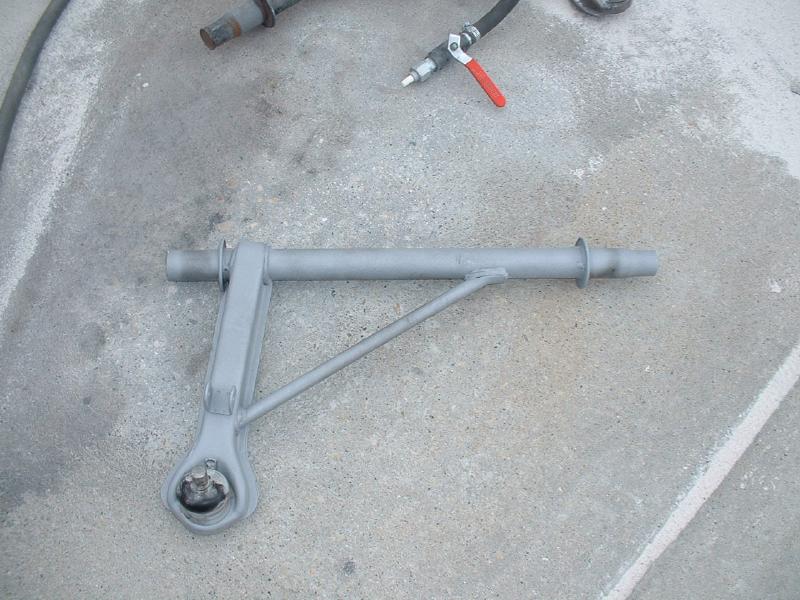
|
|
|
|
| watsonrx13 |
Nov 12 2004, 04:10 PM
Post
#9
|
|
Advanced Member Group: Members Posts: 2,735 Joined: 18-February 03 From: Plant City, FL Member No.: 312 Region Association: South East States |
Classic, this has to go to the classic section. Simple, yet descriptive...
Again Eric, you are DA MAN for tech specs. BTW, great pics.... (IMG:style_emoticons/default/smilie_pokal.gif) |
|
|
|
| Eric_Shea |
Nov 12 2004, 05:48 PM
Post
#10
|
|
PMB Performance Group: Admin Posts: 19,304 Joined: 3-September 03 From: Salt Lake City, UT Member No.: 1,110 Region Association: Rocky Mountains |
We need a blushing smiley.
Thanks Rob. I like to help. Any recent pics of your project?? |
|
|
|
|
1 User(s) are reading this topic (1 Guests and 0 Anonymous Users)
0 Members:

|
Lo-Fi Version | Time is now: 9th July 2025 - 08:21 AM |
Invision Power Board
v9.1.4 © 2025 IPS, Inc.