|
|
|
Porsche, and the Porsche crest are registered trademarks of Dr. Ing. h.c. F. Porsche AG.
This site is not affiliated with Porsche in any way. Its only purpose is to provide an online forum for car enthusiasts. All other trademarks are property of their respective owners. |
|
|


| tumamilhem |
 Feb 6 2013, 07:16 AM Feb 6 2013, 07:16 AM
Post
#1
|
|
LUFTBRIGADE  Group: Members Posts: 1,228 Joined: 29-October 12 From: Jacksonville, FL Member No.: 15,092 Region Association: South East States |
Buy NOS visors.
Haha just kidding. (IMG:style_emoticons/default/smile.gif) So I have been trying to figure out exactly how/which way to restore my sun visors after much suggestion consideration. Many send their visors off to get restored and come back with nice leather, fitted tight with stitched seams. But alas, they don't look stock and they don't include the passenger mirror (or driver's paper slot). It seems the restoration places simply make a template sized from the wire frame and cut leather to it and stitch it up. Many of you are happy with these and they do look nice. But I want mine stock. And I want the mirror. And it seemed to me that when they cut the leather, they could cut an opening for the mirror, cut out the secured area for the mirror in the stock visor and glue it to the new cut leather, hence new leather with a mirror opening and the stock mirror housing attached to it so you have a mirror. As far as the outer stitching goes, again it's not stock looking, and last time I checked when you buy a leather jacket, purse, pants, etc, they are stitched together from the inside. I don’t see why this technique is not applied to these refurbished visors. With that said, I needed to fix my visors and I wanted to keep them as original as possible. So I took two stock visors I had that both had pros and cons to them, took them apart and re-assembled the better parts into one. If you have only one visor, the same protocol can be used to repair one. The visor I needed to repair was a passenger visor. I wanted to get an excellent one for my car. And I have two that are both damaged in some regard. One visor I have has a good mirror but missing the mirror flap and the foam inside has completely disintegrated. The other visor has good foam, mirror flap, but broken mirror. So now I needed to merge the best parts of both into one good visor. I decided what would be easiest, is to remove the good mirror from one visor to the visor with the good foam and the visor flap. Removing the good foam would ruin it and I don't want to remove and re-glue the mirror flap. So swapping mirrors seemed to be the easiest way to go. The good mirror I have is good - not excellent. There are a few minor, almost unnoticeable age spots in it, but once clean with Windex, it's not visible. So I was fine reusing the good mirror. However, if yours is not up to par, it is very simple to get a mirror cut of the same size and width. And you can probably even have it done from an existing one you have, be it a handheld mirror or an inexpensive door mirror that you are not using. Otherwise, purchasing one and having it cut to size is very inexpensive. I would probably just go to an auto glass or any glass place and have them cut one for you that is tempered glass. To open the visors, the least visible incision would be the seam along the top of the visor. So with a utility knife (with a fresh razor blade), I cut the seam open along the length of the top of the visor. After opening the visor, you can see the mirror secured in the mirror housing with 8 surrounding plastic tabs holding the mirror in place. To remove mirror, CAREFULLY bend visor and tabs so tabs lift up over the mirror. It's always better to hold the mirror from the edges, as if you hold it from the middle it is more likely to break. 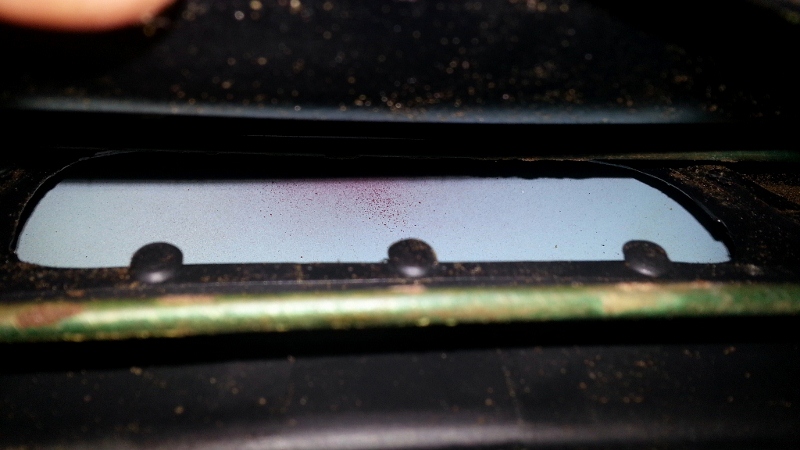 Below is the removed mirror. Tape on the back of it was used to help secure the mirror in place along with the plastic tabs. Remove the tape as bits of foam are likely to get stuck to it and make it unusable again. 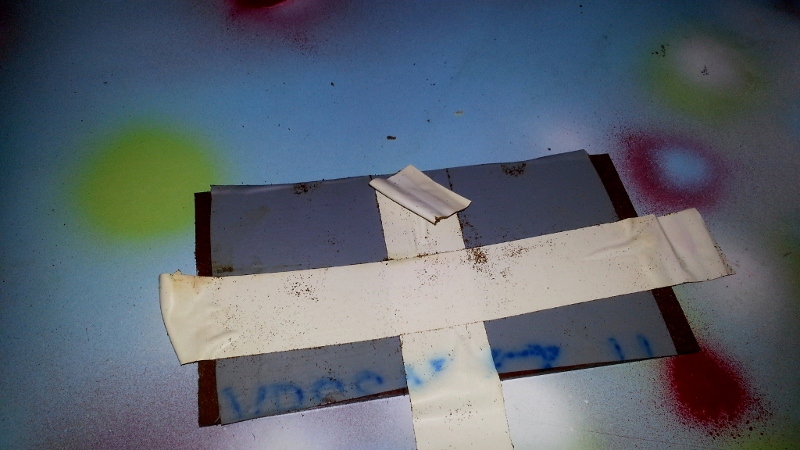 Visor with removed mirror. 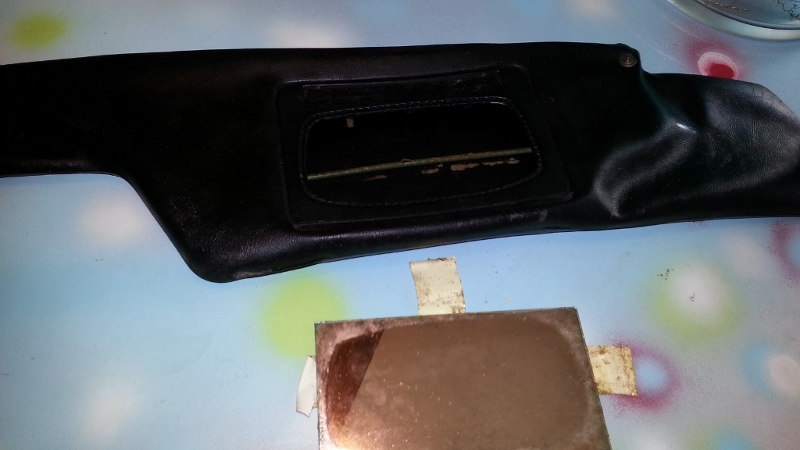 Now after making same incision on the good visor, opening to reveal broken mirror and good foam inside. 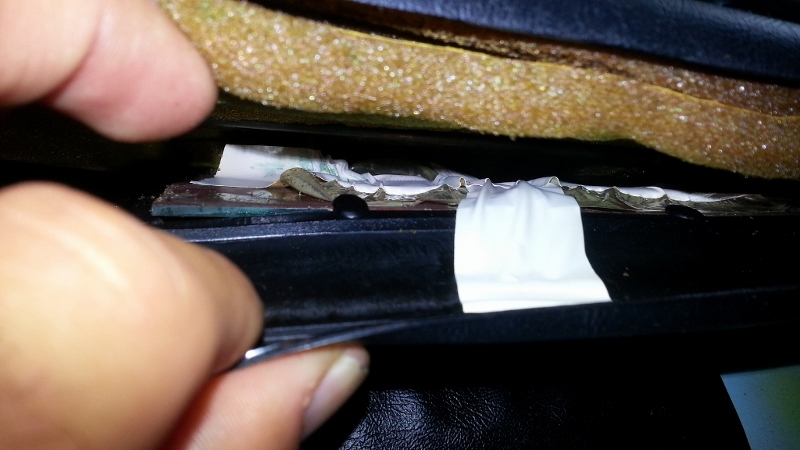 Broken mirror on good visor. 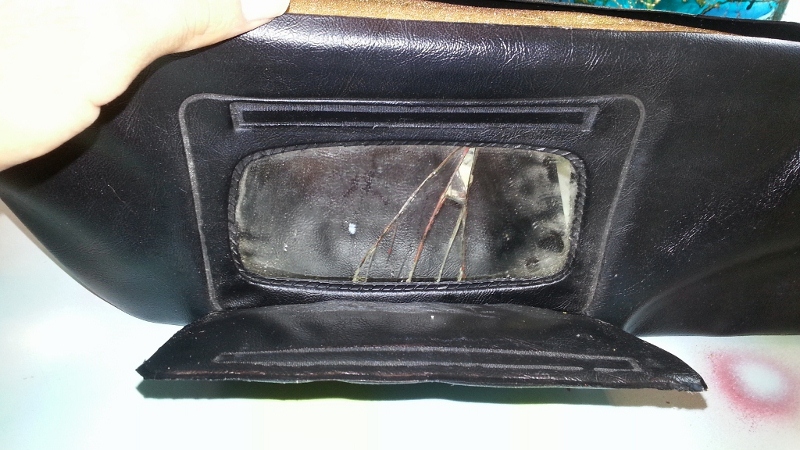 Bending visor back away from mirror edges to remove mirror from securing tabs. 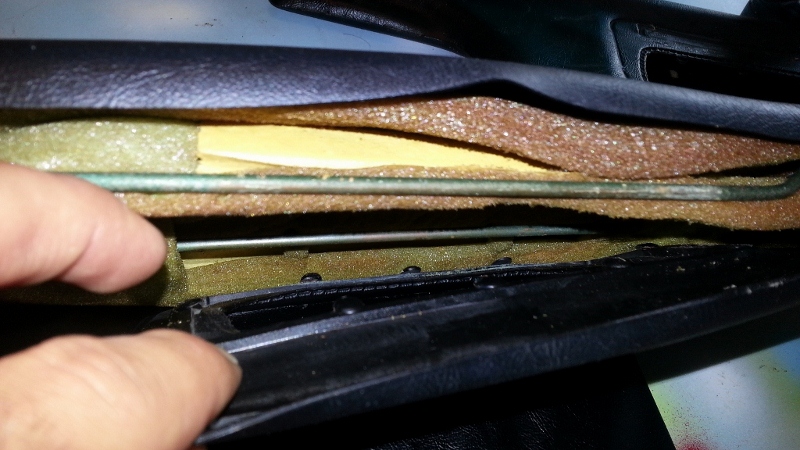 Good visor with good foam, mirror removed. 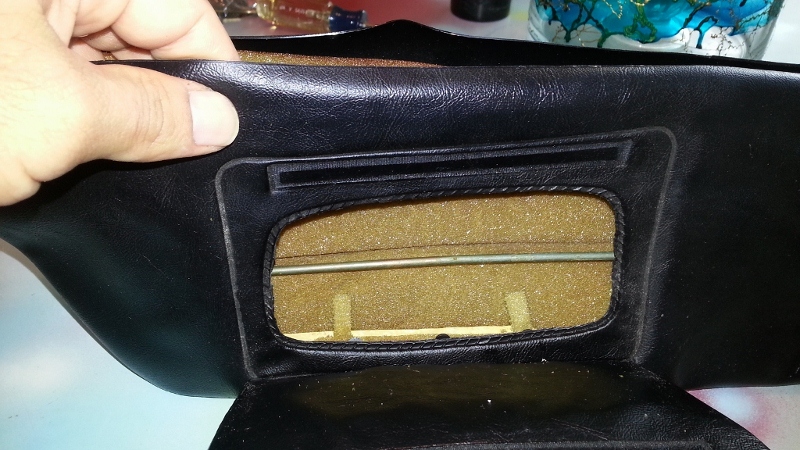 Broken mirror front and back. Back of mirror with material that hold glass together if it should break was all warped. I removed this tape-like material so I could piece the mirror back together and re-secure with new tape. 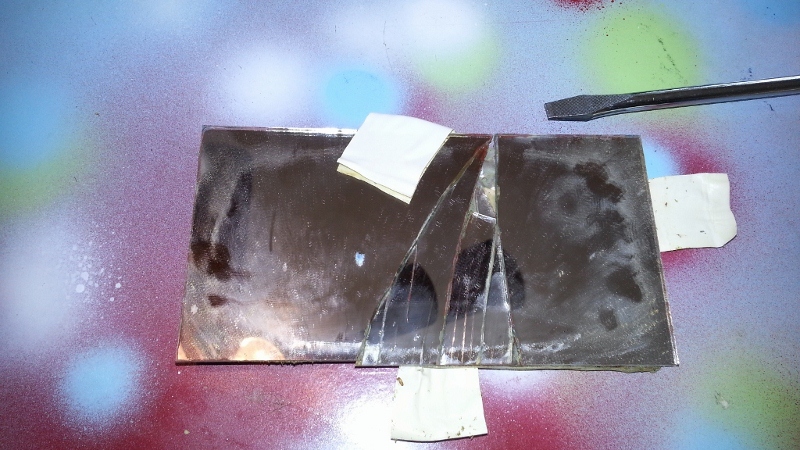  Taking the good mirror and installing it into the good visor. Note - make sure to clean and dry the inside of the visor around the mirror housing of any disintegrated foam/debris first as to have a clean surface to re-tape. Carefully bending back visor so tabs can secure around the mirror edges, putting mirror in place. Note that the mirror fits in a plastic housing, a sunken indentation in the visor. Carefully bend edges of plastic housing at each of mirror's four corners back to fit mirror securely into housing, and fold tabs over glass. 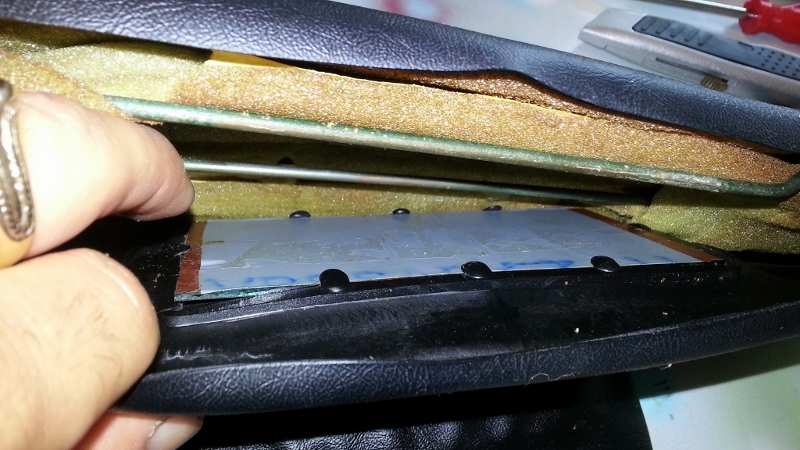 Using Gorilla tape to tape back of mirror to inside of visor as other tape did. Tape secured to mirror well, but just okay to visor. I imagine with a bit of heat, it will stick better to the plastic. The most important thing is to get the mirror stuck into it's fitted housing and secure tabs around edges. 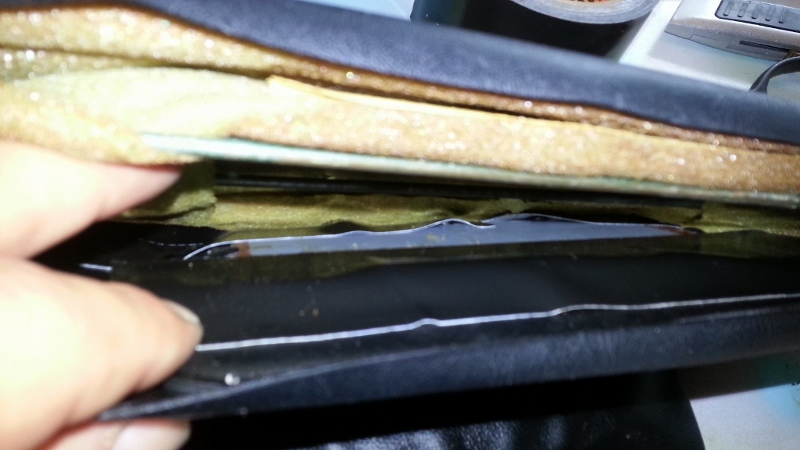 Fortunately, my visor isn't warped. So by propping up bottles around the sides of the visor, carefully adjusting so the seams don't overlap but still go far enough to touch, I used Gorilla glue to glue seam back together. Note that this is very time consuming to get it done right. I glues a few inches at a time and only propped up with bottles along visor as I went along. Otherwise, if you prop up entire visor at once, some areas will overlap and some won't come together. So do a few inches at a time and make adjustments with bottles as you move down the visor. I dabbed the inside of the seam and held together for a bit until i could leave it alone with just the bottles holding it in place. Then I glues a small line on top of the seam, using a piece of paper towel to gently wipe any excess. 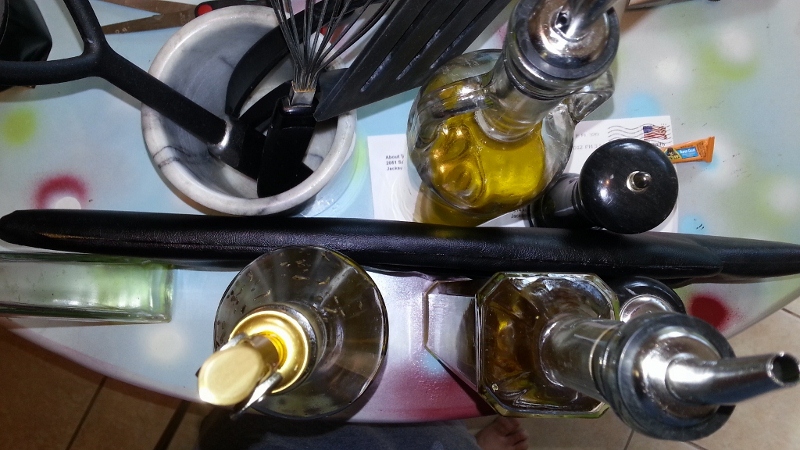 ** By the way, I don't know why the following few "Attached image(s)" pictures are showing up. They are included in the second post I made but not show up in the editing screen for this post. Must be a glitch. So please disregard the remaining pictures in this first post as to not get confused. They appear in my second post in order with description. Attached image(s) 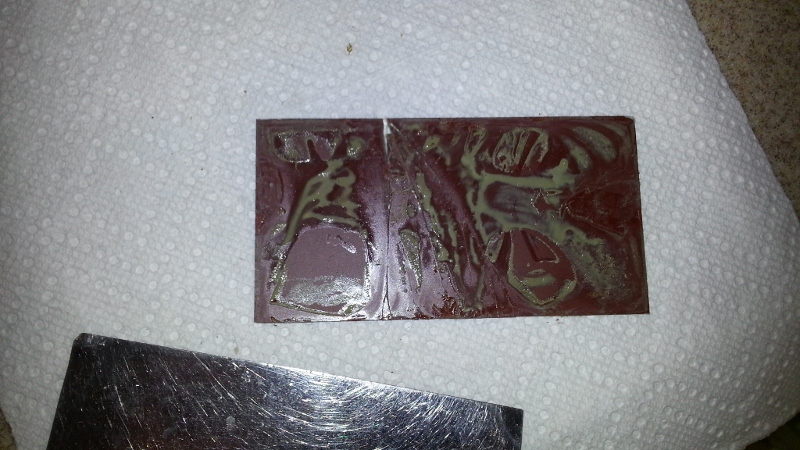 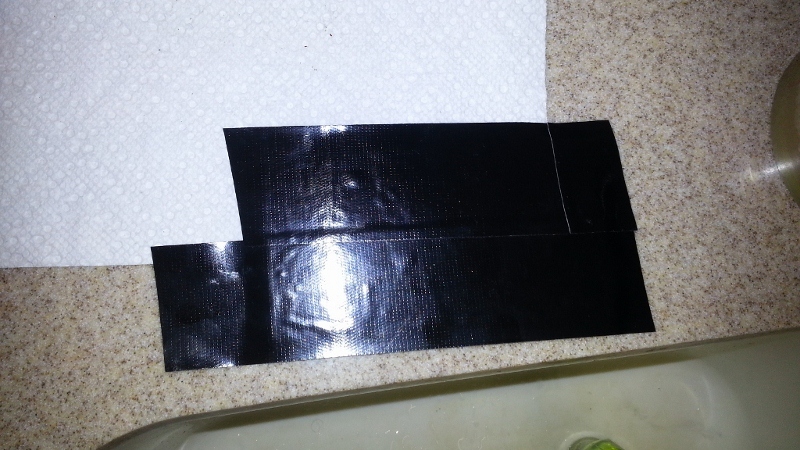 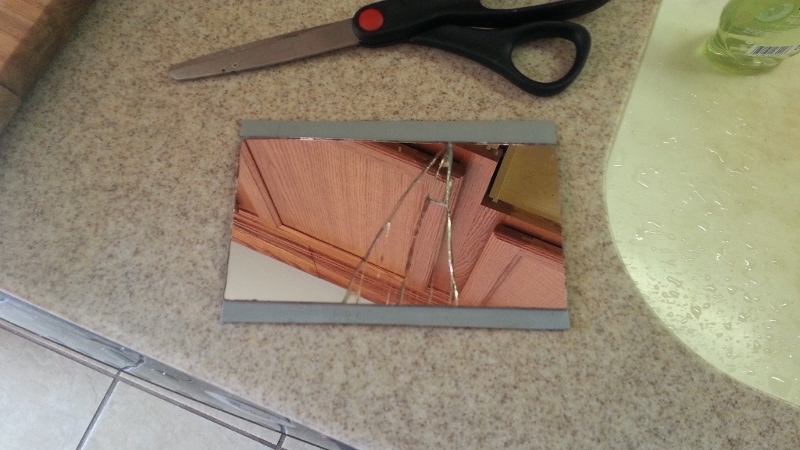 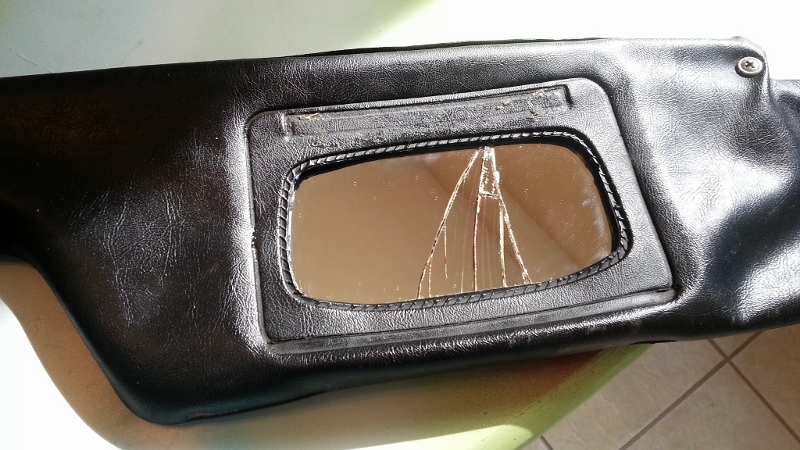 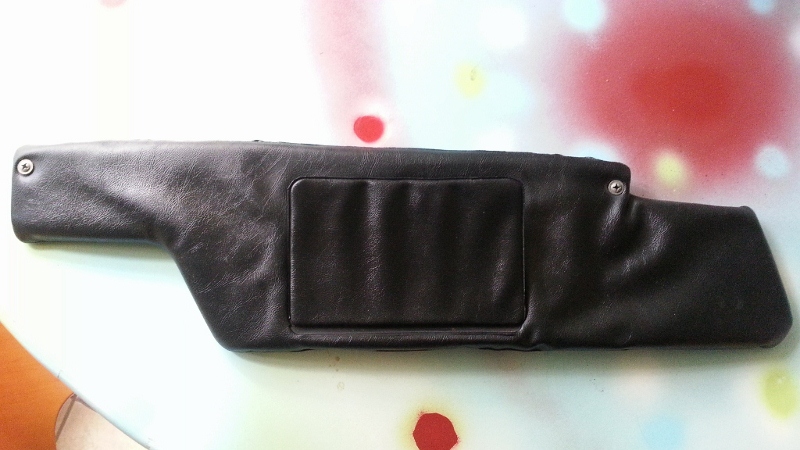
|
   |

 
|
Posts in this topic
 tumamilhem How to Refurbish Your Stock 914 Sun Visors - And Keep Them Stock Feb 6 2013, 07:16 AM
 tumamilhem You can see a small bit of the glue on top of the ... Feb 6 2013, 07:19 AM tumamilhem Hope some found this useful. :) Feb 6 2013, 04:27 PM mittelmotor Nice write-up and pics! I'd like to re-ski... Feb 6 2013, 05:46 PM turk22 good job, looks pretty darn good to me.
:beer2: Feb 6 2013, 06:40 PM RickS Not to be too much of a smart ass, but why not jus... Feb 6 2013, 09:20 PM
tumamilhem You can see a small bit of the glue on top of the ... Feb 6 2013, 07:19 AM tumamilhem Hope some found this useful. :) Feb 6 2013, 04:27 PM mittelmotor Nice write-up and pics! I'd like to re-ski... Feb 6 2013, 05:46 PM turk22 good job, looks pretty darn good to me.
:beer2: Feb 6 2013, 06:40 PM RickS Not to be too much of a smart ass, but why not jus... Feb 6 2013, 09:20 PM
 tumamilhem
Not to be too much of a smart ass, but why not ju... Feb 6 2013, 11:20 PM Eric_Shea Ok... I'll be "that guy". Not tryin... Feb 7 2013, 04:16 PM worn
Ok... I'll be "that guy". Not tryi... Feb 7 2013, 04:26 PM tumamilhem Mine is not saggy. It has double layer original fo... Feb 7 2013, 04:53 PM Eric_Shea OK... didn't read everything but looked at the... Feb 7 2013, 07:00 PM 914GT I just recently did my sunvisors. Got tired of the... Feb 7 2013, 08:24 PM tumamilhem Yeah, I wanted to keep mine all stock and look as ... Feb 8 2013, 12:01 AM tod914 I believe it was on my 75 914, I was able to get t... Feb 8 2013, 02:14 AM
tumamilhem
Not to be too much of a smart ass, but why not ju... Feb 6 2013, 11:20 PM Eric_Shea Ok... I'll be "that guy". Not tryin... Feb 7 2013, 04:16 PM worn
Ok... I'll be "that guy". Not tryi... Feb 7 2013, 04:26 PM tumamilhem Mine is not saggy. It has double layer original fo... Feb 7 2013, 04:53 PM Eric_Shea OK... didn't read everything but looked at the... Feb 7 2013, 07:00 PM 914GT I just recently did my sunvisors. Got tired of the... Feb 7 2013, 08:24 PM tumamilhem Yeah, I wanted to keep mine all stock and look as ... Feb 8 2013, 12:01 AM tod914 I believe it was on my 75 914, I was able to get t... Feb 8 2013, 02:14 AM  |
1 User(s) are reading this topic (1 Guests and 0 Anonymous Users)
0 Members:

|
Lo-Fi Version | Time is now: 19th May 2024 - 06:32 PM |
Invision Power Board
v9.1.4 © 2024 IPS, Inc.