|
|

|
Porsche, and the Porsche crest are registered trademarks of Dr. Ing. h.c. F. Porsche AG.
This site is not affiliated with Porsche in any way. Its only purpose is to provide an online forum for car enthusiasts. All other trademarks are property of their respective owners. |
|
|
  |
| timothy_nd28 |
 Jul 9 2013, 11:38 PM Jul 9 2013, 11:38 PM
Post
#41
|
|
Advanced Member     Group: Members Posts: 2,299 Joined: 25-September 07 From: IN Member No.: 8,154 Region Association: Upper MidWest 
|
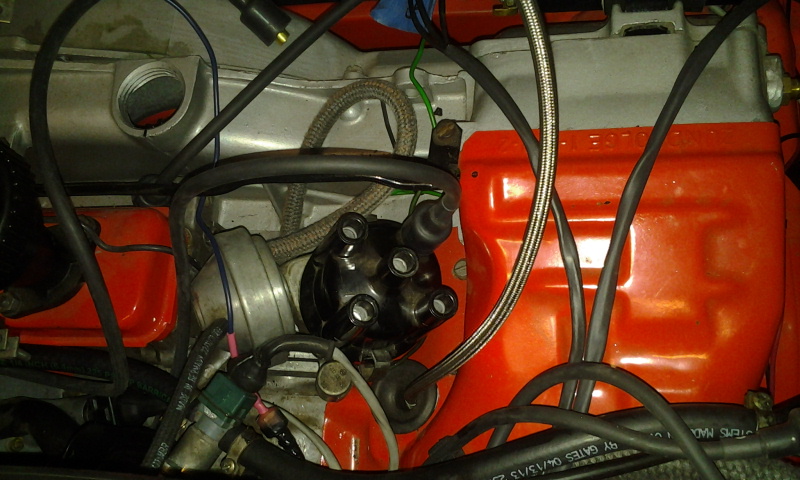
Ok, put the cap on and put only the number one plug wire on. Leave the rest of the plug wires off the cap. Repost a pic with the cap and number one plug wire on.
|
| malcolm2 |
 Jul 9 2013, 11:44 PM Jul 9 2013, 11:44 PM
Post
#42
|
|
Advanced Member     Group: Members Posts: 2,745 Joined: 31-May 11 From: Nashville Member No.: 13,139 Region Association: South East States 
|
|
| timothy_nd28 |
 Jul 9 2013, 11:49 PM Jul 9 2013, 11:49 PM
Post
#43
|
|
Advanced Member     Group: Members Posts: 2,299 Joined: 25-September 07 From: IN Member No.: 8,154 Region Association: Upper MidWest 
|
With your volt meter, set it to resistance. Measure the resistance between the middle socket on the cap to the end of the number one plug wire. Spin the dizzy clockwise till you have infinite resistance then spin the dizzy back counter clockwise right to the point where you first get a low resistance.
|
| malcolm2 |
 Jul 10 2013, 12:00 AM Jul 10 2013, 12:00 AM
Post
#44
|
|
Advanced Member     Group: Members Posts: 2,745 Joined: 31-May 11 From: Nashville Member No.: 13,139 Region Association: South East States 
|
With your volt meter, set it to resistance. Measure the resistance between the middle socket on the cap to the end of the number one plug wire. Spin the dizzy clockwise till you have infinite resistance then spin the dizzy back counter clockwise right to the point where you first get a low resistance. Either I am doing this wrong, or I found something.... my meter never moved. I am basically checking continuity thru the points and the button, correct? I then checked the #1 wire itself and got continuity, but never got the meter to read thru the center connection. Right or Wrong? |
| timothy_nd28 |
 Jul 10 2013, 12:03 AM Jul 10 2013, 12:03 AM
Post
#45
|
|
Advanced Member     Group: Members Posts: 2,299 Joined: 25-September 07 From: IN Member No.: 8,154 Region Association: Upper MidWest 
|
The vacuum can may be limiting the rotation. Try moving the number one plug wire one spot clockwise. Then spin the dizzy counter clockwise till you read resistance
|
| malcolm2 |
 Jul 10 2013, 12:12 AM Jul 10 2013, 12:12 AM
Post
#46
|
|
Advanced Member     Group: Members Posts: 2,745 Joined: 31-May 11 From: Nashville Member No.: 13,139 Region Association: South East States 
|
The vacuum can may be limiting the rotation. Try moving the number one plug wire one spot clockwise. Then spin the dizzy counter clockwise till you read resistance Yes the vacuum hits the fan housing as I turn clockwise and the cold start connector as I turn counter clockwise. However, I put the #1 plug in each of the 4 holes in the dizzy and never got the meter to move. I took the cap off and checked thru the center spring loaded section. And got continuity. The spring and button were loose and came out, but I was able to re-assemble, and try again. No movement on the meter between the center of the dizzy and the spark plug end of #1 wire...spinning the dizzy. is it me? |
| timothy_nd28 |
 Jul 10 2013, 12:16 AM Jul 10 2013, 12:16 AM
Post
#47
|
|
Advanced Member     Group: Members Posts: 2,299 Joined: 25-September 07 From: IN Member No.: 8,154 Region Association: Upper MidWest 
|
I'm sorry, I'm not thinking here. The rotor doesn't quite touch the contacts on the cap. There is a slight gap, again sorry falling asleep here. You could put a piece of aluminum foil over the rotor tip to close the distance. I think we are close here. Leave the number one plug wire where it is, and put the other wires back on. Spin the dizzy so it hits the cold start valve and try starting again
|
| malcolm2 |
 Jul 10 2013, 12:29 AM Jul 10 2013, 12:29 AM
Post
#48
|
|
Advanced Member     Group: Members Posts: 2,745 Joined: 31-May 11 From: Nashville Member No.: 13,139 Region Association: South East States 
|
I'm sorry, I'm not thinking here. The rotor doesn't quite touch the contacts on the cap. There is a slight gap, again sorry falling asleep here. You could put a piece of aluminum foil over the rotor tip to close the distance. I think we are close here. Leave the number one plug wire where it is, and put the other wires back on. Spin the dizzy so it hits the cold start valve and try starting again No change. Still will not fire up. |
| timothy_nd28 |
 Jul 10 2013, 12:31 AM Jul 10 2013, 12:31 AM
Post
#49
|
|
Advanced Member     Group: Members Posts: 2,299 Joined: 25-September 07 From: IN Member No.: 8,154 Region Association: Upper MidWest 
|
I'm turning in for the night, lets pick this up later this evening.
|
| malcolm2 |
 Jul 10 2013, 12:33 AM Jul 10 2013, 12:33 AM
Post
#50
|
|
Advanced Member     Group: Members Posts: 2,745 Joined: 31-May 11 From: Nashville Member No.: 13,139 Region Association: South East States 
|
I'm turning in for the night, lets pick this up later this evening. I was going to suggest the same.... Thanks so much. (IMG:style_emoticons/default/screwy.gif) |
| timothy_nd28 |
 Jul 10 2013, 08:30 AM Jul 10 2013, 08:30 AM
Post
#51
|
|
Advanced Member     Group: Members Posts: 2,299 Joined: 25-September 07 From: IN Member No.: 8,154 Region Association: Upper MidWest 
|
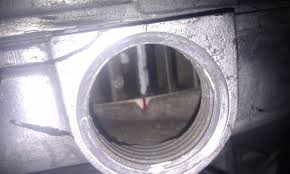
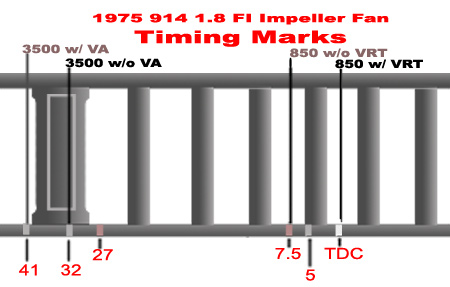
After re-reading part of this thread I made a assumption that the timing red mark on the fan was a factory mark vs a mark that you made.
 Is this what you saw last night? You should also have a 0 mark for TDC. It would be nicer if you can find the 0 mark on the fan. Depending what fan you have, the red mark could mean 7.5 degree or 27 degree BTDC. This is why the 0 TDC mark is better to set your static timing.  I know your 1911 is tight to turn right now, mine was a PIA to turn. You may be able to wedge a screw driver between the bell housing inspection port and a fly wheel tooth, which would spin the engine one tooth at a time. Find that 0 timing mark on the fan, and verify that both rockers (intake and exhaust) wiggle freely. |
| TheCabinetmaker |
 Jul 10 2013, 09:06 AM Jul 10 2013, 09:06 AM
Post
#52
|
|
I drive my car everyday      Group: Members Posts: 8,301 Joined: 8-May 03 From: Tulsa, Ok. Member No.: 666 |
K, can you remove the valve cover and wiggle the rocker arms for the number one cylinder. Do they wiggle ? I did that on the other side, to see if I was getting movement. Give me a minute and I'll check #1 for wiggle. the left one wiggles. the right does not... just thought of something.... should I have the rotor button pointing at #1? It is not in this picture. Looking at your pic, that is #1. The exhaust valve is open. You are not timed correctly. My guess is the diz drive gear is not in correctly. Do as Timothy suggested. raise the drivers wheel, trans in 5th gear, get under the car and look at the rockers while moving the drivers wheel as if it were going forward. When both rockers are relaxed with some play, you are at tdc for # 1. If there is no play, your valves are incorrectly set. When you get both closed, go look at the rotor. Use the plug tower where the rotor is pointing. That will be "alternate"# 1. If that is not the tower closest to the driver, your drive gear is off. It may be that it will run if you reposition your wires with the "alternate" #1 tower as # 1 position, However, you might not be able to get full timing cause of the limited movement of the distributor. In that case, you will have to pull the diz and drive gear to reposition it. |
| Java2570 |
 Jul 10 2013, 09:31 AM Jul 10 2013, 09:31 AM
Post
#53
|
|
Senior Member    Group: Members Posts: 649 Joined: 7-May 11 From: Fishers, IN Member No.: 13,035 Region Association: Upper MidWest |
(IMG:style_emoticons/default/agree.gif)
I just went through a similar issue with my 2.0L rebuild; had the dizzy drive gear skip one tick off and I couldn't get it started. I finally realized I needed to verify TDC #1 and make sure my drive gear was in correct place. After doing that, it started right up..... |
| stugray |
 Jul 10 2013, 11:14 AM Jul 10 2013, 11:14 AM
Post
#54
|
|
Advanced Member     Group: Members Posts: 3,824 Joined: 17-September 09 From: Longmont, CO Member No.: 10,819 Region Association: None |
QUOTE you might not be able to get full timing cause of the limited movement of the distributor. In that case, you will have to pull the diz and drive gear to reposition it. No, you should not need to pull the drive gear. You can move the #1 position in the cap by 90 degrees either way to get your adjustment back. This is when you get good at using the meter to set the static timing. Oh, and not all fans have a 0 degree TDC mark. On my recent build I had to Add one. However there should be the #1 TDC mark on the flywheel that you can see through the bottom. Stu |
| malcolm2 |
 Jul 10 2013, 11:50 AM Jul 10 2013, 11:50 AM
Post
#55
|
|
Advanced Member     Group: Members Posts: 2,745 Joined: 31-May 11 From: Nashville Member No.: 13,139 Region Association: South East States 
|
(IMG:style_emoticons/default/agree.gif) I just went through a similar issue with my 2.0L rebuild; had the dizzy drive gear skip one tick off and I couldn't get it started. I finally realized I needed to verify TDC #1 and make sure my drive gear was in correct place. After doing that, it started right up..... You sir have given me hope! But I plan to start from scratch this evening. 1st off I need a way to turn the engine by hand. My wheels and axles have not been installed yet. I plan on using a long bar and bolting it to the axle flange on the P-side, then finding something that will give me leverage and a full rotation on the D-side flange so I can turn the engine by hand and watch the rockers. |
| malcolm2 |
 Jul 10 2013, 12:04 PM Jul 10 2013, 12:04 PM
Post
#56
|
|
Advanced Member     Group: Members Posts: 2,745 Joined: 31-May 11 From: Nashville Member No.: 13,139 Region Association: South East States 
|
After re-reading part of this thread I made a assumption that the timing red mark on the fan was a factory mark vs a mark that you made.  Is this what you saw last night? You should also have a 0 mark for TDC. It would be nicer if you can find the 0 mark on the fan. Depending what fan you have, the red mark could mean 7.5 degree or 27 degree BTDC. This is why the 0 TDC mark is better to set your static timing.  I know your 1911 is tight to turn right now, mine was a PIA to turn. You may be able to wedge a screw driver between the bell housing inspection port and a fly wheel tooth, which would spin the engine one tooth at a time. Find that 0 timing mark on the fan, and verify that both rockers (intake and exhaust) wiggle freely. No, the marks are marks I made. Now I don't remember exactly what they were, I may have made notes. Also I wondered if there was a way to "re-mark" using the keyway in the fan as HOME. In your picture, it looks like the area of the fan in the V window is FLAT. IIRC I see a rounded area in mine. currently at work and can't check. Is the V notch on the fan belt side or the engine side of the housing? Probably impossible and a bad idea to take the fan off with the engine in the car, right? I forgot about the flywheel access from the bottom. There is a mark there too, right? I guess one tooth at a time is better than tweeking the starter and hoping it stops on what I think is the mark. Can't watch the rocker that way either. I am not productive here at work today, so I will probably get home early and start from stratch. I can't thank you enough, at least I am hoping all this is leading to a smoke filled garage....sooner than later. If nothing else I am learning more and more. |
| Java2570 |
 Jul 10 2013, 12:23 PM Jul 10 2013, 12:23 PM
Post
#57
|
|
Senior Member    Group: Members Posts: 649 Joined: 7-May 11 From: Fishers, IN Member No.: 13,035 Region Association: Upper MidWest |
(IMG:style_emoticons/default/agree.gif) I just went through a similar issue with my 2.0L rebuild; had the dizzy drive gear skip one tick off and I couldn't get it started. I finally realized I needed to verify TDC #1 and make sure my drive gear was in correct place. After doing that, it started right up..... You sir have given me hope! But I plan to start from scratch this evening. 1st off I need a way to turn the engine by hand. My wheels and axles have not been installed yet. I plan on using a long bar and bolting it to the axle flange on the P-side, then finding something that will give me leverage and a full rotation on the D-side flange so I can turn the engine by hand and watch the rockers. Yep, not having the axles and wheels on really makes it harder to turn over the engine! Good luck!! |
| malcolm2 |
 Jul 10 2013, 06:08 PM Jul 10 2013, 06:08 PM
Post
#58
|
|
Advanced Member     Group: Members Posts: 2,745 Joined: 31-May 11 From: Nashville Member No.: 13,139 Region Association: South East States 
|
I have come up with a way to manually rotate the engine. While doing that i can look straight accross the #1 rockers. I can perfectly see when the springs extend and close the valves. I then try to insert my feeler gauge. There is NOT a time when I can insert the .006 gauge under both swivel feet.
I can get .006 under the exhaust or outer foot, .005 seems to fit a bit better. But the best I can do at the intake is .003. At this location of the # 1 rockers the rotor button is pointing just past the location we made #1 last night. My fan housing has the v notch on the fan belt side, I see NO marks because the marks are on the engine side. |
| TheCabinetmaker |
 Jul 10 2013, 06:19 PM Jul 10 2013, 06:19 PM
Post
#59
|
|
I drive my car everyday      Group: Members Posts: 8,301 Joined: 8-May 03 From: Tulsa, Ok. Member No.: 666 |
Forget the mark you made. Where does the rotor point? At a plug tower? Which one?
Valves are too tight, bit should still run. |
| malcolm2 |
 Jul 10 2013, 06:31 PM Jul 10 2013, 06:31 PM
Post
#60
|
|
Advanced Member     Group: Members Posts: 2,745 Joined: 31-May 11 From: Nashville Member No.: 13,139 Region Association: South East States 
|
Forget the mark you made. Where does the rotor point? At a plug tower? Which one? Valves are too tight, bit should still run. Pointing between the 2 "towers" on the passenger side. That is very close to where we THOUGHT TDC would be. As I shine a bright light in the hole I can see that I wrote on the blades and I see a big "O". So I am close. another 1/4 inch of fan turn and that will be it and the button will be pointing at the right rear tower. I made the right front my temporary #1 last night. |
  |
12 User(s) are reading this topic (12 Guests and 0 Anonymous Users)
0 Members:

|
Lo-Fi Version | Time is now: 28th May 2024 - 09:06 PM |
Invision Power Board
v9.1.4 © 2024 IPS, Inc.


