|
|
|
Porsche, and the Porsche crest are registered trademarks of Dr. Ing. h.c. F. Porsche AG.
This site is not affiliated with Porsche in any way. Its only purpose is to provide an online forum for car enthusiasts. All other trademarks are property of their respective owners. |
|
|

  |

| computers4kids |
 Aug 5 2013, 06:38 PM Aug 5 2013, 06:38 PM
Post
#1
|
|
Love these little cars!  Group: Members Posts: 2,443 Joined: 11-June 05 From: Port Townsend, WA Member No.: 4,253 Region Association: None |
I need to remove the bezel on one of my gauges to do some custom work. Do you have any tips or tricks for removing the bezel with the least amount of damage? The only thing that comes to mind is very carefully use a small thin bladed flat screw driver and work it slowly around the gauge under the lip.
|
   |

 
|
| timothy_nd28 |
Aug 5 2013, 06:41 PM
Post
#2
|
|
Advanced Member Group: Members Posts: 2,299 Joined: 25-September 07 From: IN Member No.: 8,154 Region Association: Upper MidWest |
I'm currently working on a machine to do just that, but yes a small flat screwdriver gets the job done.
|
|
|
|
| balljoint |
Aug 5 2013, 06:43 PM
Post
#3
|
|
914 Wizard Group: Members Posts: 10,001 Joined: 6-April 04 Member No.: 1,897 Region Association: None |
Better than a screwdriver, I would recommend making use of a Tim. (IMG:style_emoticons/default/wink.gif)
|
|
|
|
| TheCabinetmaker |
Aug 5 2013, 07:23 PM
Post
#4
|
|
I drive my car everyday Group: Members Posts: 8,374 Joined: 8-May 03 From: Tulsa, Ok. Member No.: 666 |
I use a scratch awl (since I have one). Just lay the end under the lip,
and drag it around the gauge slowly. No damage. Then use the round part of the shaft to roll it back down |
 |
|
| GeorgeRud |
Aug 5 2013, 07:24 PM
Post
#5
|
|
Advanced Member Group: Members Posts: 3,725 Joined: 27-July 05 From: Chicagoland Member No.: 4,482 Region Association: Upper MidWest |
My guess is that VDO has a machine that crimps the bezels onto the gauge with the idea it's a disposable item that gets replaced when the gauge is repaired.
Anyone have a friend at North Hollywood Speedometer? |
|
|
|
| toolguy |
Aug 6 2013, 09:56 AM
Post
#6
|
|
Senior Member Group: Members Posts: 1,276 Joined: 2-April 11 From: San Diego / El Cajon Member No.: 12,889 Region Association: Southern California |
When putting the bezel back on, I use a hand roller that is suppose to be for installing screen windows beading. . it has a roller with a little groove running down the middle. . . place the grove where you want the bezel to bend and roll it around 'gently'. . . makes a nice consistent curve and will straighten out all the little irregular bends you put in when removing it. .
|
|
|
|
| 76-914 |
Aug 6 2013, 10:12 AM
Post
#7
|
|
Repeat Offender & Resident Subaru Antagonist Group: Members Posts: 13,878 Joined: 23-January 09 From: Temecula, CA Member No.: 9,964 Region Association: Southern California |
QUOTE(toolguy @ Aug 6 2013, 08:56 AM)  When putting the bezel back on, I use a hand roller that is suppose to be for installing screen windows beading. . it has a roller with a little groove running down the middle. . . place the grove where you want the bezel to bend and roll it around 'gently'. . . makes a nice consistent curve and will straighten out all the little irregular bends you put in when removing it. . I liked your method of removal using the hose clamp. And this tip for re-installing one is just as good. (IMG:style_emoticons/default/beerchug.gif) |
|
|
|
| r_towle |
Aug 6 2013, 12:51 PM
Post
#8
|
|
Custom Member Group: Members Posts: 24,705 Joined: 9-January 03 From: Taxachusetts Member No.: 124 Region Association: North East States |
Little screw driver.
When all is done, you will never see it. Don't try to get it all in the first pass or you can kink the edge. Just go around two or three times in different places to get it all bent up straight. Tim, if you build a tool, I would love to see what you come up with. For putting it back on, I would think a large diameter piece of tubing with the correct inside profile, and a rubber mallet would do the trick. |
|
|
|
| timothy_nd28 |
Aug 6 2013, 01:05 PM
Post
#9
|
|
Advanced Member Group: Members Posts: 2,299 Joined: 25-September 07 From: IN Member No.: 8,154 Region Association: Upper MidWest |
Yep, after being shot down by VDO and other gauge repair shops for information on this top secret tool, I decided to make my own.
When I get mine working, I'll post instructions on how to replicate it by supplying pictures and CAD drawings. So tired of this need to know basis, and I need not know (IMG:style_emoticons/default/bs.gif) |
|
|
|
| r_towle |
Aug 6 2013, 01:17 PM
Post
#10
|
|
Custom Member Group: Members Posts: 24,705 Joined: 9-January 03 From: Taxachusetts Member No.: 124 Region Association: North East States |
How about something along the lines of a counter mounted can opener.
The tool sits still, the gauge spins. A knife type attachment gets under the edge and folds up the edge in one turn. A set of graduated rollers rolls it back in place. This might work for all size gauges. Also, do a patent search....should be able to see some drawings. |
|
|
|
| Dr Evil |
Aug 6 2013, 02:27 PM
Post
#11
|
|
Send me your transmission! Group: Members Posts: 23,041 Joined: 21-November 03 From: Loveland, OH 45140 Member No.: 1,372 Region Association: MidAtlantic Region |
When I was doing gauge repair/customization I used a soup can to put the edge back over. A nice can of tomato paste is easy to manipulate. Make sure it is an unopened can as it is easier to use (IMG:style_emoticons/default/smile.gif)
|
|
|
|
| computers4kids |
Aug 6 2013, 04:30 PM
Post
#12
|
|
Love these little cars! Group: Members Posts: 2,443 Joined: 11-June 05 From: Port Townsend, WA Member No.: 4,253 Region Association: None |
This is great info...thank you!!
Mark |
|
|
|
| rnellums |
Aug 10 2013, 01:51 PM
Post
#13
|
|
Professional Enthusiast Group: Members Posts: 1,673 Joined: 26-November 09 From: Littleton, CO Member No.: 11,072 Region Association: Rocky Mountains |
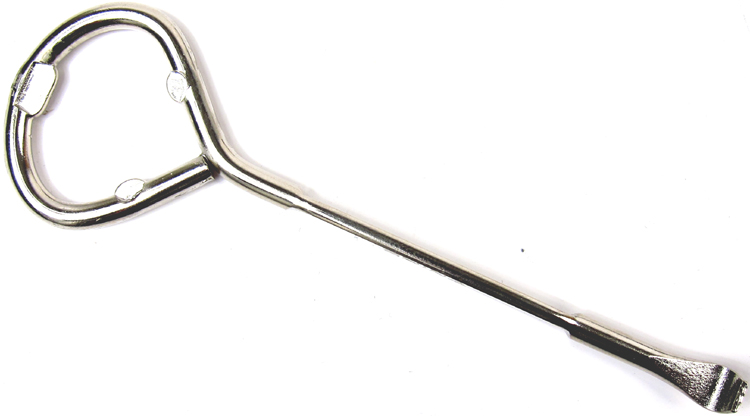
A paint can opener has enough curvature of the blade to fit under the lip, I prefer it to a screw driver.
 |
|
|
|
| computers4kids |
Aug 21 2013, 09:25 PM
Post
#14
|
|
Love these little cars! Group: Members Posts: 2,443 Joined: 11-June 05 From: Port Townsend, WA Member No.: 4,253 Region Association: None |
OK...I started to convert an extra 3.25 911 clock for my Ghetty dash using a wideband AEM air fuel gauge. I still need to pickup a lense without a hole. Pelican sells glass ones for $20. Do you think a local glass company can cut one?
Secondly, as you can see I left the clock markings on the faceplate to take-up some of the extra space around the 2" A/F gauge. Do you think I should leave the markings or paint the faceplate black? I'm concerned that if I paint the faceplate black the 2" gauge will look too small. Another option would be to design an overlay on the computer for the faceplate. I thought that perhaps I could use a font similar to the stock VDO gauges and label that extra space with markings and labels like, lean, stoich and rich. Ideas? Suggestions? Attached image(s) 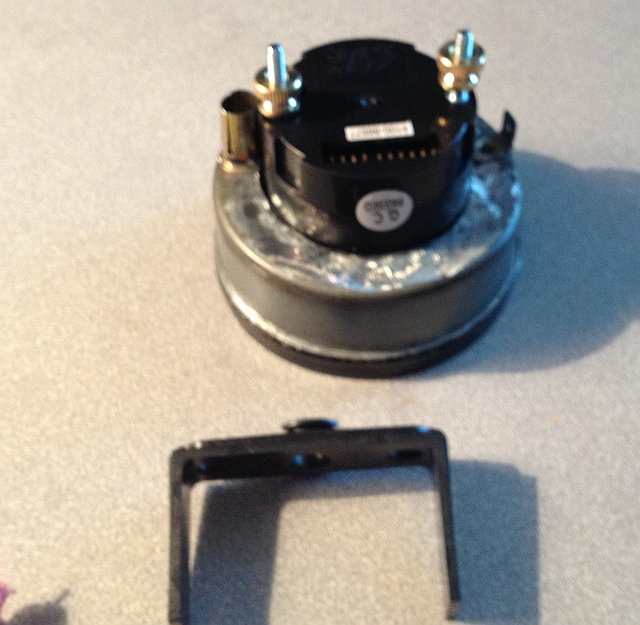 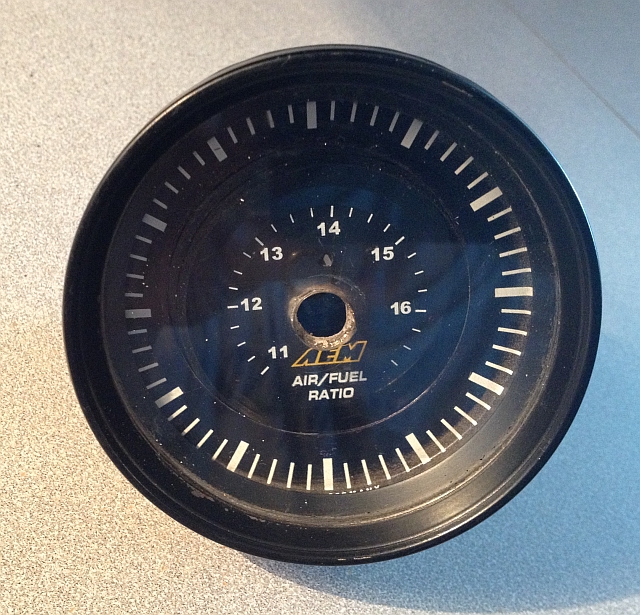 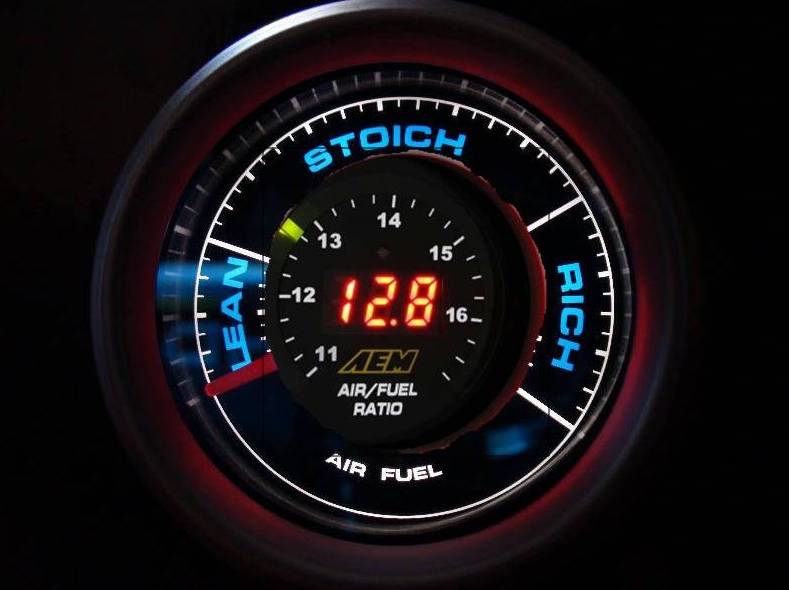
|
|
|
|
| timothy_nd28 |
Aug 21 2013, 09:41 PM
Post
#15
|
|
Advanced Member Group: Members Posts: 2,299 Joined: 25-September 07 From: IN Member No.: 8,154 Region Association: Upper MidWest |
How did you remove the clock hands?
|
|
|
|
| computers4kids |
Aug 21 2013, 10:08 PM
Post
#16
|
|
Love these little cars! Group: Members Posts: 2,443 Joined: 11-June 05 From: Port Townsend, WA Member No.: 4,253 Region Association: None |
QUOTE(timothy_nd28 @ Aug 21 2013, 08:41 PM) How did you remove the clock hands? When you remove the bezel, the guts of the clock easily slip out. Here's the dash I'm trying to have the modified gauge blend into. The clock is on the far right. (IMG:http://www.914world.com/bbs2/uploads/post-4253-1375059013.jpg) |
|
|
|
|
1 User(s) are reading this topic (1 Guests and 0 Anonymous Users)
0 Members:

|
Lo-Fi Version | Time is now: 7th April 2026 - 02:06 PM |
Invision Power Board
v9.1.4 © 2026 IPS, Inc.