|
|
|
Porsche, and the Porsche crest are registered trademarks of Dr. Ing. h.c. F. Porsche AG.
This site is not affiliated with Porsche in any way. Its only purpose is to provide an online forum for car enthusiasts. All other trademarks are property of their respective owners. |
|
|

  |

| Mblizzard |
 Aug 9 2013, 04:17 PM Aug 9 2013, 04:17 PM
Post
#1
|
|
Advanced Member  Group: Members Posts: 3,033 Joined: 28-January 13 From: Knoxville Tn Member No.: 15,438 Region Association: South East States |
Well it has been a long road to get to this picture. It looks good but I hope it runs better!
 I have to thank Mark at Original Customs for getting me an engine that just needed a little polishing. 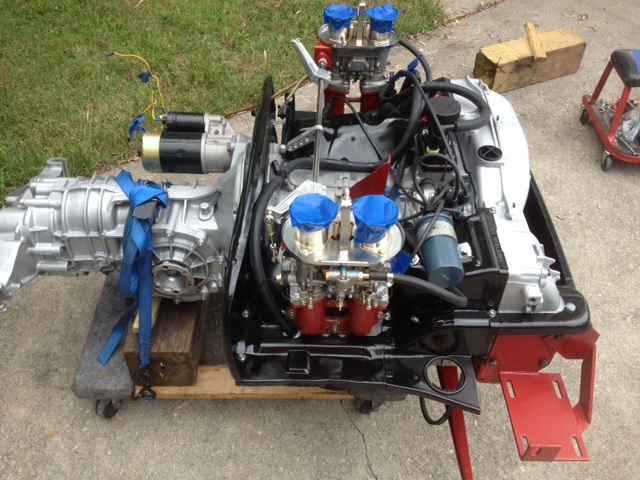 Tomorrow is install day and hopefully that will lead to driving at some point. |
   |

 
|
| McMark |
Aug 9 2013, 04:32 PM
Post
#2
|
|
914 Freak! Group: Retired Admin Posts: 20,179 Joined: 13-March 03 From: Grand Rapids, MI Member No.: 419 Region Association: None |
|
|
|
|
| worn |
Aug 9 2013, 04:38 PM
Post
#3
|
|
can't remember Group: Members Posts: 3,156 Joined: 3-June 11 From: Madison, WI Member No.: 13,152 Region Association: Upper MidWest |
QUOTE(Mblizzard @ Aug 9 2013, 02:17 PM)  Well it has been a long road to get to this picture. It looks good but I hope it runs better! I have to thank Mark at Original Customs for getting me an engine that just needed a little polishing. Tomorrow is install day and hopefully that will lead to driving at some point. Very nice!!! What does the bracket do? Replace battery tray? Or supercharger goes there. (IMG:style_emoticons/default/smilie_pokal.gif) |
|
|
|
| Elliot Cannon |
Aug 9 2013, 04:53 PM
Post
#4
|
|
914 Guru Group: Retired Members Posts: 8,487 Joined: 29-December 06 From: Paso Robles Ca. (Central coast) Member No.: 7,407 Region Association: None |
It looks so good it almost HAS to run good. Am I wrong? (IMG:style_emoticons/default/laugh.gif)
|
|
|
|
| McMark |
Aug 9 2013, 04:53 PM
Post
#5
|
|
914 Freak! Group: Retired Admin Posts: 20,179 Joined: 13-March 03 From: Grand Rapids, MI Member No.: 419 Region Association: None |
It a place to set your beer while your working.
|
|
|
|
| Mblizzard |
Aug 9 2013, 04:54 PM
Post
#6
|
|
Advanced Member Group: Members Posts: 3,033 Joined: 28-January 13 From: Knoxville Tn Member No.: 15,438 Region Association: South East States |
That bracket does exactly the opposite of a super charger. It sucks HP out! It is for the AC compressor.
|
|
|
|
| stugray |
Aug 9 2013, 05:06 PM
Post
#7
|
|
Advanced Member Group: Members Posts: 3,824 Joined: 17-September 09 From: Longmont, CO Member No.: 10,819 Region Association: None |
Very nice!
Step two - (after installing engine) = replace linkage with CFR throttle linkage. Step three - add bronze bushing to side shift tranny (cant see that side to see if you have already) You appear to be running head vents, but where do they go? Stu |
|
|
|
| Mblizzard |
Aug 9 2013, 05:13 PM
Post
#8
|
|
Advanced Member Group: Members Posts: 3,033 Joined: 28-January 13 From: Knoxville Tn Member No.: 15,438 Region Association: South East States |
The head vents go to a oil breather that is not on the engine. At some point I am going back ti FI so I did not close off the vents.
|
|
|
|
| malcolm2 |
Aug 9 2013, 05:32 PM
Post
#9
|
|
Advanced Member Group: Members Posts: 2,745 Joined: 31-May 11 From: Nashville Member No.: 13,139 Region Association: South East States |
|
|
|
|
| Mblizzard |
Aug 9 2013, 05:39 PM
Post
#10
|
|
Advanced Member Group: Members Posts: 3,033 Joined: 28-January 13 From: Knoxville Tn Member No.: 15,438 Region Association: South East States |
QUOTE(malcolm2 @ Aug 9 2013, 03:32 PM) Did you ever get yours back together? Just so you know, I checked compression and verified the timing many times! But I did not split the case on this one so I have high hopes for a quick start. |
|
|
|
| rhodyguy |
Aug 10 2013, 07:15 AM
Post
#11
|
|
Chimp Sanctuary NW. Check it out. Group: Members Posts: 22,081 Joined: 2-March 03 From: Orion's Bell. The BELL! Member No.: 378 Region Association: Galt's Gulch |
rock on mike! git er' in there! mild cam iirc, yes?
|
|
|
|
| PanelBilly |
Aug 10 2013, 08:53 AM
Post
#12
|
|
914 Guru Group: Members Posts: 5,807 Joined: 23-July 06 From: Kent, Wa Member No.: 6,488 Region Association: Pacific Northwest |
Take a video of the startup so we can hear you scream like a little girl
|
 |
|
| Mblizzard |
Aug 10 2013, 01:40 PM
Post
#13
|
|
Advanced Member Group: Members Posts: 3,033 Joined: 28-January 13 From: Knoxville Tn Member No.: 15,438 Region Association: South East States |
Well it is in! Mostly wired but still have heat exchangers and exhaust to go.
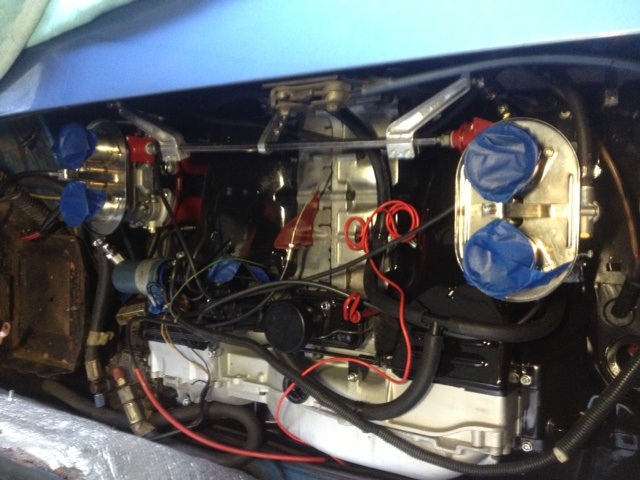 Just need to figure out how to wire up the starter. It has the hot start external configuration that I did not pay much attention to when I removed it. Kevin no cam. Left some HP on the table but I am planning on switching it back to FI at some point. PanelBilly my wife loved your post and promised to capture the moment. |
|
|
|
| McMark |
Aug 10 2013, 05:37 PM
Post
#14
|
|
914 Freak! Group: Retired Admin Posts: 20,179 Joined: 13-March 03 From: Grand Rapids, MI Member No.: 419 Region Association: None |
Pic of the starter wiring and we can help
|
|
|
|
| r_towle |
Aug 11 2013, 03:12 PM
Post
#15
|
|
Custom Member Group: Members Posts: 24,576 Joined: 9-January 03 From: Taxachusetts Member No.: 124 Region Association: North East States |
Should be three wires.
One from the battery One yellow wire One goes to the spade terminal at the starter solenoid. The yellow wire would be the trigger The one from the battery and the one going to the starter are the circuit. Typically a three pole relay has two poles that look alike, or are on the same plane, and one that is not... A relay is a switch. The trigger closes the connection. OR You can just go back to stock and put the yellow wire on the spade bit at the starter solenoid and remove the aftermarket wiring. Rich |
|
|
|
| Mblizzard |
Aug 11 2013, 03:30 PM
Post
#16
|
|
Advanced Member Group: Members Posts: 3,033 Joined: 28-January 13 From: Knoxville Tn Member No.: 15,438 Region Association: South East States |
Thanks Rich. Before I pulled the engine I thought I had installed a bad ignition switch. I change that again and t still won't start. I hear a click from the fuse block. But nothing at the starter. I have not checked voltages yet but is there a relay for the starter on the fuse block?
I have a push bottom starter wired in and it runs but the key wont start it. Any suggestions? Mark that thing started on the first crank! Never had that happen ever! |
|
|
|
| Jesco Reient |
Aug 11 2013, 05:19 PM
Post
#17
|
|
Member Group: Members Posts: 135 Joined: 18-July 12 From: Western Washington Member No.: 14,690 Region Association: Pacific Northwest |
QUOTE(stugray @ Aug 9 2013, 04:06 PM) Very nice! Step two - (after installing engine) = replace linkage with CFR throttle linkage. Step three - add bronze bushing to side shift tranny (cant see that side to see if you have already) You appear to be running head vents, but where do they go? Stu I'm in the same place with mine, where do you get information on "Step three - add bronze bushing to side shift tranny (cant see that side to see if you have already)" Appreciate information thanks, |
|
|
|
|
1 User(s) are reading this topic (1 Guests and 0 Anonymous Users)
0 Members:

|
Lo-Fi Version | Time is now: 20th May 2024 - 08:01 PM |
Invision Power Board
v9.1.4 © 2024 IPS, Inc.