|
|
|
Porsche, and the Porsche crest are registered trademarks of Dr. Ing. h.c. F. Porsche AG.
This site is not affiliated with Porsche in any way. Its only purpose is to provide an online forum for car enthusiasts. All other trademarks are property of their respective owners. |
|
|

  |

| 914forme |
 Jan 21 2018, 04:39 PM Jan 21 2018, 04:39 PM
Post
#1061
|
|
Times a wastin', get wrenchin'!  Group: Members Posts: 3,896 Joined: 24-July 04 From: Dayton, Ohio Member No.: 2,388 Region Association: None |
Tom asked me to add updates as I did work on his gauges for him. We have a few items up our sleeve and this car will have a full array of needles to keep your eyes off of so you can (IMG:style_emoticons/default/driving.gif)
First item was a new speedo for the car. Subaru uses an electric speed sensor in their MT5's so this car needed a speedo that was electric drive. So here you go, proper VDO 930.641.508.00 And well like most older VDO speedo's Anton thought it was a great idea to lube the gear shaft with a bit of grease. The grease happens to break down the material the gear was built out of. (IMG:style_emoticons/default/headbang.gif) This is the worse one I have seen in my years of doing these. 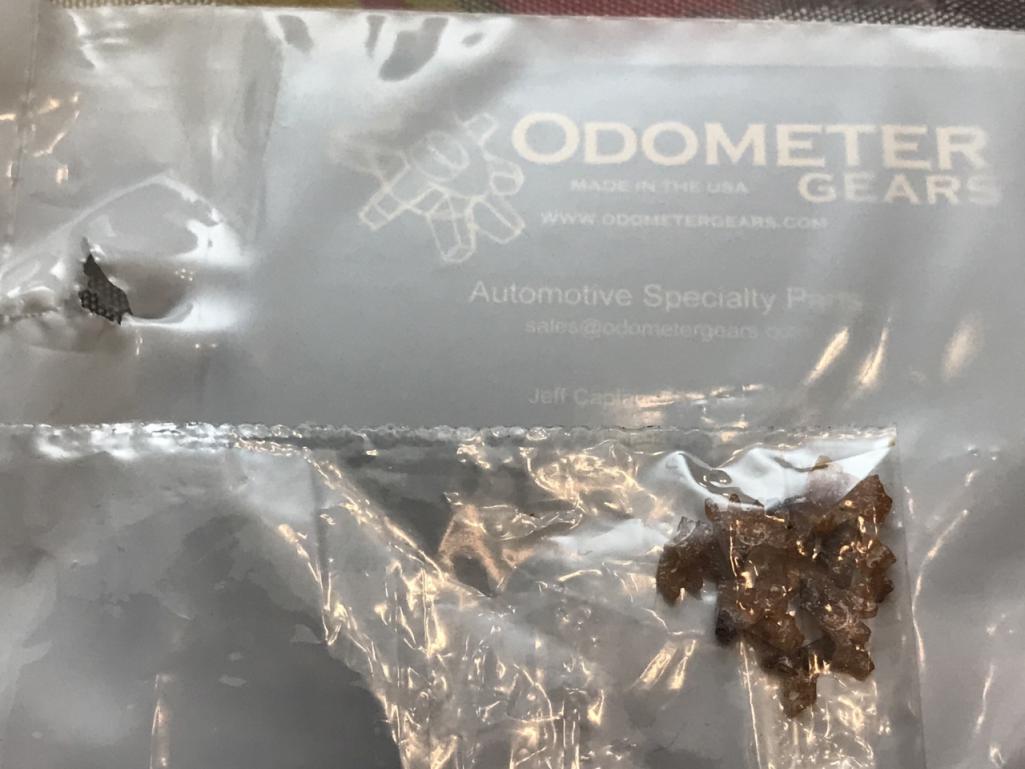 Odometer Gears LTD to the rescue, meet these guys at Hersey, great group of guys, and I knew at some point I would need at least one of their gears. Since I did not know the miles on Grey, I asked Tom how he wanted to handle the conversion. He said zero it out, it is a for the most part a brand new car. (IMG:style_emoticons/default/agree.gif) 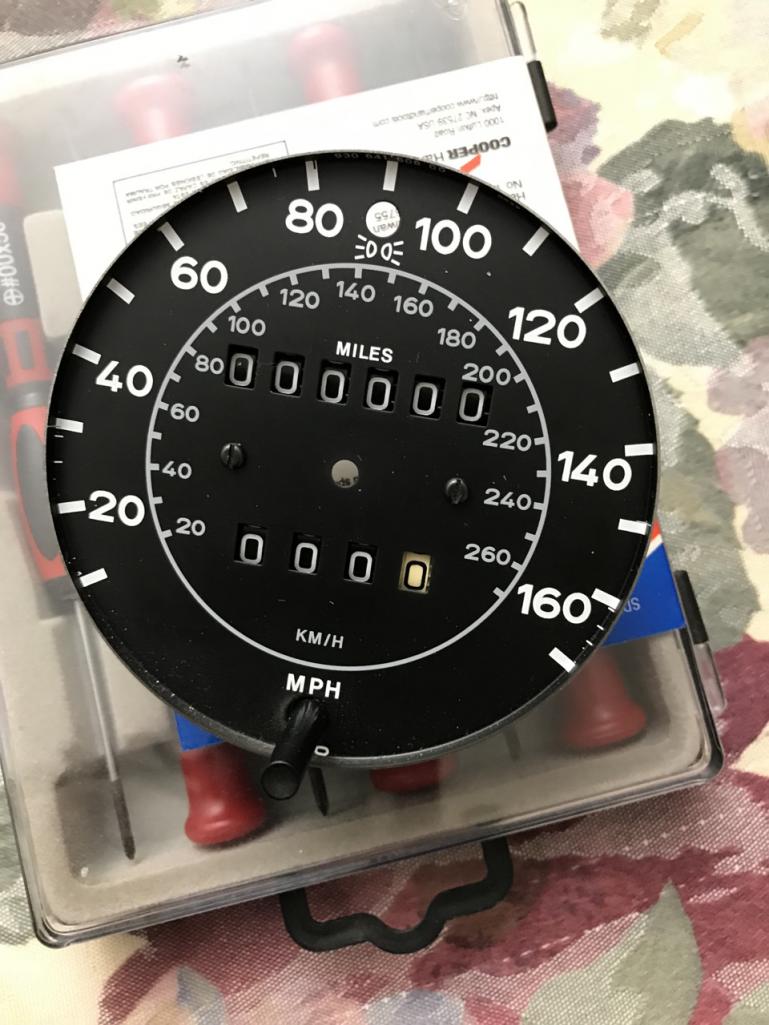 Next up get the new gear back in and get this thing assembled. First up, I polished up the shafts, then added a touch of dry graphite bearing treatment to the shaft. Then repolished the shaft to remove excess per directions. Spins smooth now. 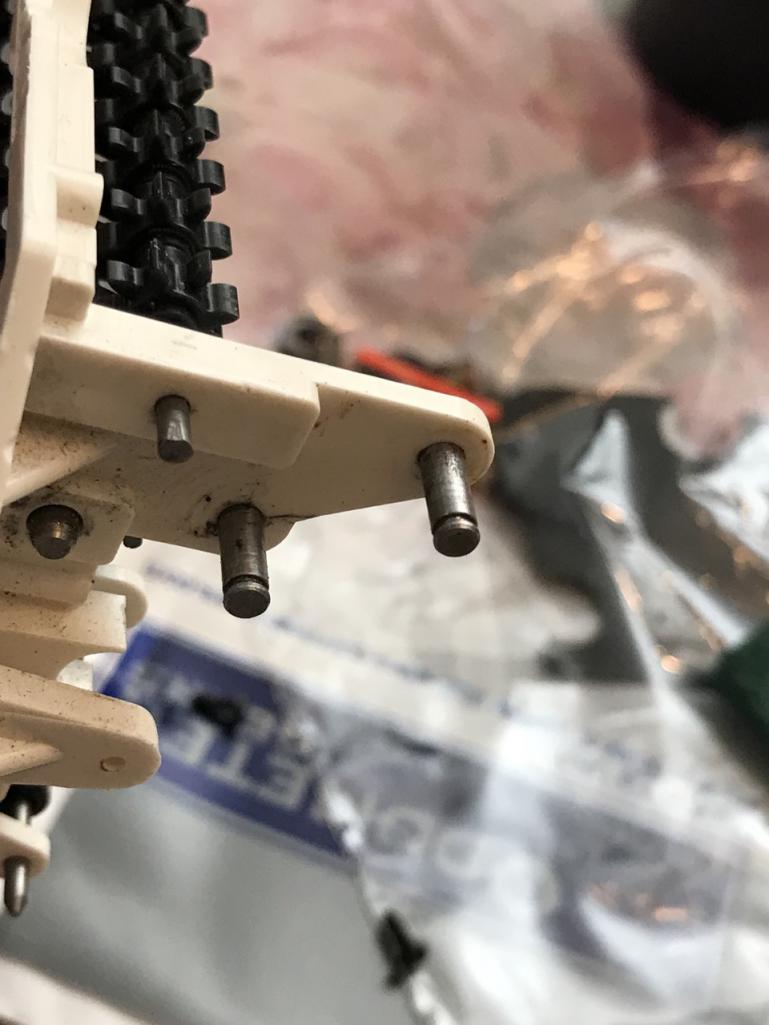 Overkill (IMG:style_emoticons/default/confused24.gif) Oh heck yeah it is. Next up add all the gears and e-clips 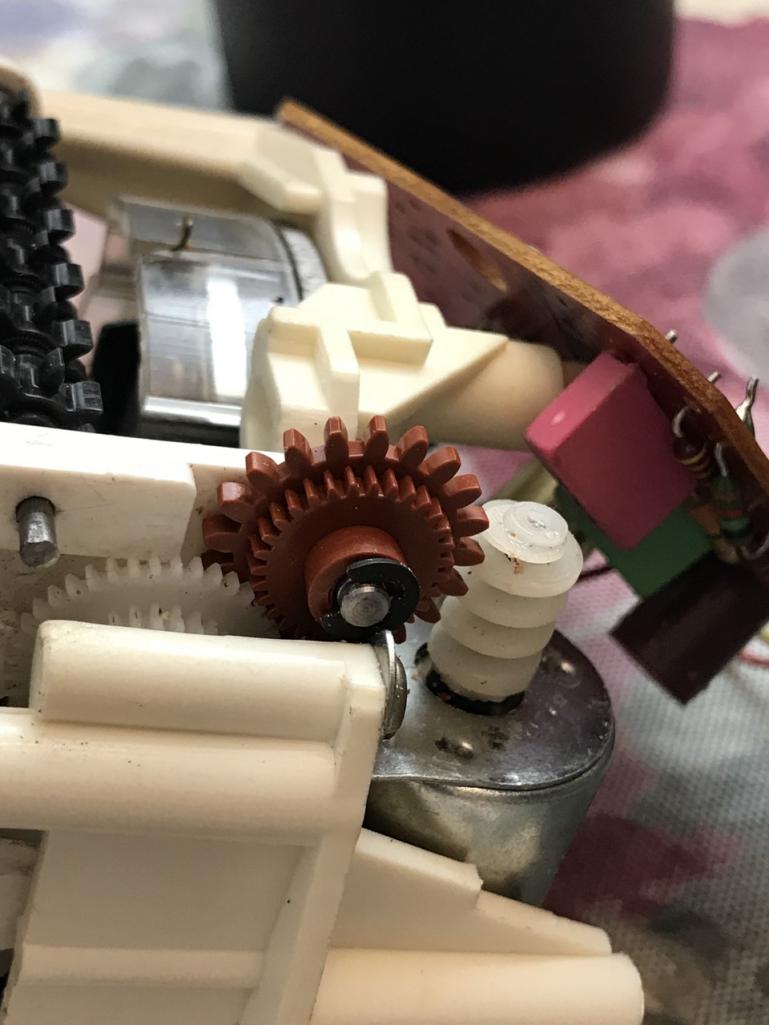 Test everything and it works (IMG:style_emoticons/default/piratenanner.gif) And because of the high definition pictures I see a piece of the old gear in the worm drive on motor, that has been removed. And it is now together again. 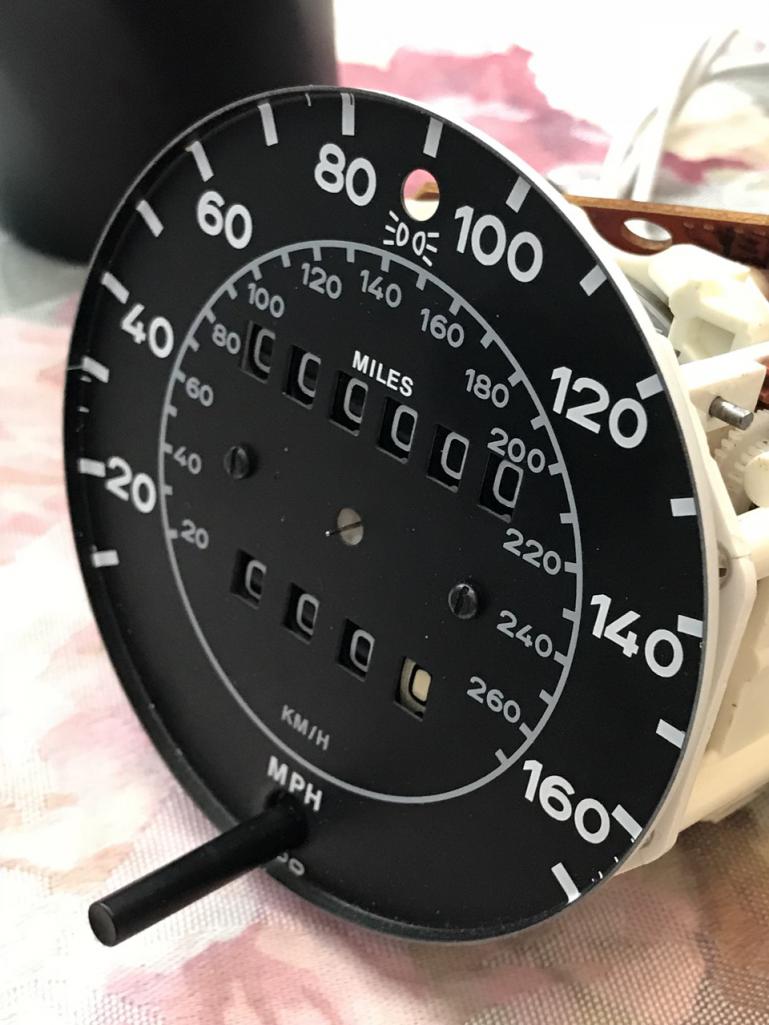 That is all I can do for now. All the needles will be painted at the same time, so they will all match. So I'll bag this one up and move onto the next one. When I reassemble I will re-dust all the surfaces to get all the last bits out and off the assembly and the faces. |
   |

 
|
| theer |
Jan 22 2018, 08:05 AM
Post
#1062
|
|
Senior Member Group: Members Posts: 692 Joined: 31-July 15 From: Dover, MA Member No.: 19,014 Region Association: North East States |
Looks good, Steve.
|
|
|
|
| Amenson |
Feb 7 2018, 04:14 PM
Post
#1063
|
|
That's opposite lock!! Group: Members Posts: 645 Joined: 27-May 05 From: Dublin, OH Member No.: 4,154 Region Association: None |
Fun with wires!
The harness from Mike looks decent. I have all of the tape off of the harness so that I can inspect and repair any issues. There are a few spliced wires here and there and one that had a few too many electrons moving through it at some point that will need to be replaced. Still need to cut off the protective tubing to check the rest of the wires. Then everything will get wrapped again prior to installation. 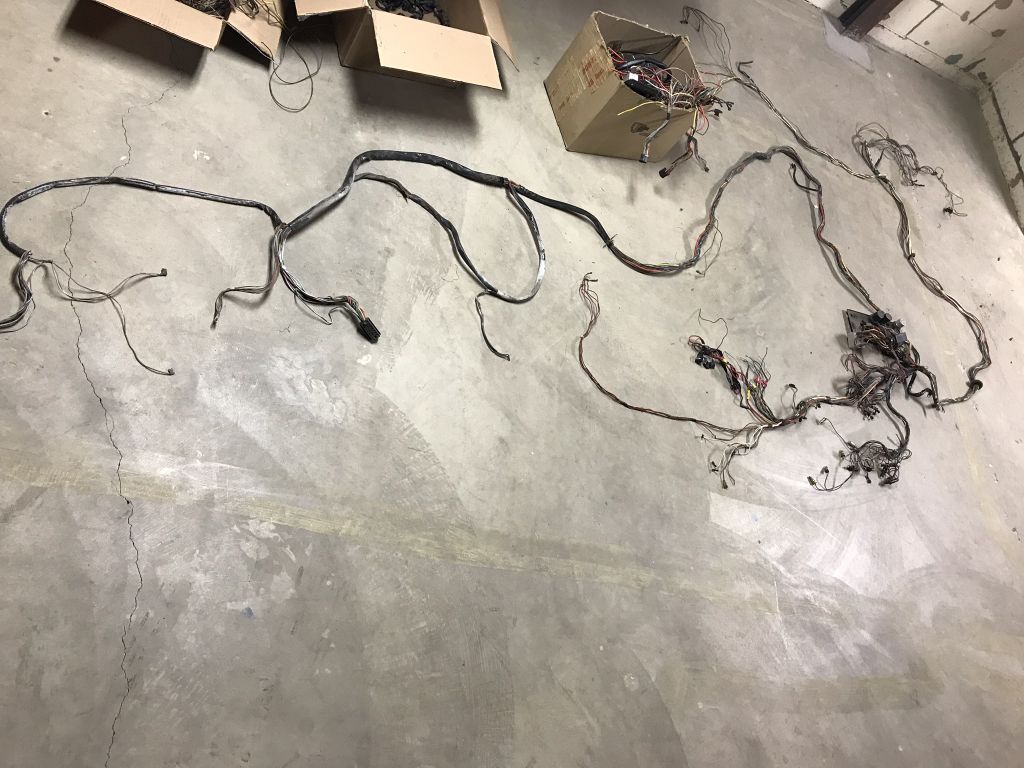 The harness is missing the steering column connectors. 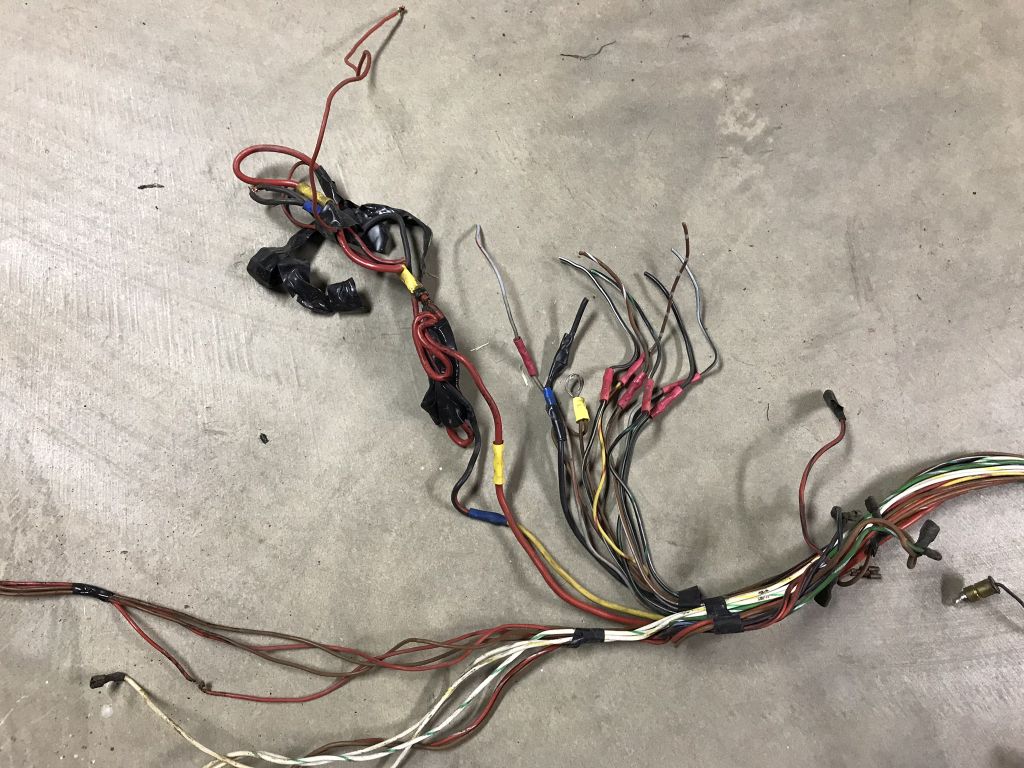 I have the harness section from Porsti that I can work into the harness but I need to make sure that the connector pin definition is the same between the '71 and '73 columns. Are the columns interchangeable between the years? The schematics look a bit different and not all of the wires in the '73 harness are present in the '71. |
|
|
|
| mepstein |
Feb 7 2018, 04:29 PM
Post
#1064
|
|
914-6 GT in waiting Group: Members Posts: 20,208 Joined: 19-September 09 From: Landenberg, PA/Wilmington, DE Member No.: 10,825 Region Association: MidAtlantic Region |
QUOTE(Amenson @ Feb 7 2018, 05:14 PM)  Fun with wires! The harness from Mike looks decent. I have all of the tape off of the harness so that I can inspect and repair any issues. There are a few spliced wires here and there and one that had a few too many electrons moving through it at some point that will need to be replaced. Still need to cut off the protective tubing to check the rest of the wires. Then everything will get wrapped again prior to installation. The harness is missing the steering column connectors. I have the harness section from Porsti that I can work into the harness but I need to make sure that the connector pin definition is the same between the '71 and '73 columns. Are the columns interchangeable between the years? The schematics look a bit different and not all of the wires in the '73 harness are present in the '71. I thought the 71 was a 14 pin connector and later was 12. Jeff B would know for sure. |
|
|
|
| theer |
Feb 7 2018, 04:59 PM
Post
#1065
|
|
Senior Member Group: Members Posts: 692 Joined: 31-July 15 From: Dover, MA Member No.: 19,014 Region Association: North East States |
Grey started life as a '75.
|
|
|
|
| Amenson |
Feb 11 2018, 09:41 PM
Post
#1066
|
|
That's opposite lock!! Group: Members Posts: 645 Joined: 27-May 05 From: Dublin, OH Member No.: 4,154 Region Association: None |
I continued plugging away on the harness in the evenings and hit it hard on Saturday. Got it completely unwrapped and cleaned and started fixing some minor nicks/cuts. Noticed some odd terminations of the main power supply wires from the outset but figured that I could swap them out when I reinstalled the steering column connectors.
 I pulled apart the old porsti harness to harvest the steering column connectors. I planned to take the wires as complete as possible to minimize splices. After much studying the wire diagrams between the '71(actually probably a 70) and '73...there are just too many differences to cleanly/efficiently adapt it to work with the '73 column. Add in the two burned circuits and odly spliced power circuits (which probably resulted in the meltage) and I pulled the plug on this harness. Time of death Saturday, February 10th, 4:45pm. 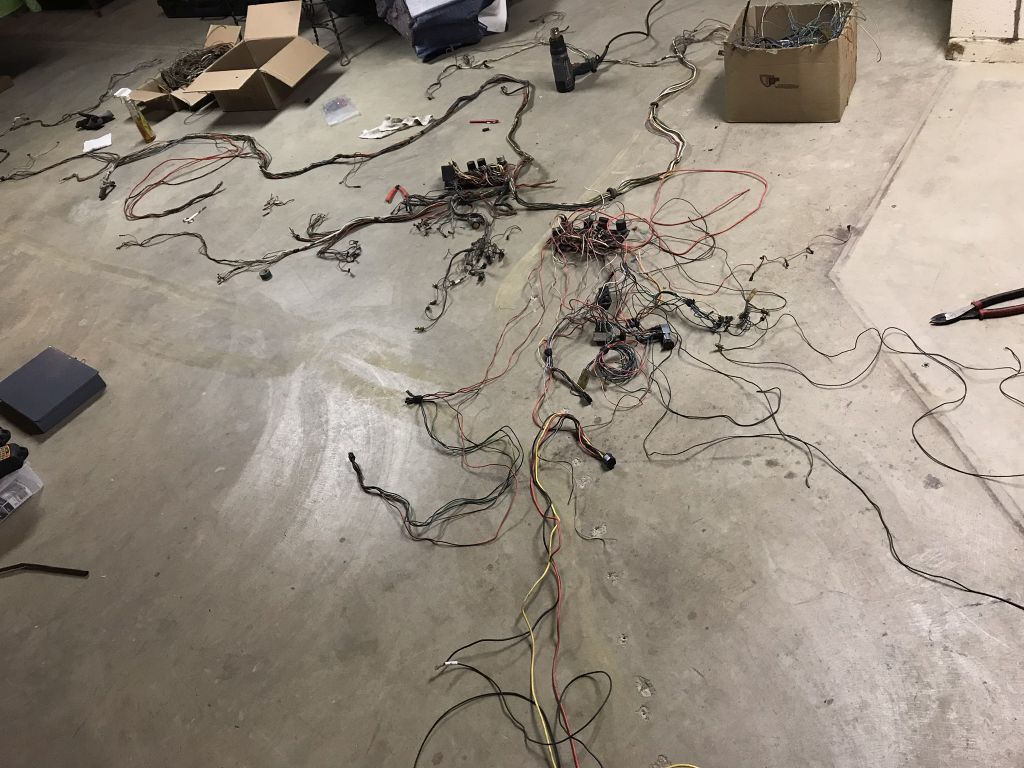 A quick email to Bruce and what should be a really clean, complete harness from a '74 will be arriving soon. Bruce to the rescue again. Time to make some progress. I convinced Tom to let me fix the clutch MC install and nearby angry beaver access port. 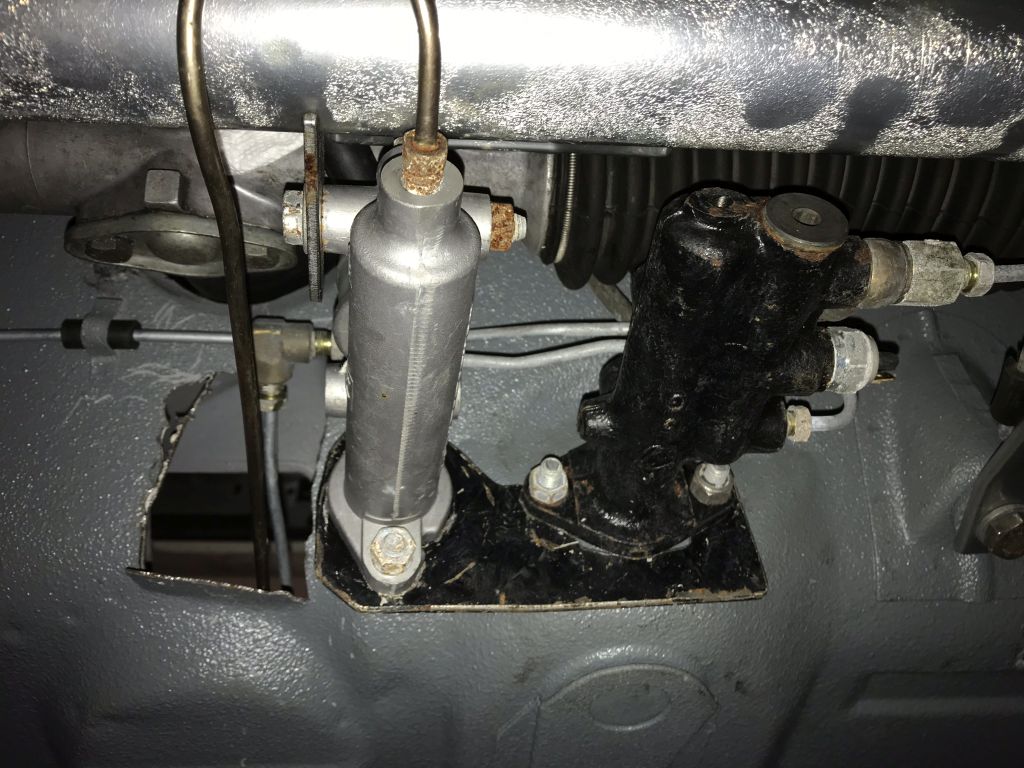 MC mount will be replaced with rnellums part. 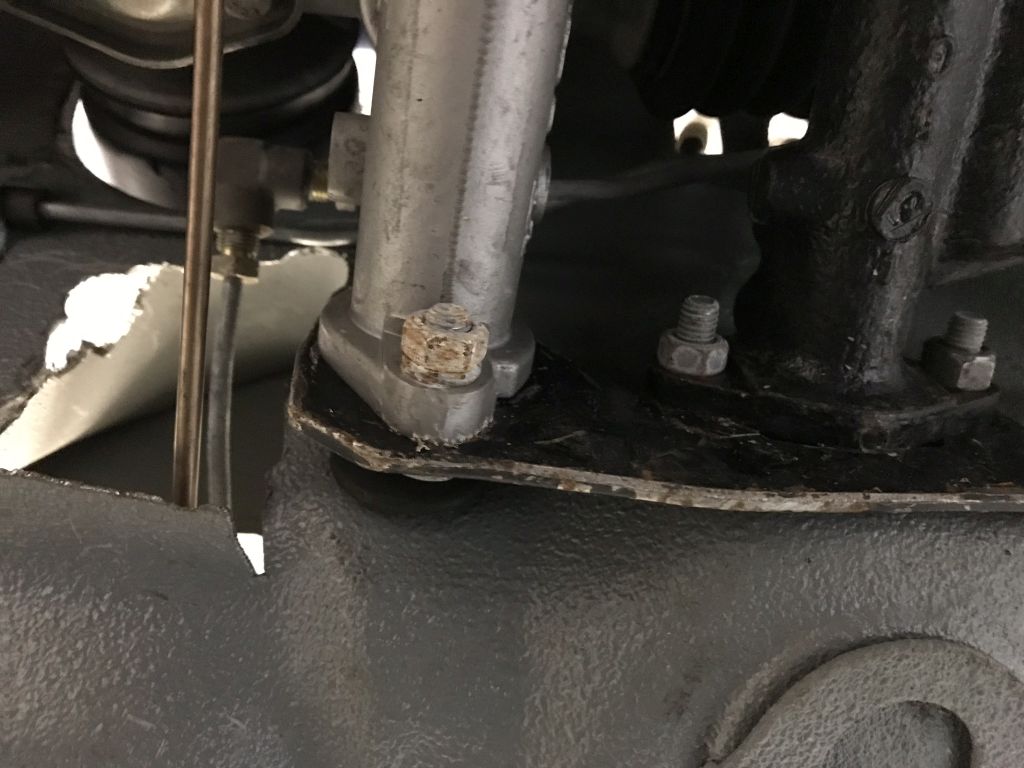 Not quite sure what this hole was for but the beaver managed to cut through to the area below the fuel tank making it a multi dimensional fix. First step, cut back to clean margins. Actually second step, first step was to disassemble everything. 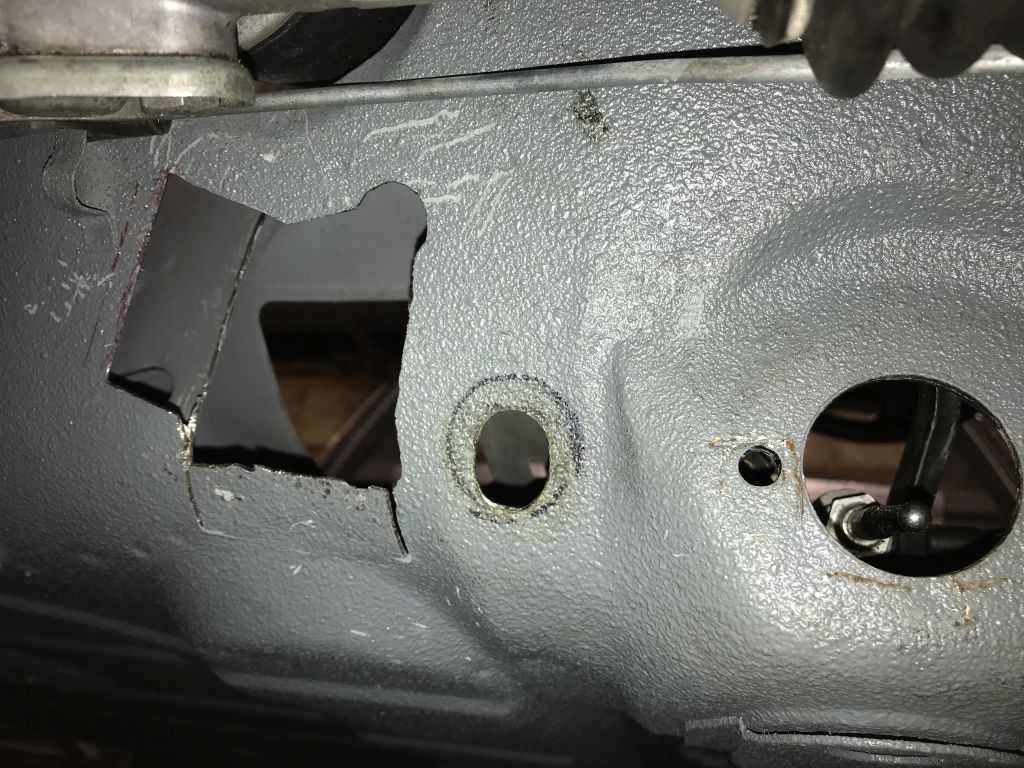 First patch made...only took 3 attempts to get it right. 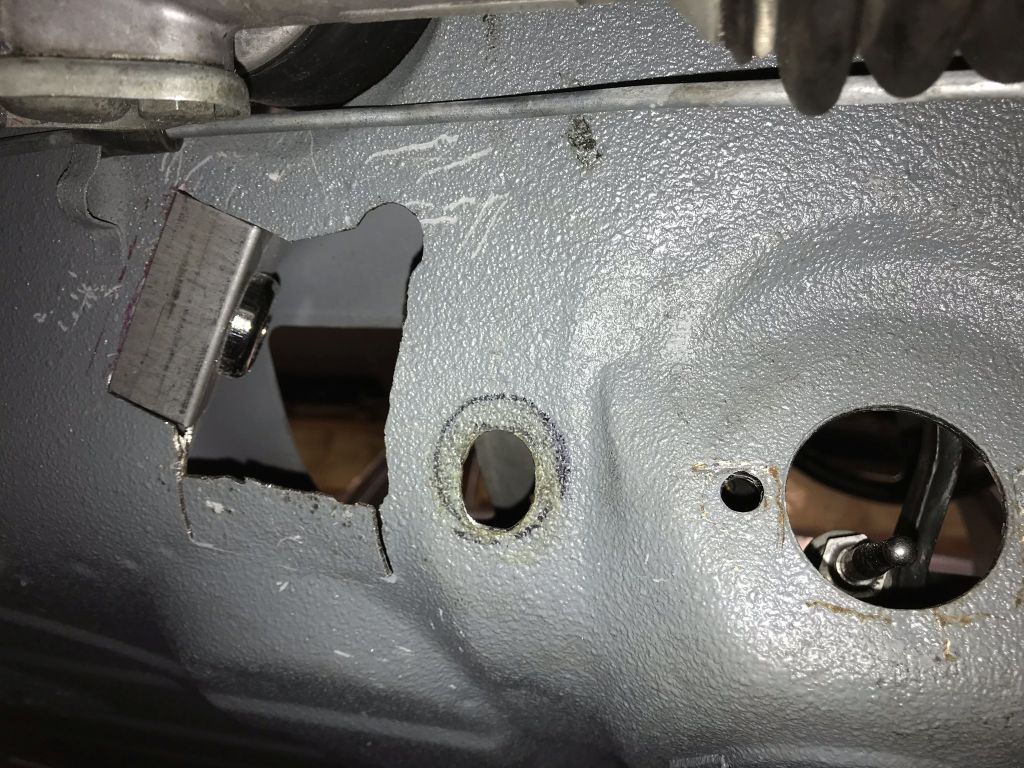 View from below the fuel tank. 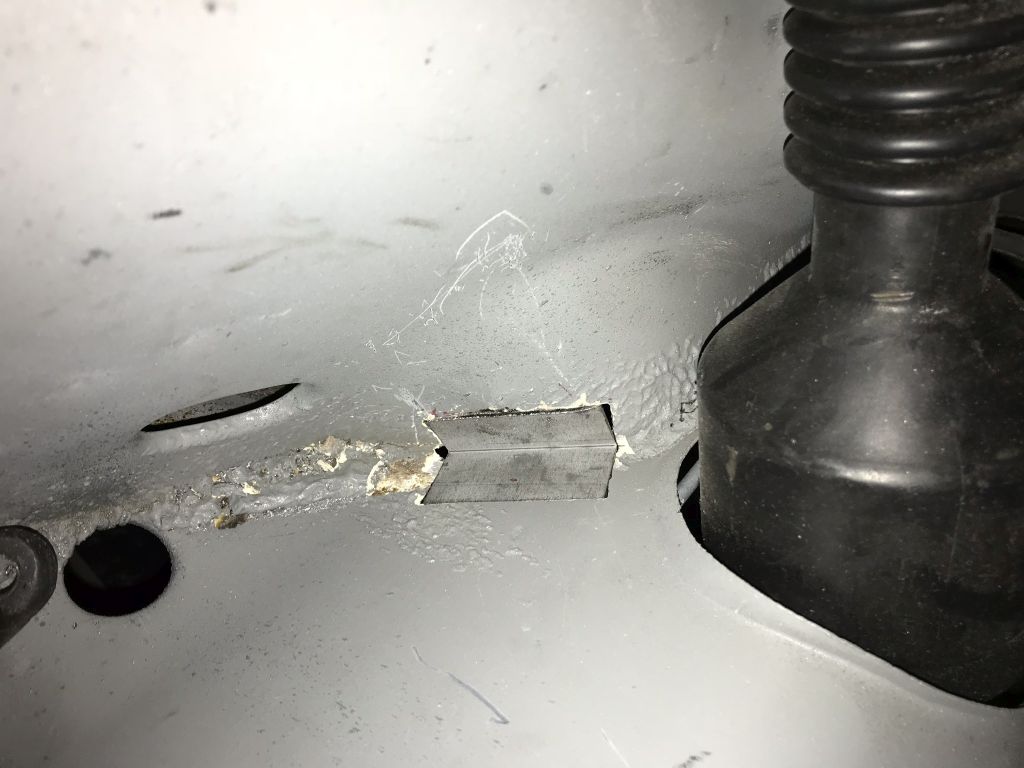 The other piece will be much easier to make, then (IMG:style_emoticons/default/welder.gif) (IMG:style_emoticons/default/welder.gif) (IMG:style_emoticons/default/welder.gif) It has been too long since I picked up the torch. |
|
|
|
| Amenson |
Feb 18 2018, 09:11 PM
Post
#1067
|
|
That's opposite lock!! Group: Members Posts: 645 Joined: 27-May 05 From: Dublin, OH Member No.: 4,154 Region Association: None |
Just about finished up the clutch area.
Started with a little TAD to make the patch panel. 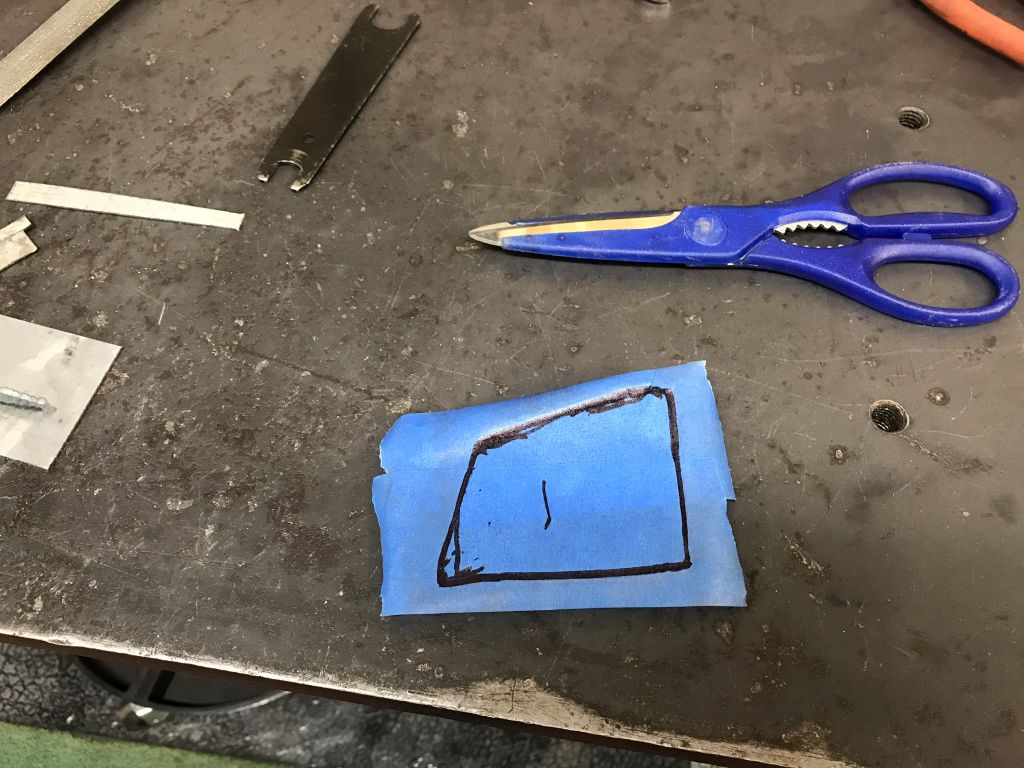 With gaps like this it will be a pitty to waste them on the MIG...unfortunately it is a bit tight in there to tig overhead, so mig it is. 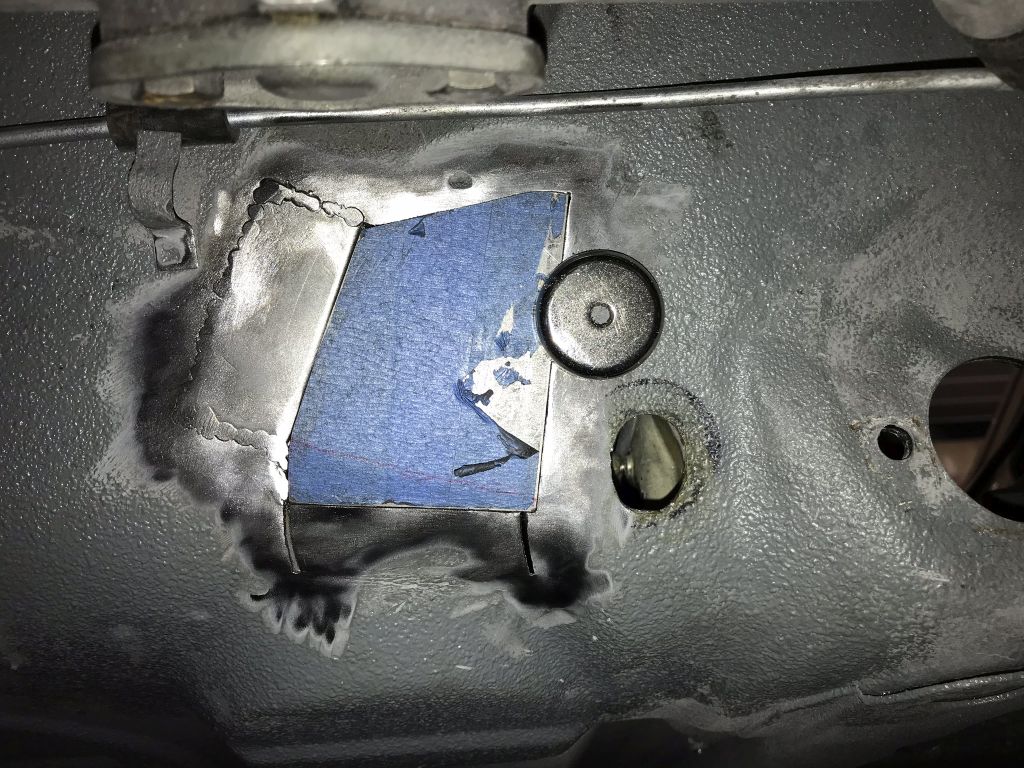 After a few adjustments to the body to get the plate to sit flat and a whole bunch of fitting, marking and cutting to get the proper size holes in the proper place.  The flash really highlighted the welds, going to have to get back in there for a bit more grinding to get them flush. |
|
|
|
| Amenson |
Feb 23 2018, 09:32 PM
Post
#1068
|
|
That's opposite lock!! Group: Members Posts: 645 Joined: 27-May 05 From: Dublin, OH Member No.: 4,154 Region Association: None |
Third time's a charm!
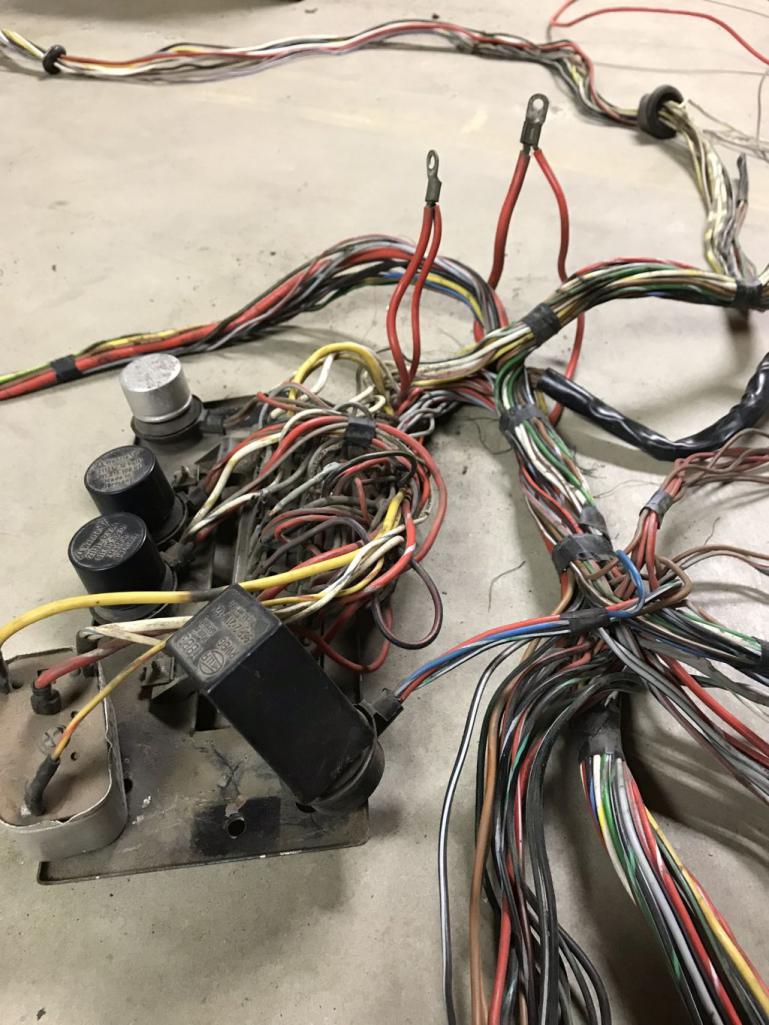
 '74 harness is pretty much unwrapped and looks pretty good. Few things to fix, remove all traces of the seat belt logic relay and then add in the wires for the new stuff and we will be substantially closer to the first start. |
|
|
|
| Amenson |
Feb 25 2018, 09:34 PM
Post
#1069
|
|
That's opposite lock!! Group: Members Posts: 645 Joined: 27-May 05 From: Dublin, OH Member No.: 4,154 Region Association: None |
Feels so good to have it done right.
 A little bummed that the paint dried so light. I found another rattle can color that will hopefully be closer. Finally pulled the trigger on a battery location. 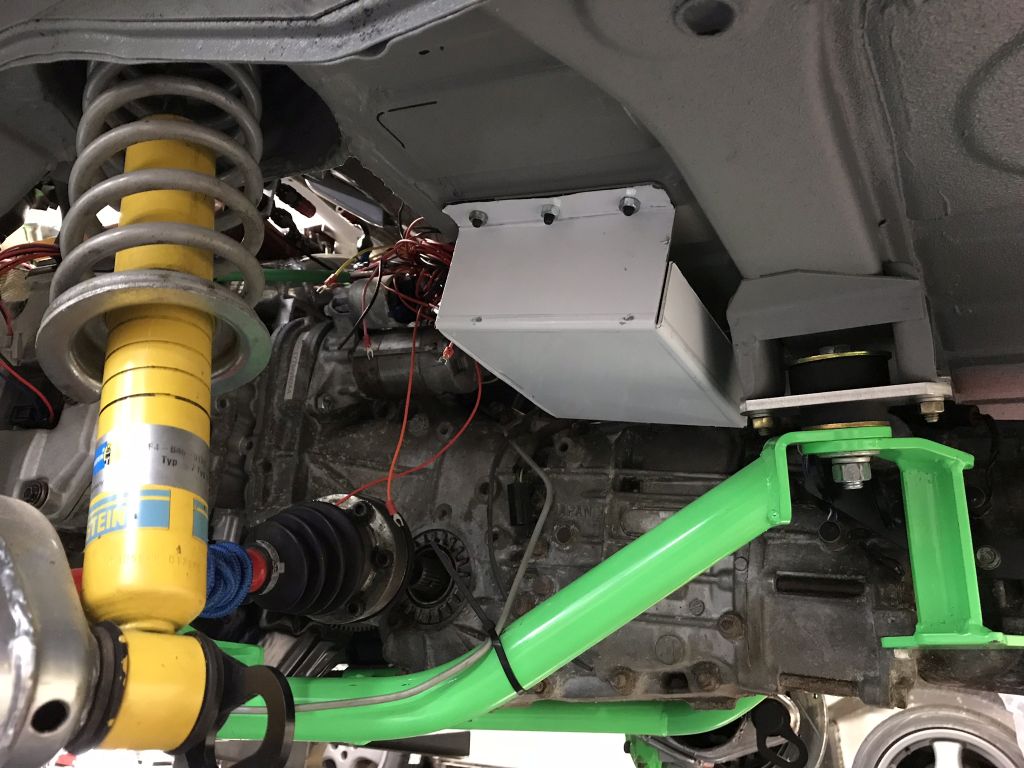 Knocked out some more CAD work. 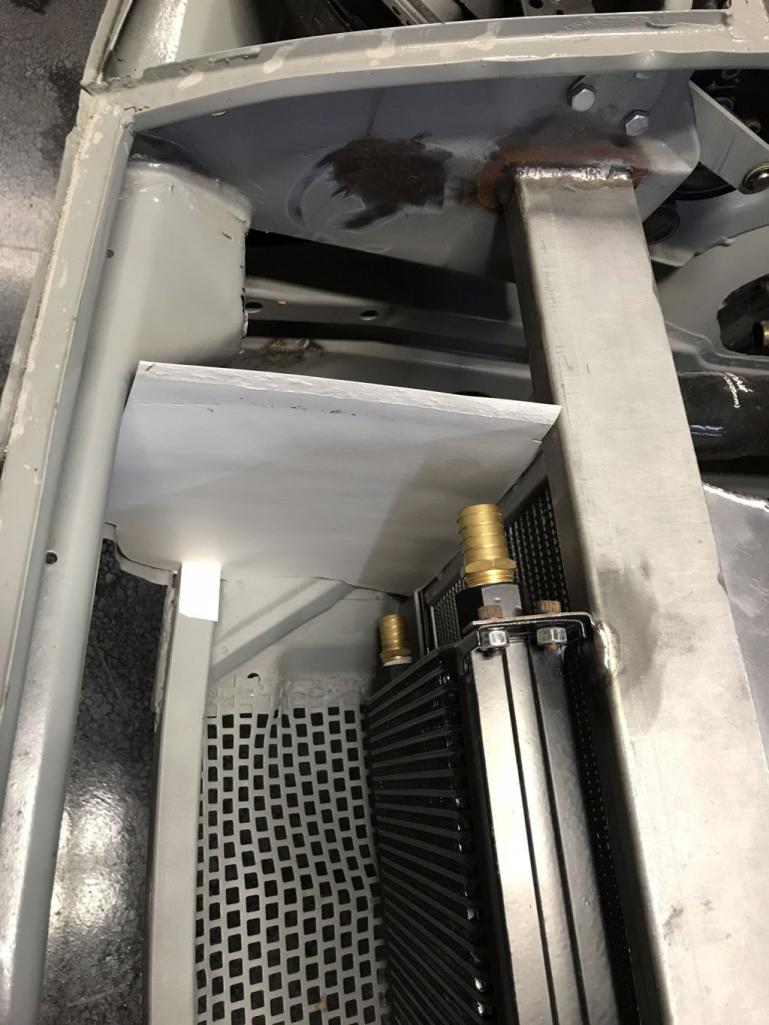 And some more hours on the harness. It is amazing how much dirt can get stuck in a bundle of wires. Sucks to clean it but gives me an opportunity to find any hiding nicks/cracks. |
|
|
|
| Amenson |
Mar 11 2018, 08:32 PM
Post
#1070
|
|
That's opposite lock!! Group: Members Posts: 645 Joined: 27-May 05 From: Dublin, OH Member No.: 4,154 Region Association: None |
I always thought that the hose running to the radiator looked a bit sloppy. Needing to tuck the spare tire as far to the passenger side as possible to make room for the brake/clutch fluid reservoir gave me an excuse to tidy it up a bit.
Replaced the hose with some more AL tube. This is the return, forgot to take a picture of the top tube. 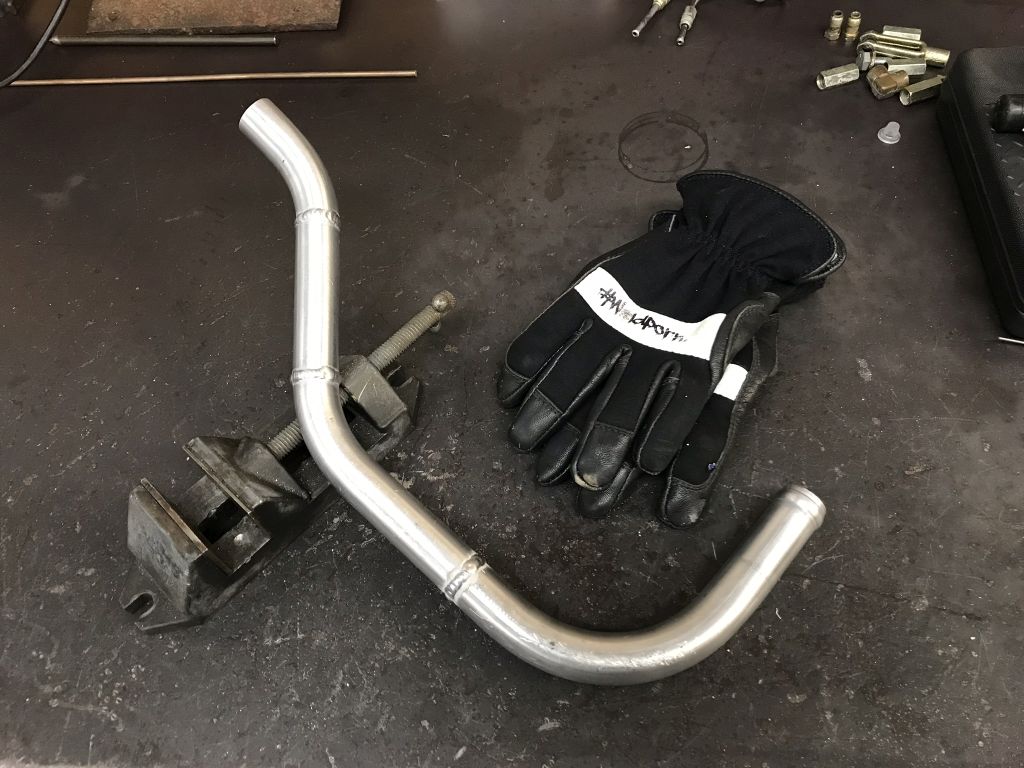 Tight. 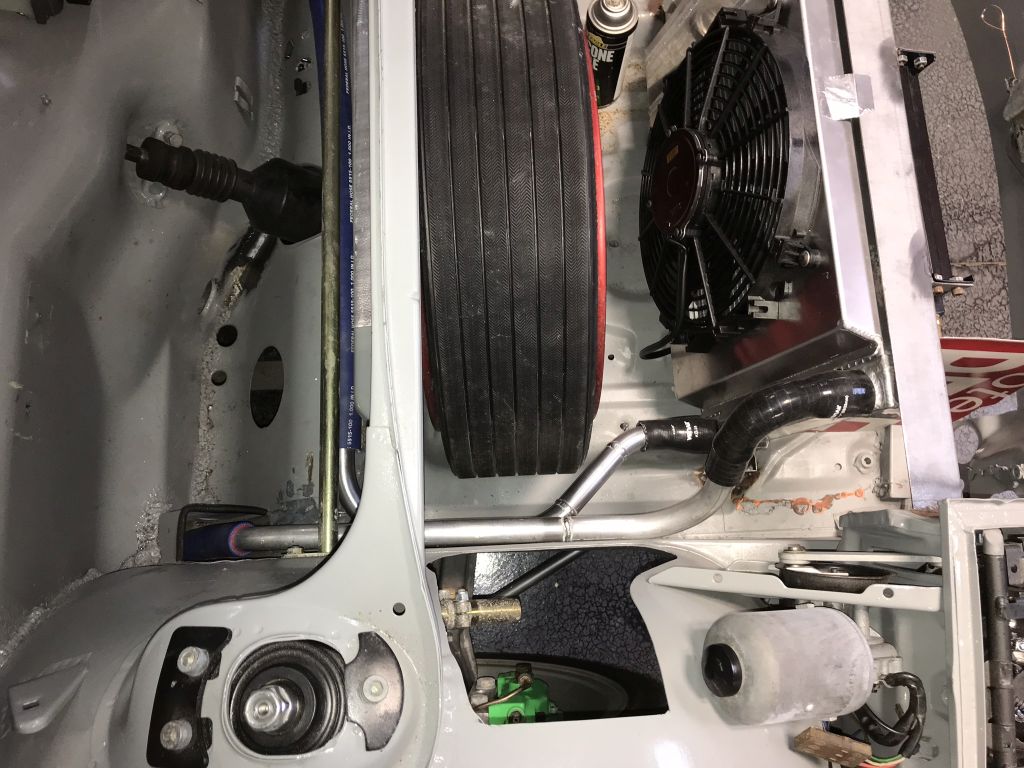 |
|
|
|
| Amenson |
Mar 17 2018, 05:59 PM
Post
#1071
|
|
That's opposite lock!! Group: Members Posts: 645 Joined: 27-May 05 From: Dublin, OH Member No.: 4,154 Region Association: None |
While running the final bit of plumbing through the center tunnel I was disgusted enough of the previous removal of the top to convince Tom to source a new center tunnel.
He found a really nice donor. First step of prep was to remove the unnecessary tubes. 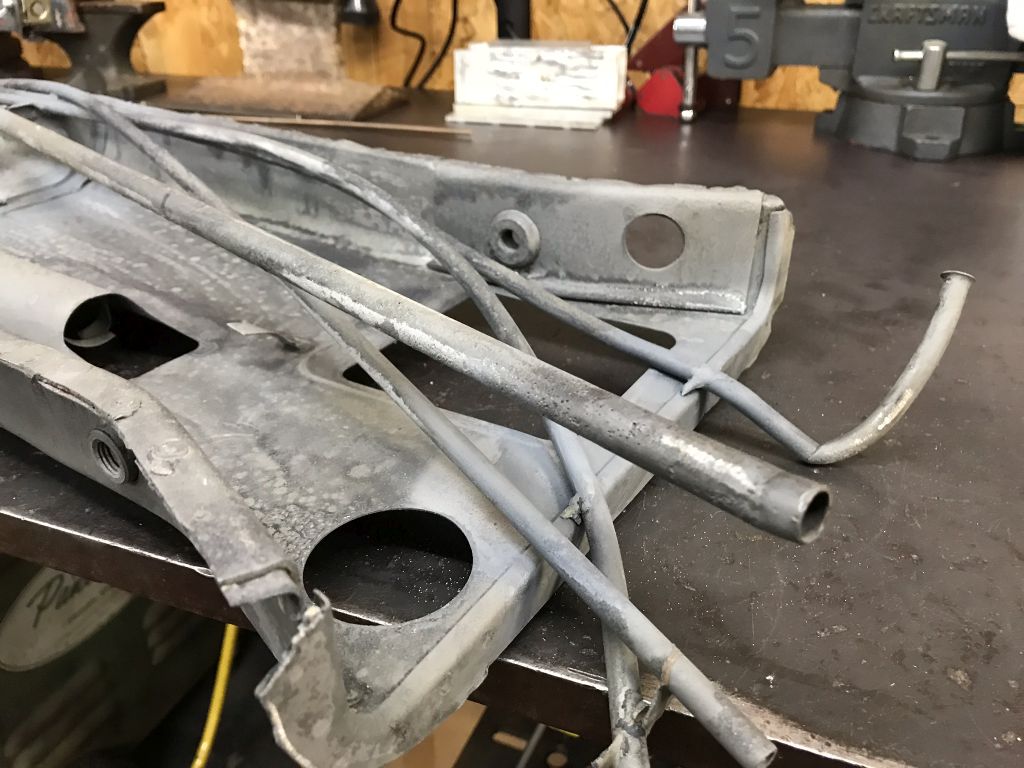 Much better. The throttle tube will be moved to the driver side for cleaner routing of the throttle cable to the reveres intake. It also leaves the center of the tunnel open in case the 1" coolant tubes are not large enough. I will be modifying porsti to run the coolant tubes down the center tunnel and if it works, Marks EG will be run this way also. Plenty of room now! 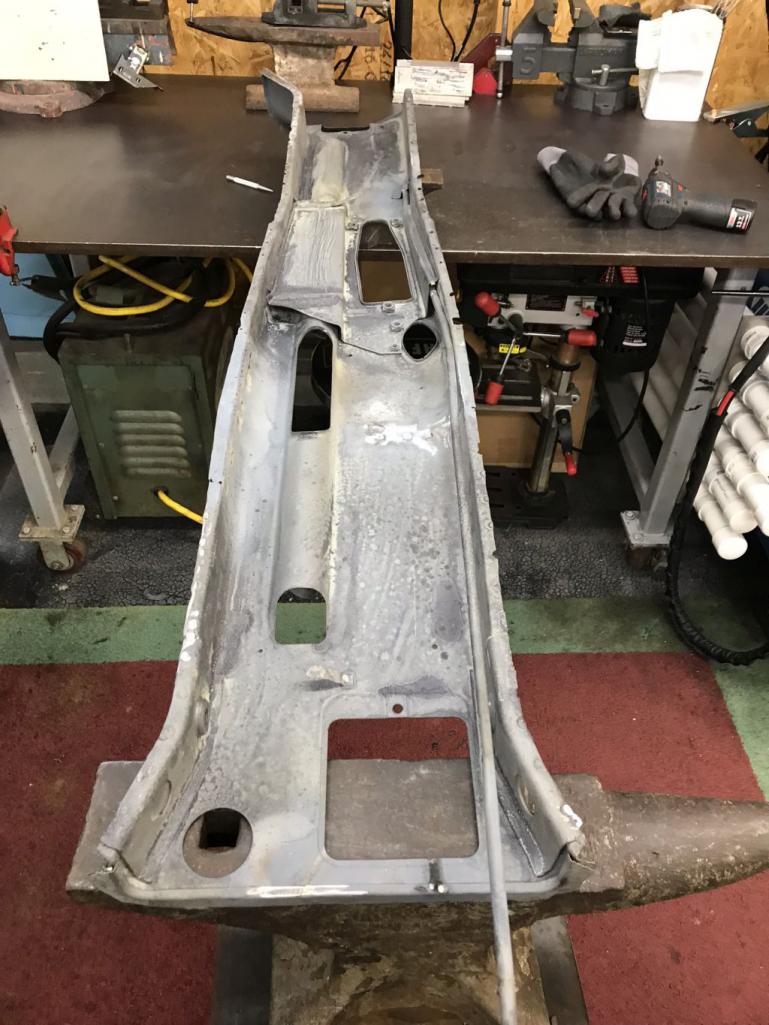 Center tunnel was prepped really well, only had to remove the firewall flange. 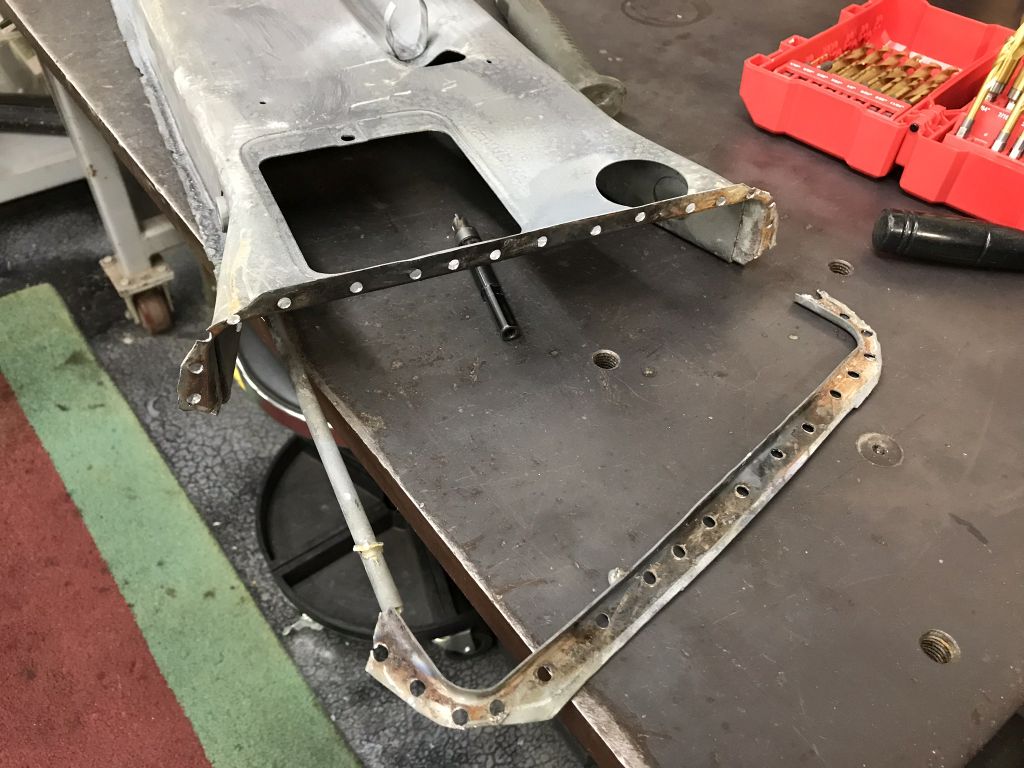 Old tunnel almost removed. 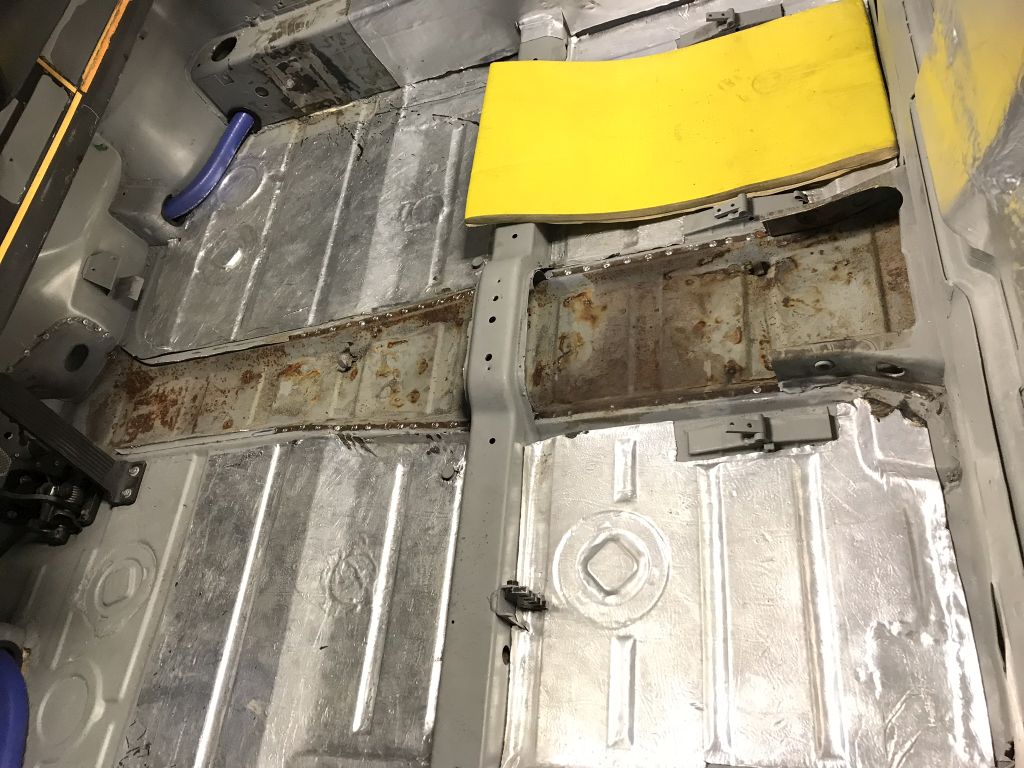 Had to stop to get to the bar for once a year amazing corned beef. |
|
|
|
| mepstein |
Mar 17 2018, 06:09 PM
Post
#1072
|
|
914-6 GT in waiting Group: Members Posts: 20,208 Joined: 19-September 09 From: Landenberg, PA/Wilmington, DE Member No.: 10,825 Region Association: MidAtlantic Region |
Center tunnel lines sound good. Is there any issue having the coolent lines share space with the fuel lines.
|
|
|
|
| Amenson |
Mar 17 2018, 06:14 PM
Post
#1073
|
|
That's opposite lock!! Group: Members Posts: 645 Joined: 27-May 05 From: Dublin, OH Member No.: 4,154 Region Association: None |
QUOTE(mepstein @ Mar 17 2018, 07:09 PM) Center tunnel lines sound good. Is there any issue having the coolent lines share space with the fuel lines. Nope. |
|
|
|
| 914forme |
Mar 17 2018, 07:34 PM
Post
#1074
|
|
Times a wastin', get wrenchin'! Group: Members Posts: 3,896 Joined: 24-July 04 From: Dayton, Ohio Member No.: 2,388 Region Association: None |
QUOTE(Amenson @ Mar 11 2018, 10:32 PM) I always thought that the hose running to the radiator looked a bit sloppy. Needing to tuck the spare tire as far to the passenger side as possible to make room for the brake/clutch fluid reservoir gave me an excuse to tidy it up a bit. Replaced the hose with some more AL tube. This is the return, forgot to take a picture of the top tube. Tight. I recognize those beads on the end of these tubes. Keep going, keep going. |
|
|
|
| mgp4591 |
Mar 17 2018, 07:54 PM
Post
#1075
|
|
914 Guru Group: Members Posts: 5,805 Joined: 1-August 12 From: Salt Lake City Ut Member No.: 14,748 Region Association: Intermountain Region |
My center tunnel was trashed and eaten up on the sides almost to the top. I sourced some 2x4" 14 ga tubing that fit right in and welded up fine to the new floor pans. I'll run the coolant lines down the center and top that tube with another one for my brake, fuel lines, and cables. Probably some wiring too plus my shifter. I'm working on a different type of heater setup to eliminate more water running through the middle plus if I bet a leak, the center tunnel is isolated from the rest of the car and won't flood anything - it'll just run out and it eliminates the possibility of hitting coolant lines run under the car. I've never really liked that solution...
|
|
|
|
| Amenson |
Mar 18 2018, 09:01 PM
Post
#1076
|
|
That's opposite lock!! Group: Members Posts: 645 Joined: 27-May 05 From: Dublin, OH Member No.: 4,154 Region Association: None |
I would like to take this time to make a public service announcement.
If you are thinking about making random holes in your car; for the sake of your future self, kids, future owner or humanity in general....please don't. Take the time and/or spend the money to do it right. The owner of this car before Doug is officially on my shit list. And say off my grass (IMG:style_emoticons/default/dry.gif) I was a bit optimistic that yesterday's progress was closer to the finish than the start, it was not. The rear part of the tunnel where it is reinforced for the seat belt anchor is spot welded and seam welded to the floor and had to be ground out. Getting the rear flange out from under the strengthening panel was also quite a joy. I shortened the flange on the replacement part so that it can slide under. On a happy note, the replacement center tunnel is almost ready to weld in! 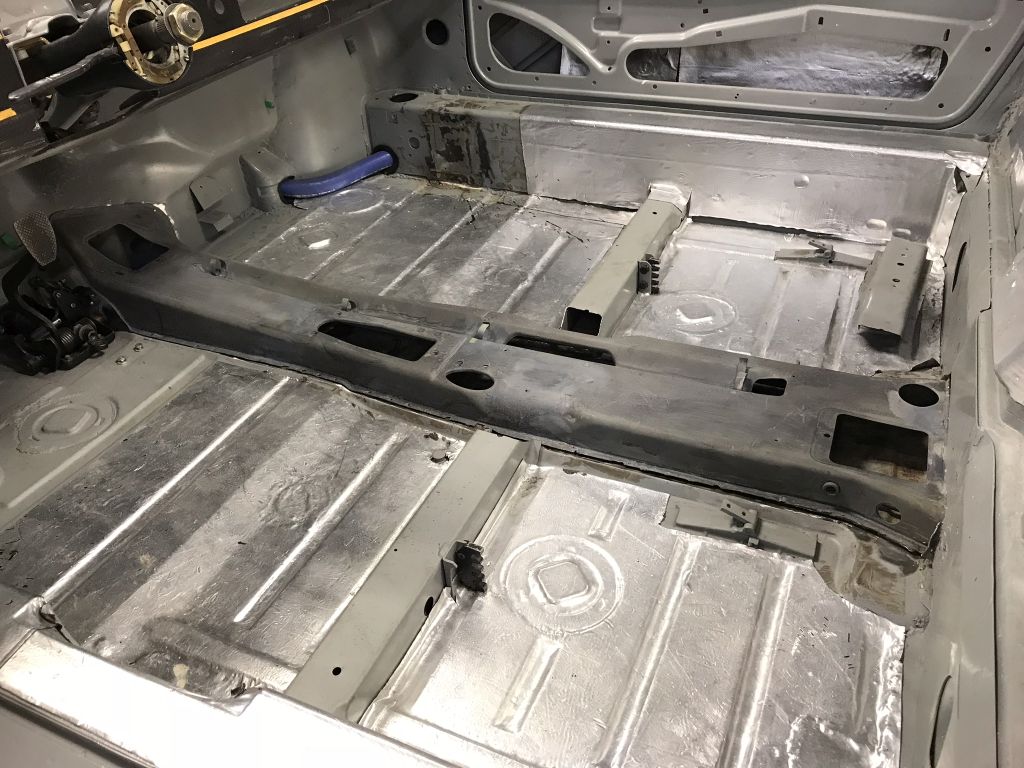 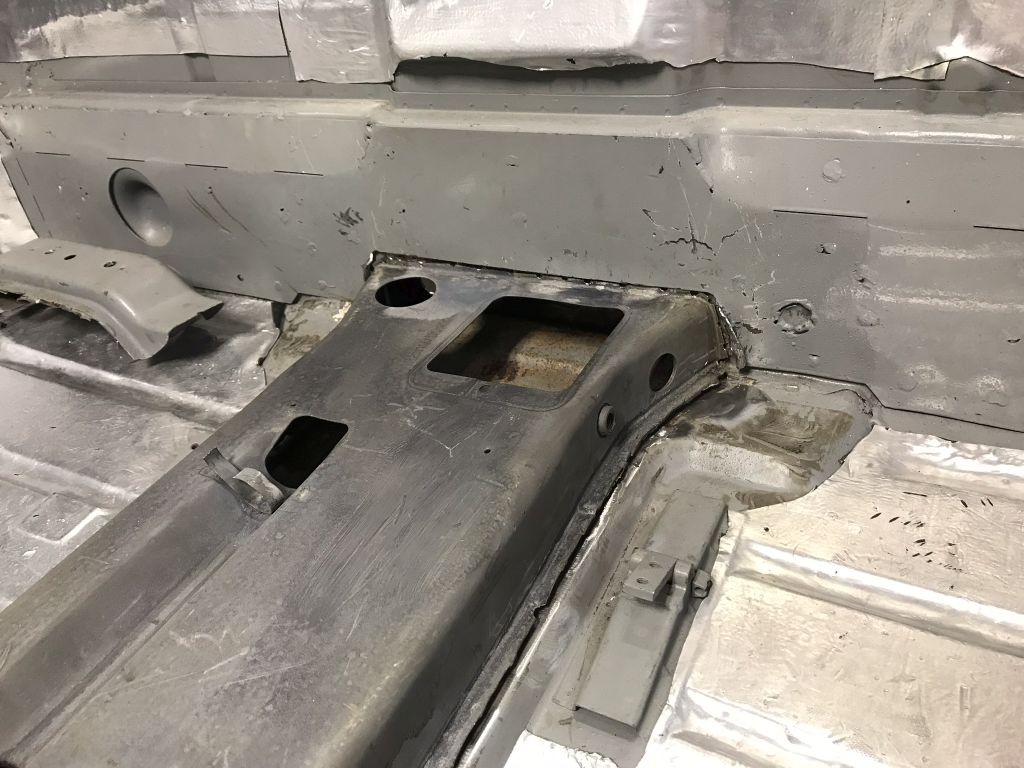 There was a repair at the passenger front of the replacement panel is a bit proud to the bottom of rest of the weld flange and keeping that side from sitting flat. A bit of cutting and it sits flat, now I just need to weld it back together. |
|
|
|
| Amenson |
Mar 25 2018, 08:33 PM
Post
#1077
|
|
That's opposite lock!! Group: Members Posts: 645 Joined: 27-May 05 From: Dublin, OH Member No.: 4,154 Region Association: None |
Several days of fun compressed into one post.
This is the repaired area that needed adjustment. Didn't get a post repair picture. 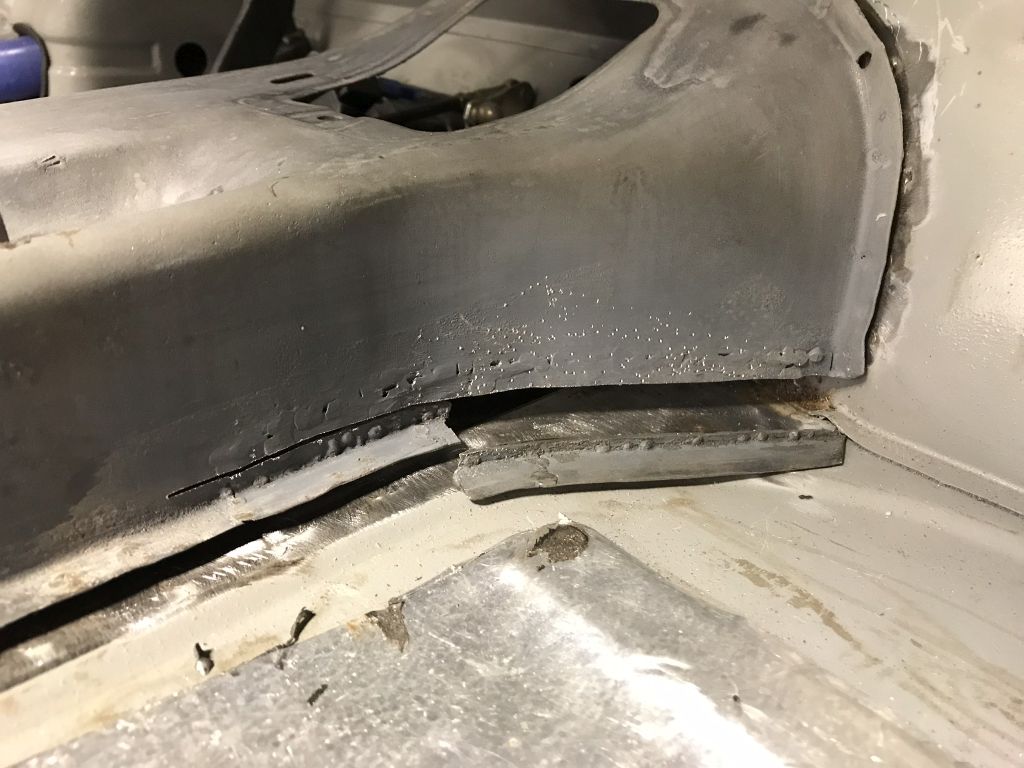 I couldn't help myself, had to wire brush and paint the floor under the center tunnel. Just used weld through primer. 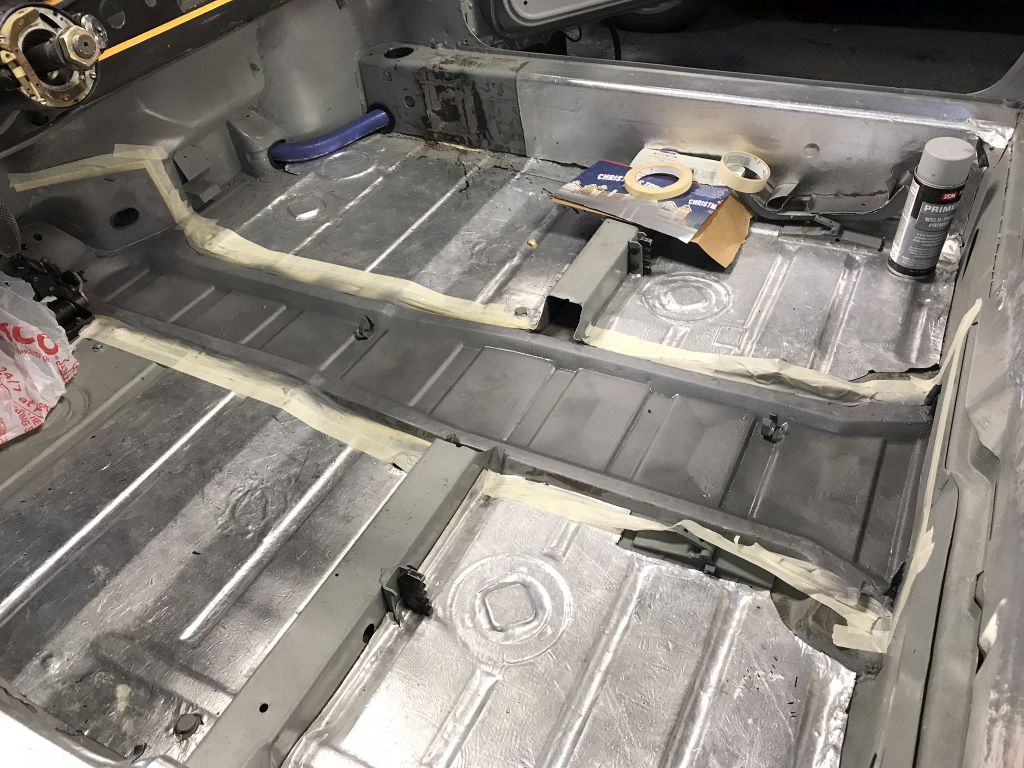 Holes for the IC heat exchanger. I am pretty sure I would not have been able to drill these holes with the center tunnel in place.  Center tunnel is painted with weld through primer on the underside and another poor attempt at matching the grey body color on the outside. Was warm enough to bake it in the sun today! 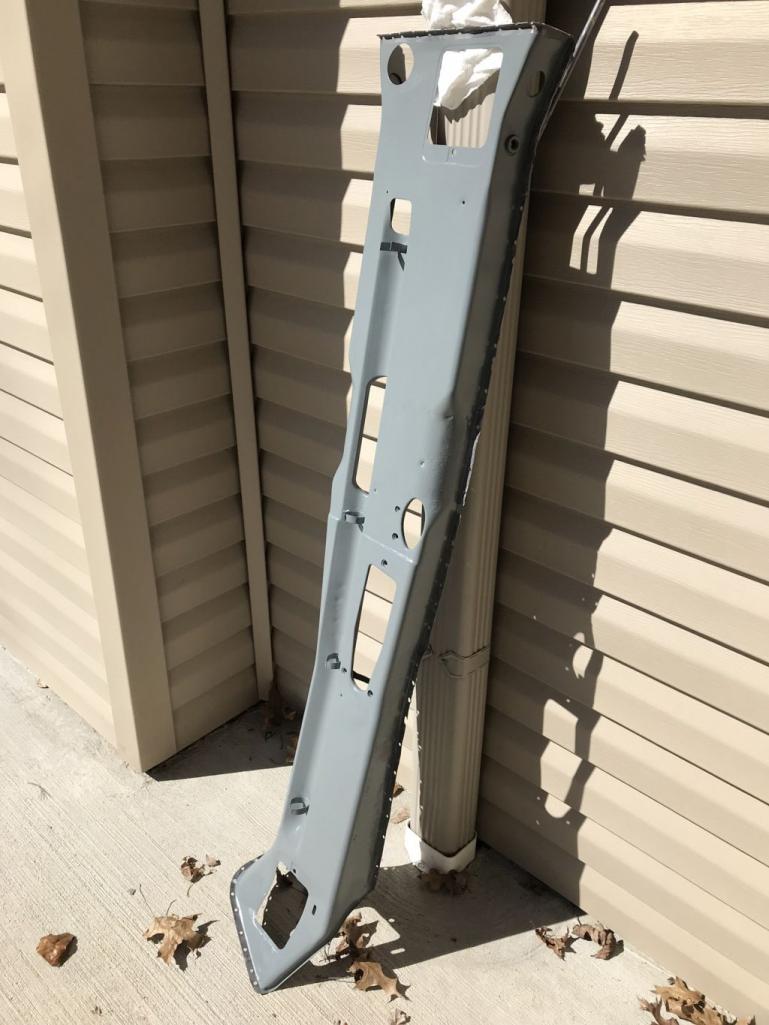 The calm before the storm. 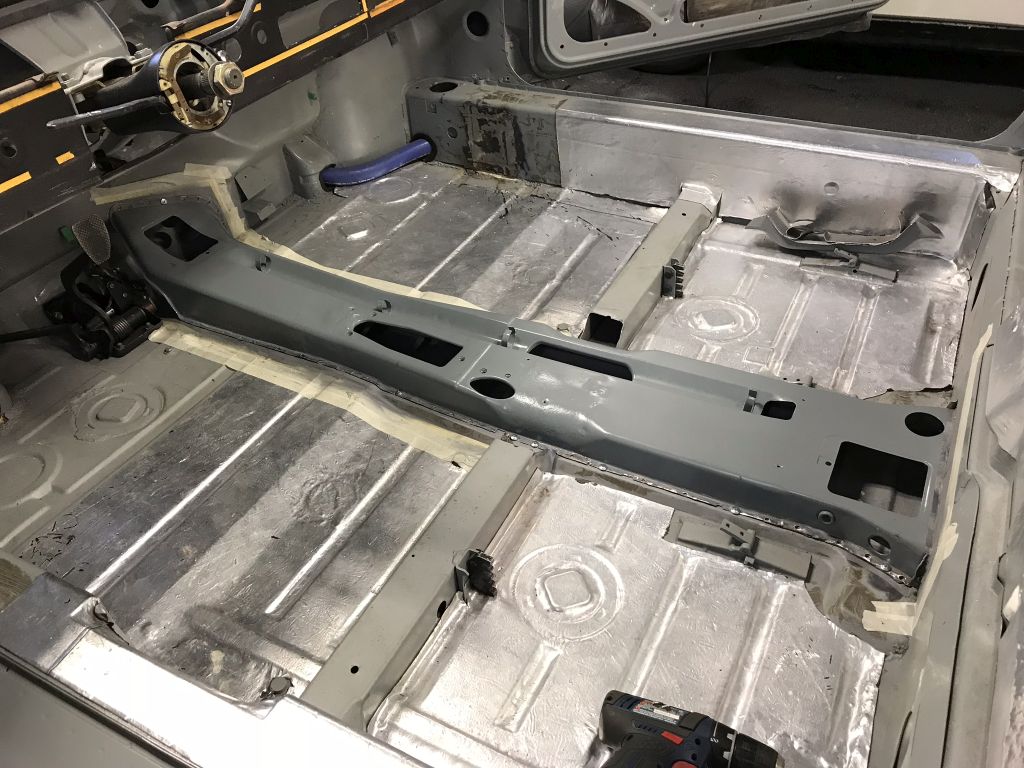 After much mig welding. It is amazing how much smoke a little bit of burning bed liner gives off. 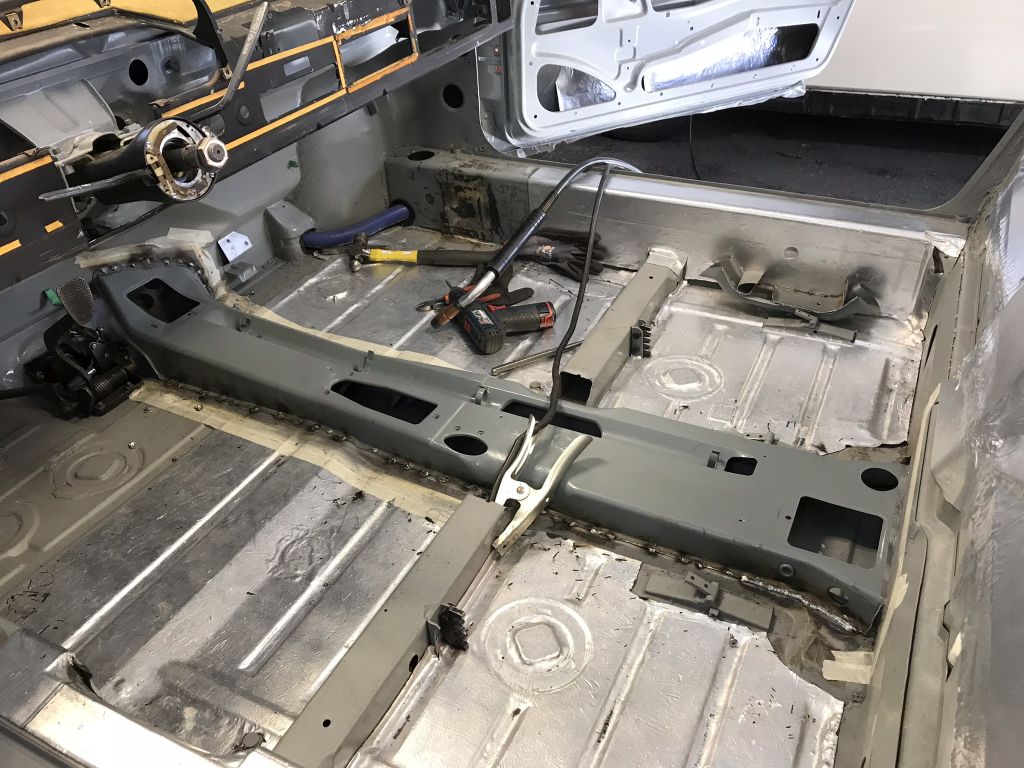 Center rib drops perfectly back in place. 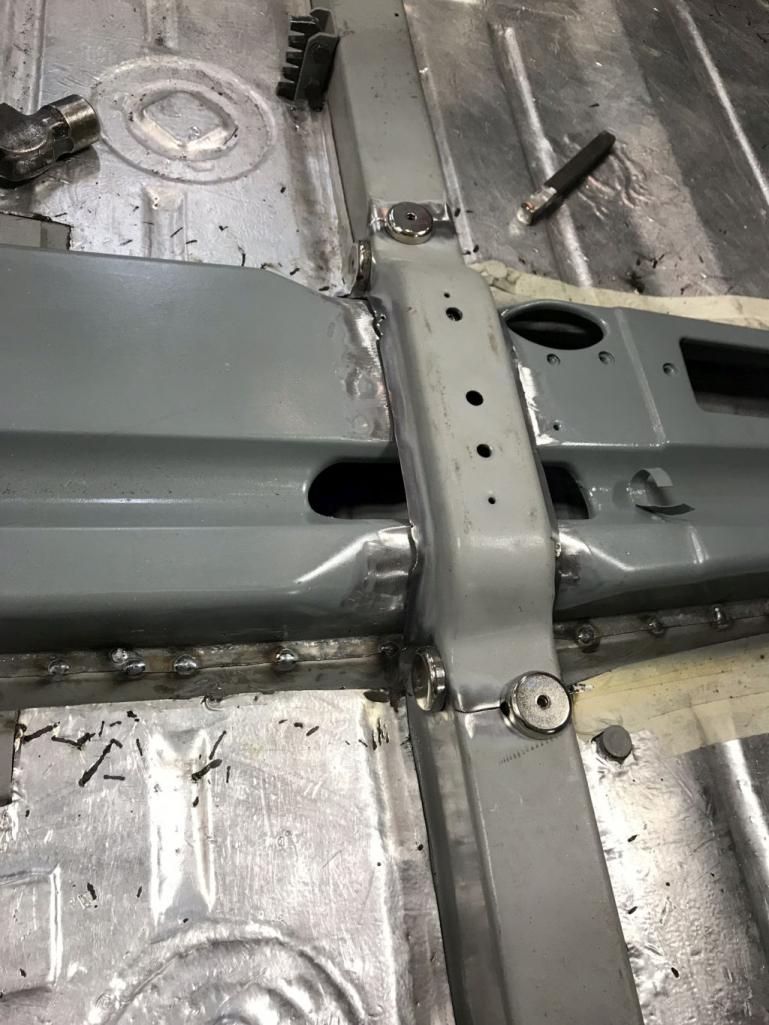 Gap's were so good that I decided to use the TIG. 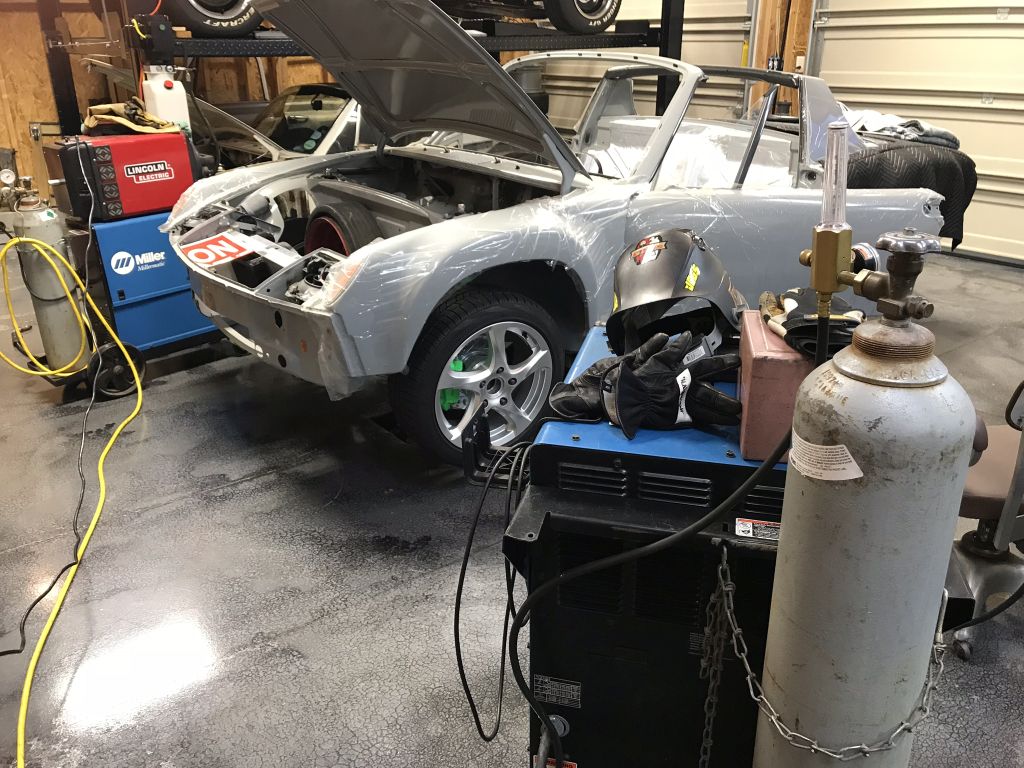 Partially TIG'd. Decided to call it Beer'thirty after sticking the tungsten for the third time. What an awkward welding position. 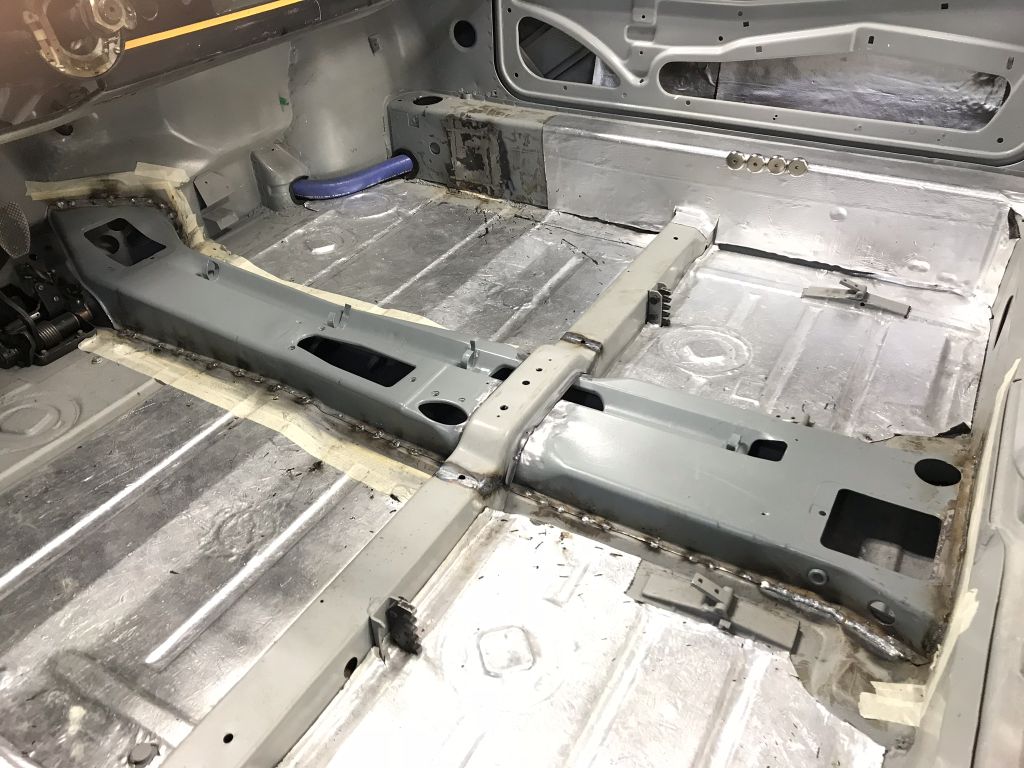 Looks so much better. Much welding and a bit of painting and this task will be complete. |
|
|
|
| theer |
Mar 25 2018, 09:00 PM
Post
#1078
|
|
Senior Member Group: Members Posts: 692 Joined: 31-July 15 From: Dover, MA Member No.: 19,014 Region Association: North East States |
|
|
|
|
| bbrock |
Mar 25 2018, 09:16 PM
Post
#1079
|
|
914 Guru Group: Members Posts: 5,269 Joined: 17-February 17 From: Montana Member No.: 20,845 Region Association: Rocky Mountains |
That is one wicked repair! (IMG:style_emoticons/default/pray.gif)
|
|
|
|
| Amenson |
Mar 26 2018, 07:24 AM
Post
#1080
|
|
That's opposite lock!! Group: Members Posts: 645 Joined: 27-May 05 From: Dublin, OH Member No.: 4,154 Region Association: None |
QUOTE(bbrock @ Mar 25 2018, 10:16 PM) Small potatoes compared to what you are tackling! |
|
|
|
|
1 User(s) are reading this topic (1 Guests and 0 Anonymous Users)
0 Members:

|
Lo-Fi Version | Time is now: 7th November 2025 - 06:20 AM |
Invision Power Board
v9.1.4 © 2025 IPS, Inc.