|
|
|
Porsche, and the Porsche crest are registered trademarks of Dr. Ing. h.c. F. Porsche AG.
This site is not affiliated with Porsche in any way. Its only purpose is to provide an online forum for car enthusiasts. All other trademarks are property of their respective owners. |
|
|

  |

| Maltese Falcon |
 Jul 25 2015, 02:56 PM Jul 25 2015, 02:56 PM
Post
#221
|
|
914 Guru  Group: Members Posts: 5,267 Joined: 14-September 04 From: Mulholland SoCal Member No.: 2,755 Region Association: None |
Try
S+B Filters Ontario, California. They make/stock many shapes + sizes, all with high flow washable cotton filter material. Keep your base and tops, just drop your dimension in the filter height. Marty |
   |

 
|
| saigon71 |
Jul 25 2015, 05:11 PM
Post
#222
|
|
Advanced Member Group: Members Posts: 2,026 Joined: 1-June 09 From: Dillsburg, PA Member No.: 10,428 Region Association: MidAtlantic Region |
It's coming together nicely Steve! (IMG:style_emoticons/default/beerchug.gif)
You will be (IMG:style_emoticons/default/driving.gif) very soon. |
|
|
|
| euro911 |
Jul 25 2015, 09:33 PM
Post
#223
|
|
Retired & living the dream. God help me if I wake up! Group: Members Posts: 8,937 Joined: 2-December 06 From: So.Cal. & No.AZ (USA) Member No.: 7,300 Region Association: Southern California |
Intake manifolds come in different widths too. See if you can find a set of them.
It looks like an inch on each side just might do the trick (IMG:style_emoticons/default/confused24.gif) |
|
|
|
| maf914 |
Jul 26 2015, 06:11 AM
Post
#224
|
|
Not a Guru! Group: Members Posts: 3,049 Joined: 30-April 03 From: Central Florida Member No.: 632 Region Association: None |
There are some shorter dual throat Webber manifolds out there, but I am not sure who may have them today. The CB style now seem to be the standard for type 4 applications. I bought a pair of short manifolds from PMO many years ago, when they used to advertise 914 Type 4 Webber carb kits in the PCA Panorama magazine. I don't know if PMO still deals with Type 4 carbs, but if you want to try a shorter manifold you might contact them and ask if the short manifolds are still available or who made them.
|
|
|
|
| rhodyguy |
Jul 26 2015, 07:26 AM
Post
#225
|
|
Chimp Sanctuary NW. Check it out. Group: Members Posts: 22,252 Joined: 2-March 03 From: Orion's Bell. The BELL! Member No.: 378 Region Association: Galt's Gulch |
what are those 6"+/- tall filters?
|
|
|
|
| Bulldog9 |
Jul 26 2015, 06:04 PM
Post
#226
|
|
Senior Member Group: Members Posts: 706 Joined: 21-August 13 From: United States Member No.: 16,283 Region Association: MidAtlantic Region |
QUOTE(rhodyguy @ Jul 26 2015, 09:26 AM)  what are those 6"+/- tall filters? I got them from Chris at Tangerine Racing. |
|
|
|
| euro911 |
Jul 27 2015, 02:17 AM
Post
#227
|
|
Retired & living the dream. God help me if I wake up! Group: Members Posts: 8,937 Joined: 2-December 06 From: So.Cal. & No.AZ (USA) Member No.: 7,300 Region Association: Southern California |
I'll keep my eyes open for any spare manifolds while I'm packing up my shop, but I think I may have already sold off all of them.
A few years ago I bought an engine with intakes and carbs, but no throttle crossbar. I had a spare crossbar but it was too short - by at least 2 inches. I installed a narrower set of manifolds and all was well. I don't know who made either set of manifolds, they didn't have any brand markings (IMG:style_emoticons/default/confused24.gif) You might give George at European Motor Works (EMW) a call to explain your dilemma and see what's available. A lot of the parts that retail shops sell come from EMW (310 644-8038) |
|
|
|
| ChrisFoley |
Jul 27 2015, 08:13 AM
Post
#228
|
|
I am Tangerine Racing Group: Members Posts: 8,024 Joined: 29-January 03 From: Bolton, CT Member No.: 209 Region Association: None |
There are shorter manifolds. I've also seen ones which go up straighter so the filters would be closer to the engine centerline.
The ones I usually work with are what Pierce Manifolds sells. I can get ITG filters 1 1/2 inches shorter. The fuel inlet interfering with the air cleaner mounting plate is something I haven't seen. Your inlets are different. A spacer plate would solve that. |
|
|
|
| ChrisFoley |
Jul 27 2015, 08:13 AM
Post
#229
|
|
I am Tangerine Racing Group: Members Posts: 8,024 Joined: 29-January 03 From: Bolton, CT Member No.: 209 Region Association: None |
QUOTE(rhodyguy @ Jul 26 2015, 09:26 AM) what are those 6"+/- tall filters? They're 100mm. |
|
|
|
| Bulldog9 |
Jul 29 2015, 12:06 AM
Post
#230
|
|
Senior Member Group: Members Posts: 706 Joined: 21-August 13 From: United States Member No.: 16,283 Region Association: MidAtlantic Region |
QUOTE(Racer Chris @ Jul 27 2015, 10:13 AM) There are shorter manifolds. I've also seen ones which go up straighter so the filters would be closer to the engine centerline. The ones I usually work with are what Pierce Manifolds sells. I can get ITG filters 1 1/2 inches shorter. The fuel inlet interfering with the air cleaner mounting plate is something I haven't seen. Your inlets are different. A spacer plate would solve that. Thanks Chris, that should work, but hold off a bit. I will measure tomorrow to make sure that will be enough. I just looked at the Pierce Manifold site, does anyone know the height/spacing of those manifolds? I got these manifolds with the Carbs. Ah the joy of customizing........ |
|
|
|
| maf914 |
Jul 30 2015, 08:20 AM
Post
#231
|
|
Not a Guru! Group: Members Posts: 3,049 Joined: 30-April 03 From: Central Florida Member No.: 632 Region Association: None |
I was recently browsing Aircooledtechguy's build thread and came across these photos of his shortening a pair of manifolds. This build thread is full of great tech ideas and procedures. Thanks for sharing Nate.
http://www.914world.com/bbs2/index.php?sho...0739&st=200 Attached image(s) 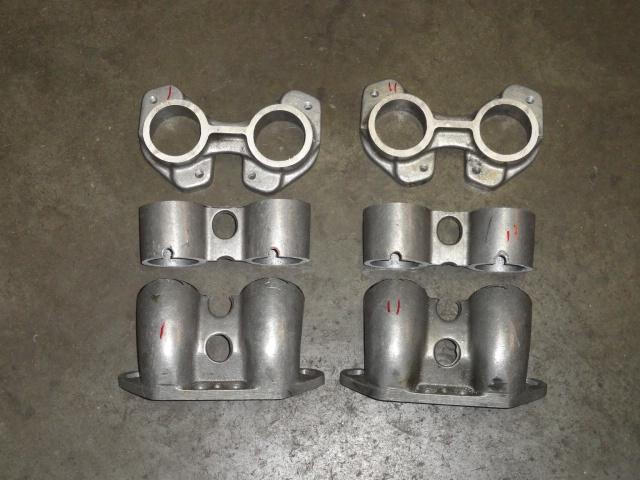 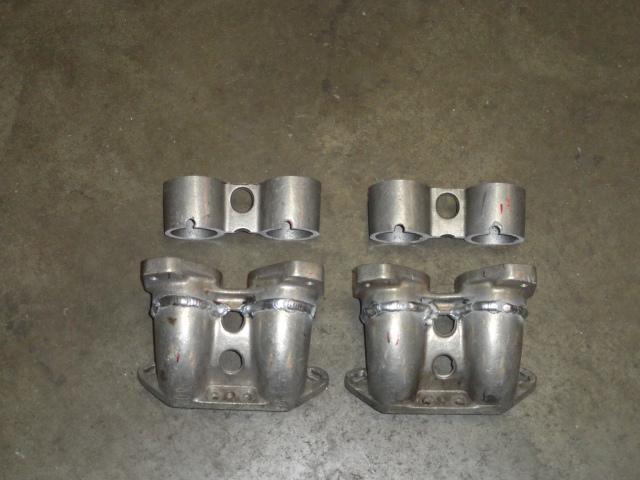
|
|
|
|
| ChrisFoley |
Jul 30 2015, 11:17 AM
Post
#232
|
|
I am Tangerine Racing Group: Members Posts: 8,024 Joined: 29-January 03 From: Bolton, CT Member No.: 209 Region Association: None |
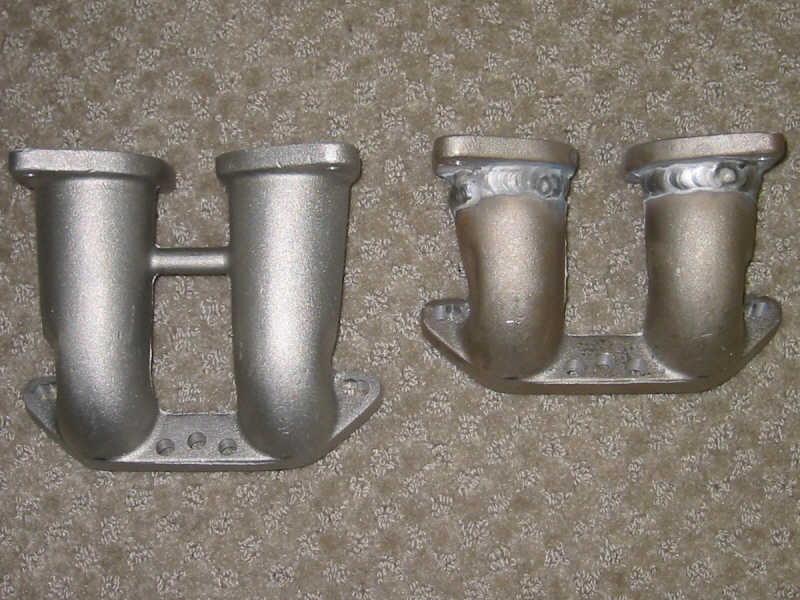
I shortened a set of PMO manifolds for my race car.
 |
|
|
|
| Bulldog9 |
Aug 8 2015, 09:59 PM
Post
#233
|
|
Senior Member Group: Members Posts: 706 Joined: 21-August 13 From: United States Member No.: 16,283 Region Association: MidAtlantic Region |
sheet summa a beech................... I diddnt know the windshield wipers are reversed on this car.................. yeah, bolted them up today, had them pulled up turned on to test and promptly gouged the paint.............. I think I scared my neighbors with my NY inspired flood of language................ Pissed beyond words.........
I also finalized my aux fan system. Pushes about as much air as the stock system. Began sorting out the rear fuse box and wiring harness as well as did a wiring harness and ran wires for the new sensors (CHT, Oil Pressure, AAFM) and the starter relay. Turns out the little black relays aren't working, they click, but don't send power out. Is this a common type of failure? On another note, the Headlight switch also freaked out today, suddenly out of the blue, the dimmer for the dash lights turns the headlights on and off.... lol. The only thing that I did was install the gauges, not sure if that would cause a circuit to loop back and cause this. Will recheck tomorrow. OY Attached thumbnail(s) 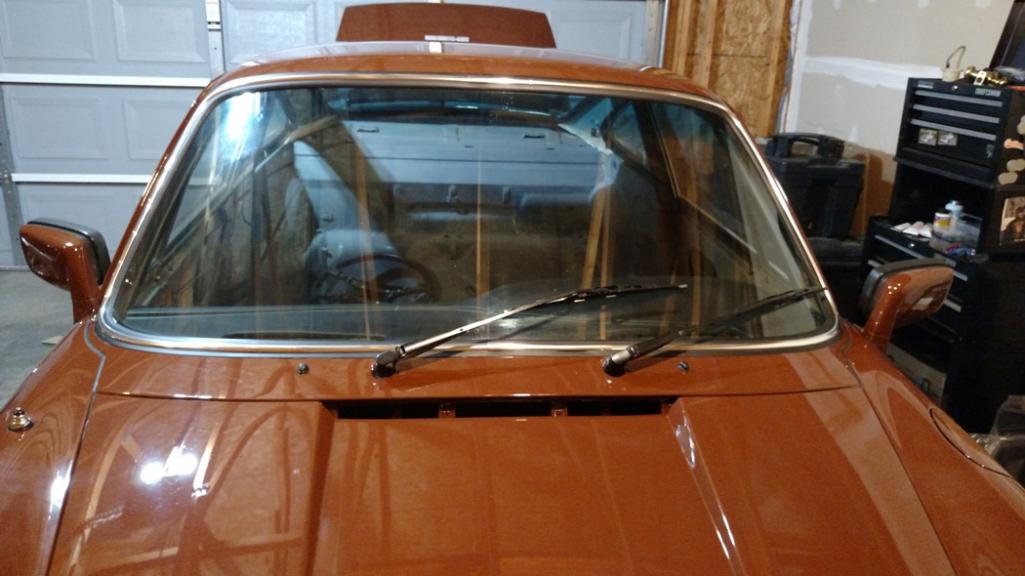  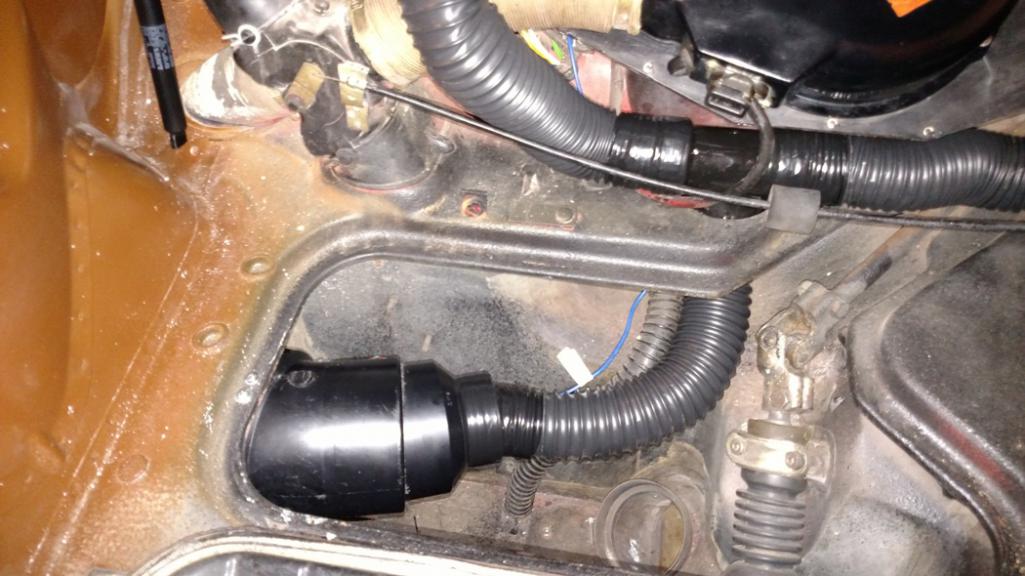 
|
|
|
|
| Dave_Darling |
Aug 8 2015, 10:55 PM
Post
#234
|
|
914 Idiot Group: Members Posts: 15,339 Joined: 9-January 03 From: Silicon Valley / Kailua-Kona Member No.: 121 Region Association: Northern California |
QUOTE(Steve Pratel @ Aug 8 2015, 08:59 PM) Turns out the little black relays aren't working, they click, but don't send power out. Is this a common type of failure? Not really. You can test them with a battery and a multimeter. Check for continuity between pins 30 and 87a when no power is connected to the other pins. You should have it. Then apply +12V to pin 85 and ground to pin 86. There should no longer be continuity between 30 and 87a; instead it should be between 30 and 87. (You can swap power and ground between 85 and 86 and get the same result.) If either one of those fails, then the relay really is borked. You can often pop the plastic cap off the base to look at the insides--it is just an electromagnet and a switch. When current flows between 85 and 86, the magnet pulls the switch so it bridges from 30 to 87, when the current isn't flowing between 85 and 86, there's a spring that pulls the contact form 30 over to 87a. --DD |
|
|
|
| zambezi |
Aug 9 2015, 02:51 PM
Post
#235
|
|
Senior Member Group: Members Posts: 711 Joined: 14-April 08 From: Lafayette, LA Member No.: 8,920 Region Association: South East States |
Sorry about the paint. This very reason is why I test out the wipers on cars I restore by using a "flag" of tape wrapped around the shaft before mounting the arms and blades. By doing this I can test the speeds and park position without running them dry on the windshield and it also prevents the problem you have.
|
|
|
|
| Bulldog9 |
Aug 15 2015, 05:53 PM
Post
#236
|
|
Senior Member Group: Members Posts: 706 Joined: 21-August 13 From: United States Member No.: 16,283 Region Association: MidAtlantic Region |
Thanks Dave, I confirmed that the relay is good, as is the power circuit to activate the relay. The issue is no power at 30, so I need to track that down. So far it is the only circuit with no power. There is also no power at the fuse, so I need to pull the panel off and look, but want to check wiring from the front, not sure if this is a direct to the battery of front fuse box.
** Edit, figured it out, the power feed to the rear fan comes from a wire connected to the alternator. I went out, connected all the wires under the car, alternator, starter, starter relay and WALLAH........... QUOTE(Dave_Darling @ Aug 9 2015, 12:55 AM) QUOTE(Steve Pratel @ Aug 8 2015, 08:59 PM) Turns out the little black relays aren't working, they click, but don't send power out. Is this a common type of failure? Not really. You can test them with a battery and a multimeter. Check for continuity between pins 30 and 87a when no power is connected to the other pins. You should have it. Then apply +12V to pin 85 and ground to pin 86. There should no longer be continuity between 30 and 87a; instead it should be between 30 and 87. (You can swap power and ground between 85 and 86 and get the same result.) If either one of those fails, then the relay really is borked. You can often pop the plastic cap off the base to look at the insides--it is just an electromagnet and a switch. When current flows between 85 and 86, the magnet pulls the switch so it bridges from 30 to 87, when the current isn't flowing between 85 and 86, there's a spring that pulls the contact form 30 over to 87a. --DD |
|
|
|
| Bulldog9 |
Aug 19 2015, 10:52 PM
Post
#237
|
|
Senior Member Group: Members Posts: 706 Joined: 21-August 13 From: United States Member No.: 16,283 Region Association: MidAtlantic Region |
Gents, I hope to wrap up the gauge wiring and tangerine cable throttle linkage this weekend, then prime the oil system and install the upper valve train.
A few pics of engine compartment and throttle cable install. A few Electrical Q's. 1. Now that I have gone to carbs and eliminated the FI brain, What is the best way to run power to the fuel pump, just a switched power feed? 2. I did up a diagram to illustrate the Pertronix install, but have a question about grounding the coil. Nothing I could find in the pertronix instructions said anything about grounding the negative lead of the coil, but to connect the black wire from the module. My GUESS is that the module and coil are grounded by the distributor and the wire between the two accomplishes this. YES? NO? I'd prefer to do a direct ground for the coil just for power supply, but...... Attached thumbnail(s) 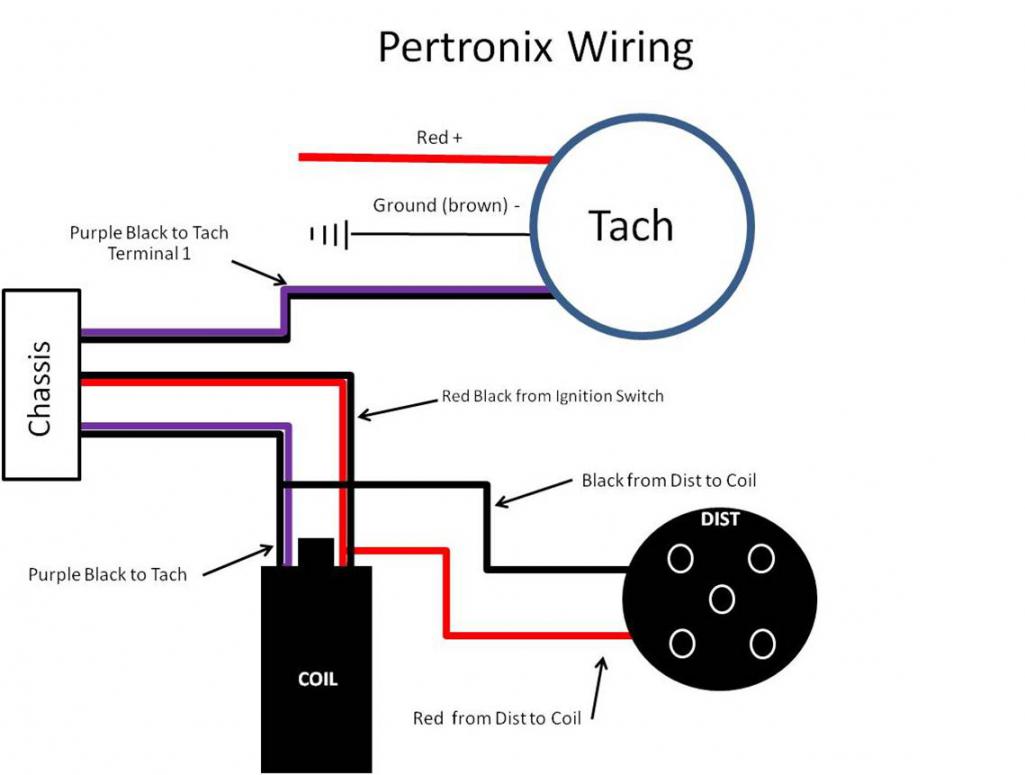 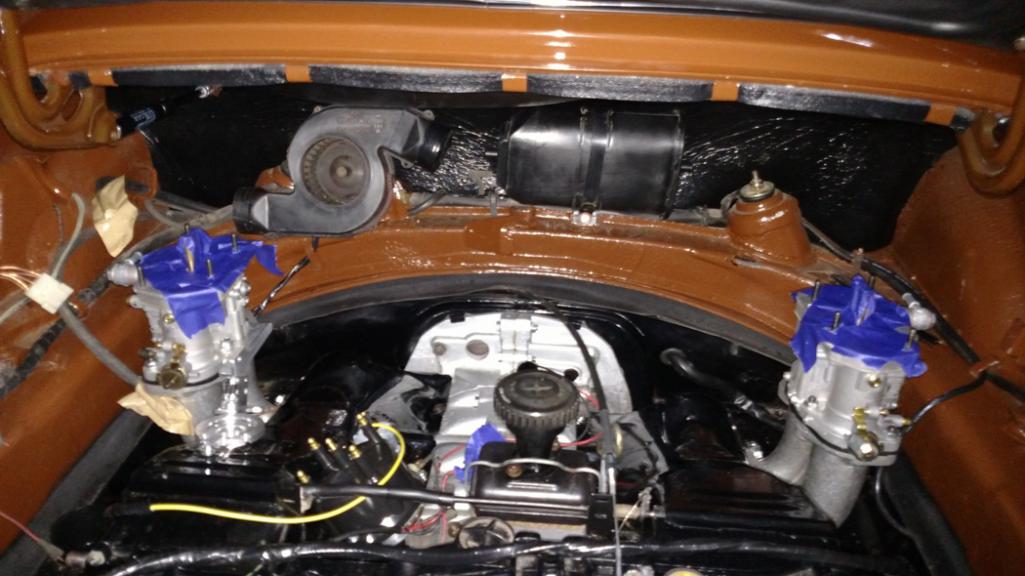 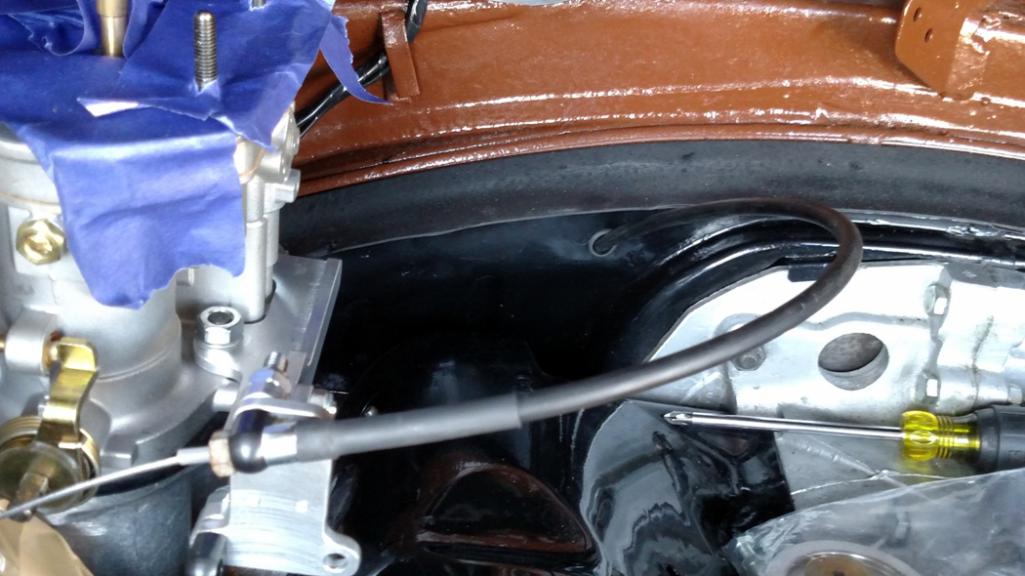 
|
|
|
|
| Dave_Darling |
Aug 20 2015, 09:12 AM
Post
#238
|
|
914 Idiot Group: Members Posts: 15,339 Joined: 9-January 03 From: Silicon Valley / Kailua-Kona Member No.: 121 Region Association: Northern California |
Do not ground the coil directly!! It grounds through the points, or in this case through the Pertronix. (The other circuit in the coil grounds through the spark plugs.)
Sir Andy did a write-up on adding a jumper to one of the pins in the four-pin connector on the relay board so that the fuel pump relay would power the pump when you are running carbs. It's an old thread, but a search should turn it up. AFAIK, there are no power wires that come off the alternator. Just the one large-ish red wire from the starter, which shares a stud with the fat battery (+) cable. There would be several wires attached to the battery end of that cable, on the terminal that fits around the battery post. Sounds like someone has replaced the cable at some point (not the worst idea!) and hooked one of the power wires to the alternator. Which is a bit odd. --DD |
|
|
|
| Bulldog9 |
Aug 21 2015, 09:00 AM
Post
#239
|
|
Senior Member Group: Members Posts: 706 Joined: 21-August 13 From: United States Member No.: 16,283 Region Association: MidAtlantic Region |
Thanks Dave, that's what I thought, but wasn't sure that the lead from the module could carry enough current for the coil.
I'll look up that thread on the jumper. I may just power the fuel pump off the switched acc relay I installed in the front, seems silly to run power from the front to the back to run it all the way to the front again. I'd like to retain the stock wiring as much as possible, QUOTE(Dave_Darling @ Aug 20 2015, 11:12 AM) Do not ground the coil directly!! It grounds through the points, or in this case through the Pertronix. (The other circuit in the coil grounds through the spark plugs.) Sir Andy did a write-up on adding a jumper to one of the pins in the four-pin connector on the relay board so that the fuel pump relay would power the pump when you are running carbs. It's an old thread, but a search should turn it up. AFAIK, there are no power wires that come off the alternator. Just the one large-ish red wire from the starter, which shares a stud with the fat battery (+) cable. There would be several wires attached to the battery end of that cable, on the terminal that fits around the battery post. Sounds like someone has replaced the cable at some point (not the worst idea!) and hooked one of the power wires to the alternator. Which is a bit odd. --DD |
|
|
|
| Bulldog9 |
Aug 24 2015, 01:31 AM
Post
#240
|
|
Senior Member Group: Members Posts: 706 Joined: 21-August 13 From: United States Member No.: 16,283 Region Association: MidAtlantic Region |
Well, I finally got all the upper gauges wired in properly, new gauge and indicator lights, everything seems to be working including the high beam and parking light indicators. Also installed the Momo.
Ran in to a few snafu's still need to work it out (maybe) for some reason the ground wire (ground) was energized with 12V when the key was on. This of course created all kinds of havoc, primarily activating the headlights when the dimmer was turned on, as well as the gauges acting funny. I traced the wire back into the dash and it looks like it runs down to a plug into a module? I just eliminated it and ran a fresh ground for the gauges and backlight. So I now have in the upper dash Oil temp & pressure with oil and alt idiot lights from a 911, stock tach and stock speedo. I also removed the EGR light and put a fan switch (from a 911 AC system) for the new dash vents that bank the upper gauges. Now I need to finish wiring in the lower gauges, to include a gas gauge, CYL head temp, clock (2"VDO) and a PLX Air Fuel/Volt meter. All the lower VDO gauges will be lit off the gauge lighting circuit including dimmer function, and LED indicators for the fog lights, low fuel and new aux fan. The PLX will come on with the ignition. Its not stock, and the purist may hate it, but I kinda like it (IMG:style_emoticons/default/beer.gif) Dash almost complete with MOMO steering wheel  Good view of all gauges. I have the PLX mounted with EZpass style velcro, I moved it down a bit to be more center. 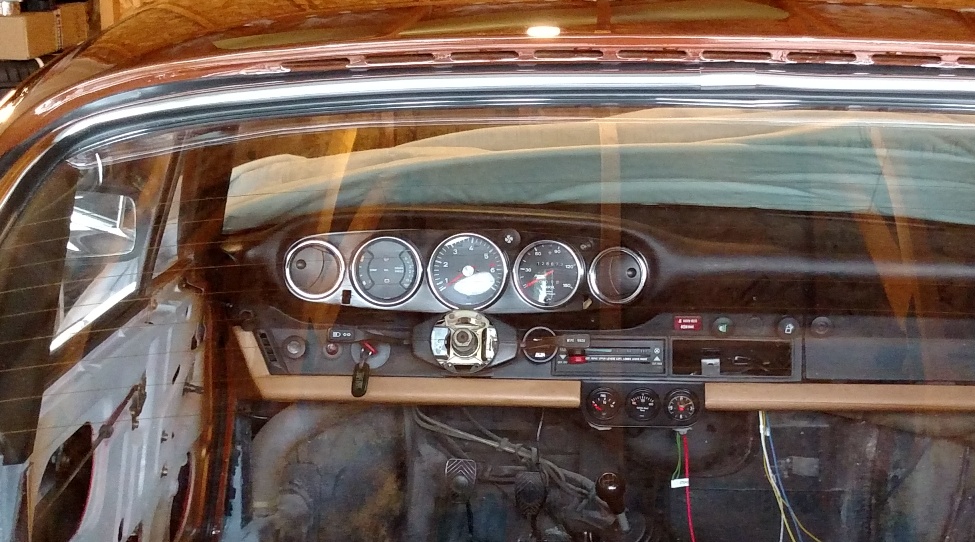 Here is the offending 12V ground wire, and some of the new wires I had to run, the yellow is the Oil Pressure, and green is new ground. I also had to run an eztra 12V switched lead for the double gauge. 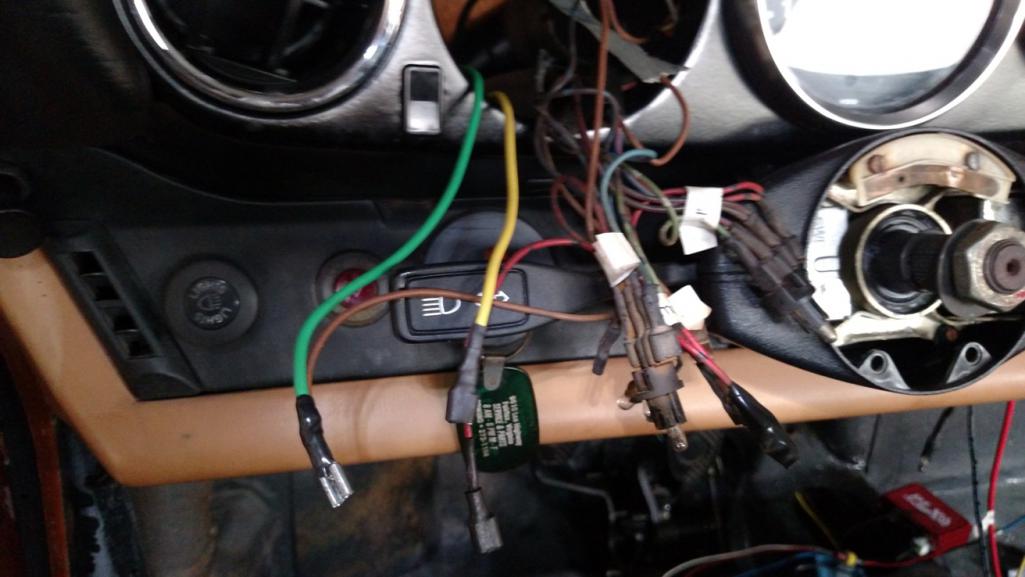 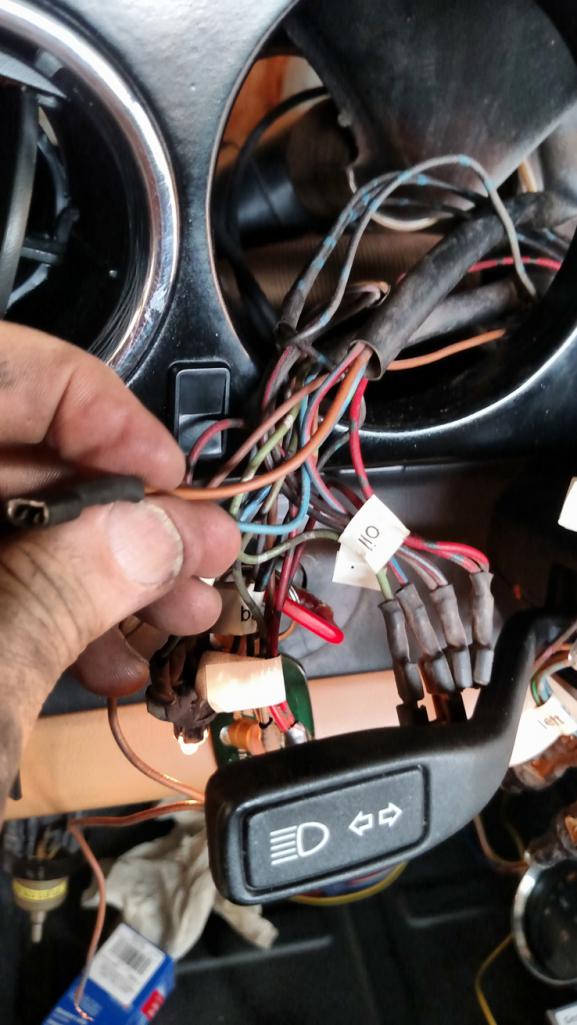 |
|
|
|
|
1 User(s) are reading this topic (1 Guests and 0 Anonymous Users)
0 Members:

|
Lo-Fi Version | Time is now: 23rd May 2026 - 02:08 PM |
Invision Power Board
v9.1.4 © 2026 IPS, Inc.