|
|
|
Porsche, and the Porsche crest are registered trademarks of Dr. Ing. h.c. F. Porsche AG.
This site is not affiliated with Porsche in any way. Its only purpose is to provide an online forum for car enthusiasts. All other trademarks are property of their respective owners. |
|
|

  |

| Kerrys914 |
 Dec 10 2004, 12:16 PM Dec 10 2004, 12:16 PM
Post
#1
|
|
Dear, the parts I just sold paid for that part ;)  Group: Members Posts: 1,568 Joined: 26-December 02 From: Williamsburg, VA Member No.: 16 |
Has anyone tried to duplicate the of cad plating without the cost?
Photos will be accepted (IMG:style_emoticons/default/wink.gif) Cheers |
   |

 
|
| Mueller |
Dec 10 2004, 01:03 PM
Post
#2
|
|
914 Freak! Group: Members Posts: 17,146 Joined: 4-January 03 From: Antioch, CA Member No.: 87 Region Association: None |
|
|
|
|
| brant |
Dec 10 2004, 01:09 PM
Post
#3
|
|
914 Wizard Group: Members Posts: 11,618 Joined: 30-December 02 From: Colorado Member No.: 47 Region Association: Rocky Mountains |
Kerry,
Eastman has a paint version of the kit. Its 3 paint colors actually. In real life it looks close but not quite in pictures it looks like gold paint. the 3 colors are gold, red, green and they are layered to give it different hue's from different angles.. our motor was built with real cad plating on all the hardware, so we used the eastwood kit to do some of the assesories (sortof a match).. anyways the last 2 pages of my signature line show our rear throttle mount with the eastwood kit.. Like I said, looks a bit better in real life than pictures. brant |
|
|
|
| brant |
Dec 10 2004, 01:11 PM
Post
#4
|
|
914 Wizard Group: Members Posts: 11,618 Joined: 30-December 02 From: Colorado Member No.: 47 Region Association: Rocky Mountains |
Here is one shot:
Attached thumbnail(s) 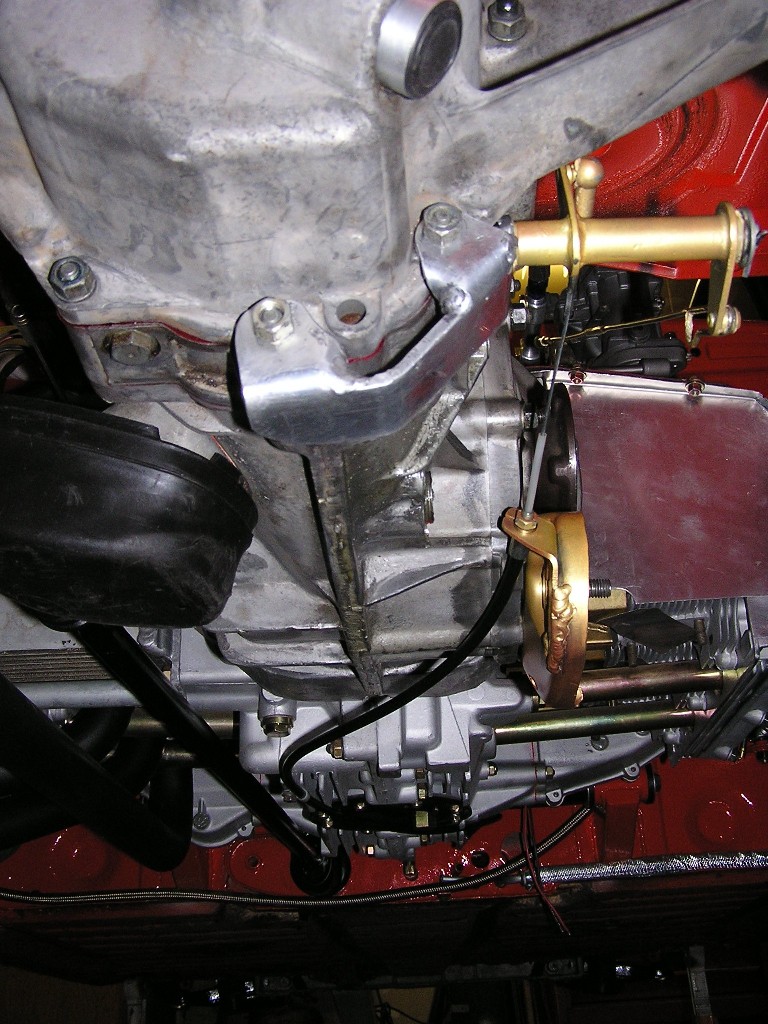
|
|
|
|
| Mueller |
Dec 10 2004, 01:15 PM
Post
#5
|
|
914 Freak! Group: Members Posts: 17,146 Joined: 4-January 03 From: Antioch, CA Member No.: 87 Region Association: None |
I never knew they had that (IMG:style_emoticons/default/wacko.gif)
I guess it's good for an item that cannot be CAD plated..... |
|
|
|
| brant |
Dec 10 2004, 01:18 PM
Post
#6
|
|
914 Wizard Group: Members Posts: 11,618 Joined: 30-December 02 From: Colorado Member No.: 47 Region Association: Rocky Mountains |
QUOTE(Mueller @ Dec 10 2004, 12:15 PM) I never knew they had that (IMG:style_emoticons/default/wacko.gif) I guess it's good for an item that cannot be CAD plated..... kinda ironic... I hadn't seen the home cad kit before.. I like it. brant |
|
|
|
| Jeff Bonanno |
Dec 10 2004, 02:43 PM
Post
#7
|
|
il dottore Group: Members Posts: 421 Joined: 30-April 03 From: San Diego, CA Member No.: 636 |
|
|
|
|
| brant |
Dec 10 2004, 02:46 PM
Post
#8
|
|
914 Wizard Group: Members Posts: 11,618 Joined: 30-December 02 From: Colorado Member No.: 47 Region Association: Rocky Mountains |
QUOTE(Jeff Bonanno @ Dec 10 2004, 01:43 PM) thanks for the link Jeff. guess I wasn't paying attention that day. nice work... brant |
|
|
|
| sixnotfour |
Dec 10 2004, 03:41 PM
Post
#9
|
|
914 Wizard Group: Members Posts: 10,418 Joined: 12-September 04 From: Life Elevated..planet UT. Member No.: 2,744 Region Association: Rocky Mountains |
True Cad plating expensive, Yellow Zinc plating cheap in comparison looks the same. As for embritlement there is a ovenbaking process to dissapte it.
Call your platers and see. |
 |
|
| Doug Leggins |
Dec 10 2004, 04:37 PM
Post
#10
|
|
Senior Member Group: Benefactors Posts: 1,358 Joined: 6-February 03 From: Nashville, Indiana Member No.: 261 Region Association: None |
I bought the Eastwood kit and have used it on a few parts. The kit I purchased had 4 components - gold base, red tint, green tint, and a clear finish. The clear finish makes a huge difference in the final appearance.
After a little practice I have been able to get some nice looking parts. The parts do look a bit different than plated parts. But I'll be using plated parts right next to the cad painted parts and it will look very good. I have also touched up some of my plated parts with the cad paint and that worked very well. I am very pleased with the results from using the kit. Here's a link to the kit that I bought. Eastwoods CAD Paint Here is the only pic that I have access to right now. I should be able to post 1 or 2 more pics later. The 2 parts in the center were painted using the 4 step cad paint. The parts actually look better than in the pic. The silver parts were painted with Eastwood's Reflective Aluminum paint. I really like this paint too. I bought the AL paint to use on my front turn signal housings. They turned out fantastic! I had some left over so I've been using it on other parts. Attached image(s) 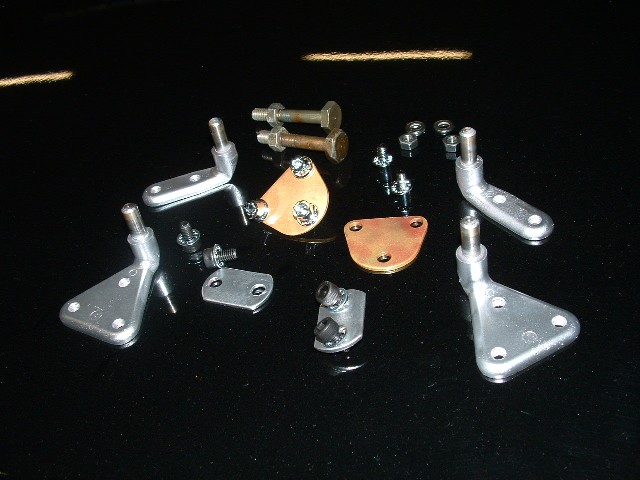
|
|
|
|
| SpecialK |
Dec 10 2004, 09:01 PM
Post
#11
|
|
aircraft surgeon Group: Benefactors Posts: 3,211 Joined: 15-March 04 From: Pacific, MO Member No.: 1,797 |
Did my front calipers with the Eastwood kit (minus the clear), turned out sharp (IMO). Practiced on some smaller (i.e. - easy to remove paint from) parts, it does take some practice laying down the green and red tint well enough to make them look fairly "real" (little green here, little red there......crap! (IMG:style_emoticons/default/headbang.gif) Start over...repeat as necessary). I had some new cad plated parts to use as reference, and I'm real pleased by the way the calipers turned out. I'll post some picks when I get home. I think it wouldn't hurt to shoot some brake fluid/heat/chemical resistant clear. Not to 'hijack' but does anyone know of a "tough-as-nails" clear coat finish?
|
|
|
|
| Doug Leggins |
Dec 10 2004, 10:17 PM
Post
#12
|
|
Senior Member Group: Benefactors Posts: 1,358 Joined: 6-February 03 From: Nashville, Indiana Member No.: 261 Region Association: None |
Here's my first attempt at using the cad paint. This part provides a good comparison to the original plating on the square bar portion and the cad paint on the round plate.
Attached image(s) 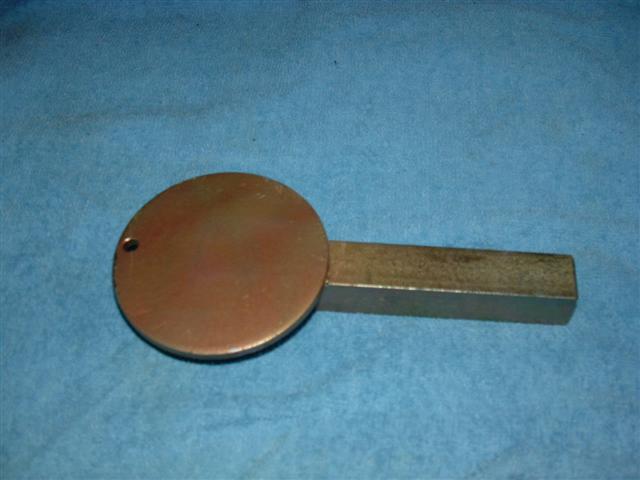
|
|
|
|
| Doug Leggins |
Dec 10 2004, 10:23 PM
Post
#13
|
|
Senior Member Group: Benefactors Posts: 1,358 Joined: 6-February 03 From: Nashville, Indiana Member No.: 261 Region Association: None |
The jack plate looked good but the pattern was a little too representative of a spray path - not quite blotchy enough, especially on small parts. So I made a spray template to help make the red and green tint look more blotchy. I folded a piece of paper in half and used a hole punch to make a random pattern that i could spray the tint through. As i sprayed the red and green tint I moved the pattern around a bit to create a blotchy patch of the tints.
Attached image(s) 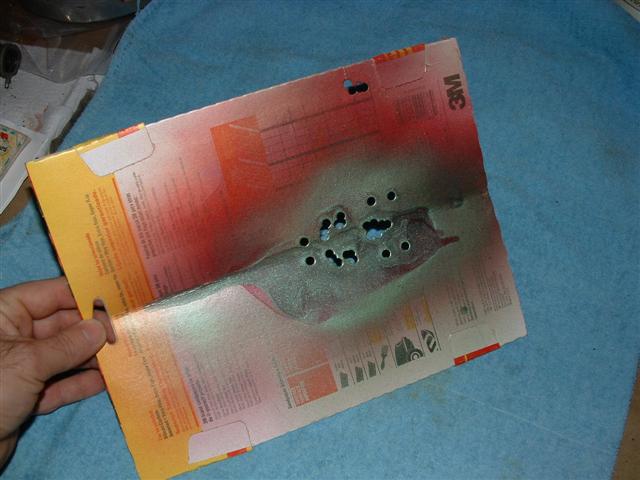
|
|
|
|
| Doug Leggins |
Dec 10 2004, 10:24 PM
Post
#14
|
|
Senior Member Group: Benefactors Posts: 1,358 Joined: 6-February 03 From: Nashville, Indiana Member No.: 261 Region Association: None |
Lower front hood latch in cad paint
Attached image(s) 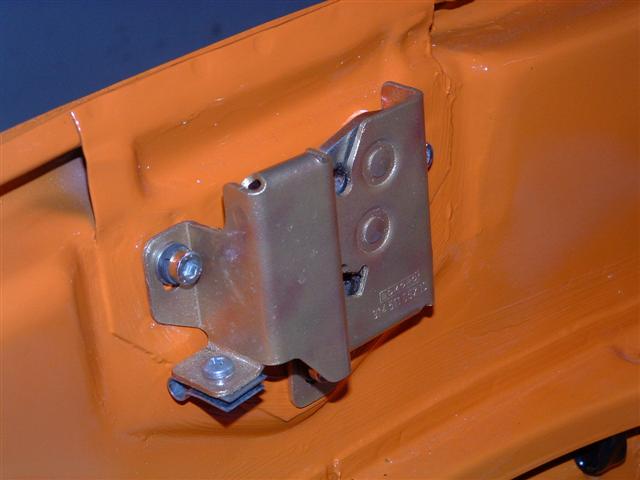
|
|
|
|
| Doug Leggins |
Dec 10 2004, 10:25 PM
Post
#15
|
|
Senior Member Group: Benefactors Posts: 1,358 Joined: 6-February 03 From: Nashville, Indiana Member No.: 261 Region Association: None |
fresh air box clips
Attached image(s) 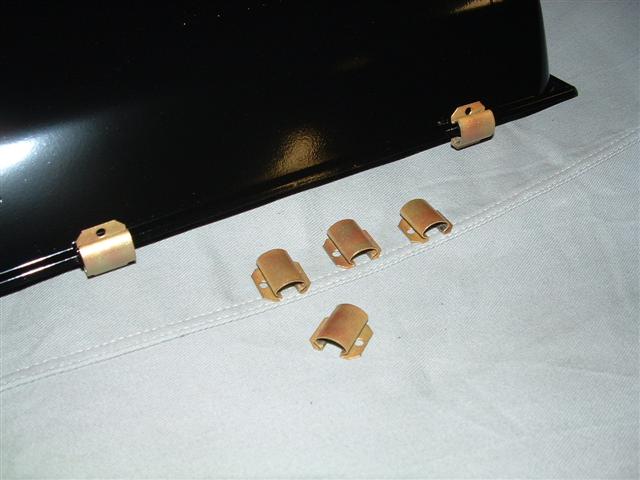
|
|
|
|
| Doug Leggins |
Dec 10 2004, 10:28 PM
Post
#16
|
|
Senior Member Group: Benefactors Posts: 1,358 Joined: 6-February 03 From: Nashville, Indiana Member No.: 261 Region Association: None |
Upper front hood latch
I used the cad paint only on the portion that your fingers would contact when opening the hood. This area was pretty much gray and had a small amount of surface rust before the paint touch-up. Attached image(s) 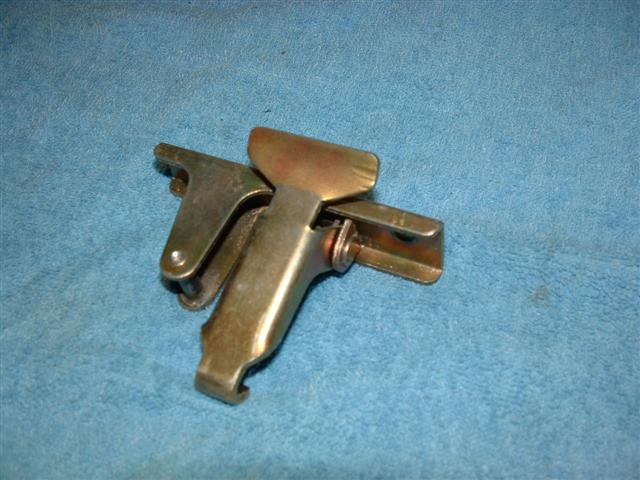
|
|
|
|
| Doug Leggins |
Dec 10 2004, 10:34 PM
Post
#17
|
|
Senior Member Group: Benefactors Posts: 1,358 Joined: 6-February 03 From: Nashville, Indiana Member No.: 261 Region Association: None |
I painted only the front half and the latch tip on the engine lid release. The rest of the plating looked very good on this part so I masked it off and did not paint it. I didn't want to paint the internal area with moving parts and the spring. After the cad paint, the fresh paint area looks better that the areas that were left with the original plating.
Attached image(s) 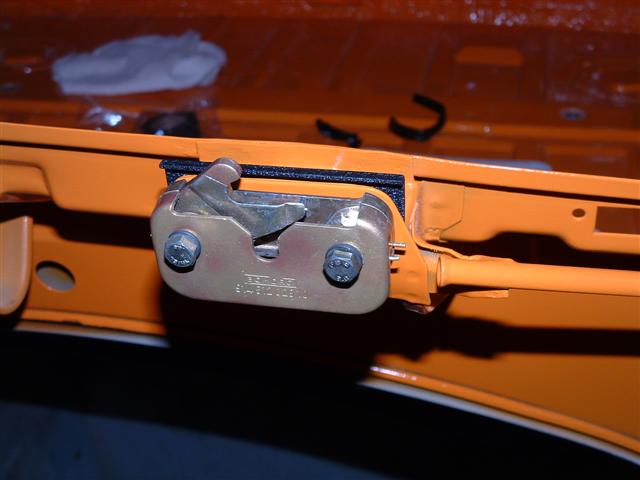
|
|
|
|
| Doug Leggins |
Dec 10 2004, 10:38 PM
Post
#18
|
|
Senior Member Group: Benefactors Posts: 1,358 Joined: 6-February 03 From: Nashville, Indiana Member No.: 261 Region Association: None |
comparison pic
New upper rear trunk latch on top, cad painted air box clips in the middle, and original plating in good condition on the headlight motor linkage on the bottom. Attached image(s) 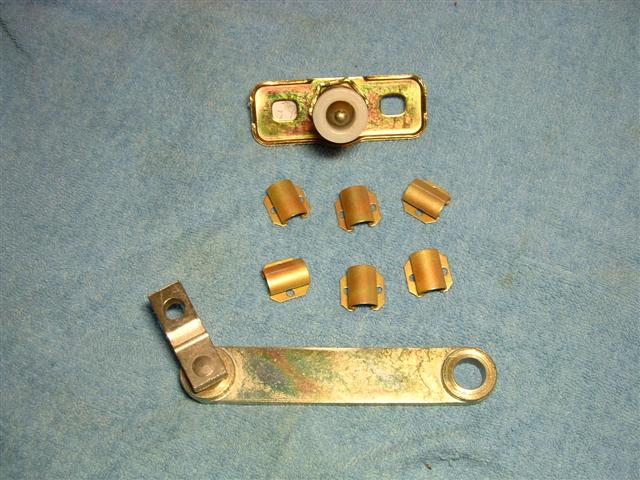
|
|
|
|
| SpecialK |
Dec 11 2004, 12:51 AM
Post
#19
|
|
aircraft surgeon Group: Benefactors Posts: 3,211 Joined: 15-March 04 From: Pacific, MO Member No.: 1,797 |
Okay, got home and took off the wheel for a pic with my POS digi....it looks alot better than the pic shows. Still looking for an impervious clearcoat to shoot on them. Been thinking about POR-15 clear (since I have some laying around), but I'm not sure how it'll react with the Eastwood paints. Time to do some testing.
Attached image(s) 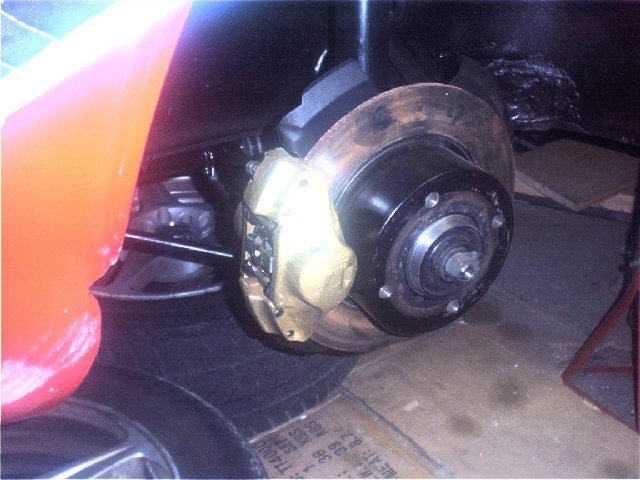
|
|
|
|
|
1 User(s) are reading this topic (1 Guests and 0 Anonymous Users)
0 Members:

|
Lo-Fi Version | Time is now: 3rd May 2024 - 12:40 AM |
Invision Power Board
v9.1.4 © 2024 IPS, Inc.