|
|
|
Porsche, and the Porsche crest are registered trademarks of Dr. Ing. h.c. F. Porsche AG.
This site is not affiliated with Porsche in any way. Its only purpose is to provide an online forum for car enthusiasts. All other trademarks are property of their respective owners. |
|
|


| e_artiles |
 Sep 7 2013, 01:06 PM Sep 7 2013, 01:06 PM
Post
#1
|
|
Member  Group: Members Posts: 76 Joined: 14-February 12 From: Corona, CA Member No.: 14,131 Region Association: Southern California |
How do you remove the trim panel that sits between the headlight cover and the front bumper? It looks like it's held in place by some rubber plugs.
|
   |

 
|
  |
Replies(1 - 8)
| pilothyer |
Sep 7 2013, 01:09 PM
Post
#2
|
|
Member Group: Members Posts: 838 Joined: 21-May 08 From: N. Alabama Member No.: 9,080 Region Association: South East States |
You just push the rubber plugs back through from the inside.
|
|
|
|
| jimkelly |
Sep 7 2013, 04:04 PM
Post
#3
|
|
Delaware USA Group: Members Posts: 4,969 Joined: 5-August 04 From: Delaware, USA Member No.: 2,460 Region Association: MidAtlantic Region |
unless any of the rubber plugs have been replaced with bolts and nuts.
Attached image(s) 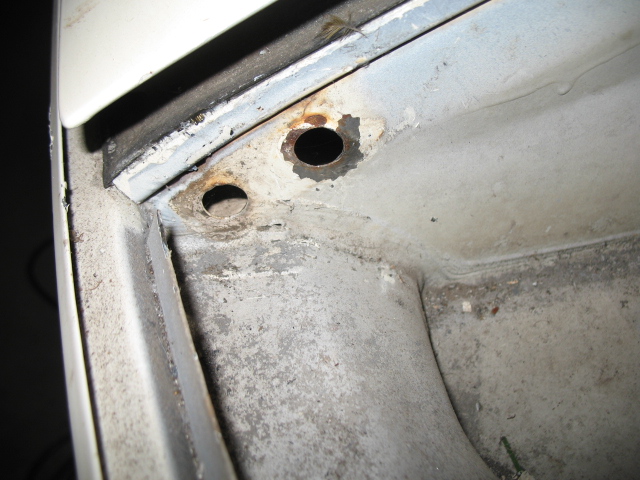 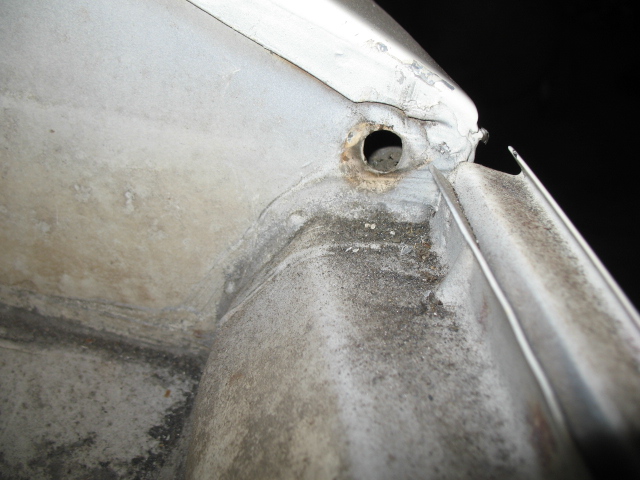
|
|
|
|
| jim_hoyland |
Sep 8 2013, 08:51 AM
Post
#4
|
|
Get that VIN ? Group: Members Posts: 9,301 Joined: 1-May 03 From: Sunset Beach, CA Member No.: 643 Region Association: Southern California |
Is each side held in with 2 or 3 grommets ? (IMG:style_emoticons/default/sad.gif)
|
|
|
|
| toolguy |
Sep 8 2013, 09:17 AM
Post
#5
|
|
Senior Member Group: Members Posts: 1,268 Joined: 2-April 11 From: San Diego / El Cajon Member No.: 12,889 Region Association: Southern California |
3 each 2 on the trunk side, 1 on the fender well side. .
Try not to break them as they are probably brittle if they are the real ones. . . If you do need new ones, I think 914 Rubber has some. . otherwise, using a plain rubber grommet , the kind with a hole in the center will work. . You'll probably learn a few new swear word when you replace them. . . |
|
|
|
| e_artiles |
Sep 9 2013, 04:51 PM
Post
#6
|
|
Member Group: Members Posts: 76 Joined: 14-February 12 From: Corona, CA Member No.: 14,131 Region Association: Southern California |
Do they push in from the headlight cavity or from the trunk and fender side?
|
|
|
|
| r_towle |
Sep 9 2013, 05:34 PM
Post
#7
|
|
Custom Member Group: Members Posts: 24,574 Joined: 9-January 03 From: Taxachusetts Member No.: 124 Region Association: North East States |
Push in towards the middle from the trunk and fender sides.
They stay attached to the eyebrow piece. |
|
|
|
| TJB/914 |
Sep 9 2013, 06:12 PM
Post
#8
|
|
Mid-Engn. Group: Members Posts: 4,327 Joined: 24-February 03 From: Plymouth & Petoskey, MI Member No.: 346 Region Association: Upper MidWest |
The eyebrow you want to remove has (2) grommets on the inside of the trunk area and (1) on the outside fender end. The (3) grommets are attached to the eyebrow with the grommet tit sticking in the hole showing on the above photo. Turn your headlights in the up position and gently lift the eyebrow out.
BTW: I installed an emergency wire from the hood latch with a pull handle under the eyebrow in case the cable breaks on the pull lever inside the car. Call it a safety latch if the hood cable breaks. (IMG:style_emoticons/default/w00t.gif) Hidden under my eyebrow is a miniature (yellow) 914 carved handle attached to the wire that no one will ever see unless it's needed. Tom |
|
|
|
| e_artiles |
Sep 9 2013, 06:52 PM
Post
#9
|
|
Member Group: Members Posts: 76 Joined: 14-February 12 From: Corona, CA Member No.: 14,131 Region Association: Southern California |
That's very creative TJB/914! Thank you all for your responses. I take it that the installation is just the reverse...push the rubber tit into the corresponding hole?
|
|
|
|
|
1 User(s) are reading this topic (1 Guests and 0 Anonymous Users)
0 Members:

|
Lo-Fi Version | Time is now: 18th May 2024 - 12:42 PM |
Invision Power Board
v9.1.4 © 2024 IPS, Inc.